Peel and stick backsplash tiles are an easy DIY upgrade for your kitchen that even a beginner tiler can accomplish! Get the look of real tile without mortar or grout. This tutorial walks you step-by-step with tips for a variety of applications, examples, and advice for a great installation.
This project was inspired by my brother-in-law. The mission? Budget friendly upgrades that produce a good return on investment.
When my brother-in-law bought their house, he wanted to do some upgrades but knew that they may only live in this house a few years. So, they decided to do budget friendly updates with small projects to make the space livable and give a good return.
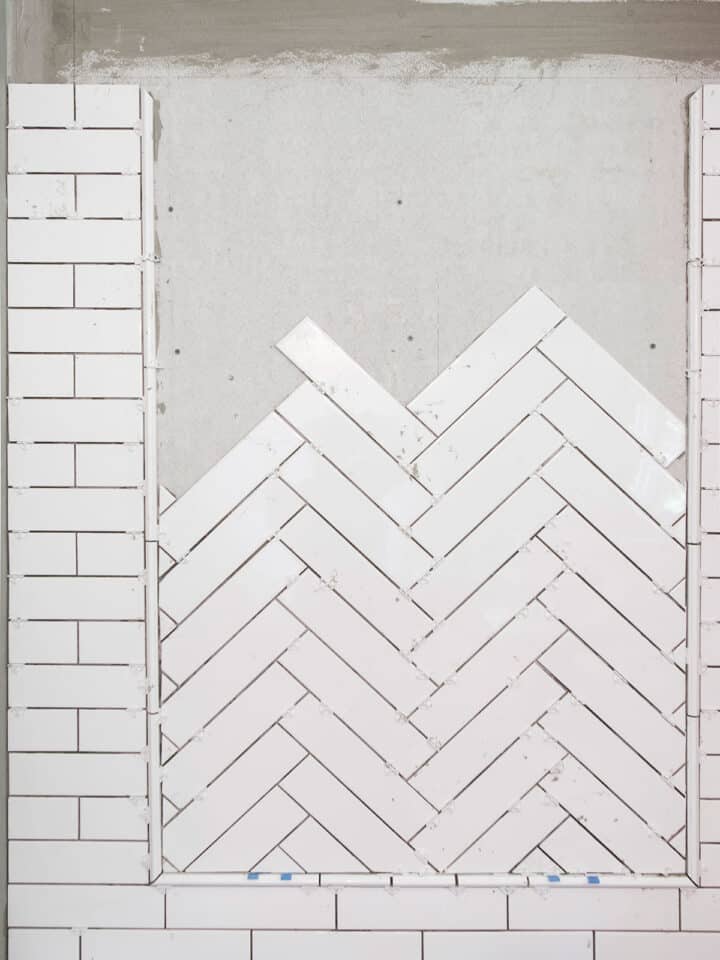
I have tiled many backsplashes and bathrooms the traditional way, so I was excited to try a new method and see if it was worth it. From tiling shower walls to designing shower niches, refreshing subway tile patterns, and even grouting vinyl tile floors, well-laid tile can change the entire atmosphere of a room.
Recommended Supplies
For Thin Metal, Vinyl, and Plastic Tiles:
- Measuring Tape
- Hard ruler or Straight Edge
- Heavy Sniping Shears or very strong scissors
- Box cutters
- Pencil
- Level – we love our 4 ft. level!
- Dry erase or washable marker
- Kraft paper for making templates (optional)
- Paint and Supplies – (optional) paint should be a similar color to the tile
- Silicone Caulk for Kitchen and Bathrooms (sometimes called latex caulk)
- Putty Knife – if you need to reposition tile
Additional needs for real stone and glass peel and stick:
- Glass cutter – One with a snap helper is ideal. Only for glass tiles.
- Wet Saw – This is for intricate cuts like around outlets for both glass and stone
- Safety goggles
Types of Peel and Stick Tiles
There are several different options for peel-and-stick tiles. These include sheets and individual tiles composed of vinyl, glass, metal, and sometimes stone. The individual tiles are more versatile, allowing you to create unique patterns.
Check our guide to Subway tile patterns for kitchens and bathrooms for more inspiration.
Here are a few of our favorites:
(Click the photo to go to the retail site)

How To Prep the Wall
As with any DIY project, surface prep is always key. Here are some quick tips to get your walls prepped correctly.
- Peel and stick tile is not recommended for direct water surfaces such as showers or bathtub surrounds.
- Surfaces that have been previously painted are fine. Do not install on fresh drywall.
- The wall needs to be in good condition: no mold, structural problems, or water damage.
- Walls need to be free of grease, dirt, and stains. A simple degreasing cleaner that won’t leave a residue is fine.
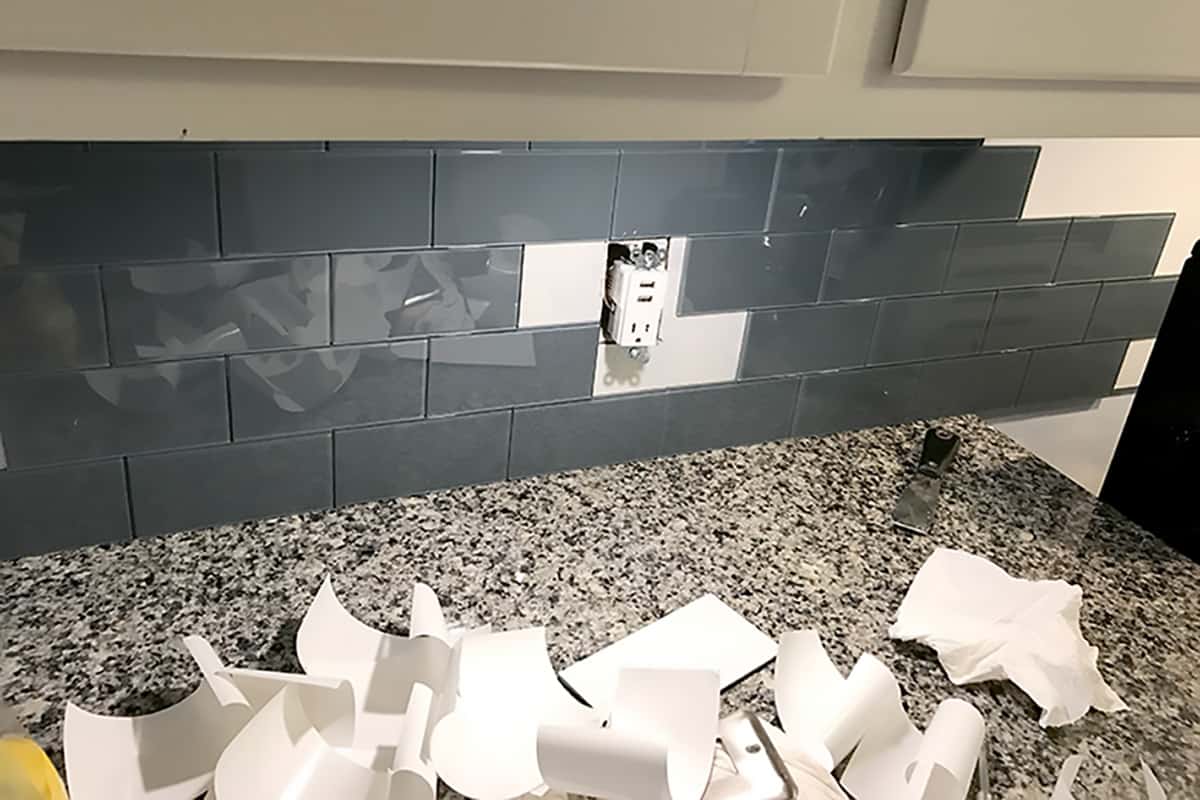
- Remove outlet covers before installing the tiles behind them. The covers should go over the tile to cover rough edges. You may need to reposition the outlet itself to extend a little further out. Do be sure to turn off the power to the receptacle when adjusting electrical wiring.
Pro Tip: Paint the wall in a similar color to your tile in the event of gaps, but this is optional. Use flat paint or sand the wall lightly; tiles adhere best to non-shiny surfaces.
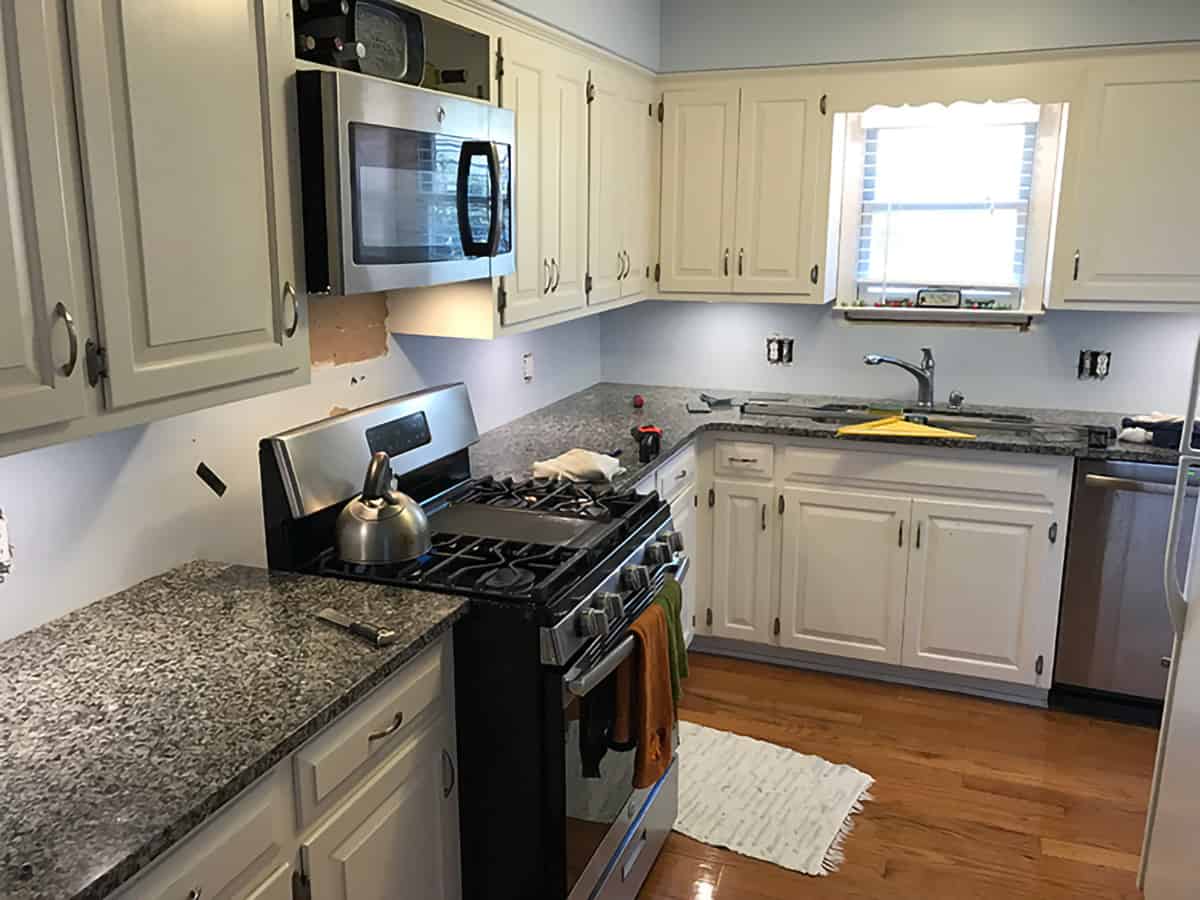
In this case, we added a thin plywood backer board (we screwed it into studs) and primed it because they wanted the ability to change it out, if needed. That is a great idea if you have a rental or know that you will replace the countertops at some point. It also works if you have warped drywall.
Checking for Straightness
Before you make your first cut, it’s imperative to check that your cabinets and countertop are completely straight relative to each other. Square and level aren’t as important, but you should know this as well.
Measure at both ends and, in the center, to check for height differences. If you do have a difference in height, the best place to hide it is at the top, under the cabinets.
How to Plan a Tile Layout
Planning your design layout ahead of time is a good idea to enhance the visual appeal of your kitchen backsplash. It will help you quickly identify trouble spots to get the look you want.
- Always lay out the pattern before applying it to the wall. The backing is very sticky, so it is not easy to remove once you stick it down.
- Since imperfections are easier to hide underneath the cabinets, I suggest going from bottom to top.
- Sometimes it’s best to start at one end, and other times, it is best to start in the middle or a corner, depending on how straight the area is.
- If you have a glass or real stone tile, you will still need a glass cutter and/or a wet saw. Set out your tools and I recommend covering the countertops with some sort of plastic.
PRO TIP: While you won’t make a nasty mess like you do with mortar, I still recommend putting some towels down on the countertop and under your tile cutter to catch any glass fragments from the cutter.
How To Install a Peel and Stick Backsplash
While the instructions seem pretty simple- peel the backing off and stick it to the wall- I have a few hints for possible trouble spots.
- To start, mark a vertical reference line that you can follow to make sure the lines are straight.
- In some products, the adhesive is so strong that you GET ONE SHOT at putting it on right. It may not come back off, so make sure to position it carefully.
- If you have to remove it, pry it up gently with a putty knife.
- Since there’s no mortar to dry, I find it easiest to put all of the tiles on and then come back to the tiles that need cutting. This clears a lot of mess out your way and frames all sides for proper cuts.
- Periodically check that your tile pattern is straight and doesn’t dip or bow.
- There’s no reason to use spacers or leave a gap between tiles.
TIP #2: Use a dry erase or washable marker to draw your cut lines. It’s easy to see and easy to wipe off after cutting the tile.
Lastly, add caulk around the perimeter where the countertop meets the backsplash to prevent any moisture from getting behind the tiles, which can lead to mold or installation failure.
How to Cut Peel and Stick Tile
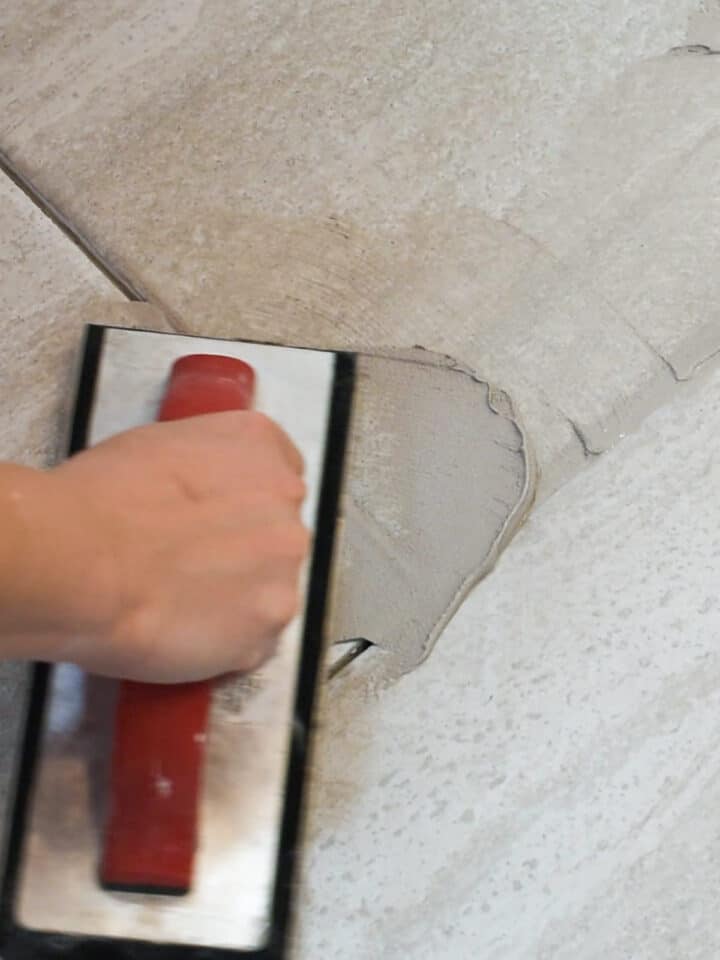
Vinyl and Silica type tiles can be cut with strong scissors or heavy-duty snips. For rigid vinyl, I prefer using a box cutter to score the tops and then snapping them apart. You can see more about this in my tutorial about installing vinyl tile with grout.
Glass snips or a wet saw with a diamond cutting blade will be used to make cuts for glass or stone peel and stick tiles. A wet saw is going to be the easiest way for intricate cuts.
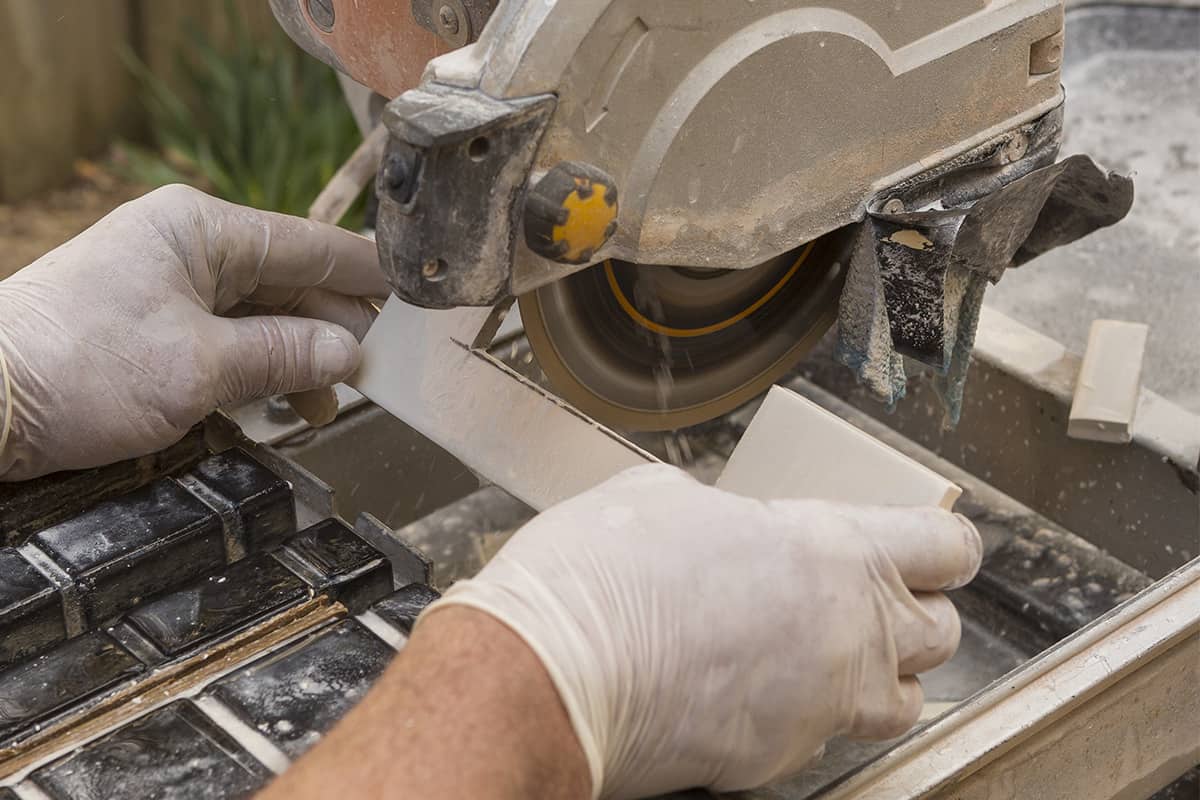
If you have a really intricate cut, make a template out of paper to ensure proper fit before cutting the sheet.
Like Budget Renovation? We have lots of ideas!
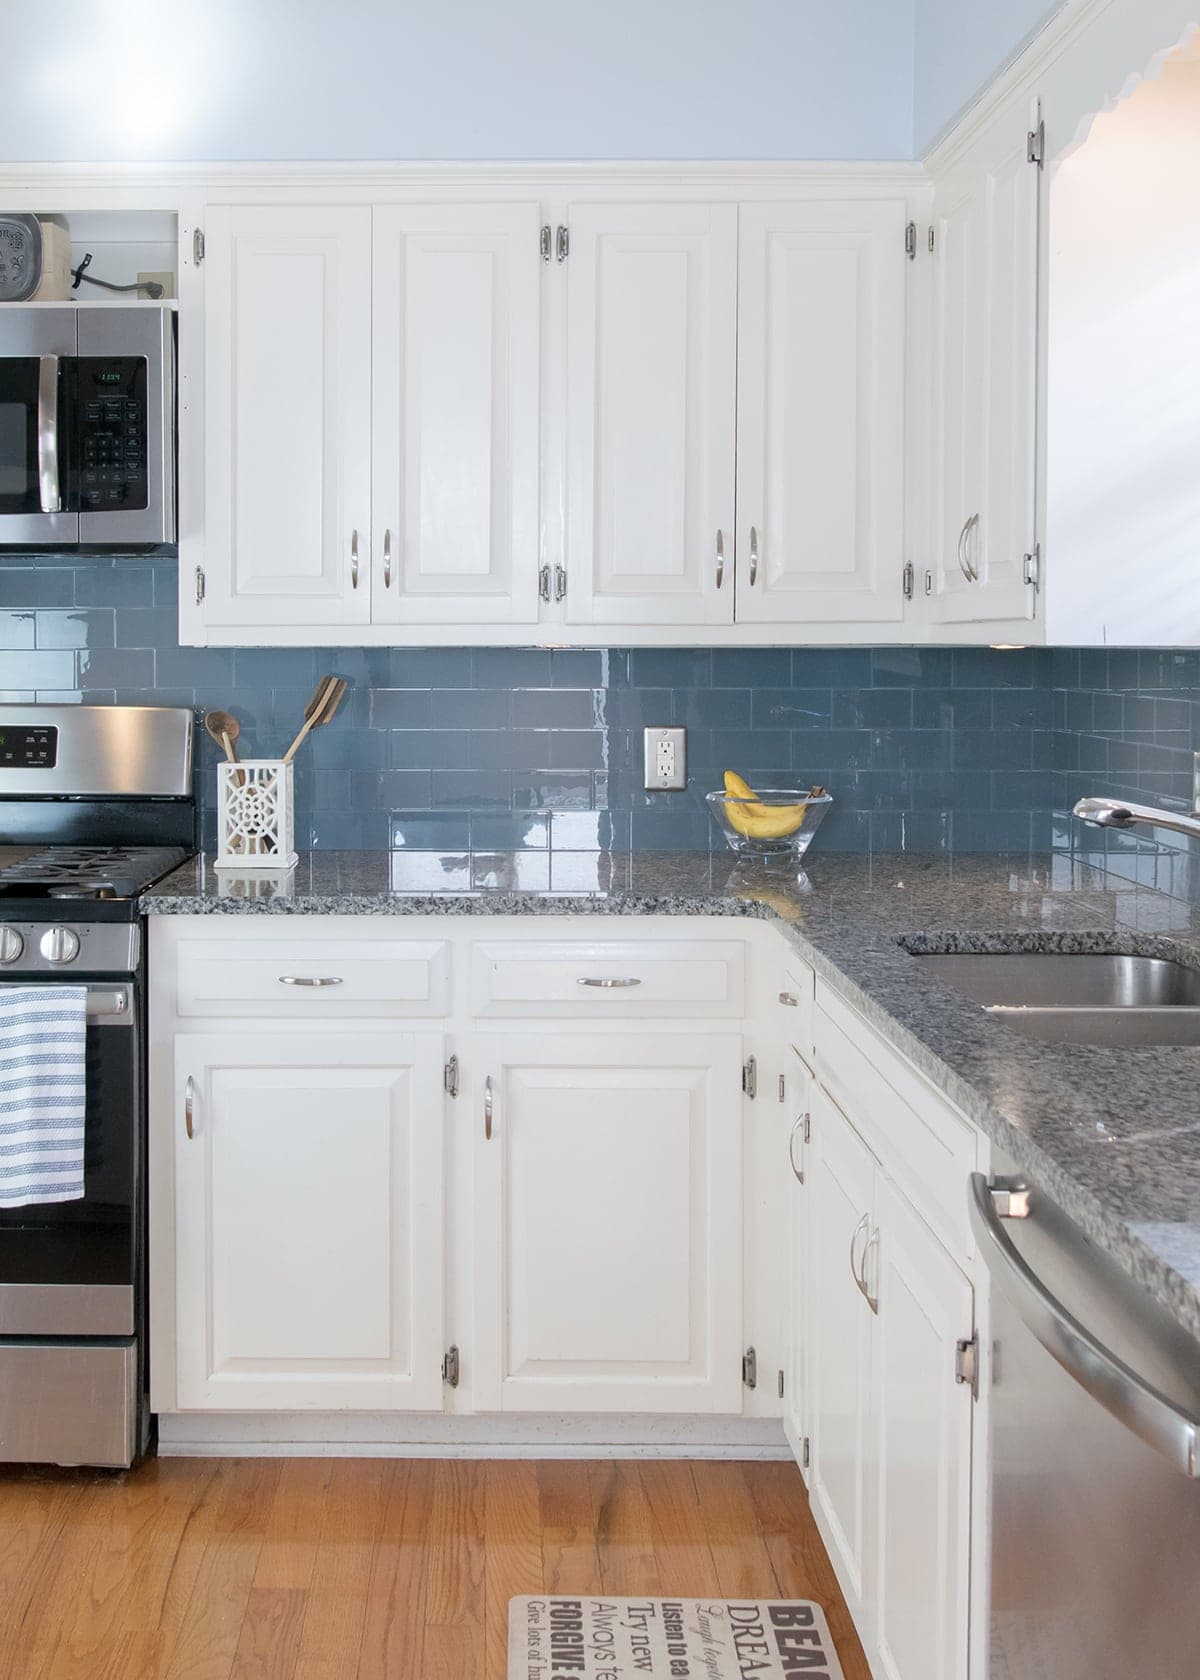
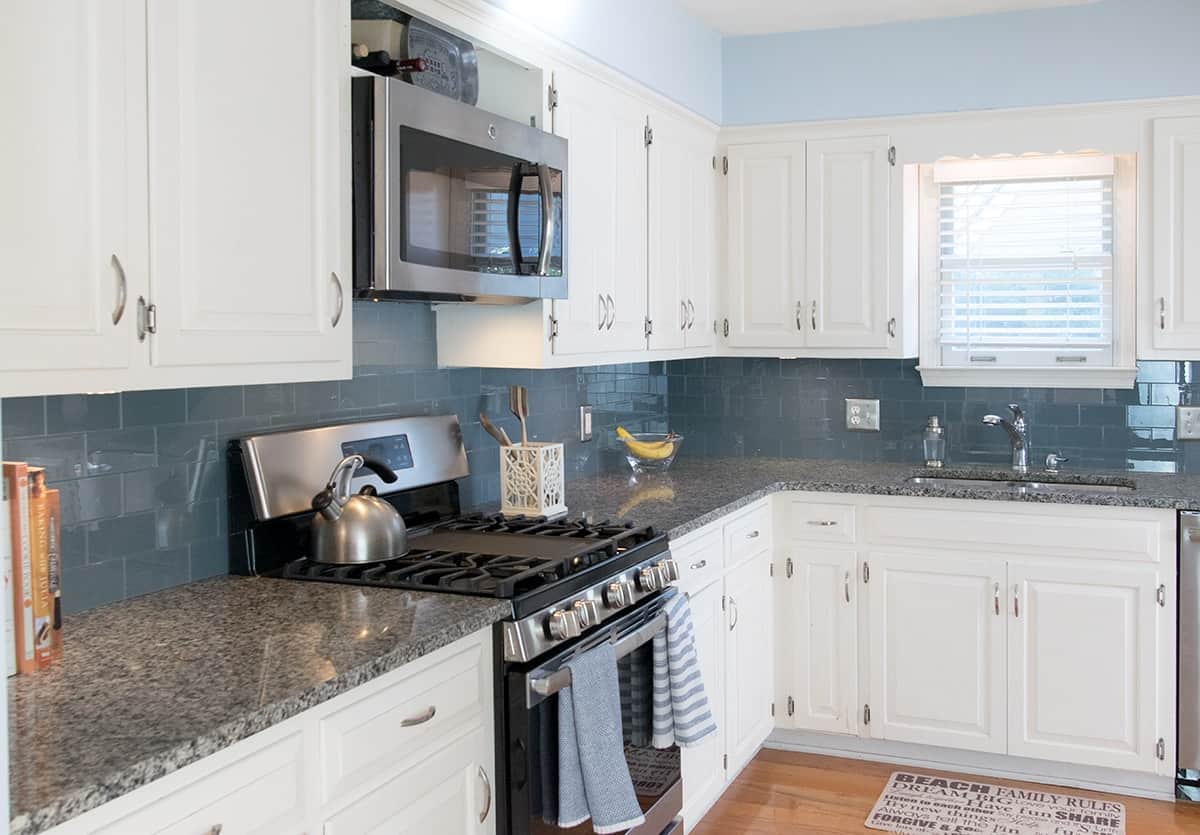
The peel and stick kitchen backsplash has held up well. No tiles have fallen and it’s a breeze to keep the kitchen clean. Mission accomplished.
Frequently Asked Questions
The cost will vary based on the price of the tiles that are purchased and the size of the kitchen. It can be anywhere from $200-1000.
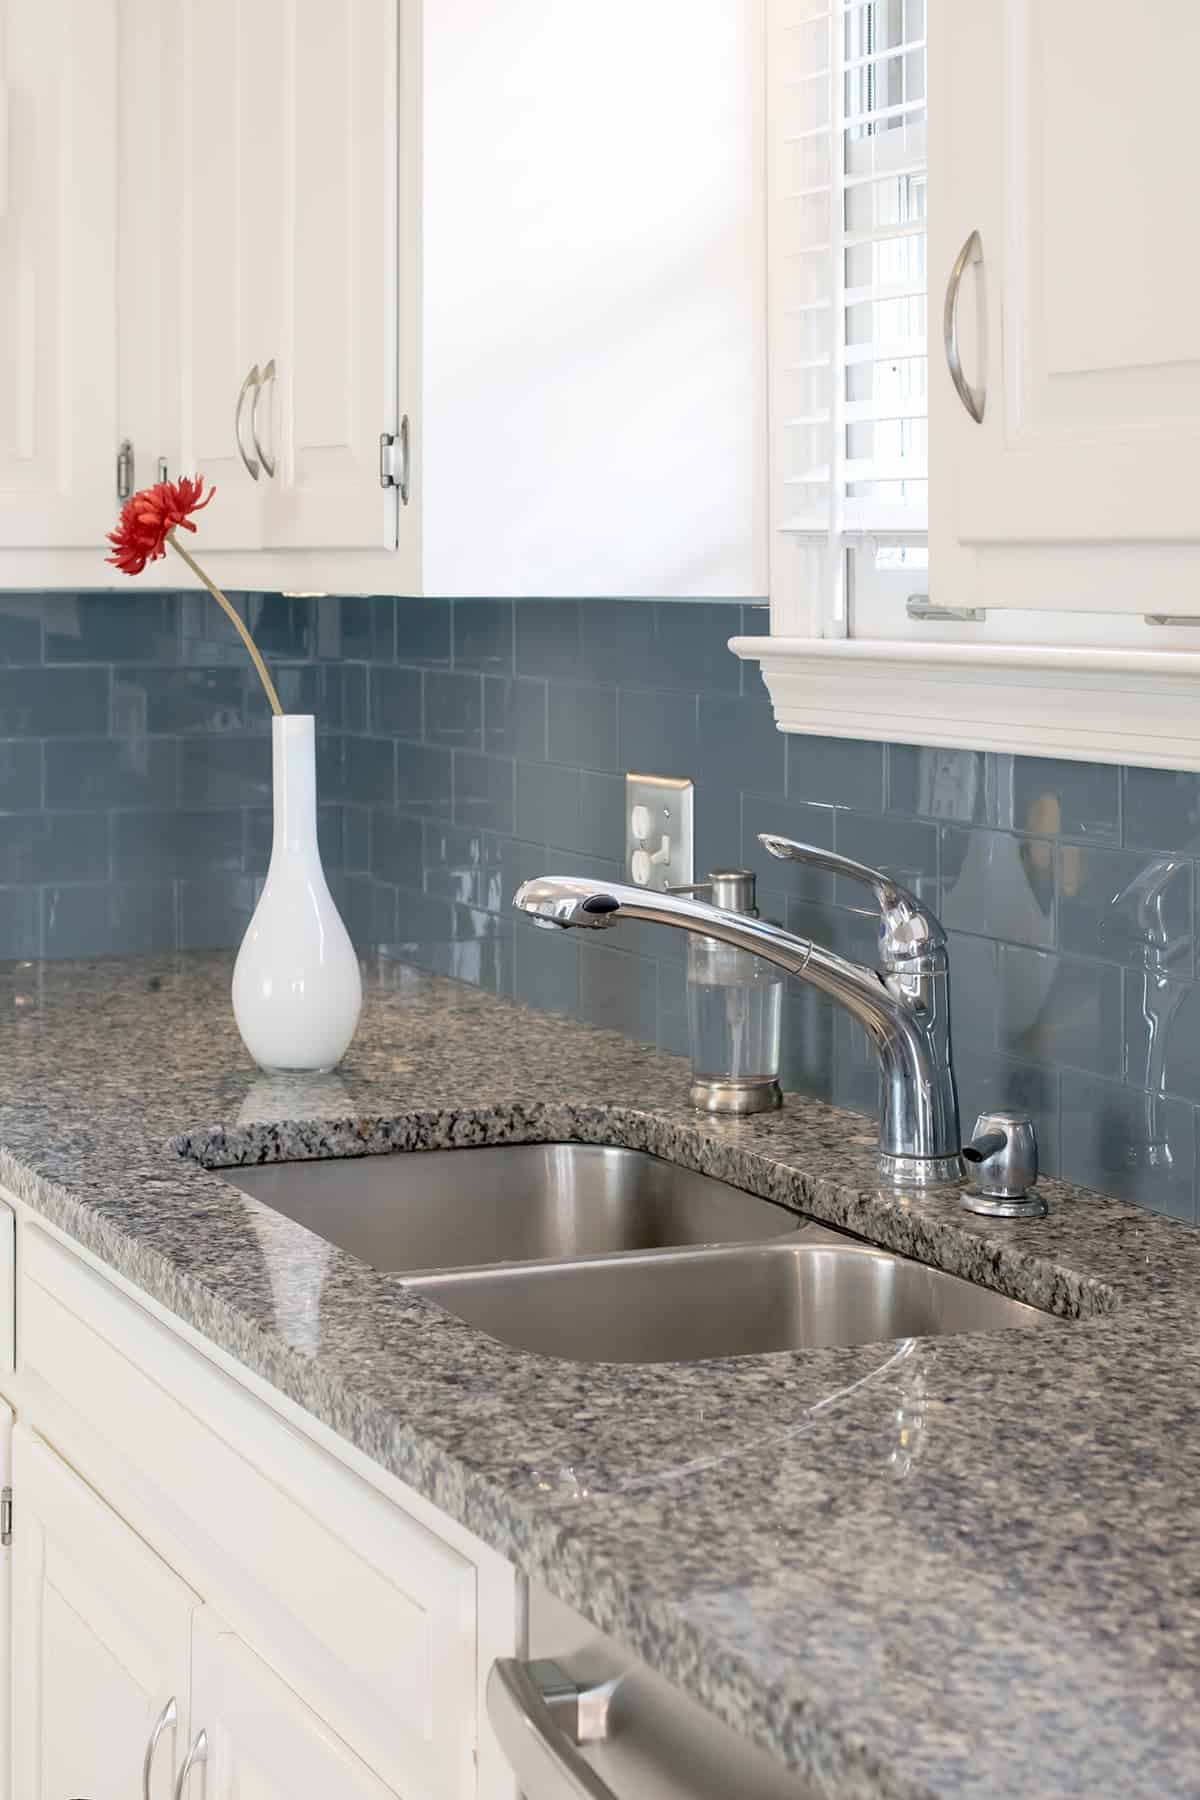
We used Aspect Tile in Storm Cloud. You can find it here.
The information out there as to how long they can last varies wildly but based on our experience that it will at least last a few years if installed properly. Installation, moisture, and heat exposure can all affect how well it adheres and how long it will last.
Yes! Make sure the surface is free of any dirt and press firmly. While it will work best on flat tiles, you can do it over rough surface tiles if you use a liquid adhesive like liquid nails. You only need a 5-6 pea-sized dots of adhesive for a 3×6 tile.
I would recommend this project for areas that are not prone to heavy moisture like a bathroom. A backsplash should be fine but pay attention to the area behind the sink. It is definitely easier than traditional tile and will last several years with the right installation.
Most silica and vinyl peel-and-stick tiles cannot be used near a heat source like a fireplace or stove. However, there are some varieties that use glass and real stone that may be used. Check the manufacturer’s instructions.

Grab our free series "Weekend Home Projects that will Transform Your Life" Sign up below to receive updates including free printables, organization tips, home improvement projects, recipes and more! |
More Tile DIY Projects
PS I love seeing your creations! Be sure to take a photo and tag #cravingcreative on Instagram! You can also stay in touch with me through following me on Instagram, Pinterest, and subscribing to the newsletter!
Denise says
Can I use vinyl peel and stick tiles over ceramic tile? The ceramic was previously
installed.
Rachel says
I once put sheets of vinyl tile over ceramic without a problem. It’s mostly a matter of getting the vinyl tile flat and looking nice. If it is a rental, just make sure it can come cleanly off without removing the tile behind it.
Elaina Hall says
Hi! This is an older post, so I hope you get this message. I love this transformation! I’ve done several backsplash projects and this project doesn’t seem to be much easier than using a traditional ceramic (non-stick) tile. One of my least favorite and difficult things for me is the backer board. I know you can’t stick to drywall, but is there anything else you would recommend? What did you use in this project? Do you think using the pre-stick tiles was worth it? Thanks!
Rachel says
Concrete board, hardi-backer, etc is only really necessary in areas such as near a kitchen sink or a tile shower. You can put peel and stick tile and even regular tile on drywall in an area that is not around running water. However, I do generally recommend that the drywall is at least painted or otherwise sealed. I would never recommend this in a shower or wet area, but it was great for a backsplash. I have done tons of tile projects in both bathrooms and kitchens involving traditional tile and I find this to be much easier. There is no mortar to mix, no working time, no concrete backerboard, no grouting, no haze, or waiting to use or regular sealing.
Tamela Morin says
Wow, I can not wait to try your home improvement ideas!!
Erica says
What color paint if any did you use under the glass tiles? My wall is currently a light beige?
Also, have far apart was your spacing between each tile?
Rachel says
We didn’t paint the walls since they were already blue and we didn’t leave any gaps between the tiles. They are not grouted. The glass tile has a backing to it for uniform color, but the beige may show through if there are any gaps between the tiles. I would probably paint the walls a similar color to the tiles, let it dry for a week or so before tiling.
Lindsey says
I LOVE how this turned out. I have been wanting to add a backsplash but havent found the right color until I saw this! What is the name of the tile you used?
Rachel says
The tile is Aspect Tile in Storm Cloud
Harry Lance says
Great Design I’ve been thinking for a kitchen upgrade for a long time but couldn’t find a nice idea but this looks Amazing! I will surely implement this on my Kitchen.
simple nature decor says
I have some of those tiles that I received free from the Haven Conference, I still need to use. I love the color, its beautiful, and you did an amazing job. You said you used a diamond cutter, is that easy to use.
Thanks
Maria
Rachel says
It’s basically a wet saw but it has a blade on it specific for glass. I have used them several times and, while messy, it isn’t hard. I recommend using a towel underneath to keep most of the mess and tinyist bits of glass at bay. We only used this on the intricate cuts like around the outlets. Straight cuts were easier with the glass scoring/cutting tool (and no mess).
arielgarneau says
Holy smokes! What a difference that tile makes! I used the white version in our powder room and it’s perfect.
Amanda says
It looks awesome! I’ve been wanting to try this stuff in my powder room, I need to get on that!!
Rachel says
Oh, I bet it would be pretty in a bathroom. But I can totally understand. I have a million projects I would like to get to…one day, lol!
Roxanne says
This came out beautiful! I have a box of that exact same tile waiting to be installed in my niece’s house!
Rachel says
haha, great minds think alike! I love the blue they chose, but the metal tiles are also really cool. I was thinking of using them in the bathroom.