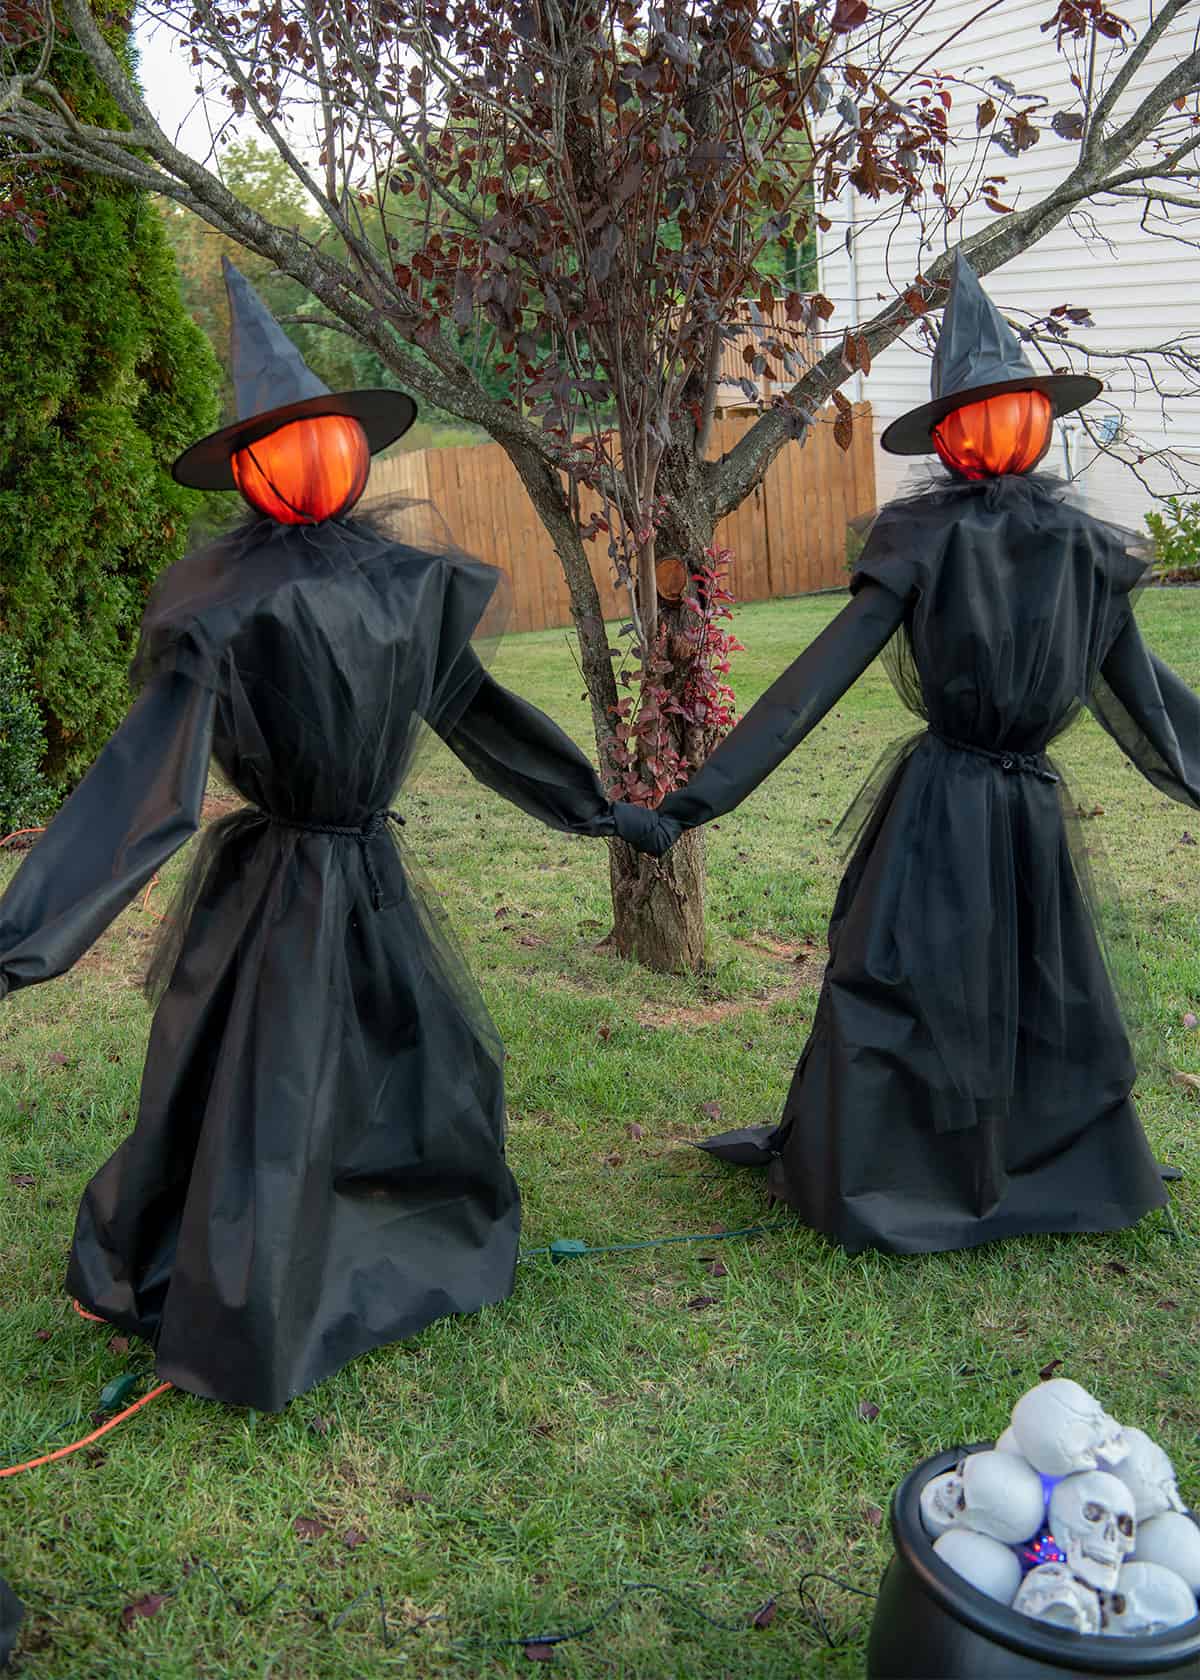
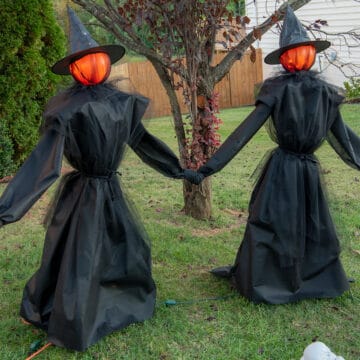
Add some spirit by building these DIY Halloween witches. Made with easy to find supplies and glowing heads! They are life sized, easy to store, and no-sew. Includes step by step instructions and video.
While everyone around the internet is basking in the coming of pumpkin spice, I am thinking something much more sinister!
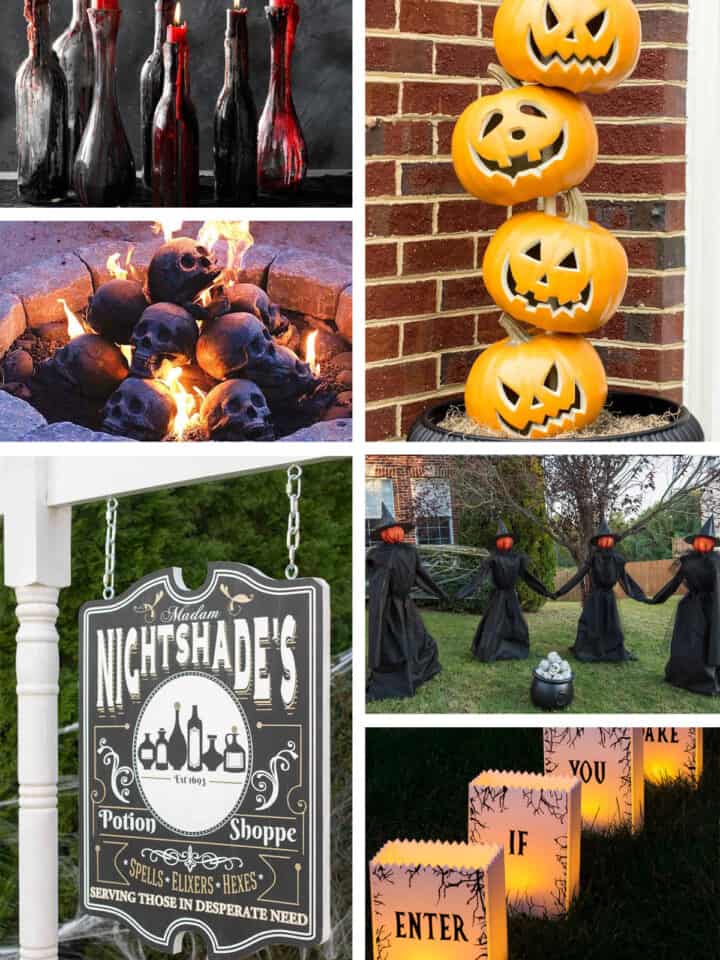
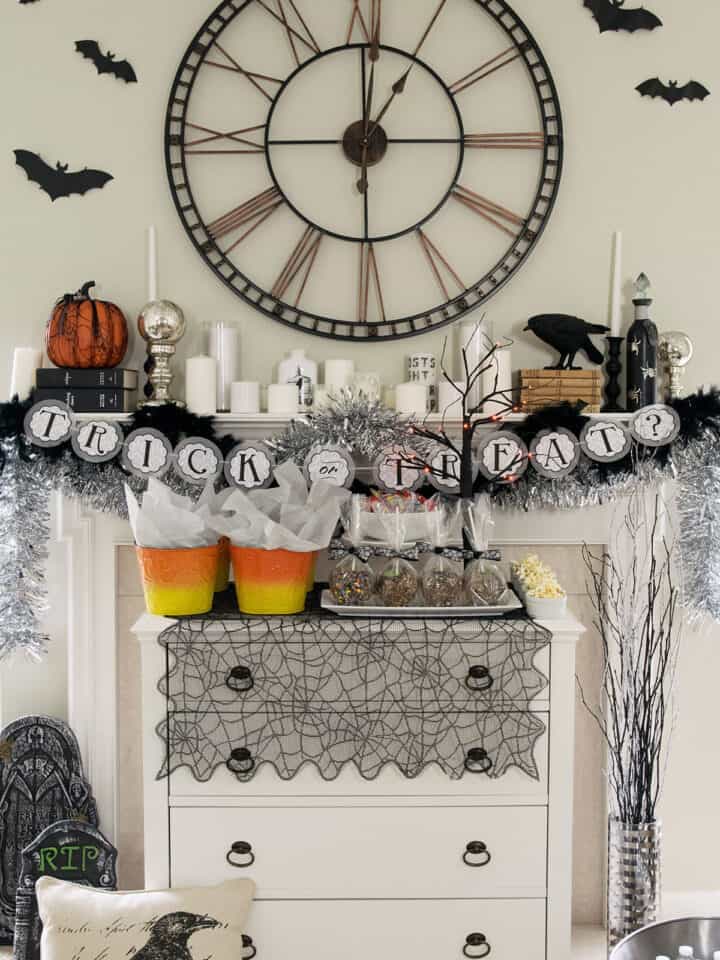
Every year I decorate the house up for a haunting Outdoor Halloween Witch Theme and it gets bigger and better each time. We have tons of DIYs from spooky porch decorations to Halloween decorated mantels, so it’s a big deal around here.
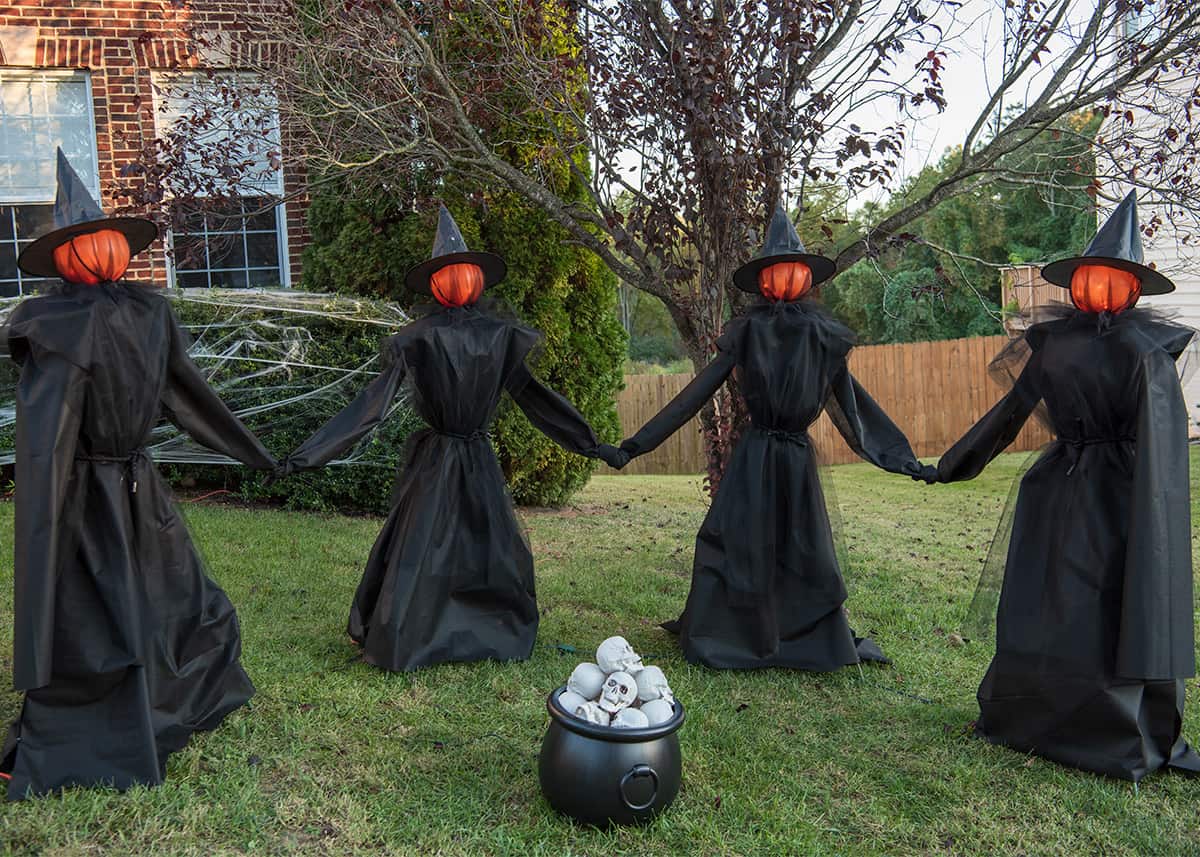
These DIY outdoor witches are my newest outdoor decoration creation and I’d like to think that they are dancing in celebration!
Why I love these Witch Decorations
The tutorial and printable supply list is at the bottom of this post. We did a ton of research on this project, and I designed these with several considerations in mind:
- Holds up in normal weather conditions. That includes using waterproof materials or those that would dry well.
- Large decorations down as small as possible for storage. In fact, all 4 witches (except the garden stakes and pvc pipe) can fit in one large storage tote!
- Life size! About 5 feet tall, not including the hats.
- Inexpensive. I bought the plastic pumpkin heads, witch hats, PVC pipe (we cut our own), rope, and mesh fabric. Total cost for 4 witches (for us): $47. I would have paid around $200 for 4 of these and they wouldn’t be near the quality.
- Look realistic and scary!
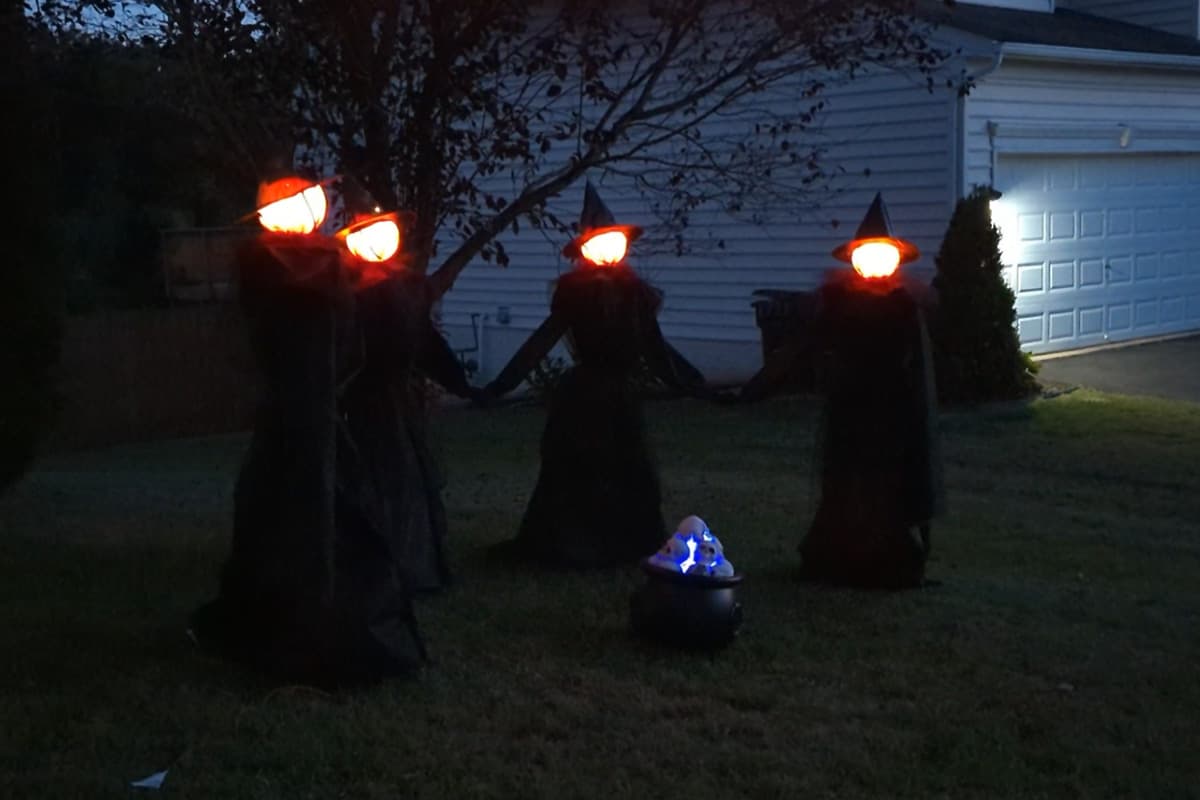
- Glowing heads. I highly recommend using waterproof battery-operated lights for this project over the Christmas lights we used.
Supplies Needed
Here are the items we used (1 witch) and a few notes on things I specifically recommend.
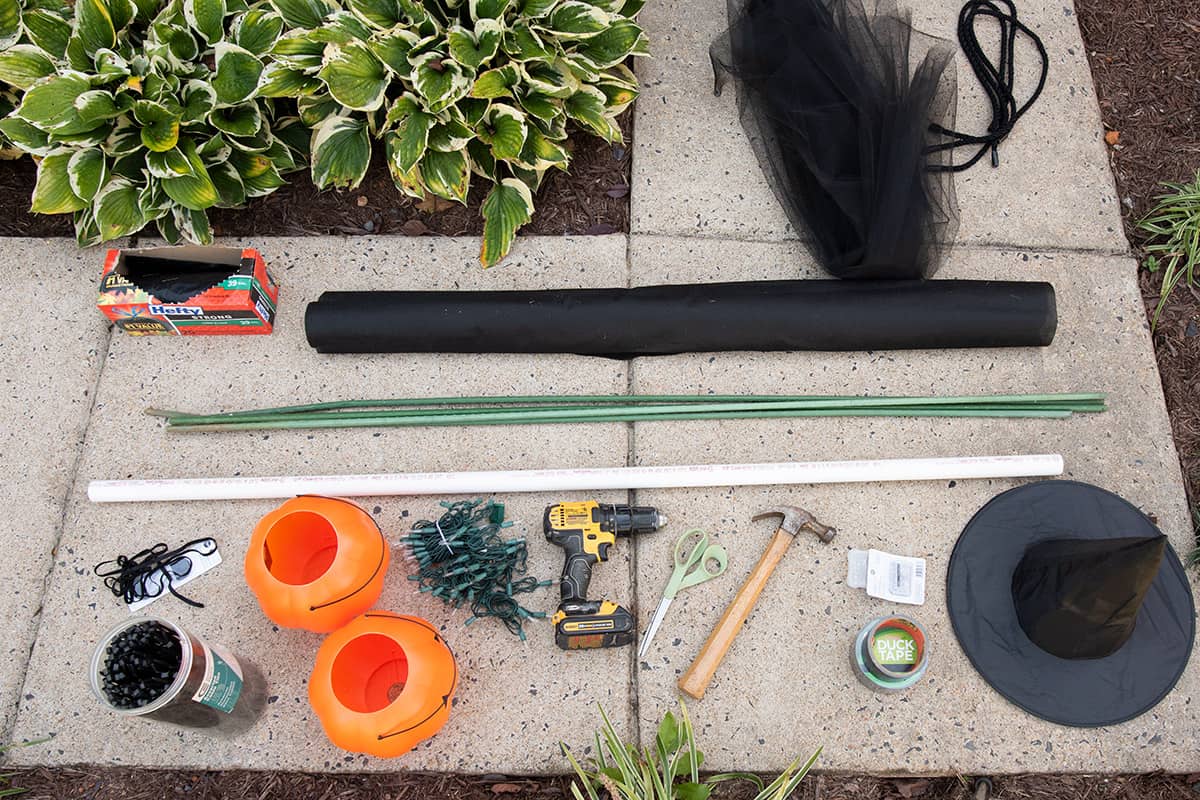
Stretchy cord. Those hats need to stay put in weather. The stretch cord keeps the hats in place pretty well but gives me an access point to adjust the lights if necessary.
Mesh fabric. You could just buy enough to cover the heads, but I bought extra to add some to the body. It softens the yard fabric dress with a slightly more ghostly appearance. I liked doubling mine over to create more of a gauzy effect.
Cage Garden Stakes (the green poles above). Most tutorials I see use traditional tomato cages for the skirt, and that would be much easier to build. However, using 5-foot green pole stakes creates a life size witch, requires less storage space, works on hilly terrain better. Plus, we already had them!
Christmas lights vs Battery String Lights. If I were to do this project again, I would highly recommend batter operated string lights that have a timer or a remote. The outdoor Christmas lights we used required 4 extension cords and they were a pain because every piece had to be threaded through the cord.
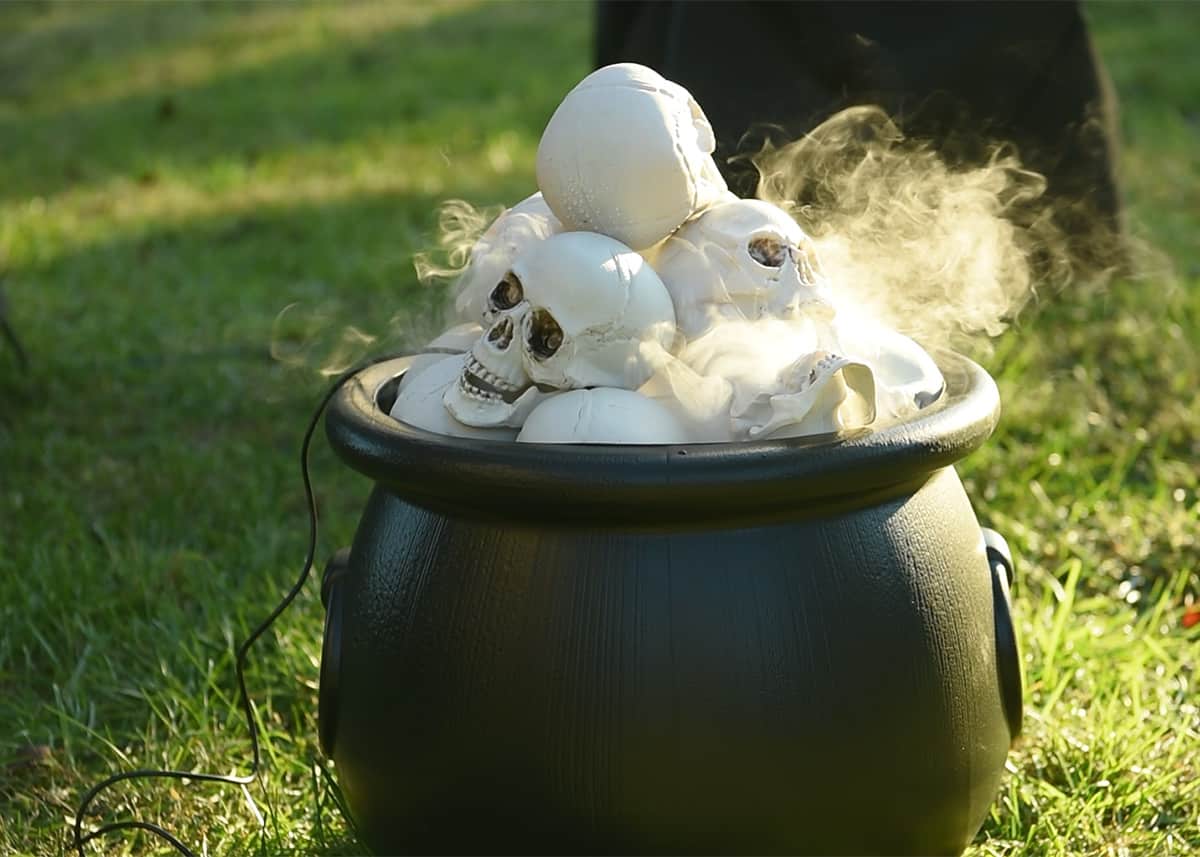
Cauldron and skulls. To make this setup even more fun, I added this lightweight cauldron and plastic skulls at the center. I purchased them from Oriental trading company, but they appear to be sold out now. We also added a tiny mist maker with lights. It’s awesome!
Tips for a Realistic Halloween Witch
- Put the bottom pumpkin up a few inches from the stake tips to create rounded shoulders.
- You can extend the PVC pipe by propping it up on a rock or brick.
- Heavier duty landscape fabric will lay better and give an overall more realistic shape, but any yard fabric will do.
- Trash bags are great for stuffing the waist and chest for fullness.
To create a proper DIY witch, you gotta get the form right. There is also an explanation of this in the video down below. I built four of these witches and perfected this technique!
- Place the PVC pipe where you want the middle of the witch. Make sure to have a zip tie and a hammer ready.
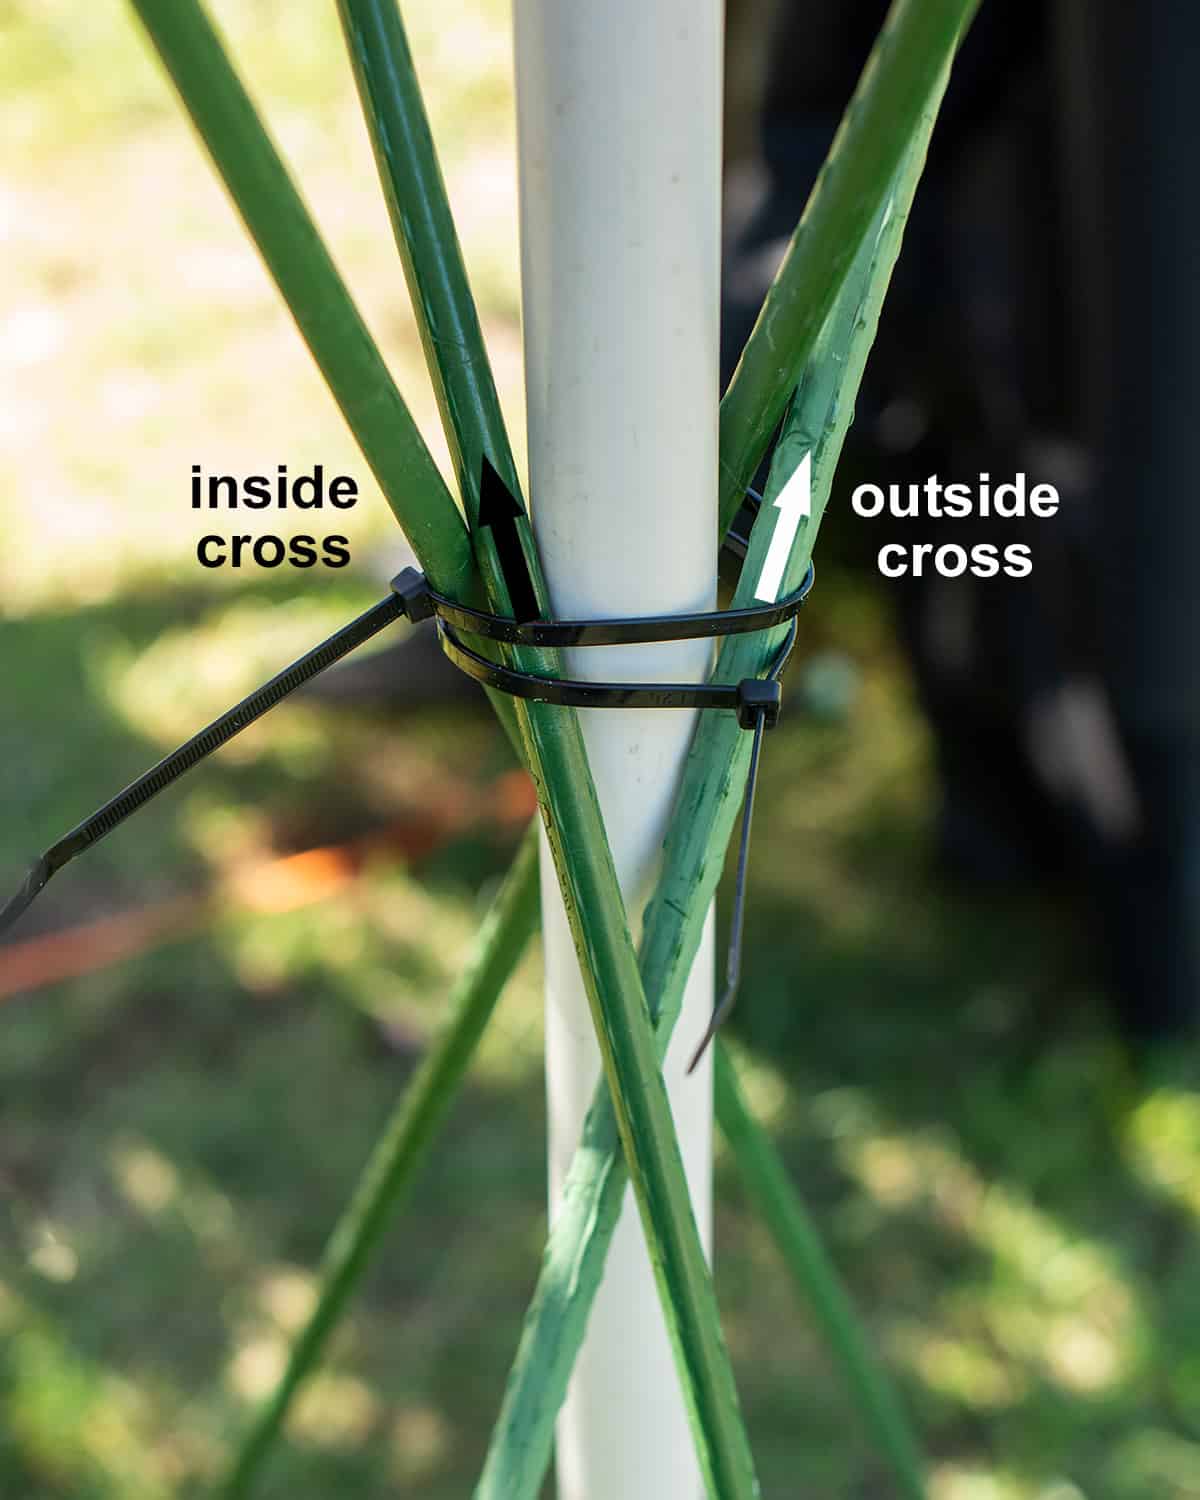
- Start by taking two stakes and crossing them about ⅓ down the body or where the natural waist will be. On the opposite side of the PVC pipe, cross the other two stakes at the same point.
- Pull the bottom of the stakes out from the PVC pipe to create the fuller skirt. This makes the crosses fold into each other up top so that one side is outside and the other is inside (imagine how you interlace your fingers).
- The tops of the stakes (shoulders) won’t be even until you hammer them in the ground.
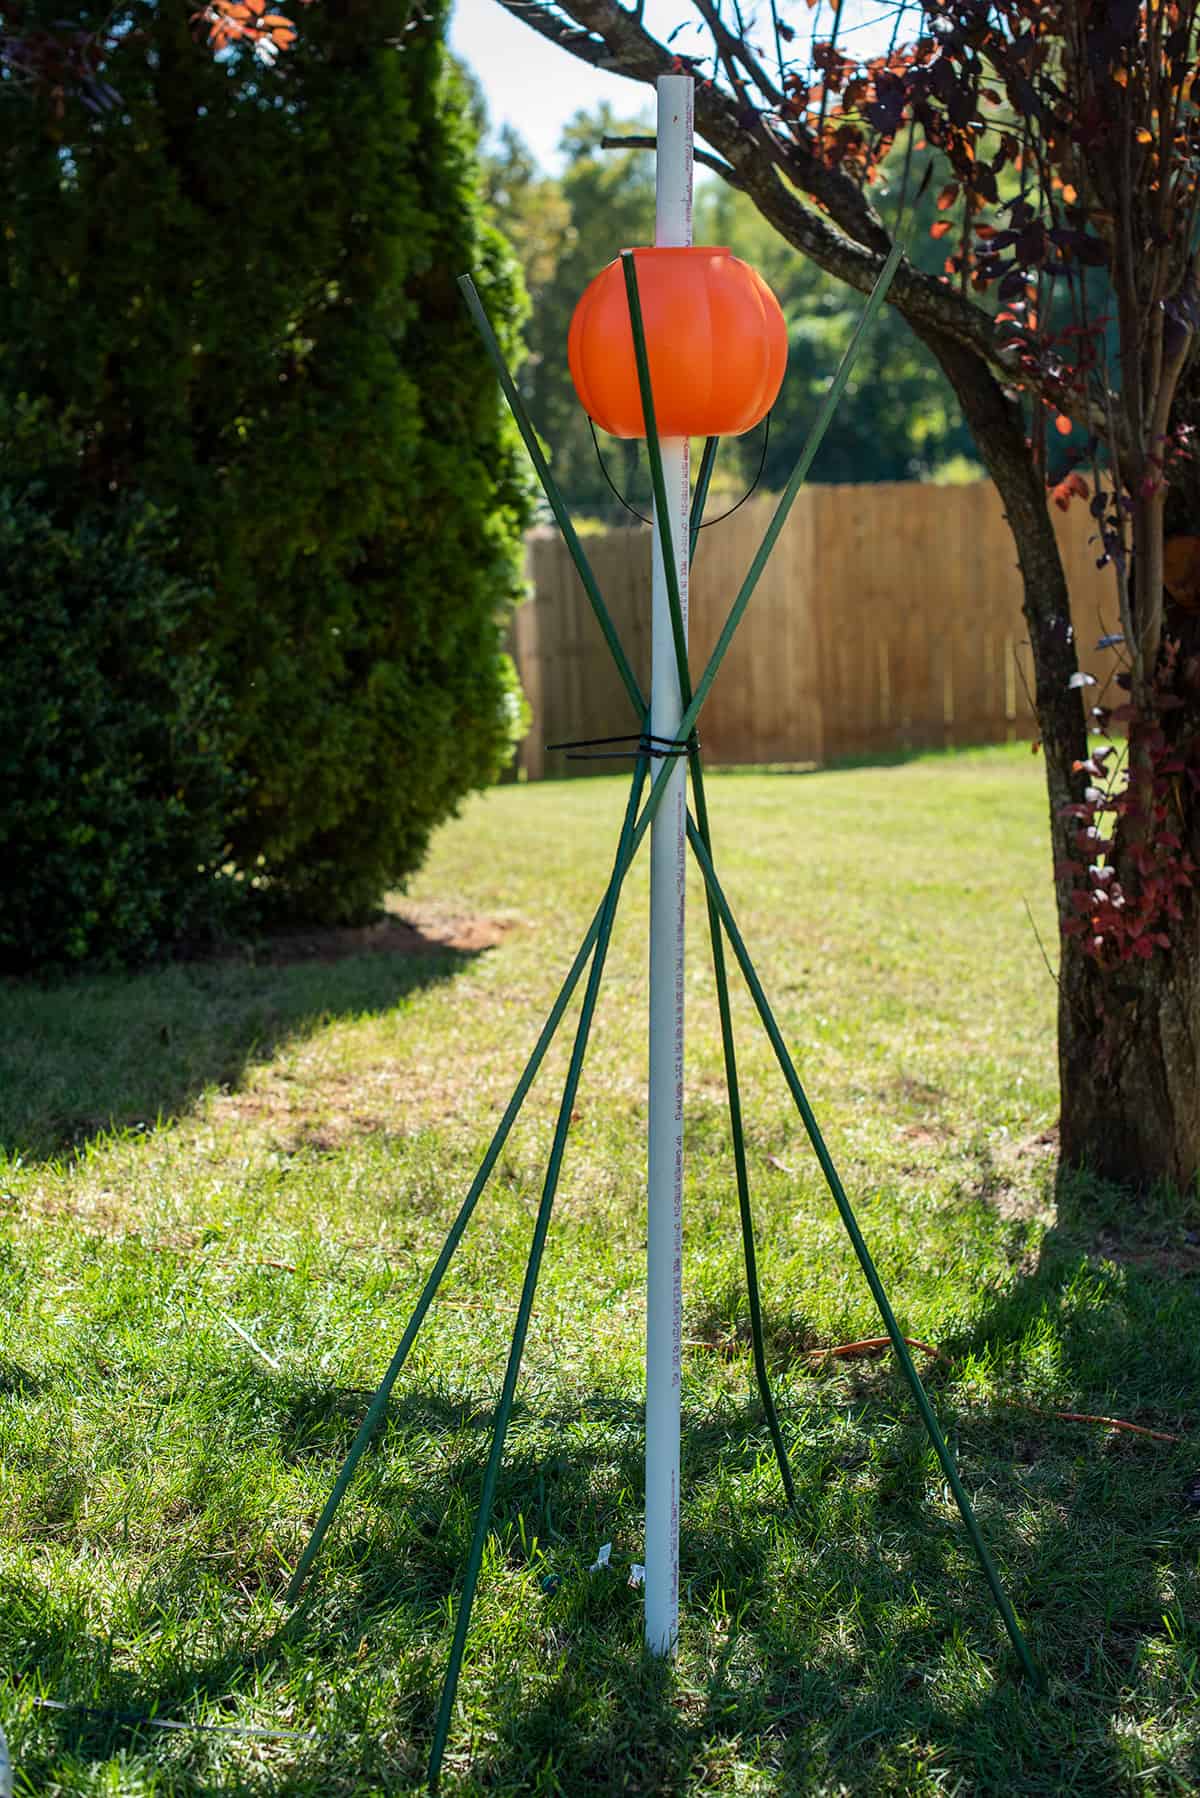
The form should look like this above. This creates a wide skirt, and the shoulders are square. The bottom pumpkin head makes the shoulders more rounded and gives the top pumpkin and fabric something to rest on. Zip tie and adjust as necessary before hammering in the ground.
Video Demonstration
Wanna see me demonstrate putting one of these awesome glowing witches together? I am not great at videography (yet) and even worse at voiceover (cringe!), but I spent a lot of time making this video, so I hope it shows how these lovelies come together.
There are tons of tips and little things that I just couldn’t explain in words.
Happy haunting!

Grab our free series "Weekend Home Projects that will Transform Your Life" Sign up below to receive updates including free printables, organization tips, home improvement projects, recipes and more! |
Halloween decorating Ideas

PS I love seeing your creations! Be sure to take a photo and tag #cravingcreative on Instagram! You can also stay in touch with me through following me on Instagram, Pinterest, and subscribing to the newsletter!
Halloween Witch Outdoor Decoration
Tools
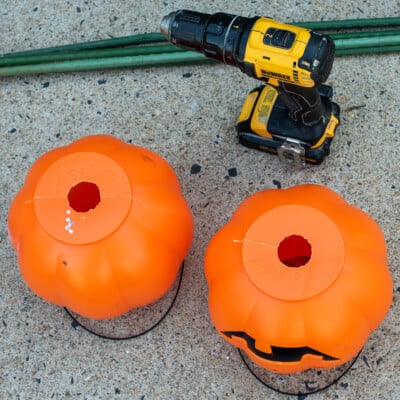
- 1 Drill or Razor Knife if your pumpkins are thin
- 1 Hammer
- 1 Scissors
- 1 Sharpie or Marker
Supplies
- 4 poles Green Tomato Stakes (5ft length each)
- 1 5ft PVC Pipe 1 inch diameter
- 2 Zip Ties 10 inches long
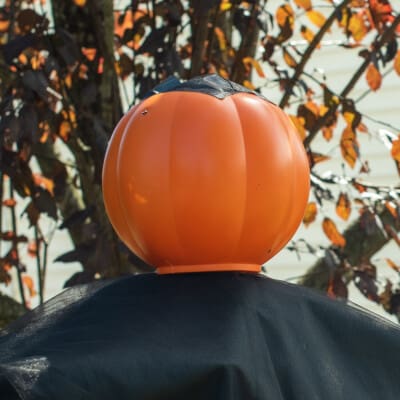
- 2 Plastic pumpkin buckets
- 1 roll Duct Tape black preferred
- 3 yards Landscape Fabric amount depends on how tall
- 3 yards Soft mesh fabric
- 1 set Battery String Lights LED, Remote controlled preferred
- 40 inches Black Rope
- 1 ft Stretchy cording plus more for tying off head
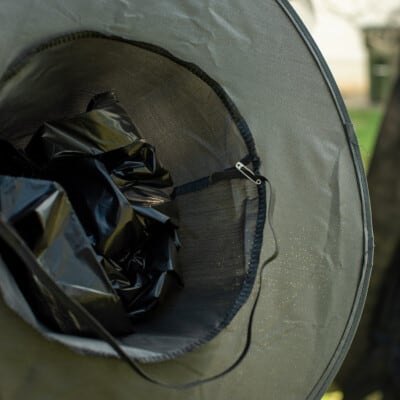
- 1 Witch Hat
- 1 box Trash Bags for stuffing the chest and waist
- Safety pins for pinning fabric
Instructions
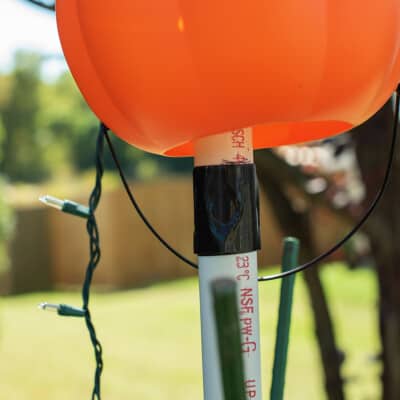
- Cut PVC pipe to length (5 ft.). Drill holes in pumpkin buckets for PVC pipe to fit snug on the pipe.

- Position tomato stakes around PVC pipe, zip tie temporarily, and hammer stakes into the ground. Zip tie again once stakes are positioned properly. Apply duct tape to ends of tomato stakes to keep from poking fabric.

- Mark at the top where the bottom pumpkin (chest and shoulders) should sit. Wrap duct tape around the pvc pipe below the mark and slide pumpkin onto PVC, positioned upside down so that the base of the pumpkin is facing upward.
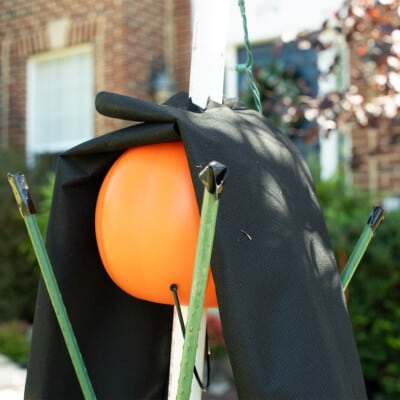
- Make Arms. Cut two 18 inches length of yard fabric. Roll and secure by cutting a hole to slide over pvc pipe. Slide down pvc and on top of bottom pumpkin head.
- Drape yard fabric over witch form and center it evenly. Cut a hole to slide over PVC pipe. Stuff the bodice with trash bags if you want more fullness and fasten sides with staples or safety pins.

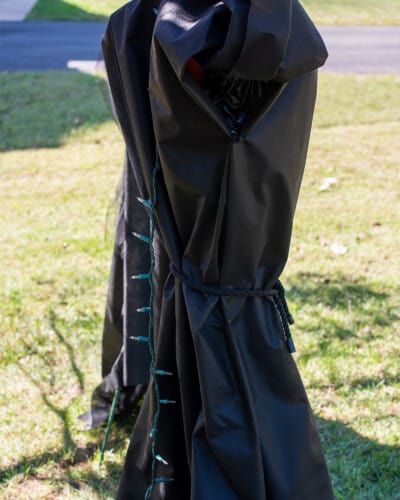
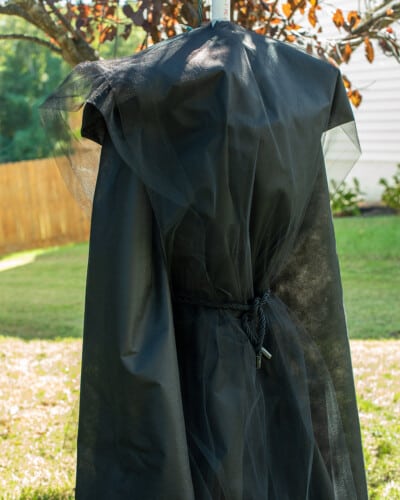
- Cut off enough tulle to cover top pumpkin head (this was 24 inches for me). Drape the rest of the tulle over your structure and tie rope around the bodice to create the waist.
- Slide second pumpkin head over PVC pipe, opening upward. Put the face backwards. Insert remote controlled or string lights on a timer inside the top pumpkin. Apply duct tape to the opening of pumpkin bucket to prevent water from collecting inside.
- Drape mesh over the pumpkin head and tie at the bottom. Adjust tulle around head as necessary,
- Attach hat to the head and secure with the bungie cord. Stuff with trashbags to keep stiff, if desired.
- Tie or attach the arms together.


Dawn G says
These came out great and were easy to make. They look so much better than store bought. Thank you for the great directions!
Kimberly says
Love this. Always wanting to create something new for Halloween.