Adding trim to a kitchen island is a budget friendly way to build your dream island! Upgrade an existing island or enhance a brand new design. Step by step tutorial and before and after photos included.
When we took on this kitchen remodel, it was quite the plight. What you see today was not the original concept. Honestly, there were points during the renovation where I half expected Ty Pennington to show up and start narrating. However, the finished space is worth every sleepless night and squabble over whether to paint the kitchen cabinets or installing new countertops.
We’ve previously highlighted how to build a kitchen island and how we made it into a stone veneer. However, something was just not sitting right with me. Then one day out of nowhere, BAM! It hit me like a bolt of lightning. The island needed a makeover.
While our island may look intimidating, it’s not necessarily a project you need to hire out for. This is actually much simpler than it looks. You only need some basic woodworking skills to change out the facade. If you can cut a 45-degree angle, you can add trim to a kitchen island!
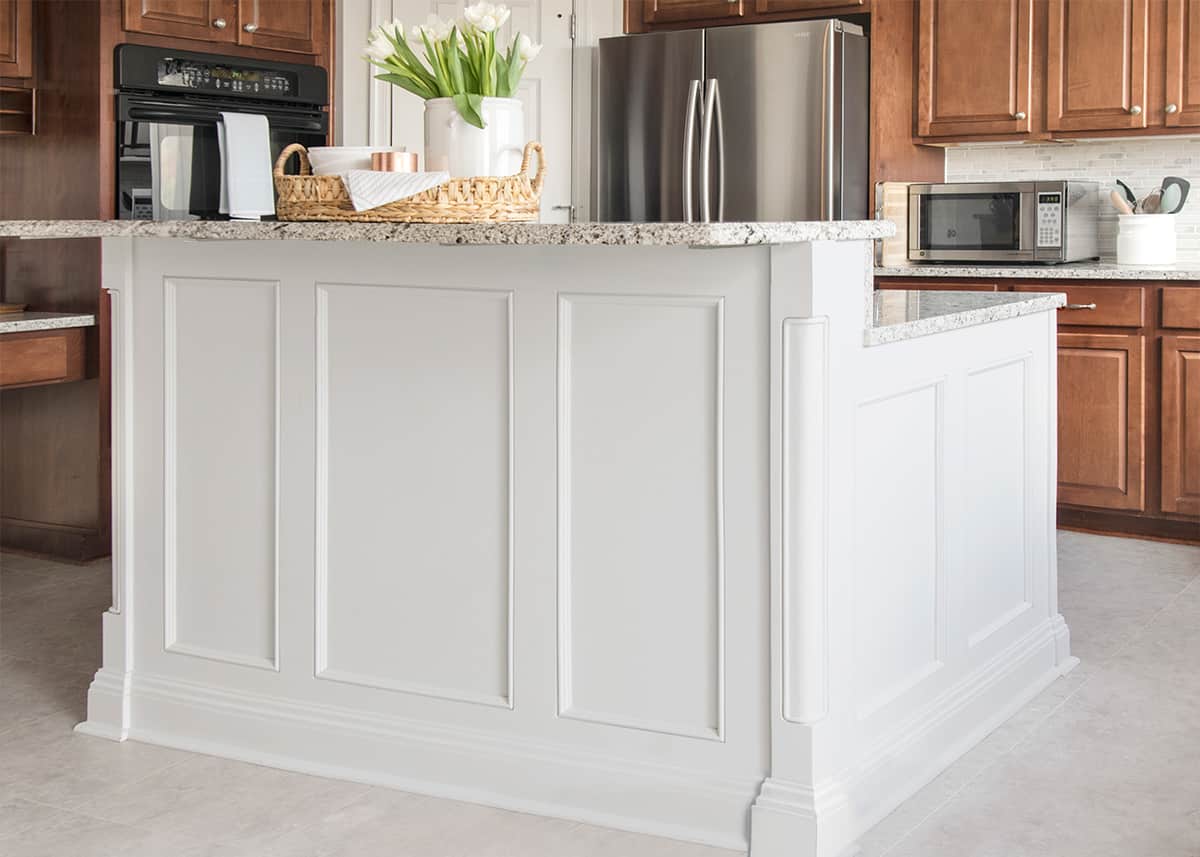
The Before
The original, builder grade bar looked like this:
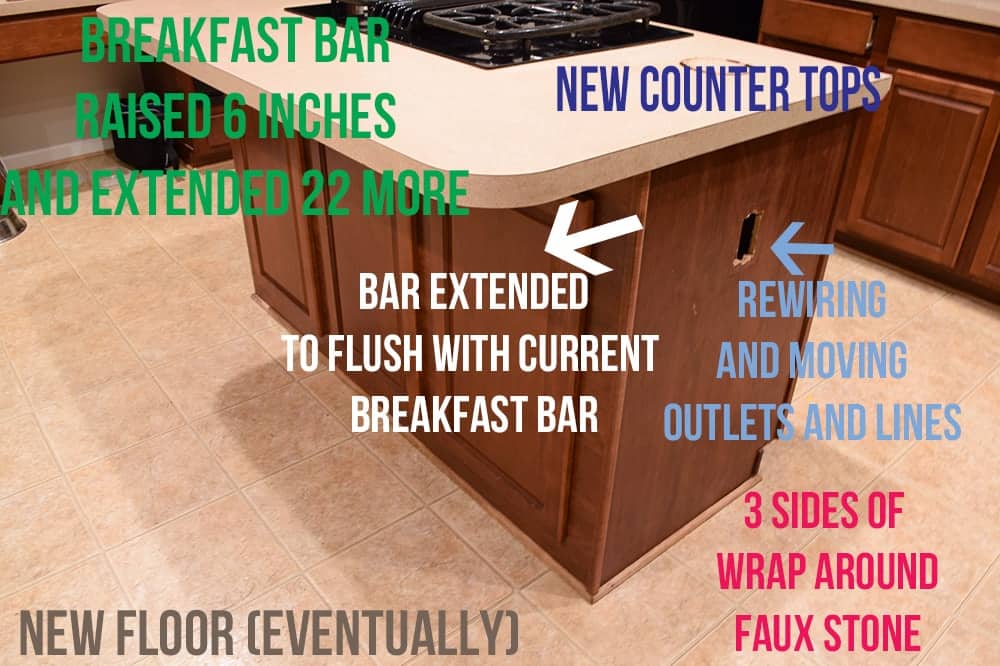
This is the original island that was installed in the house and our plans for it. These details were pivotal in transforming the island’s aesthetic to match the overall kitchen design scheme. Adding trim and corner columns provides a full-bodied and traditional style to enhance the piece.
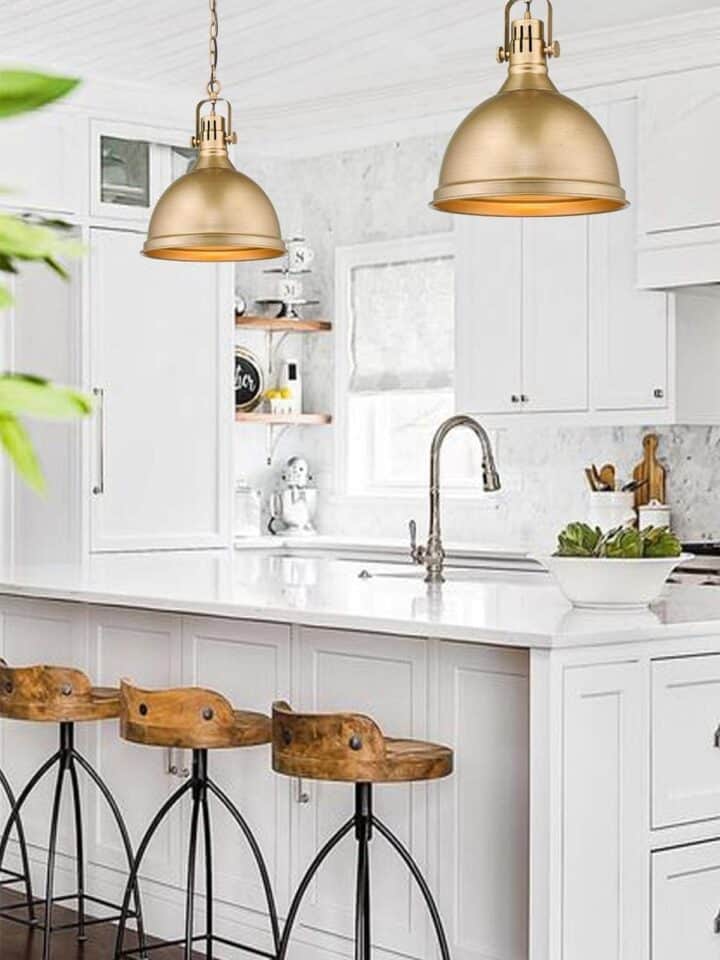
In fact, it blends so seamlessly, you’d never guess it wasn’t part of the original bones of this home. If you aren’t sure what style for your kitchen island, check out 20 Gorgeous Kitchen Remodel Ideas for more DIY inspiration and a variety of different layouts.
Recommended Tools and Supplies
While I understand that kitchen island designs are often different, as well as the size. Our kitchen island base is 5 feet wide x 4 feet deep. These are the basic supplies one need for adding a design such as this. Links are included if you are not familiar with a tool.
- ½ x 6 boards in poplar, oak, or birch (varying lengths)
- ½ x 4 boards in poplar, oak, or birch (varying lengths)
- (2) Traditional Corner Posts
- (2) 4×8 feet sheets of Smooth ¼ or ½-inch plywood
- (14 ft) baseboard trim
- 1.5-inch finishing nails
- Nail Setter or Brad Nailer
- 180 grit sandpaper
- 220 grit sandpaper
- Random Orbital Sander
- Wood Filler
- Paintable caulk
- Miter Saw (highly recommend) or Mitre Box
*Poplar isn’t much harder than yellow pine, but birch is more expensive. We painted our island and didn’t want the recessed grain that oak can show over time. Therefore, we used a mix of poplar in places that wouldn’t get as abused and birch for better rigidity on the front.
** Half inch thick plywood is sturdier and what worked best for our design. However, you can use thinner if you don’t have enough overhang or will get rigidity in other ways like the framing or smaller boxes.
More Home Improvement Projects
- The Ultimate Guide to using Stone Veneer
- How To Install Glued Vinyl Flooring
- How To Repair Electrical Cords
- How to Paint Furniture like a Pro
Step by Step of Our Project
1. Remove Any Existing Trim or Decorative Facing
The first step, in our case, was to remove any existing trim and make the faces as level as possible. Because we had built the bar out previously, we only removed the previous stone veneer walls. Underneath, it was a nice flat surface to work with.
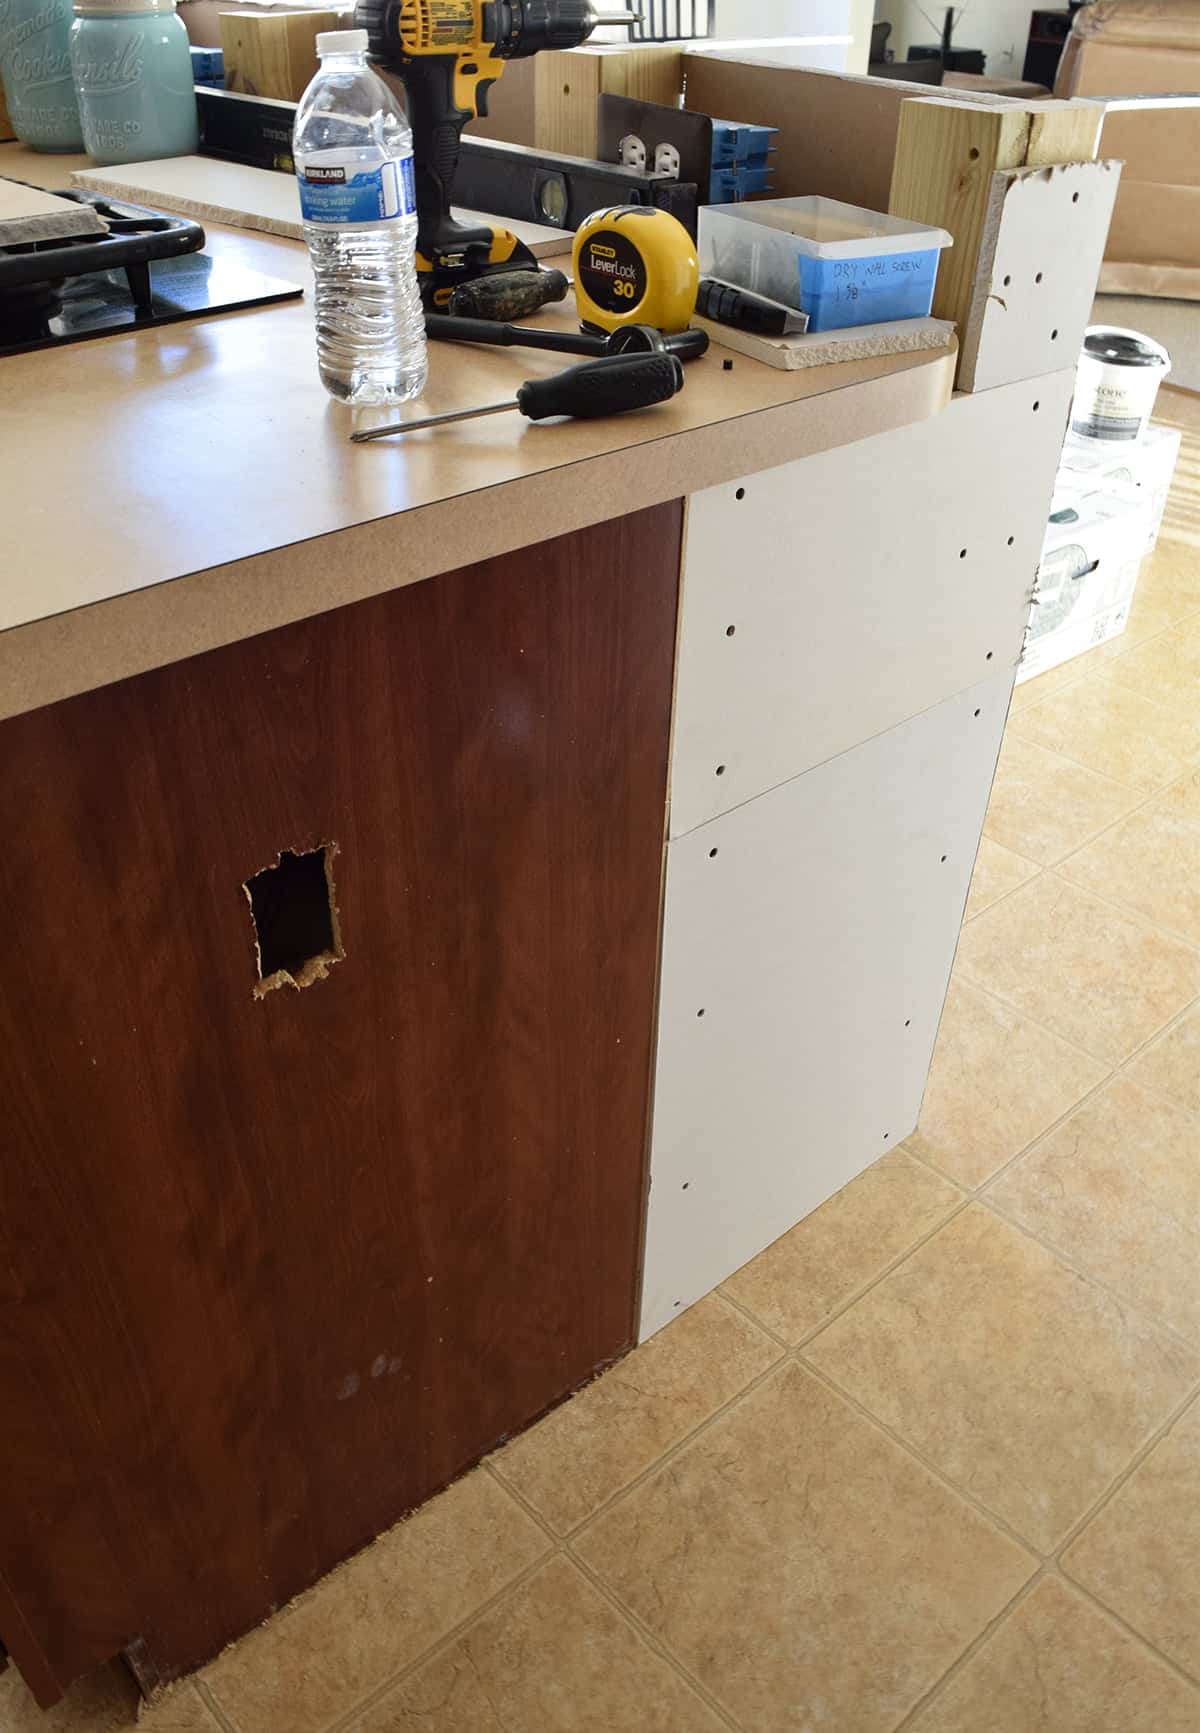
***Pro Tip: Know how much countertop overhang you have to work with. You don’t want the trim to stick out further than your overhang. We installed new countertops, so we made the new countertops wider and larger to account for the new trim.
2. How to Wrap a Kitchen Island
This part is not always necessary. If you have a smooth, paintable surface after removing the trim, then you don’t need to add a new face.
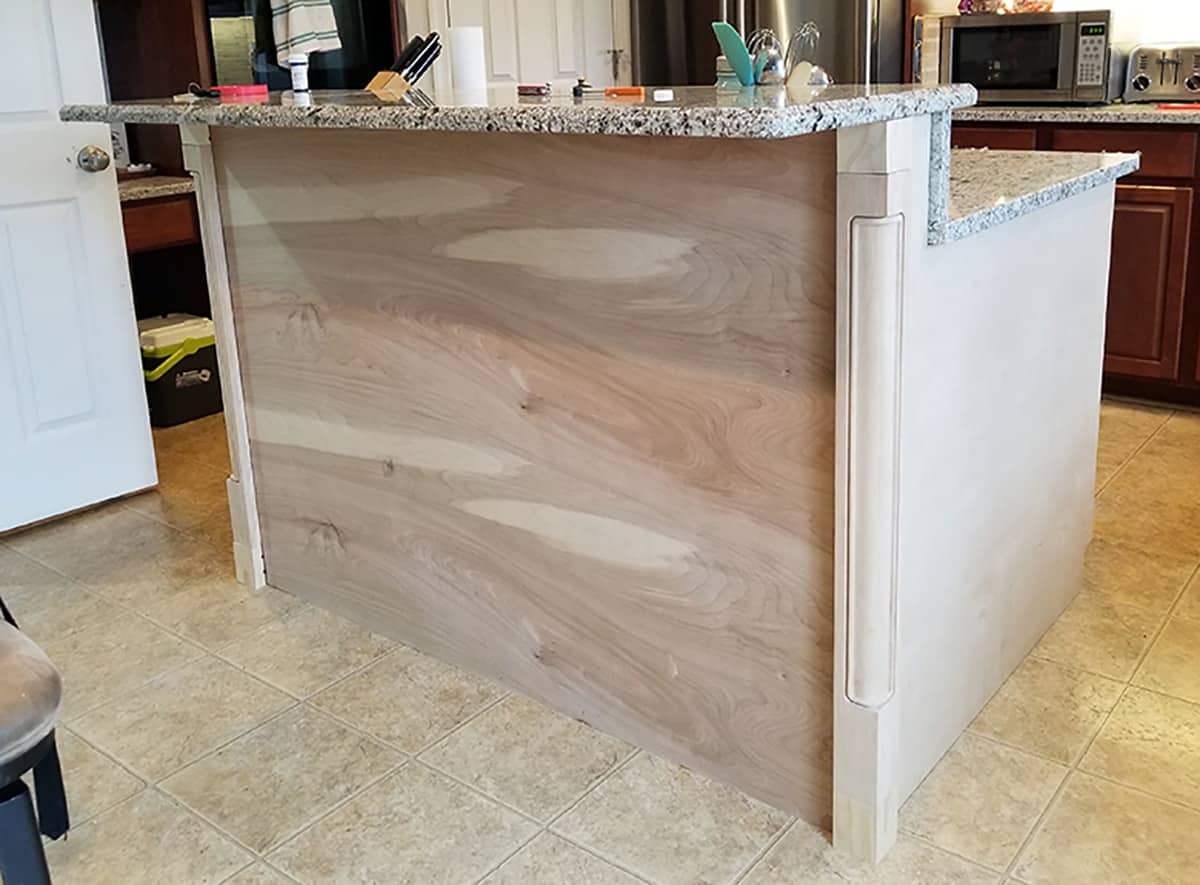
For our design, it was best to wrap some plywood sheets because we had previously drywalled and we removed that. Home Depot cut the plywood to size for us to make it easier to haul home. Fair warning though: Always, always double check their measurements before you get home!
We added these beautiful corner posts to anchor everything together and give the island some dimension. The posts are square, so we cut a long notch out of the back to fit the post over the corners of the bar, but you could design the framing so that the corner posts fit into it square. Another idea is to use them like table legs under the extended countertop. Here are several examples. If you don’t want corner posts, using flat strips to make a corner is very nice too.
3. Cut the Trim and Decorative Elements
Making a high-end looking trim design is all about layering decorative trims.
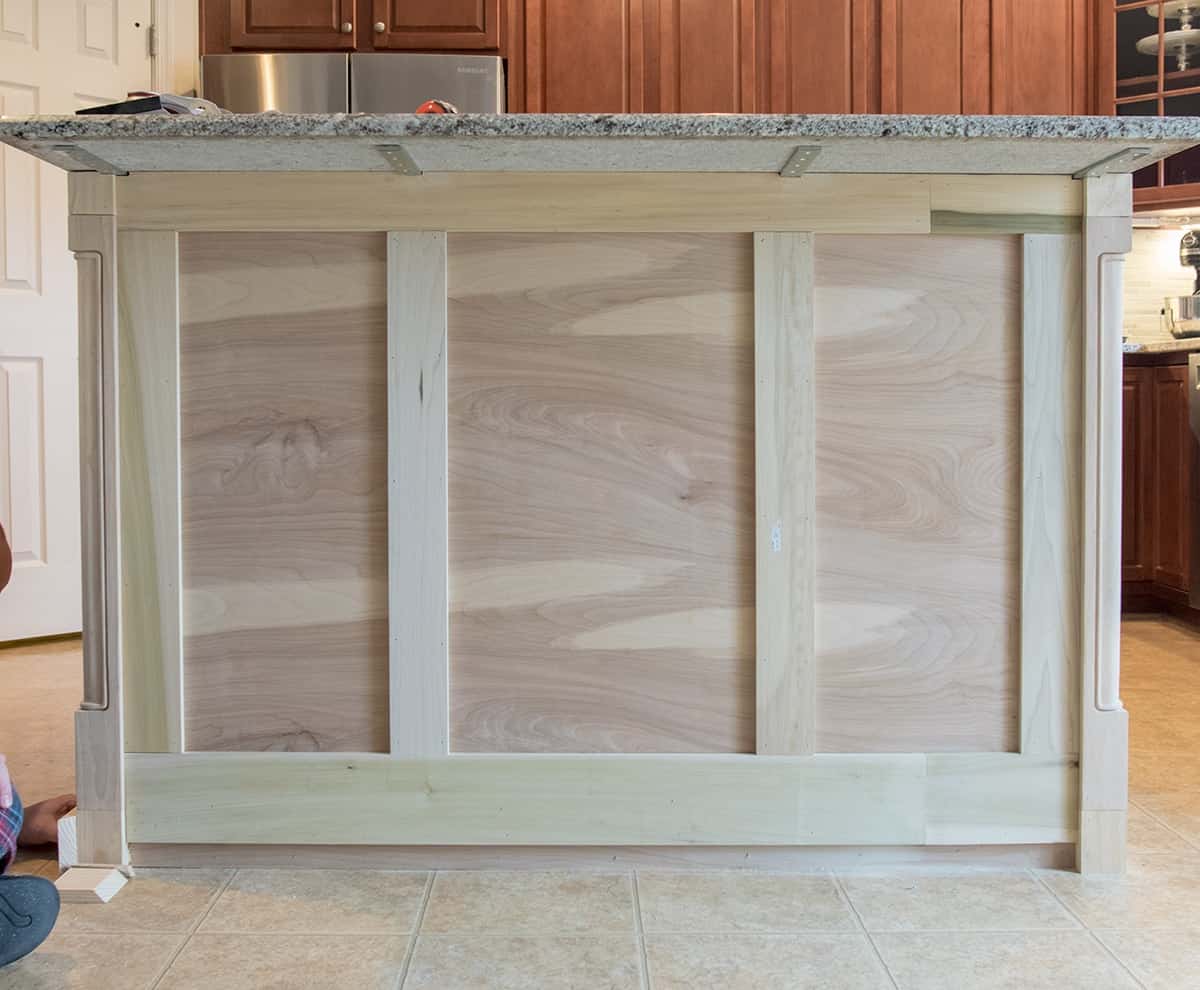
We started out making a traditional wainscotting frame with 3 sections on the front and 2 on each side. The bottom is slightly lifted because it will be covered by baseboards and quarter round.

We added small trim to the inside of the boxes and mitre cut them like a picture frame.
4. Add baseboards
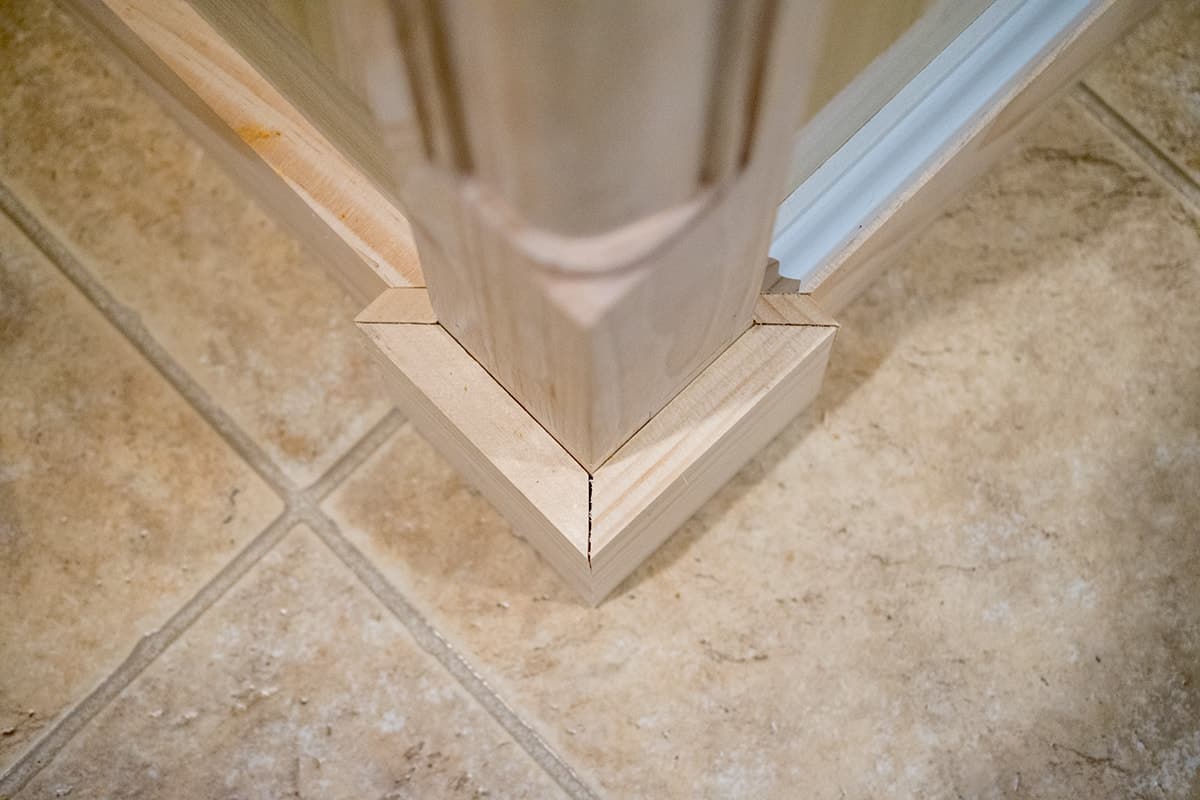
Now, I loooooove custom looking trim work. For most, some nice, simple baseboards would have been beautiful. However, we also created our own baseboard design. The shot above shows the cuts we made around the corner column. You can also see that we laid a small decorative trim on top of the ½×3 poplar board to create a taller, custom baseboard.
***Tip: We used a brad nailer for all of our nails, but if you use a regular hammer and finishing nails, you will need a nail setter to sink the nails into the wood and fill them for a smooth face.
Tips for Making Miter Cuts
Mitre cuts are essentially a 45 degree angle cut, rather than a straight cut. Our corner columns and joints use several of them.
- You can use a Miter saw (my preference), table saw, or miter box. I would only recommend a miter box for ¼ inch thick boards. We always double check the chop saw or table saw with a carpenter triangle to make sure it’s straight up and down.
- Always measure from the longest side of the cuts.
- If you plan on painting it, the corners are much more forgiving with wood filler or caulk.
- Check twice to make sure you are cutting the correct angle direction. We have caught ourselves many times about to cut the reverse angle.
The Secret to Pro looking Trim
Although we were pretty good about any gaps and ridges, a painted surface is going to have to be filled. I use both wood filler and caulk, but how do you know which to use and when?
Wood filler is used for flat surfaces that are on the same plane (yes, geometry!) and surfaces where I need some structure to feel smooth. Nail holes or where two boards are very slightly misaligned height wise are examples, I generally don’t fill gaps between boards with wood filler because often wood filler will crack over time when the two boards move independently.
Paintable Caulk is used to cover joints that need flexibility or when two different materials meet. For example, I use caulk where the wood meets the counter tops, the tops of the baseboards, and the corners of the framing.
If you want to learn more about my techniques, I have posts about caulking baseboards and installing trim and wainscotting. The one key for me is using a quality wood filler like this. It goes on smoothly, can be thinned, and easy to work with. I have tried a lot of different wood fillers.
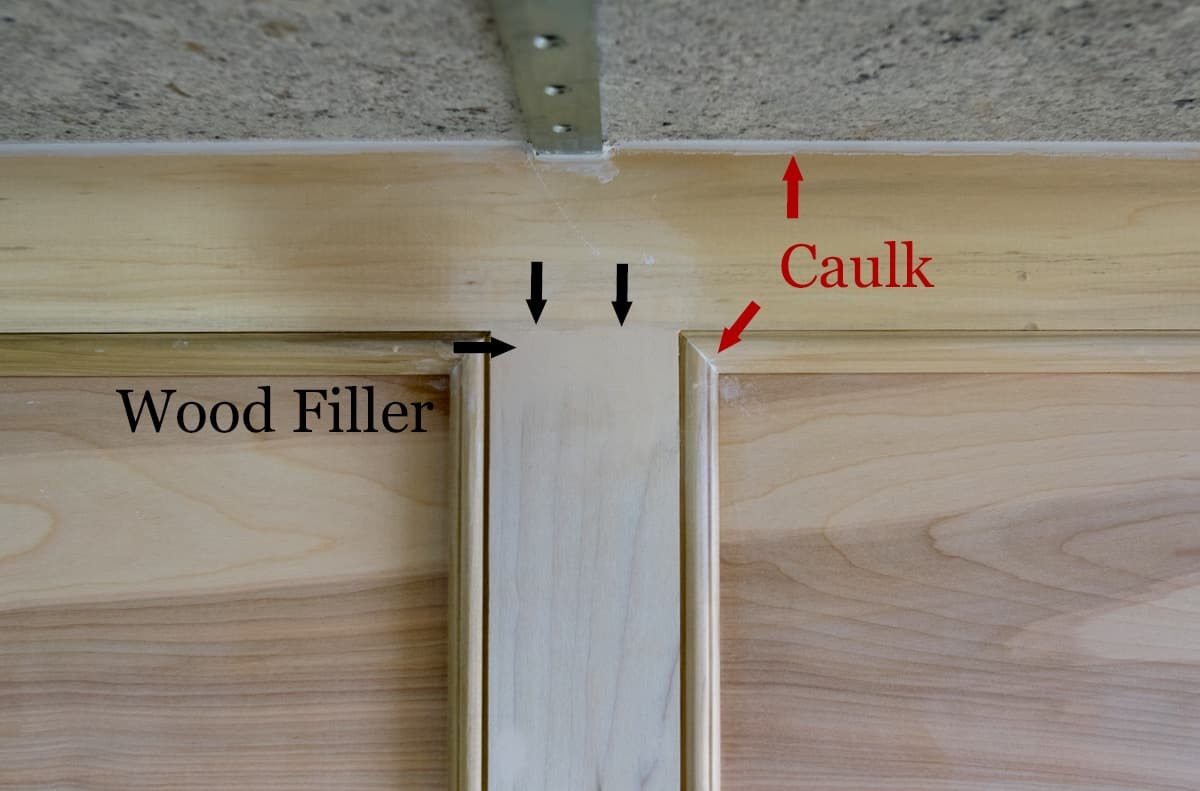
If you are painting white, or light colors, filling cracks is essential. The secret is to put in the work, meaning to fill each nail hole, every seam and joint that has a crack. It really isn’t that bad; I did all of it in a few hours. I usually do the wood filler first, then sand the entire bar and, lastly, caulk the seams. This is what makes the entire job look seamless and professional!
The kitchen remodel is finally finished! You can see the full kitchen makeover here. We painted the bar in a custom mix of Lamp White and Raw Silk from Fusion Mineral. Because this is a high traffic piece, I sprayed a water-based polyurethane from Benjamin Moore. I have a post on my favorite maximum protection topcoats for furniture.

Grab our free series "Weekend Home Projects that will Transform Your Life" Sign up below to receive updates including free printables, organization tips, home improvement projects, recipes and more! |
More Kitchen Update Ideas
PS I love seeing your creations! Be sure to take a photo and tag #cravingcreative on Instagram! You can also stay in touch with me through following me on Instagram, Pinterest, and subscribing to the newsletter!
Steve says
Beautiful island makeover. I love the columns and wainscotting. I am curious to see a view from the front of the island. The front corners look to have columns added, but I also see you had the toe-kick to deal with. Did you run a board to eliminate the toe-kick? Thank you!
Rachel says
The toe-kick cutout area was a bit of a challenge. What we ended up doing is mimicking the other corners with the decorative columns. First, we ignored the toe kick and squared it in, just like the column one. We added an 1″ x 2″ board (actual measurements, not nominal) to that edge from top to bottom. It sticks out maybe a quarter of an inch from the side and is flush with the front. It isn’t as thick as the decorative column and it is plain, but it works with the style and makes the edge look intentional. Lastly, we added the baseboards similarly to how they are in the photo above of the corner. We placed these baseboards and quarter round around the 3 sides to make it look polished.
Sandra says
Great tutorial! What is the profile of the trim used inside the rectangles on the island?
Rachel says
Thank you! Over the years, I have found that trim and shoe moulding options in big box stores tend to change. I can’t find an exact match as ours is definitely 3/4 inch thick but this decorative trim has a similar profile.
Susie says
This is the most detailed tutorial I’ve found for a split level island. Thank you. I was wondering whether you put drywall behind your backsplash and if so, just the height of the backsplash or all the way to the floor?
Rachel says
The link isn’t super obvious in this post, but I actually have a step by step of how we built and extended this island here. Because our backsplash on the island is another piece of stone countertop, we didn’t add any drywall or tile. It is supported by the 2×4 frame. We only added drywall around part of the frame because we originally added a stone veneer makeover that you can see here. I ended up not liking that look, so we changed it to this grey version. We kept the drywall as a backer for the plywood sheets to make them rigid and save money.
Kaylyn says
Did you leave your cabinets on the island dark like the rest of the cabinets in the kitchen or did you paint them white?
Rachel says
The cabinets on the stove side are darker, like the rest of the original cabinets. I just didn’t feel it necessary at the time to paint them, but that’s a personal choice. I, however, do generally like the look of the entire island being the same color.
Dawn says
Exactly what I have been searching for!!! Looks AMAZING! Can wait for the total reveal. Thanks for SHARING!
KJ-San says
Nice design. I like how you used the original island as the base instead of destroying it and making everything from scratch. I’m curious how you attached the top counter top to the base. It looks like a couple of kids leaning on it will be enough to bend the 4 L-straps holding it.
Rachel says
Great question! We have granite countertops which are caulked into place. It isn’t drilled or attached directly other than caulk/adhesive. The L brackets we use are pretty heavy duty and the wood helps to support it at it’s most vulnerable point in the bend. The key for this design is that over half of the slab is over a stable support, not the l-bracket, so that it can’t rock.
Monica Wideman says
What did u use to make the boxes is that just strips of the mdf?
Rachel says
I used trim pieces from lowes. I think they are 1/2 thick by 3.5 inches.
Sal says
Hi are those corner posts four sided? Or are the backs cut out so it fits over the cabinet corner? It looks great and I’m planning on upgrading mine. Thank you.
Rachel says
I am pretty sure we notched out the backs to fit over the corners, but I would contact the manufacturer to be sure.
html color says
Great work! I look forward to seeing how it turns out.