Unsightly cracks, chips, and pops can build over time as a house settles. Learning how to repair and caulk baseboards is easy and painless even if the baseboards are painted already. This step-by-step guide will offer you the tools to DIY the project and end up with professional results!
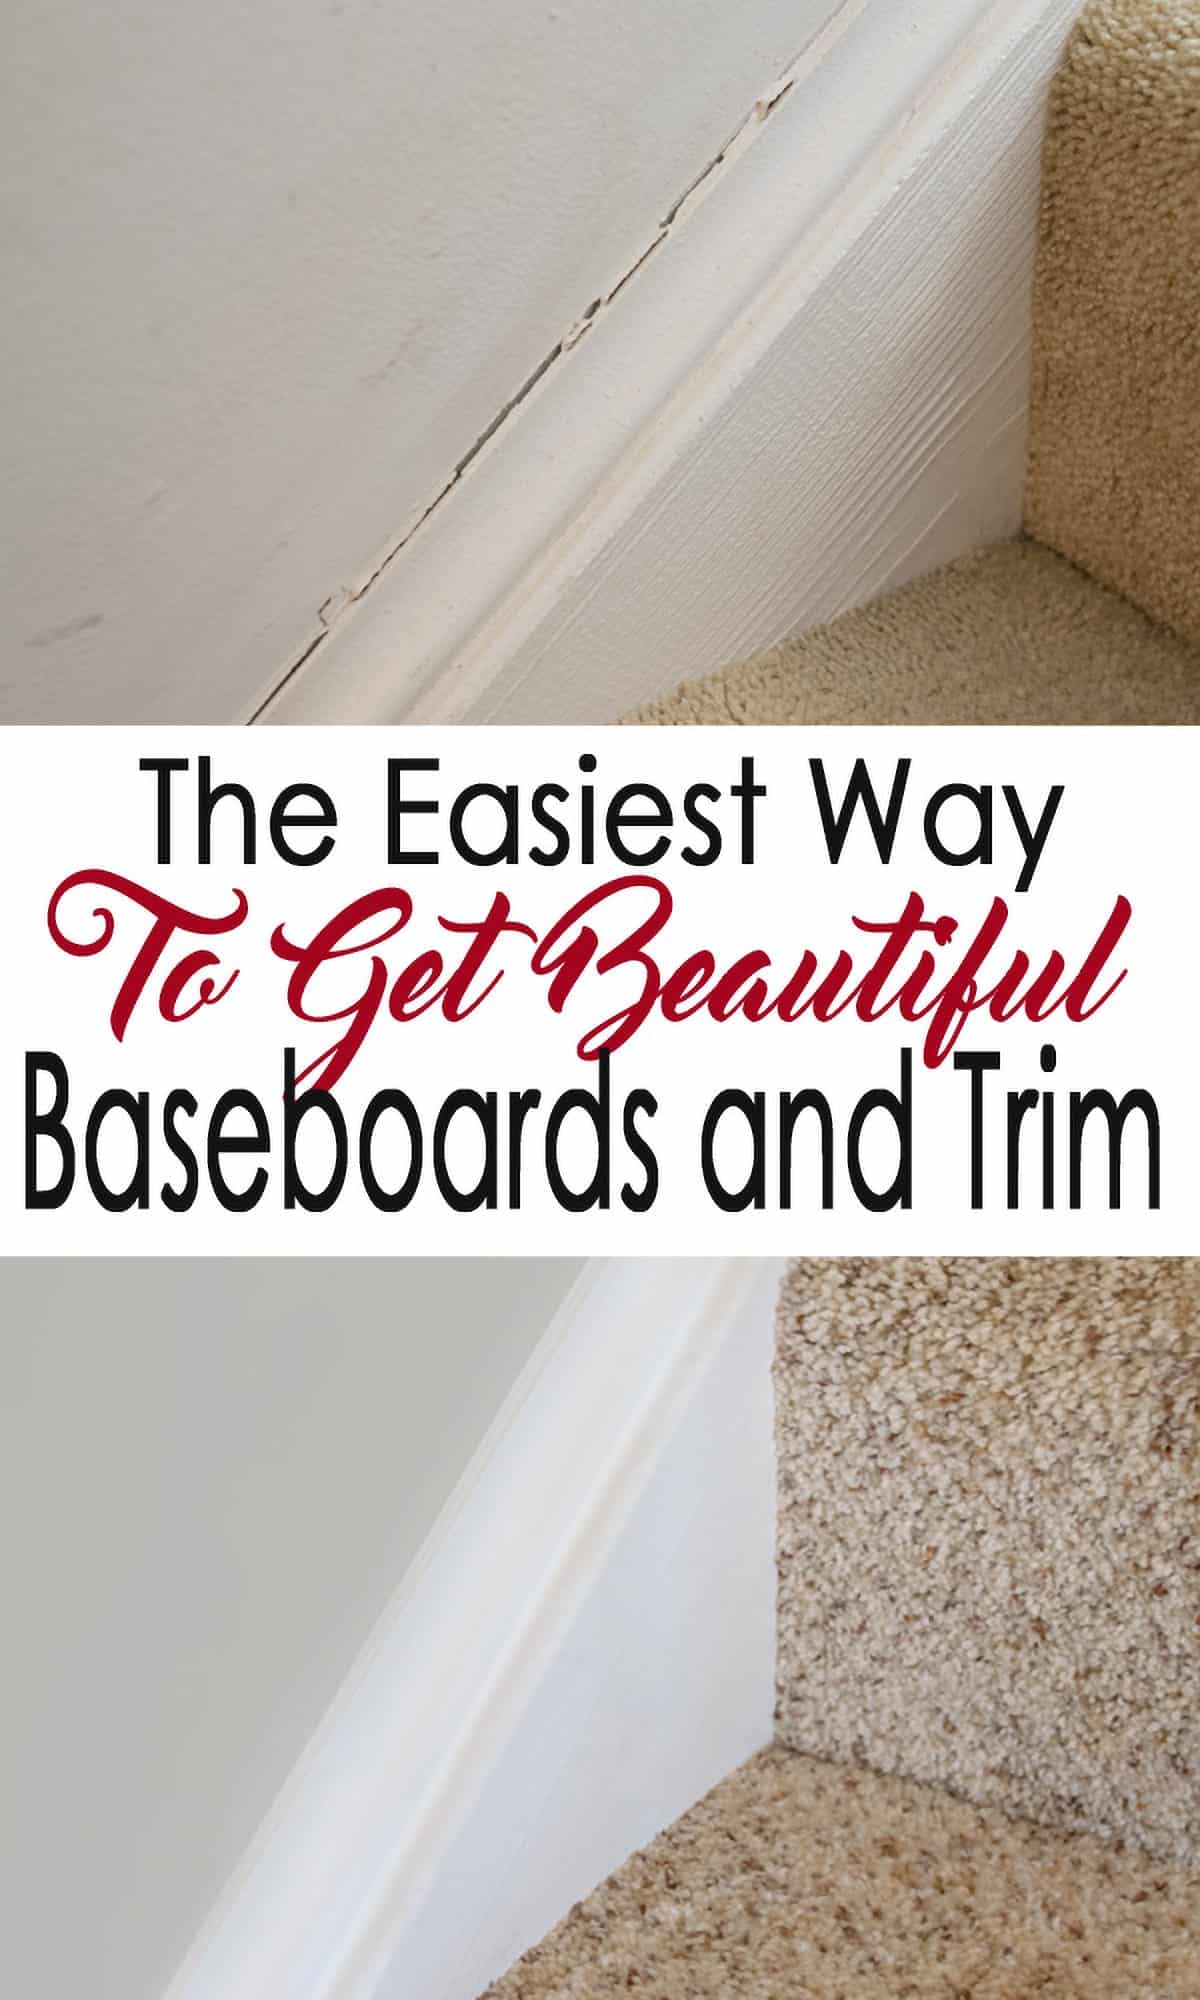
If there is one fact I know about older homes, it’s that the poor baseboards and trim take far more of a beating than they should. All those pretty wall pictures on Pinterest with the stunning crown molding and crisp baseboards? I have yet to move into a house like that.
But gaps and cracks in baseboards and trim aren’t only unsightly, they can create inefficiencies in heating and air as well as pathways for pests.
From repairing windowsills to building a custom closet or adding picture frame wainscoting, beautiful trim and baseboards really can make a wall stunning. It’s those little details that make a difference and this is an easy fix!
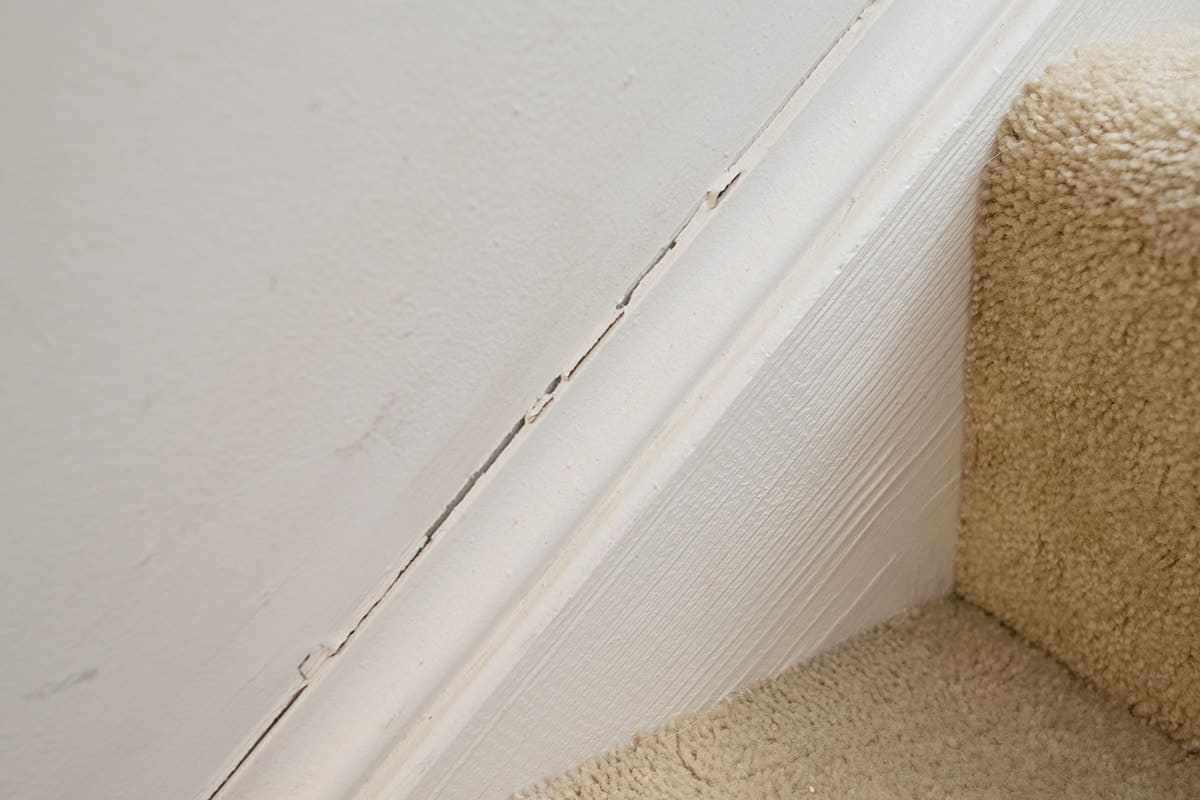
Both sets of stairs were badly cracked, but the baseboards themselves seemed to be in decent condition. Replacing them seemed like an extra step we didn’t need.
Supplies for Caulking Baseboards
- silicone caulk –This caulk is my favorite. *Make sure it is paintable caulk made for trim*
- a quality caulk gun tool
- a caulk scraper and a plastic putty knife
- scissors or utility knife
- sandpaper
- painting supplies (paint brush/roller/Tape)
Best Tip #1: Buy a Good Caulking Gun
It's only a few dollars for a better tool and the benefits are so, so worth it. This is one of the caulk guns that I use and love because:
- With cheap caulk guns, the caulk often drips long after you have released the trigger, wasting caulk and a bunch of paper towels every time you set it down. I only use dripless caulk guns! No wasted caulk.
- It comes with a handy pin attached that easily pierces the foil barrier inside the tube.
- The trigger spring allows for more even caulk distribution.
Pro Tip: If you use viscous materials (such as sanded caulk or adhesives), have a BIG job, have poor hand strength, arthritis, or would just like something that doesn't require you to squeeze as much, get a high thrust caulk gun. This is the one that I use as well for bigger jobs.
How To Repair Baseboard Trim Step-by-Step
You can print the instructions easily in the tutorial card at the bottom of this post, so I utilize the area for an in-depth look at our project along with more tips for the best results.
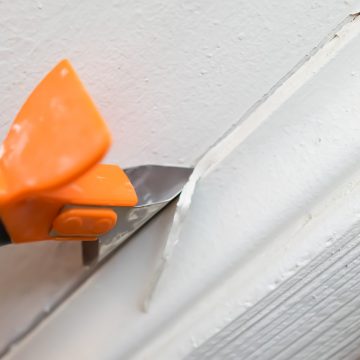
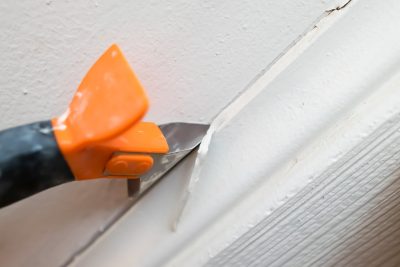
Begin by scraping off the old caulk.
If the caulk is still attached in places, cut it with a razor knife to loosen from the wall. I love this caulk scraper because it won’t gouge the wall or tile. Scrape or sand any excess texture off to create a smooth surface.

Do I need to tape off the wall?
I like to tape the front of the baseboard over the edge. It makes it easier to wipe off. If I want a really crisp line, I will tape the wall as well. This helps give me a guide for painting later.
Pro Tip: Make sure to burnish the edges. This means running your finger along the edges just before you caulk to make sure that caulk won’t push under it.
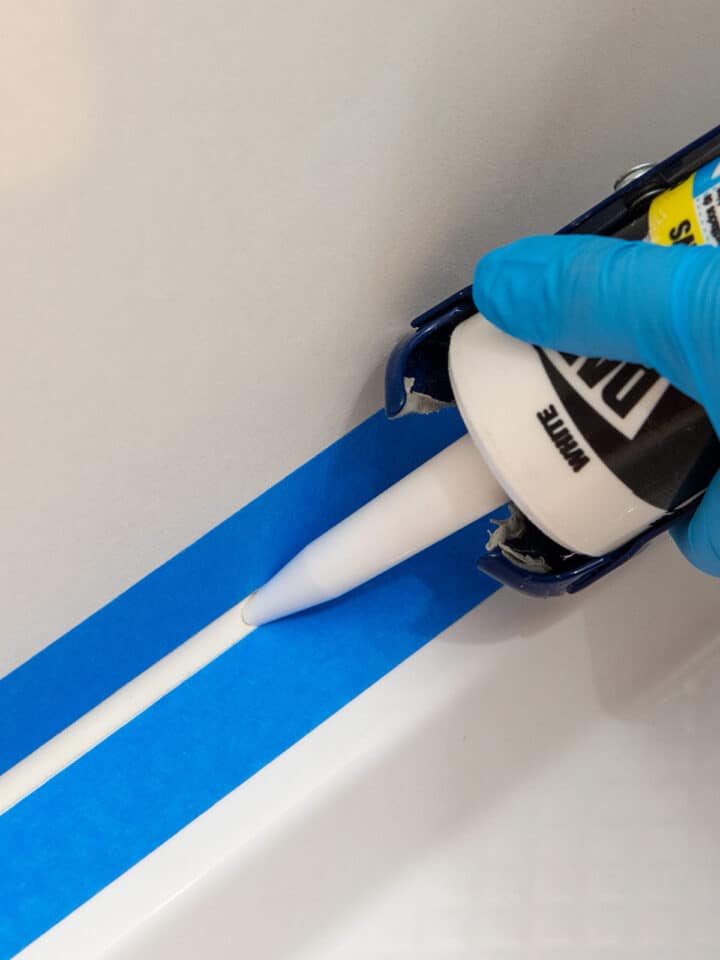
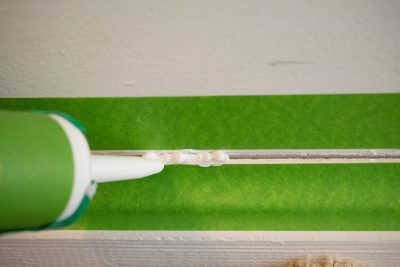
Step 3- Prepare the caulk.
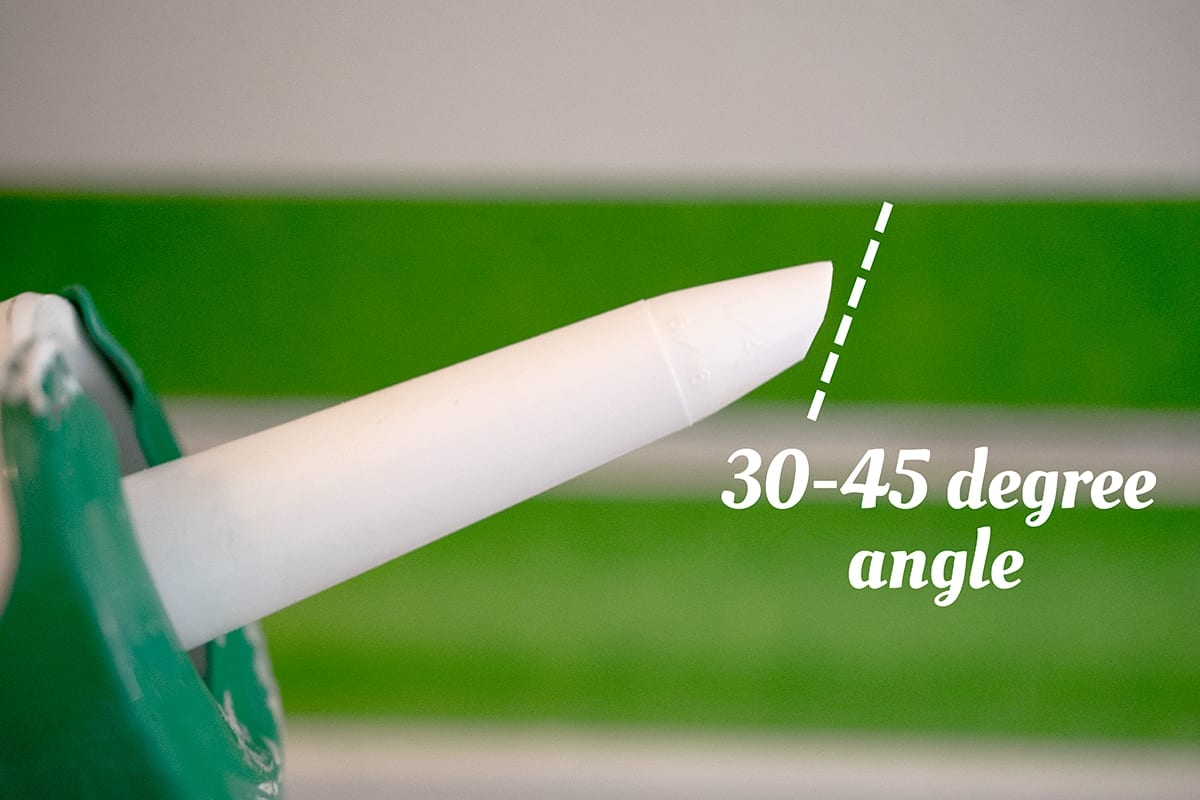
One trick to caulking is to cut the tip of the caulking gun at an angle. I use bone cutting scissors that have a notch out of them to cut the tube. Some guns come with a handy hole that cuts the tip.
Step 4 – Lay a Bead.
As you are caulking, hold the gun so that the tip is completely flush with the baseboard. I usually caulk an entire side end to end.

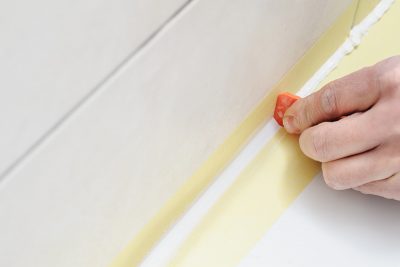
Tips to Smooth out the Caulk.
My personal favorite tool is my fingertip to smooth out the caulk. Put on some latex gloves and make sure they are tight fitting around your finger (no ridges or ripples). Use your index finger at an angle with light, but consistent pressure.
If you don’t have latex gloves, you can take a little Dawn dish detergent, dilute 1:1 with water so it doesn’t bubble, and dip your finger in the water mixture.
However, I generally recommend this wedge tool if you do not feel confident with just your hands.
I make about two passes – I wipe the most of excess off of several feet to make sure I covered well. The second pass is end to end with a little more pressure to make sure the final look is good.
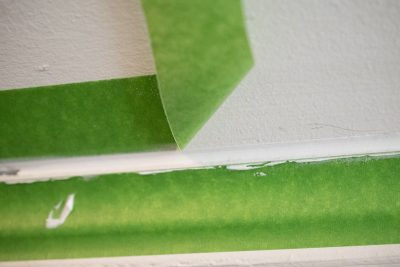
Pull the tape while still wet.
Before pulling the tape, make sure you can see the edges of the tape well. Otherwise, the tape will not have a nice edge.
Oh, I love a good reveal! Don’t you?

This is the mirroring staircase, and it was in exactly the same condition before we repaired it. See what I mean? Those clean lines really look professional!
Who knew baseboards could be this exciting?!
How To Caulk Baseboards After Painting
The steps are essentially the same. Here are some tips for caulking baseboards after painting:
- Make sure to remove any grease or dirt well.
- Remove any previous caulk and perhaps sand the surface where the new caulk will go for the best bond, but this is optional.
- Do be sure to use crack resistant caulk to keep it from pulling away from the paint to last longer.
Tips for Caulking Baseboards
While caulking your baseboards can be a pain, there are plenty of tricks and hacks that can make the process easier and even less painful on your back.
- Choose the Right Caulk: Use a high-quality acrylic latex caulk that matches the color of your baseboards. This ensures a seamless finish. Remember, make sure it is a paintable caulk made for trim.
- Cut the Nozzle at the Right Angle: Cut the nozzle of the caulk tube at a 30 to 45-degree angle. Start with a smaller hole and gradually make it larger until you achieve the desired bead size.
- Use Painter’s Tape: Apply painter’s tape along the edges of the baseboard and the wall to create clean, straight lines. This will, by far, give you the cleanest straightest edge.
- Apply Even Pressure: Squeeze the caulking gun trigger evenly while maintaining a steady hand to create a consistent bead along the baseboard.
- Remove Excess: Have a damp cloth or paper towel handy to wipe away any drops or unintended drips.
- Utilize a Scooter: Using a scooter or knee dolly can significantly reduce strain on your back and knees. It allows you to glide along the baseboard while applying caulk without the need to constantly kneel or bend over.
- Pull when wet: For caulk, it is best to remove the painter’s tape just after setting up. This will give you the smoothest finish as long as you don’t have a good amount of excess over the tape line.
More Simple Ways to Improve Your Home
- Repair and Replace Windowsills
- Upgrade Cabinets by Installing Trim
- Build a Custom Closet
- How to Paint Old Kitchen Cabinets
- Kitchen Backsplash with Peel and Stick Glass Tile
FAQs
I always paint my baseboards first because they are lighter in color. If you were using a darker color on the baseboards than on the wall, you may consider painting the wall first.
Cracks larger than ¼ of an inch may take more passes. The process is essentially the same as smaller gaps. However, make sure you fill deeper in the gap (not just flush with the surface). Allow the deeper caulk to dry completely before adding a surface bead to smooth out.
There are many good brands for trim caulk. Pay attention to whether the caulk you are using is intended for interior or exterior as well as whether it is paintable, as well as crack or shrink resistant caulk. Silicone caulk is not paintable.
My personal favorite tool is my fingertip to smooth out the caulk. It is soft enough to go over ridges and keep a consistent pressure. Put on some latex gloves and make sure they are tight fitting around your finger (no ridges or ripples). Use your index finger at an angle with light, but consistent pressure.
However, I generally recommend this wedge tool if you do not feel confident with just your hands.
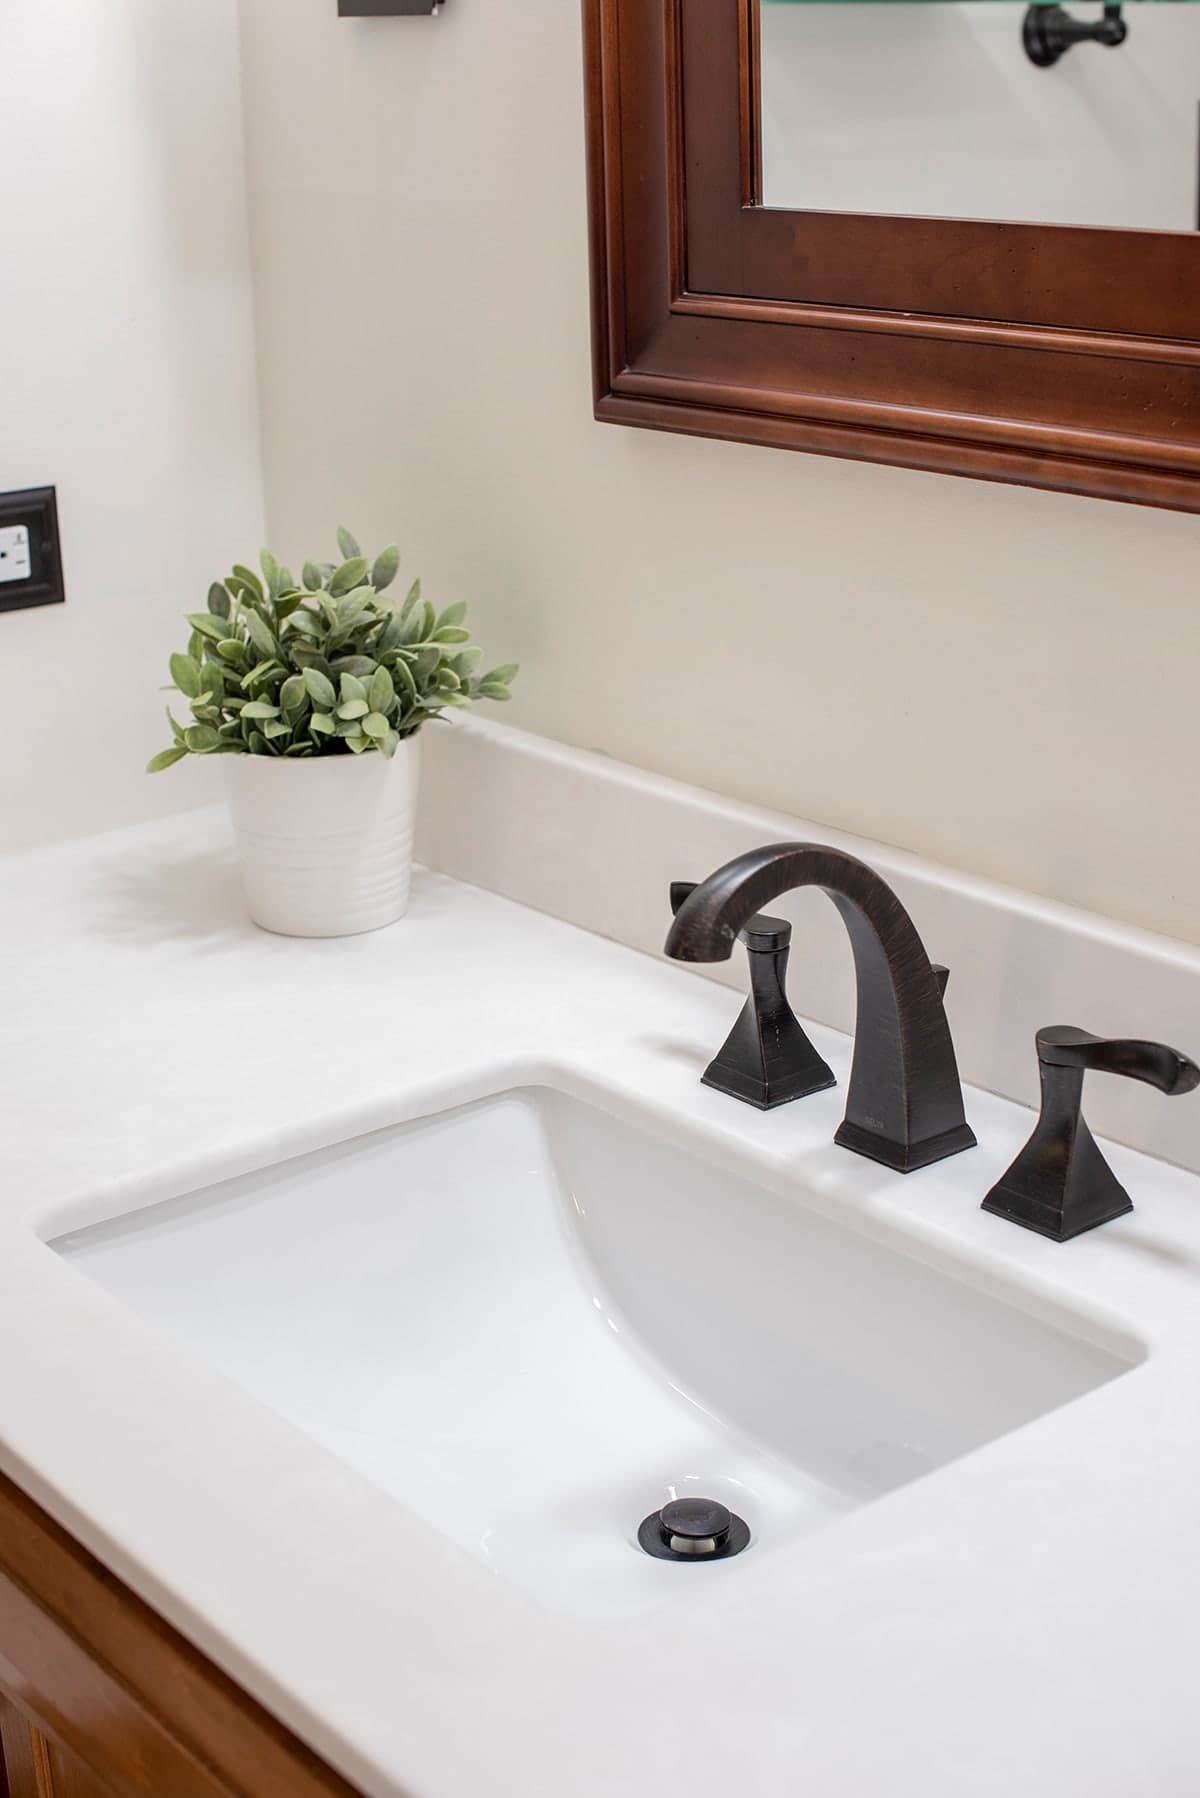
I generally caulk between drywall and tile before adding baseboards in a bathroom to make sure water doesn’t wick up the drywall. However, wood flooring often needs an expansion gap, thus the baseboards cover the gaps between the wall and floor. I don’t recommend caulking between the baseboards and floor directly.
To caulk baseboards without making a mess, use painter’s tape to create clean lines, apply even pressure on the trigger, and smooth the caulk with a damp finger or smoothing tool for a neat finish. Have a damp cloth or paper towel on hand to wipe away any excess caulk immediately.
I suggest investing in two things to make caulking baseboards easier. First, a scooter or knee dolly to take the strain off of your back and knees. Second, a high thrust caulk gun that requires less strength to push the caulk out.
While you don’t have to tape before caulking baseboards, I do suggest it in order to get a professional looking finish.
Yes, you can fill baseboard nail holes with caulk. Simply apply a small amount of caulk to each nail hole, smooth it with your finger or a putty knife, and allow it to dry before painting for a seamless and finished appearance.

Grab our free series "Weekend Home Projects that will Transform Your Life" Sign up below to receive updates including free printables, organization tips, home improvement projects, recipes and more! |
More DIY Home Projects
PS I love seeing your creations! Be sure to take a photo and tag #cravingcreative on Instagram! You can also stay in touch with me through following me on Instagram, Pinterest, and subscribing to the newsletter!
How To Caulk and Repair Baseboards
Supplies
- Silicone Caulk Make sure it is paintable caulk made for trim
- Sandpaper or Sanding Blocks
- Painter's Tape
- Well fitting Latex or Nitrile Gloves I get these from Harbor Freight
- Paper Towels
- Wedge Tool Optional
- Paint Supplies
Instructions
- Remove the old caulk. I love this a caulk scraper because it won't gouge the wall or tile. Scrape or sand any excess texture off to create a smooth surface.

- (Optional) Tape off the wall. I like to tape the front of the baseboard to the edge It makes it easier to wipe off. If I want a really crisp line, I will tape the wall as well. This helps give me a guide for painting later.
- Prepare the caulk and gun. Cut the tip of the caulking gun at an angle. Pierce the inside seal with a skewer or some caulk guns come with a piercer tool.
- Hold the gun so that the tip is completely flush with the baseboard. Caulk an entire side end to end. Make sure to fill all gaps.
- Smooth out the Caulk. With a bit of practice, smoothing caulk with your index finger is a breeze. Put on some latex gloves and make sure they are tight fitting around your finger (no ridges or ripples). Use your index finger at an angle with light, but consistent pressure. If you aren't confident using your hands, a wedge tool helps. Make two passes – Wipe most of excess off of several feet to make sure it is covered well. The second pass is end to end with a little more pressure to make sure the final look is smooth. Use paper towels to wipe the glove between passes.
- Pull the tape. Before pulling the tape, make sure you can see the edges of the tape well. Otherwise, the tape will not have a nice edge.

Zach says
thank you so much
Michelle says
thank you very much, almost had to pay $250 for someone to caulk my baseboards.
Lea says
i would like to replace my baseboards , but the previous owner had ceramic tile laid and they didn’t remove baseboards. So is there a way to update my baseboards without removing the current baseboards?
Rachel says
That is a pickle because baseboards should go over flooring. There are a few options for larger baseboards that are meant to cover existing baseboards such as this product from Home Depot. It’s a great solution for your situation, although if there are gaps, it may not be as sturdy as having one-piece baseboards.
Lea says
Thank you, I’m definitely going to look into those .
Alison says
This article is great! It’s helping me redo the cracks between the baseboards and mounding on my stairs. As I’m removing the cracked caulk, there’s cracks that are 3/8s to a half inch. Do you recommend just putting a lot of caulk or filling it with something else before caulking?
Rachel says
Theoretically, yes, filling 1/2 inch gap shouldn’t be an issue as long as you fill the void pretty well and not just gloss over the top. I have filled larger voids such as exterior window casing on a wood shingle house. There must be no movement in the two substrates (the wall and the baseboard). However, I am slightly concerned as to why there are such large gaps if these are standard baseboards. If the baseboard is moved out from the wall and wiggles or bends, it would probably be best to reattach it.
Maureen says
HI!, Looks great! How did you get the skirt board to look smooth? Sanding or a product? Thanks!
Rachel says
They look smoother because the lighting changed between the before and after photos. However, there are smoother skirt boards than the oak ones that I have in this house. If you have heavy grain, I would recommend sanding them with 120 sandpaper on a random orbital sander. It won’t be easy to get in the corners unless you have a mouse sander or square sander. I definitely wouldn’t hand sand – take too long. You can also fill the grain. I give several tips for filling wood grain in this post.
Lauren says
Love this idea and I will absolutely be giving this a try. Your post mentions paintable caulk and paint. My baseboards are already white so do I need to repaint or can I just add the caulk? Did you paint in this project since yours were already white or is that only for if you are painting baseboards another color?
Rachel says
I would repaint because paint is much easier to clean and wipe dirt away.We are currently working on a client home renovation, and I fixed all their baseboards and cracked door trim after the walls were prepped, but before painting both the baseboards and walls. However, if you only have some small areas, you wouldn’t have to paint the entire baseboards again, just touchups.
Barbara says
The carpet is very pretty. What color is that?
Rachel says
Unfortunately, I am not sure of the exact name since it has been a few years. I know that it was a light Stainmaster carpet that we purchased through Lowes.
Alicia Hursley says
Just had my hardwood floors refinished and the baseboards are next on my list to get updated! Thanks so much for sharing.
Sara Ann says
This looks amazing! You did a great job on those baseboards and kudos to you for DIY-ing it! My baseboards looked so bad from years of having pets and I just recently had a local wood refinishing company come and fix them up. I want to follow your advice next time they need some work and see if I can tackle it myself!
Barbara says
Hi there,
I have recently bought a (new to me) condo. I was in the kitchen the other day and realized that when they built these condos, one of the things they did was cover the cabinets with some type of sticky paper (done by manufacturer). I don’t know who the manufacturer is to contact them. I am afraid to peel it off as I don’t know what is underneath. Could be something icky. I am wondering, if I can paint over these or will I just have to replace them. If I have to replace them, I will have to wait quite a while, as there is no money left in the budget right now. Thank you.
Rachel says
This would be something I would have to see in order to give you the right advice. Many cabinets are manufactured with an outer covering over particle board. If you peel it off, there isn’t solid wood underneath. Those are not very easy to paint although it can be done. There are also Thermofoil cabinets which are basically wrapped in vinyl. Again, hard to paint usually as the paint doesn’t bond well. You could try priming them with a extreme bond primer – like those used for ceramic tile and such. If this is the inside of the cabinets, often times I recommend to clients to cover them in contact paper if the shelves have worn out. There are tons of good quality contact paper that can be solid or patterned to suit your needs. If you want further advice or to send me photos, email me at Rachel @ cravingsomecreativity.com
Faye says
I love the advice you give. I have a 35 year old house that I had built. All of my baseboards are a dark walnut color and I I am really tired of the look. Want to do white because I think it would look more refreshed and clean. Can I just paint over them or do I have to sand all of them first.
Rachel says
Oh, that sounds beautiful! So, you have a few options. You can hand sand just to rough them up a bit which helps the paint bond better, prime them, and paint them. I have a post about painting a staircase that I think has some applicable tips her this. Changing from dark walnut to bright white is going to be the bigger challenge. For baseboards, I don’t think you need a top of the line paint like Advance. I would recommend a good quality stain sealer like Kilz premium (my personal fave and hasn’t failed me yet) and a trim paint with good hiding coverage. Sanding is the most durable option in my opinion, and works well if your baseboards are glossy (coated in polyurethane). If they aren’t glossy, you can probably skip sanding. Also, if you want to skip the sanding process with a glossy surface, it is possible to paint them if you prime first with a high-binding primer like Kilz Adhesion or similar. Good luck with your project!
Santanna says
Really enjoy your article! Recently moved into a fixer upper and have my work cut out for me. Your directions are easy to follow and I am currently buying all the supplies you mentioned to get started! I’m excited! Do you have any recommendations for trim and base boards that have been painted black? Thank you!
Rachel says
Thank you! I promise the work is worth it though. I hope you find some inspiration there. If you intend to change the color of the baseboards, I would definitely use a primer/stainblocker like KILZ (I generally go with KILZ Premium for most of my projects). It will make for a lot less coats. Black baseboards can be a cool look though depending on the style of the house. If you want to keep them black, I might consider using a clear or black caulk if you have dark walls just so you aren’t painting black over white which, again, might require a few coats.
Nea says
Awesome tips! We have corners where our dog chewed it up. Any advice on how to remedy this? Thank you!
Rachel says
I had the exact same problem with my window sills! We adopted a sweet puppy with a serious anxiety issue. While it depends on the severity of the damage, I shared some tips on how I fixed the dog chewing marks and replaced the sill here.replaced the sill here.replaced the sill here. I hope that gives you some good tips!
Suzanne says
You did an amazing job, looks fantastic! We’re working through a total redo of our “new” 1950 ranch. I’ve tried to caulk, and I have ALOT more to do. My problem is getting the tape straight! Try as I might, it’s always off. Since yours looks perfect, do you have any pointers for me? Any ideas would be greatly appreciated! Thank you and again, well done!!!!
Rachel says
Good question and I completely get what you are saying. With baseboards or something like that, it’s not as big a deal to be super straight since it will be painted over anyhow. For me, I find that it works better if I pull about 18 inches or 2 feet of tape off the roll (but don’t cut it). I hope this makes sense. With one hand, I hold down the free end where it should be. Then I line up the other end attached to the roll, pull it tight, and get it about where I want it before pressing that end down. Then press and smooth out the 18 inches between them. Pull out another 18 inches and repeat. I usually do a whole wall with one piece of tape if I can. Working in larger sections I have always found to work better. Here is a video very similar to the technique I use. I also personally find it easier to make a straighter line by taping the bottom baseboards first, then following the line with the top tape. Same with painting. I usually paint my baseboards first and then tape off the baseboards for the wall. Hope that helps! I have a video on caulking bathtub surrounds coming next week with video, so there might be more tips and tricks there to check out.
Suzanne says
Rachel! Thank you for your fast response. It was so helpful and the video is great, what an eye opener on my incorrect technique 🙃 I really appreciate your help. Looking forward to the bathtub info. Thanks again!
Jennifer says
This is REALLY helpful. Thank you!!