A beautiful architectural statement, wainscoting is an inexpensive way to make a room feel upscale and custom designed. This tutorial shows you how to install wainscoting with basic materials.
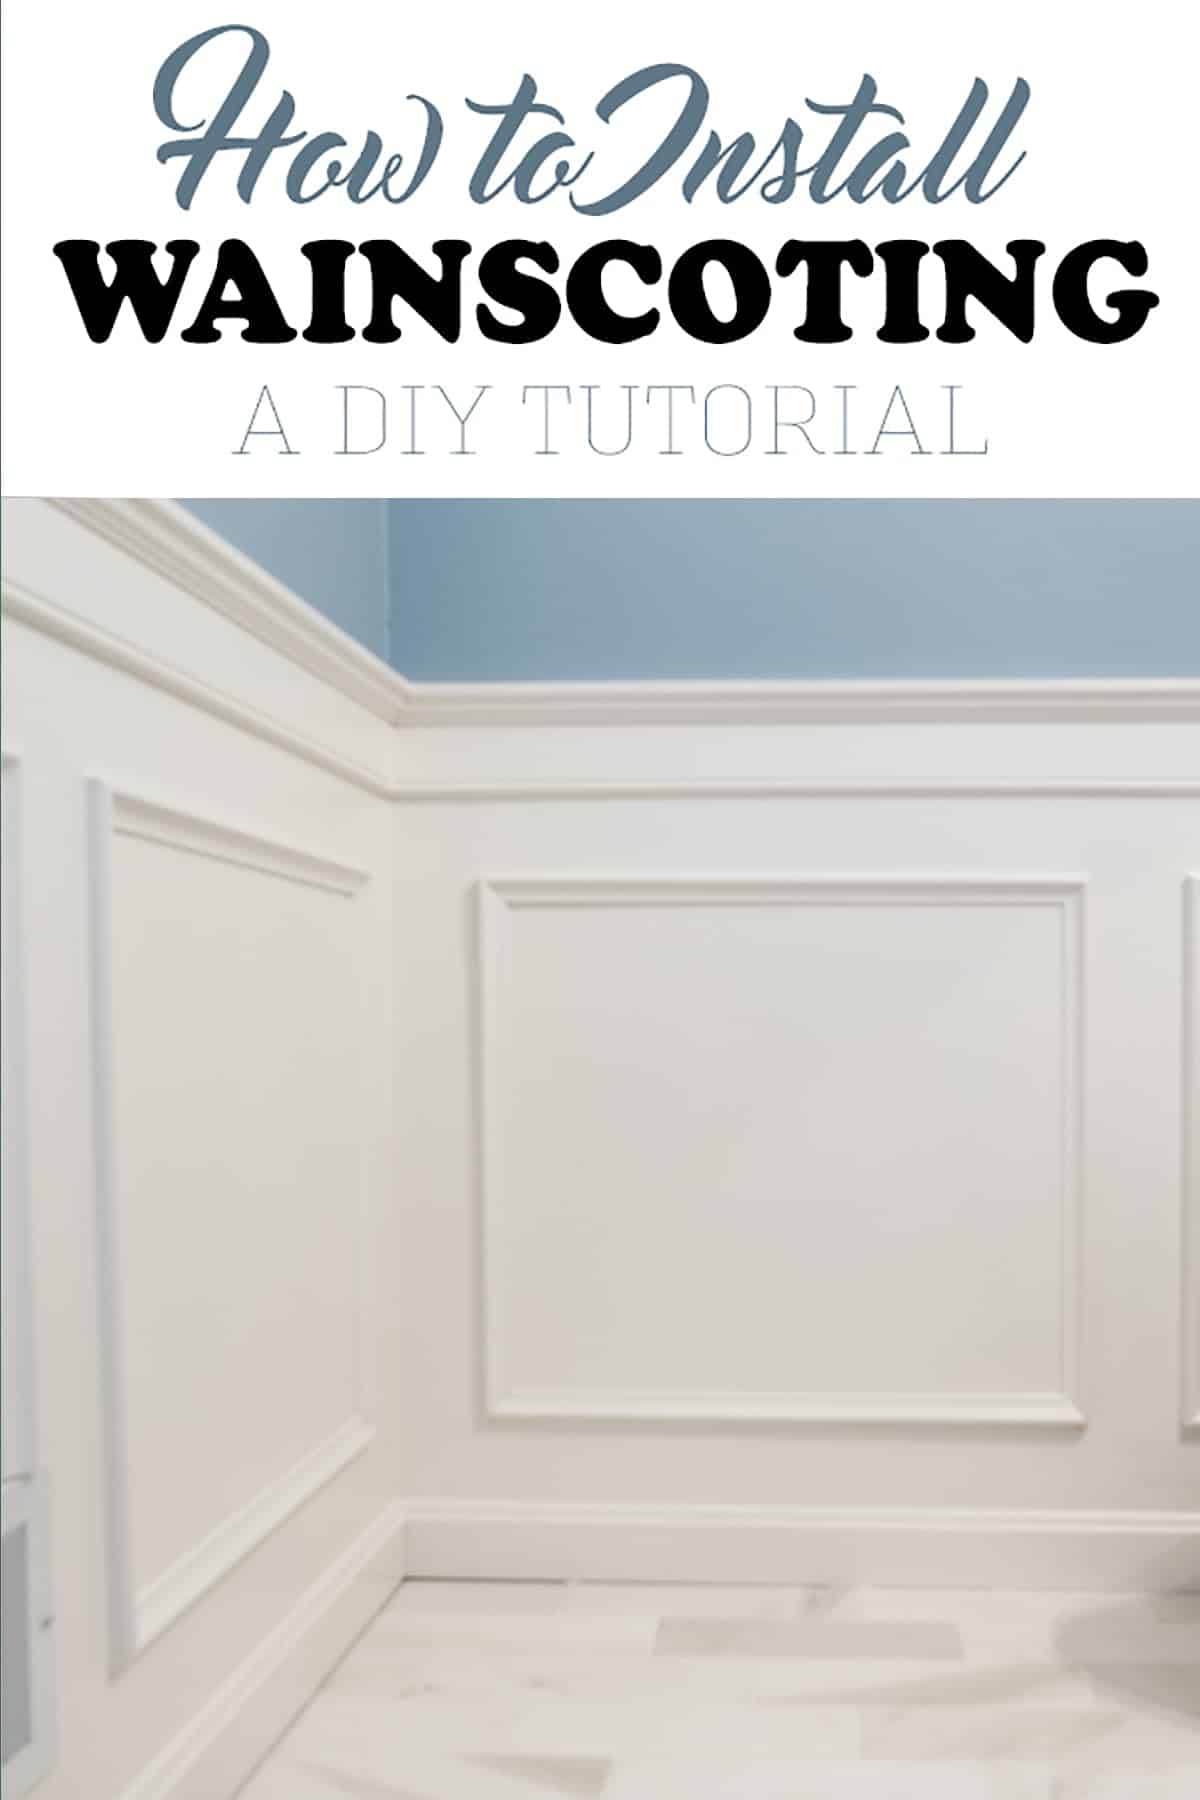
A few weeks ago, I shared that for the longest time, I had this terrible yellow bathroom and I hated it. Installing wainscoting added a classic, upscale style and broke up the space in a way that makes it feel elegant.
Recommended Supplies
- Trim
- Chair Rail Moulding – you can see our design below, but there are multiple variations.
- Compound Miter Saw
- Tape Measure
- Painter’s Tape (recommended)
- Level
- Wood Filler
- Brad Nailer or Finishing Nails and Hammer
- Wood Glue
- Paintable Caulk
- Paint
I personally do not like pre-made panels you can buy at big box stores, because you can’t adjust the sizing. This leaves you ending in awkward places, especially on small walls. So we created our own!
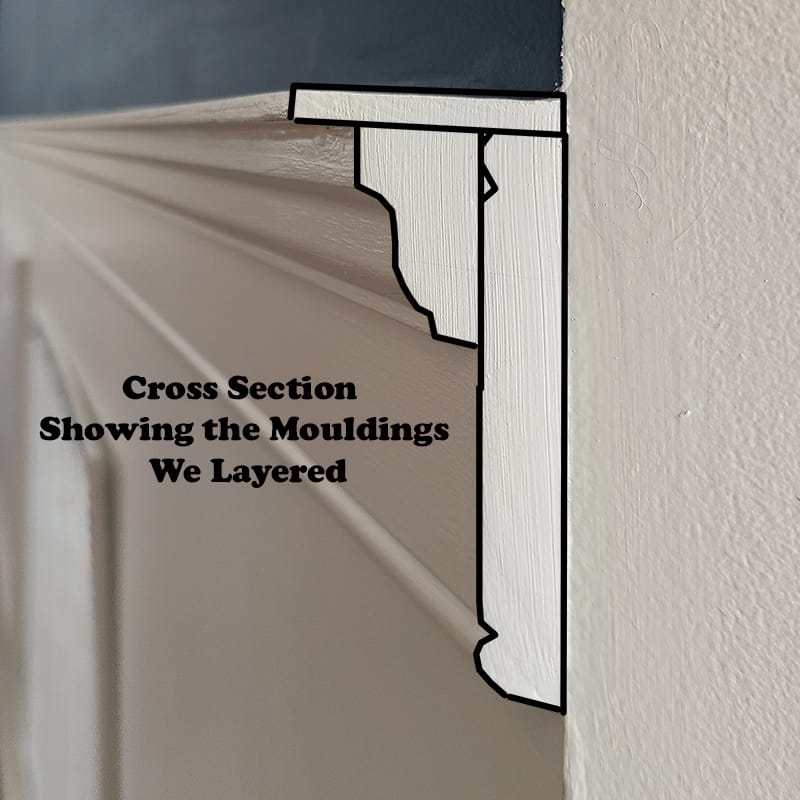
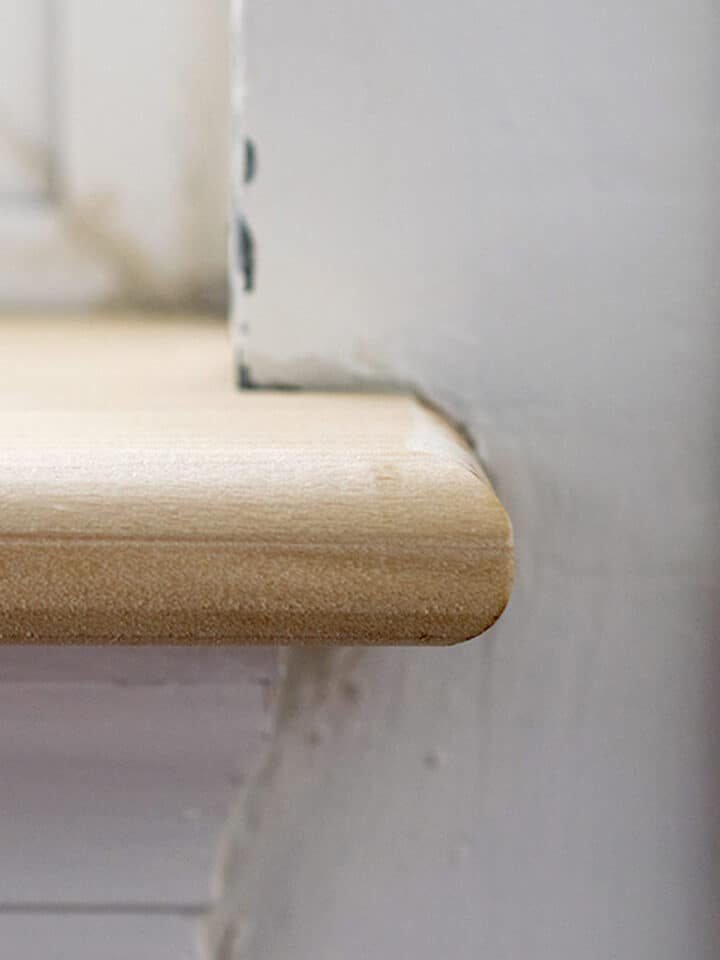
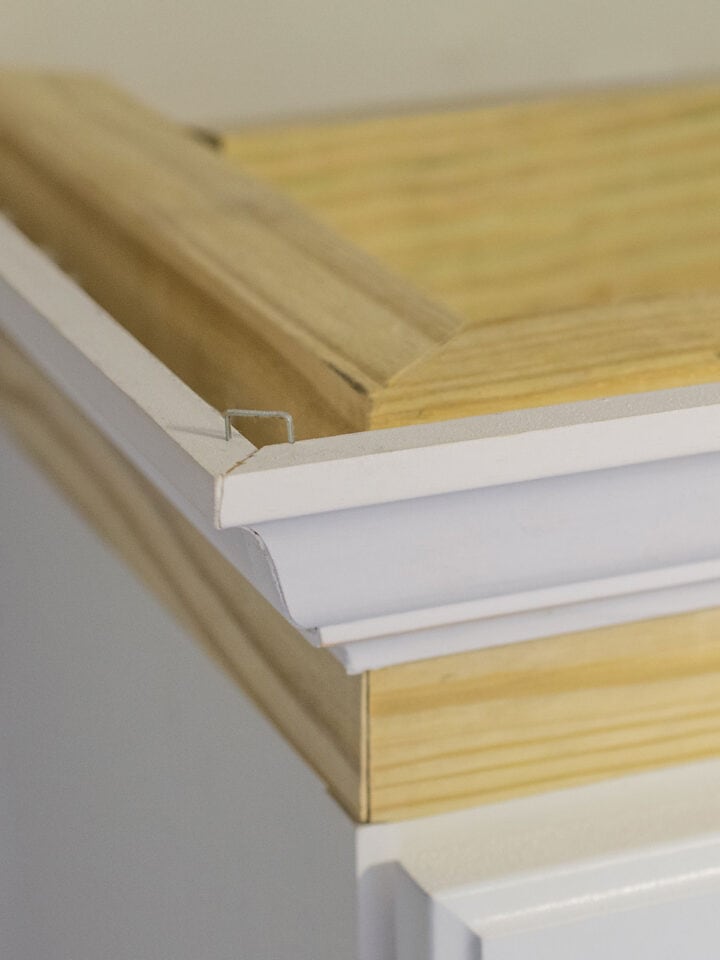
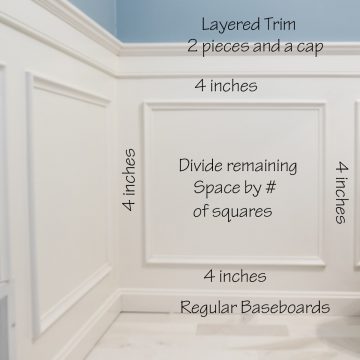
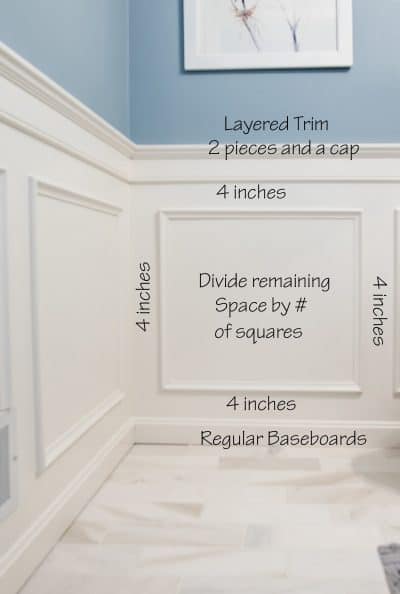
Our design is a combination of a few trims, particularly for the chair molding area. We glued and nailed them together. We used this Chair Rail Backer Moulding, along with a Small Crown Moulding, and a flat cap. Below is a 45-degree angled cross section of our dining room wainscoting, which is similar.
Deciding Your Wainscoting Design
For this or any type of wainscoting design, draw your design before you purchase materials. This will help you visually see how everything will look.
You can adjust the height as needed and the sizing. This will also help you see anything that may interrupt your design such as wall vents, a sink, a doorway. For our bathroom, we had to work around the sink and a wall vent, but we did not change the size of the squares and it looks fine. Check the corners of your squares with a T-square or vertical level for perfect 90 degrees.
QUICK TIP:
Use painters tape while you are still deciding on the design. That way you only have to mark once. I still recommend drawing out the squares once you have decided the sizing.
And of course, measure twice before purchasing your materials!
How To Install Wainscoting
Of course, first make sure your walls are in good repair including repairing any cracks, priming, and fix baseboards so they are in good condition.
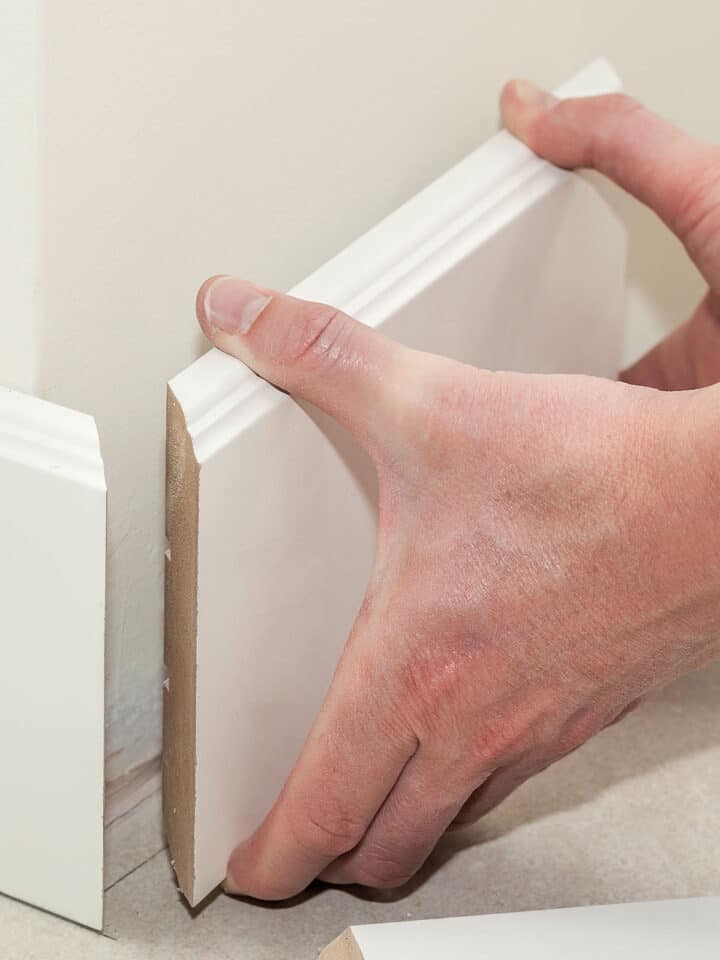
Step 1: Cut pieces to size using a compound miter saw.
The corners are mitered (i.e. cut at 45-degrees to line up). I personally prefer to cut one piece at a time and tack them as we go around.
If you are layering trim pieces like we did for the chair rail, I recommend putting them together and then cutting each piece.
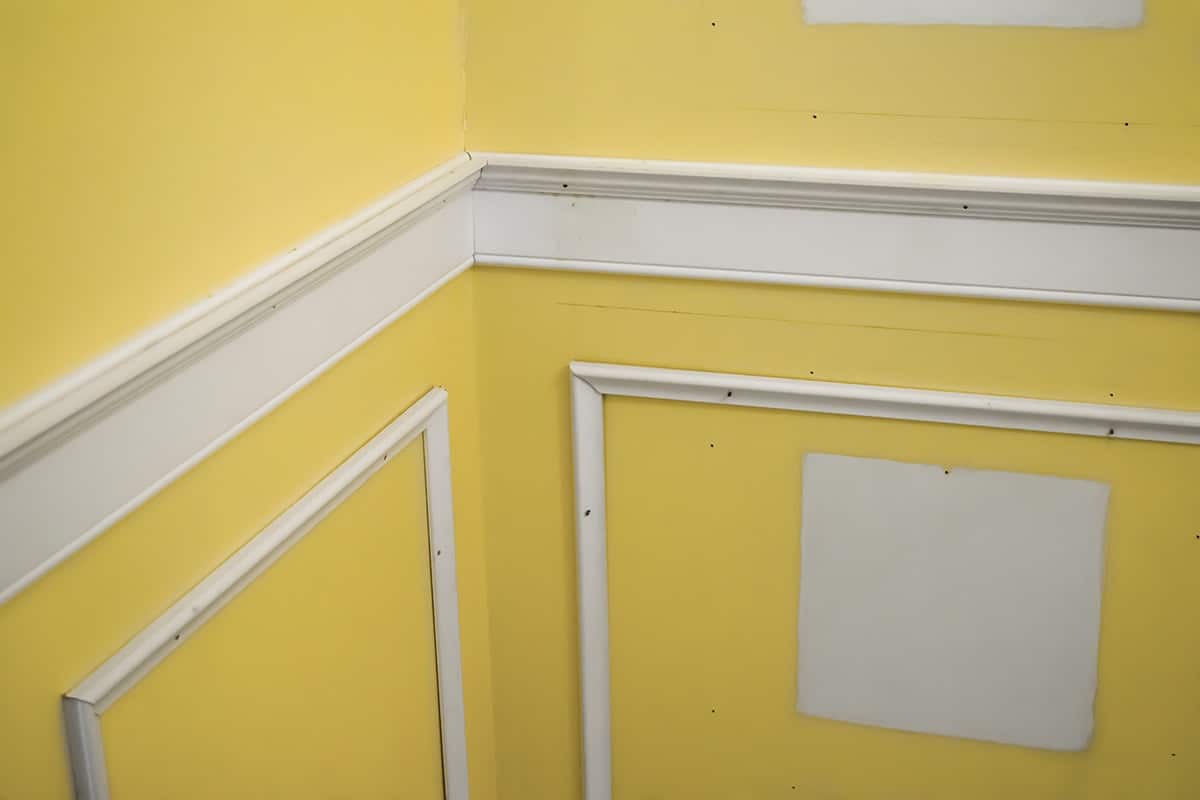
Step 2: Attach to the Wall.
These easiest way to attach is to run a small bead of caulk along the backside of the trim and then nail into place. Use a level to make sure tops and bottoms are straight.
Although nails and a hammer will work for this project, I highly recommend a brad nailer. It’s fast and requires a lot less hole filling.
Fill any nail holes as necessary but gluing with caulk will cut down on how many nails you need.
QUICK TIP:
Label your cut pieces as you go so you aren’t searching for where they belong when tacking them to the wall.
Nail at an angle when tacking the boards to the wall where there isn’t a stud behind the drywall. This gives a better and tighter hold.
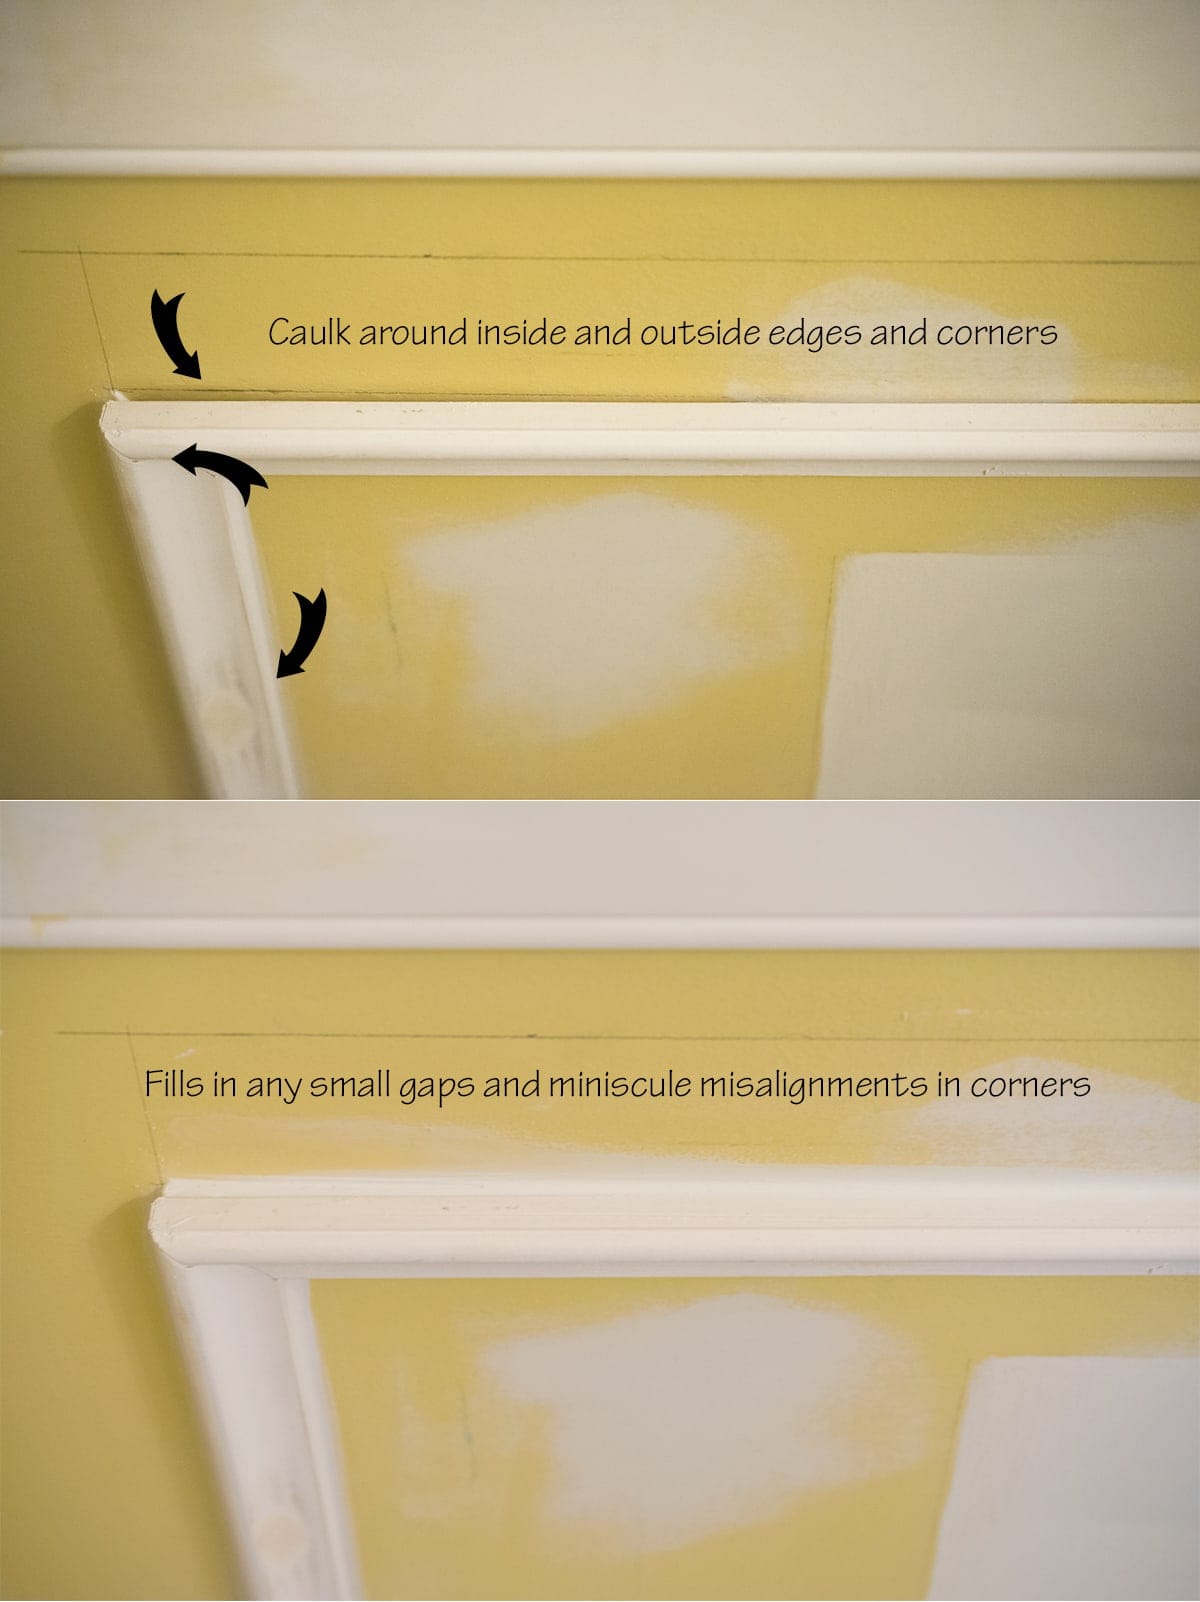
Step 3: Caulking around the Frames
Here’s the thing… walls are NOT perfectly flat, even brand-new ones. Taping, mudding, and patching create imperceptible bumps in walls. Therefore, you may notice that not all of the wood pieces lay perfectly flat against the wall. That’s ok!
To get professional looking results, use a thin bead of caulk around every edge that touches the wall. Make sure to use paintable, interior caulk. For more tips on the best way to caulk, I repaired and caulked the baseboards last year. Caulking can be a bit of an art.
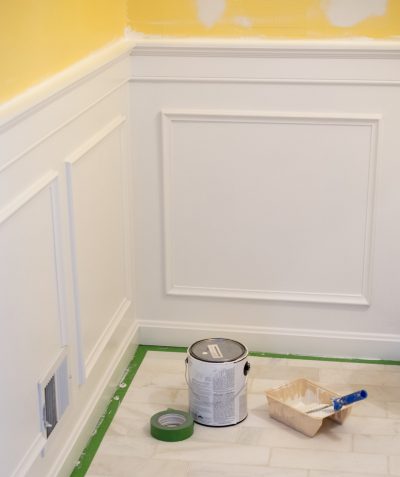
Step 4: Paint
I used trim paint that matches our baseboards throughout the house. Since I used pre-primed wood, I did not have to prime.

Final Thoughts
Installing wainscoting can be a tedious process, but it gives a look that you really can’t reproduce any other way. In total, we spent just under $200 on all of the wainscoting and supplies, which includes the crown molding we added to the top as well.

It has been lovely not to have those horrid yellow walls smacking me in the face and the lighting color is so much better than it was before.
More Simple Home Improvement Projects
- Building a Custom Closet
- Tips for Easy Install of Peel and Stick Glass Tile
- Modern Drop Ceilings ideas
- How to Paint a Garage Floor to Last
- How to Start a Room Makeover
Frequently Asked Questions
Both paneling and wainscoting or board and batten are styles of architectural additions to walls. Paneling may cover a wall floor to ceiling, while wainscoting normally covers ¼-2/3 of a wall.
It depends on the style and mouldings that you choose. Traditional wainscoting costs about $10-17 per panel for materials. Hardwood paneling is more expensive, depending on the species.
Wainscoting by itself doesn’t make a room look larger or smaller. The paint colors that you pair with wainscoting make a bigger impact. Dark or bold colors will feel smaller, more intimate while light, airy colors will feel larger and casual.
Wainscoting’s purpose is mostly decorative, rather than functional. Particularly when paired with deep colors like navy and black, wainscoting helps create a bold statement without feeling overwhelmed by the dark, moody color.

Grab our free series "Weekend Home Projects that will Transform Your Life" Sign up below to receive updates including free printables, organization tips, home improvement projects, recipes and more! |
More Easy Trim Projects
PS I love seeing your creations! Be sure to take a photo and tag #cravingcreative on Instagram! You can also stay in touch with me through following me on Instagram, Pinterest, and subscribing to the newsletter!
How To Install Wainscoting
Tools
- Straight Edge or Level
Supplies
- Trim and Moulding
- Nails
- Wood Filler
- Caulk
- Paint's Tape
- Paint
Instructions
- Cut pieces to size using a compound miter saw. Label your cut pieces as you go so you aren't searching for where they belong when tacking them to the wall.

- Attach the trim to the wall using a small bead of caulk along the backside of the trim and then nail into place. Although nails and a hammer will work for this project, I highly recommend a brad nailer. It's fast and requires a lot less hole filling.

- To get professional looking results, use a thin bead of caulk around every edge that touches the wall. Make sure to use paintable, interior caulk.

- After drying, paint the wainscoting in desired trim paint of choice. If using pre-primed wood, there is no need to prime before painting.


Notes
- Use painters tape while you are still deciding on the design. That way you only have to mark once. I still recommend drawing out the squares once you have decided the sizing.
- The corners are mitered (i.e. cut at 45 degrees to line up). I personally prefer to cut one piece at a time and tack them as we go around.
- Although finishing nails and a hammer will work for this project, I highly recommend a brad nailer. It’s fast and requires a lot less hole filling.
Sambuka says
Great work, what is the length and height of your boxes? Thanks
Rachel says
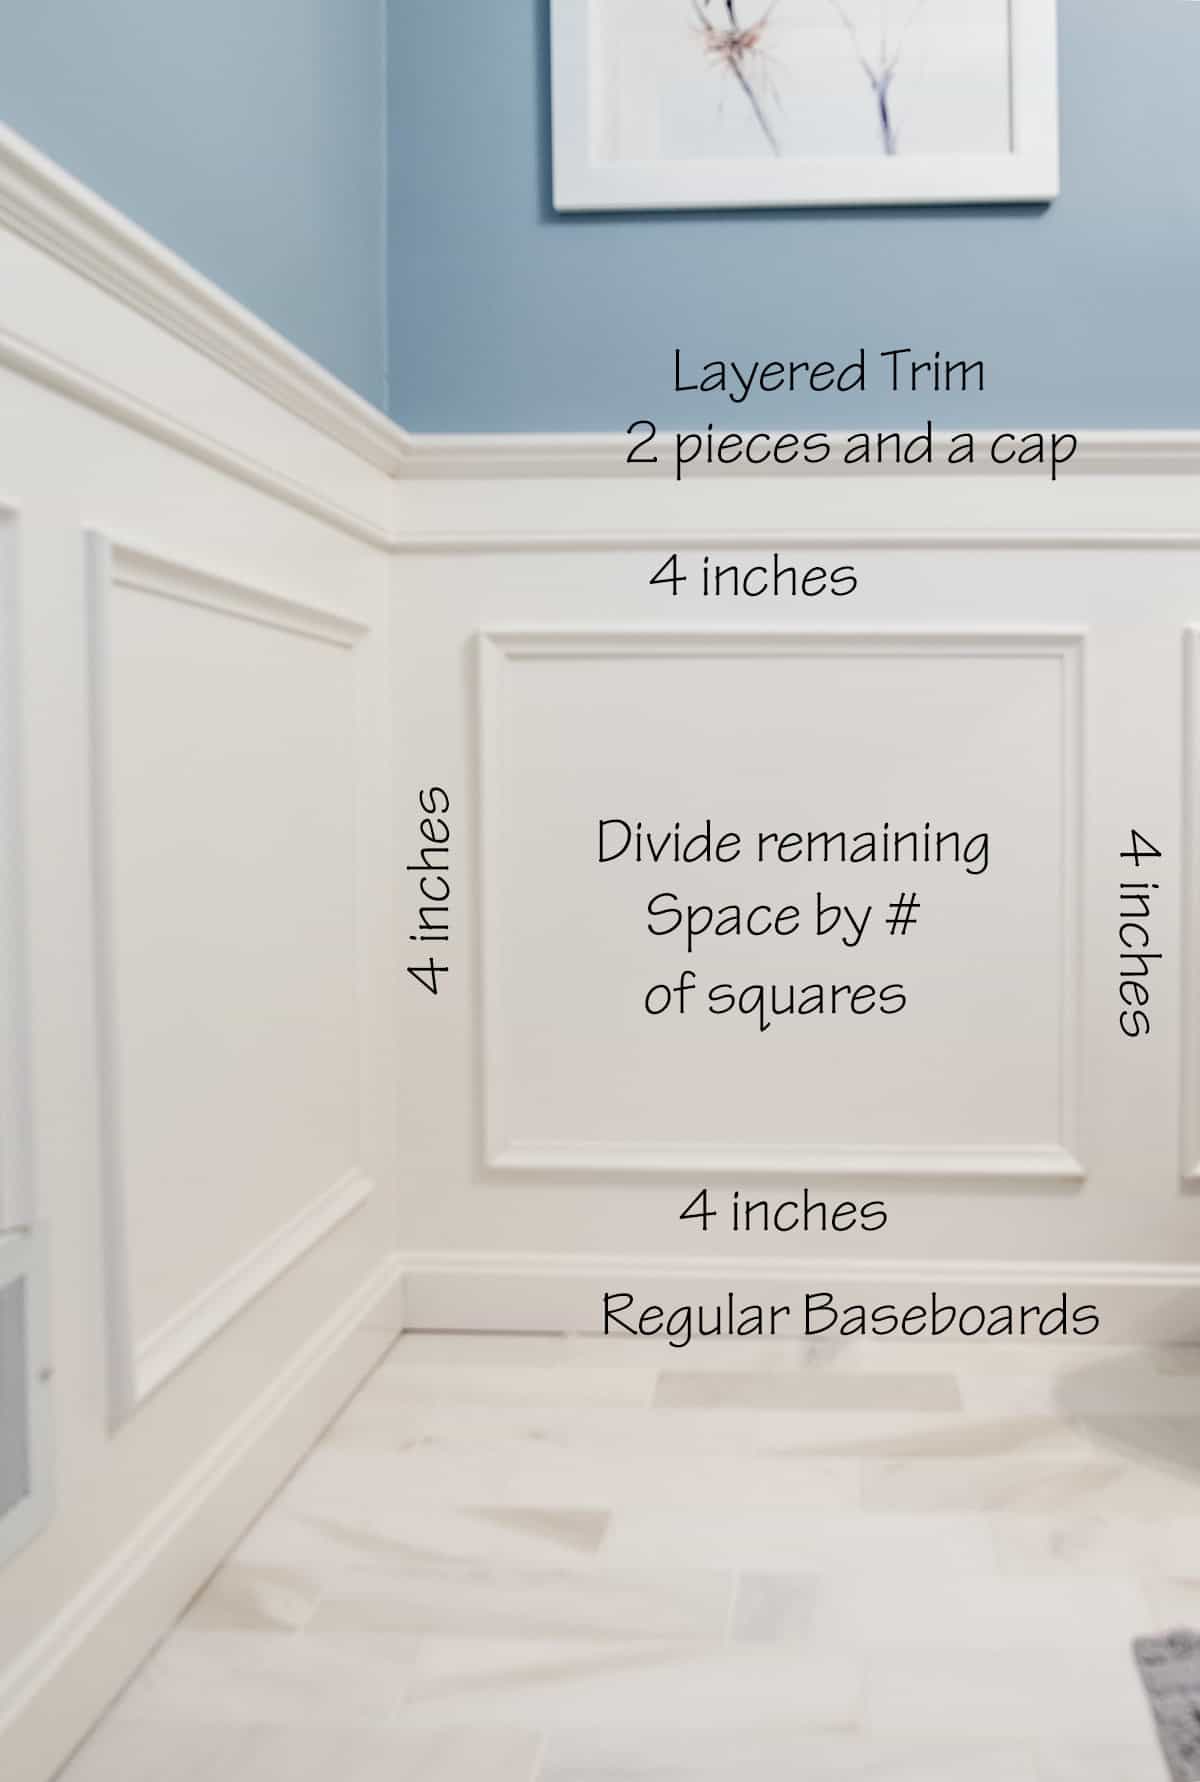
My railing is slightly higher than a traditional chair railing. The boxes are 23.5 inches high outside to outside and they vary width wise depending on which wall they are on because the walls aren’t the same width.
Tara says
Would you be able to link the material you used for the flag cap?
Rachel says
Although I know the big box stores like Lowe’s and Home Depot carry 1/4 inch thick strips in a variety of sizes, the exact one will depend on the depth of your chair rail. I can’t completely remember, but I think we used poplar 1/4″x2″ boards in whatever length. We may have cut them off larger boards with the table saw though.
Brandon says
Did you consider using a coping saw for the trim as it provides a better fit around corners and if so why did you decide not to do it? Excluding the standard answer of difficulty as I know from when I learned to do it it takes some practice to get the cuts right but once you get it figured out its easy, doesn’t add too much more time, and makes the caulking process a breeze. It also cuts down on the amount of caulking you need to use which saves money. Plus in the long term it prevents shrinkage gaps that are inevitable when caulking anything with a gap as time progresses caulk shrinks. I am a DIY’er but I admit as a teenager I did do some construction. Originally I did framing but then ended up doing trim work and painting. Best experience ever as I can install with coped corners, caulk, and paint trim without taping and without getting trim paint or caulk on a finished wall or ceiling. That bit alone erases any extra time spent using a coping saw.
Rachel says
Coping works best for inside corners and while I could have done that with the chair rail area, I like the look of mitered corners better with the wainscoting itself. Since the trim is all on one plane/wall, there’s no easy way to hide the blunt edge. Plus, I am teaching and try to keep things as easy as possible for readers and coping is its own skill to learn. Of course, there is no one best way, as it always depends on your particular situation and skill level, but the more knowledge the better!
Karen Jackson says
I love your picture frame wainscoating – how do you handle 4 or 5 inch corners around doors in a hallway – just do top and bottom? Thanks! Love your ideas!
Rachel says
I would probably leave it without anything if there is only 4 inches of space from the corner edge. If there is trim around the door, it should look fine.
Izzie says
WOW I love this design & so well explained
Sarah says
Hi I love this. Can you please tell me what brand of paint you used and what the colors are? I love the combo but have bad luck choosing my own. Its so helpful to know the paint color so I can just go buy it. Is it in glossy, eggshell or matt? I love the Wainscoting. I am redoing my bathroom and love this look.
Thank you,
Sarah
Rachel says
The color is Benjamin Moore Winter Lake, although I will say that it looks a tad bluer in my bathroom than some photos I have seen. I believe it is because of the small room and daylight lighting. It’s eggshell sheen.
Sheryl says
Wow absolutely beautiful! I love this and want to do this in my powder room as well. Can you please link the chair rail/trim pieces you used at the top? I’m having a difficult time finding something comparable. Also, are this wood, or some other material? Thank you! Sheryl
Rachel says
Our design is a combination of a few trims, particularly for the chair molding area. We glued and nailed them together. We used this Chair Rail Backer Moulding, along with a Small Crown Moulding, and a flat cap. Below is a 45-degree angled cross section of our dining room wainscoting, which is similar.
Liz Smith says
Hello and thank you for this amazing tutorial! How high are the ceilings in your bathroom? And what height did you hang the chair rail? Thank you!
Rachel says
There’s no real rules about where the chair rail should be hung. I wanted it about 5 inches above the sink so I went with that. The ceilings in our house are 9 feet tall.