Building a kitchen island is easier than you think! Some basic woodworking skills are required, but this easy-to-follow DIY Kitchen Island tutorial will teach you how to build a kitchen island to be proud of! Tools, tips, and before and after photos included.
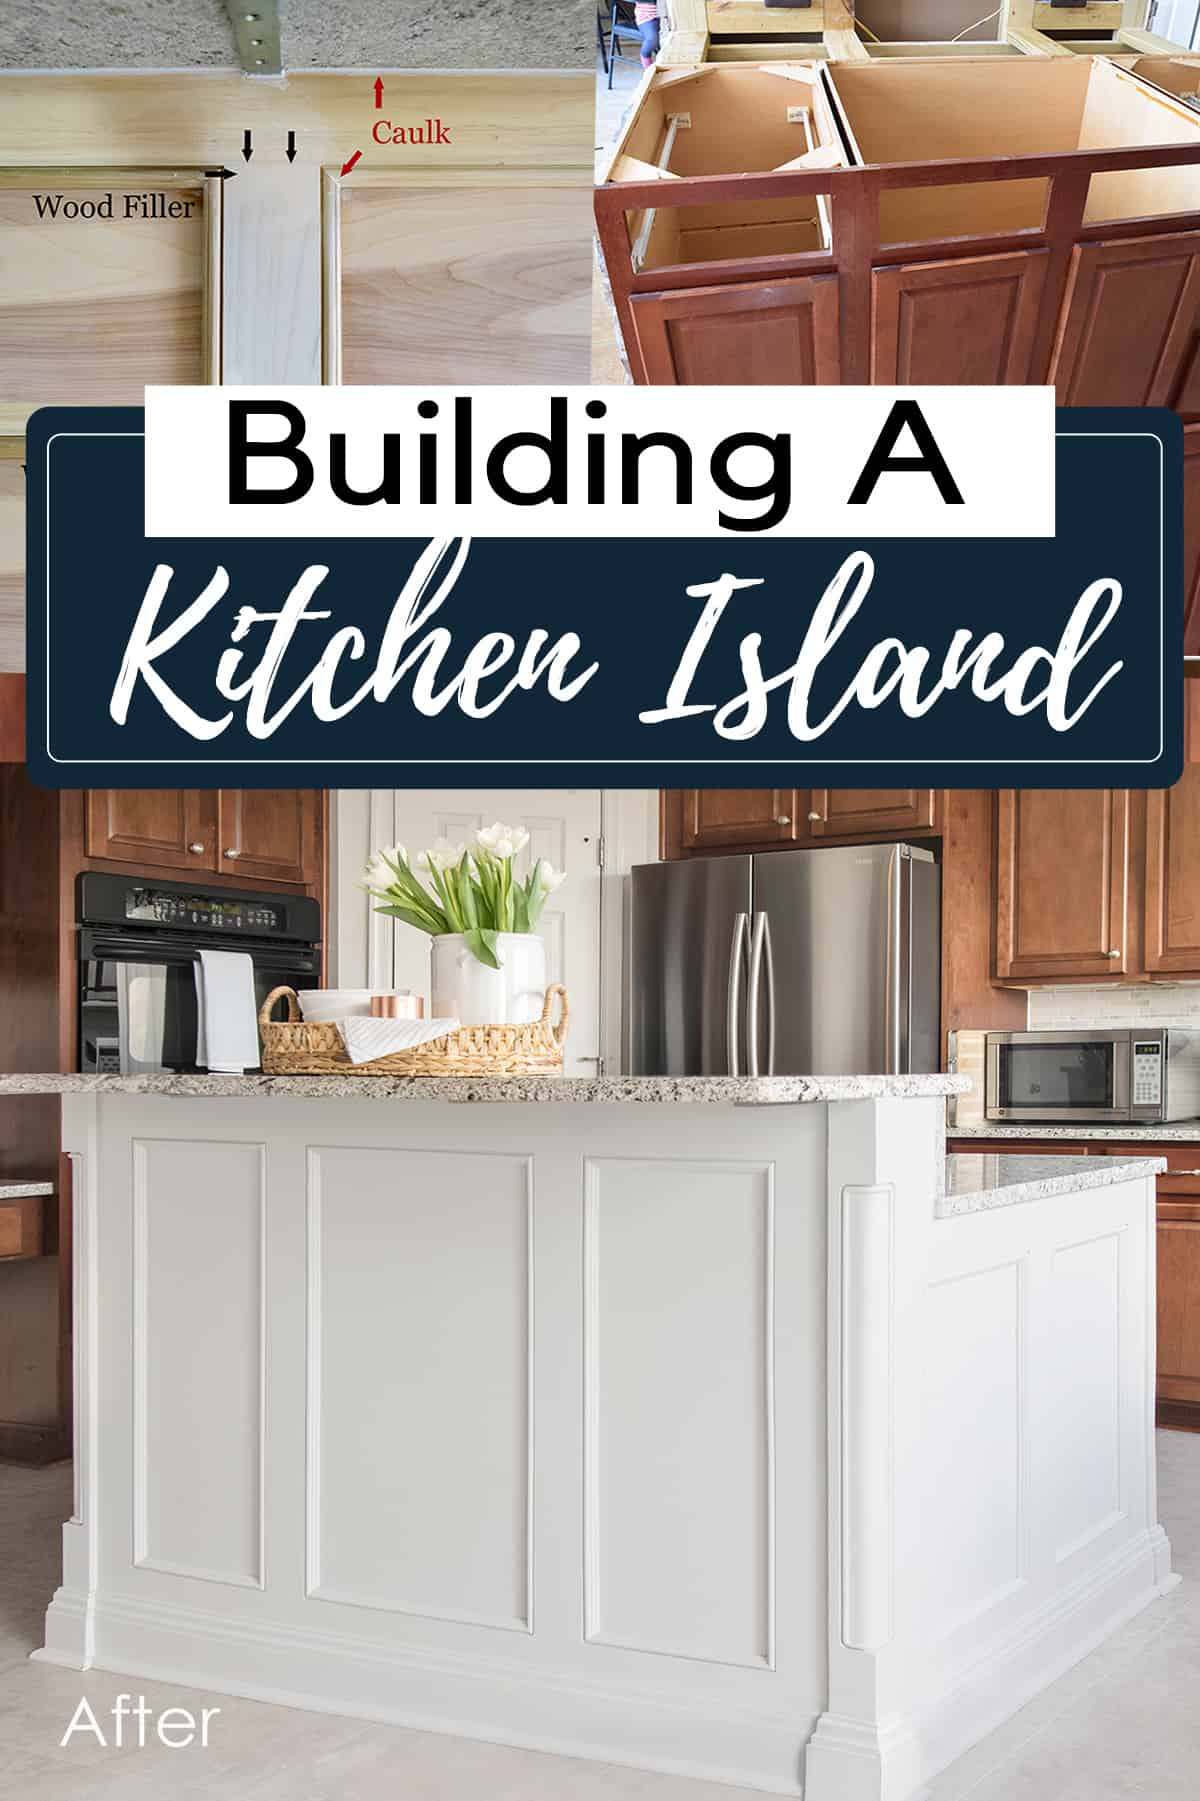
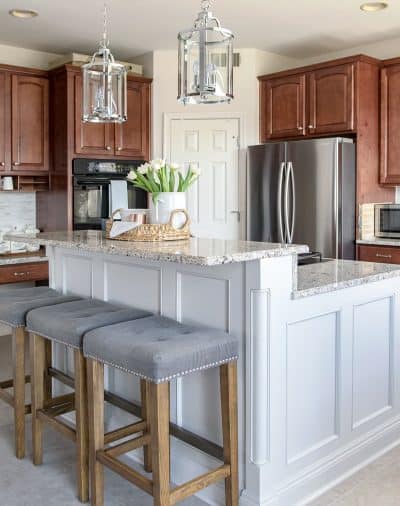
The kitchen island featured in our Kitchen Remodel is an integral part of our kitchen. We eat many of our meal there. It’s often the central regrouping spot during busy mornings and afternoons. Frankly, I have a hard time remembering what our home looked like without it.
This kitchen island is made from a simple frame built around three stock cabinets and can be sized to fit ANY kitchen. Not including the cabinets, we built this one for under $250 using basic power tools such as a miter saw and electric sander.
If you have basic woodworking skills, this is a project that’s fast enough to undertake in a weekend. Design and adding trim may take longer. This post includes pro installation tips to make your wood cuts as concise as possible.
I share our renovation process, and suggestions on how to adapt the steps to fit your own needs. These are helpful tools for any size project. For more information, learn how to remove countertops and paint kitchen cabinets or repair electrical cords for more custom DIY projects.
Our simple tutorials truly set you up for success. So, roll up your sleeves, and let’s get started!
Materials and Supplies
- Interior framing boards – at least 2×4 size
- L Brackets (if you have an extended seating area with overhang)
- Drill and bits
- Wood Shims
- Trim Boards (¼ or ½ inch depending on your overhang)
- (14 ft) baseboard trim
- Nail Setter or Brad Nailer
- Level
- 180 grit sandpaper
- 220 grit sandpaper
- Bar Clamps
- Random Orbital Sander
- Paintable caulk
- Miter Saw
Considerations Before you Start
There are a lot of considerations, and everyone will have a different design. For ideas on kitchen island designs and layouts, check out our post on Kitchen remodeling ideas.
- Do you need to move any wiring or outlets?
- Do you have ideally 3 feet around the area for walkways?
- Will any doors or drawers hit the new bar?
- If you add or replace countertops, make sure the measurements account for an overhang.
I don't recommend ordering a countertop until the build is complete, as variations in cabinets and lumber can adjust your final dimensions. I opted for a 1-½-inch overhang on the cabinet side and a 1-inch overhang on the sides.
Note: This is a fairly basic build with shortcuts where possible. Only you know your tools and skill level for your own project. These instructions are not a substitute for safety. Before using any tools or techniques with which you are unfamiliar, consult its operating instructions, and if necessary, seek instruction or a professional installer.
Building a Kitchen Island Step by Step
I have a basic tutorial at the bottom of this post that you can also print out. I include this section as well to go over our design, as well as tips and problems that we encountered along the way.
Step 1: Measure for Island
In our case, we had an existing bar, but we wanted to make it larger and more useful. First, I taped off a general area of where I wanted it and got rough estimates. Then you can get a general idea of how many cabinets you can use.
QUICK TIP:
Use painter’s tape on the floor while you are still deciding on the design. It’s easy to see if you can walk around easily as well as additional problems like door clearance.
Step 2: Pick out Cabinet Layout
If you have no existing island, the easiest way to get an island with drawers and cabinets is to buy stock ones at your local hardware store. You can mix and match stock cabinets and it is relatively inexpensive.
If you are going to paint, don’t worry about color or stain. However, I would generally recommend using a solid wood without obvious graining – i.e. I would avoid oak generally.

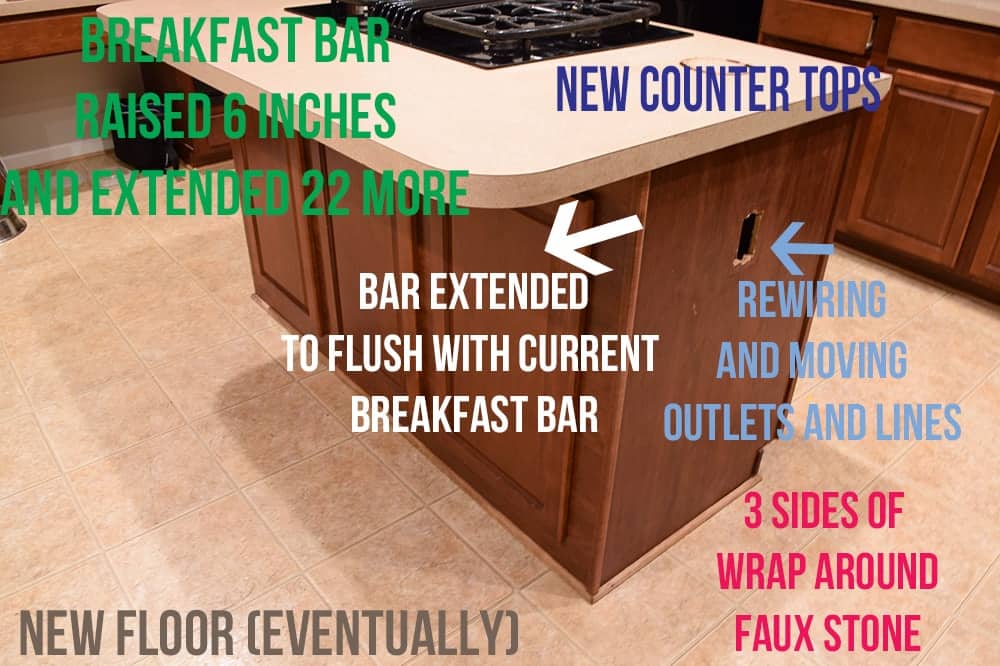
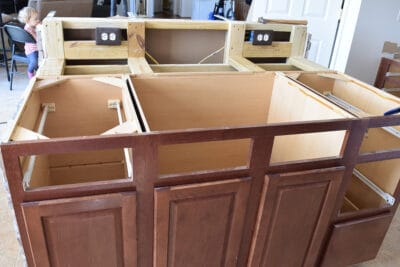
This is our layout. We have a stove in the middle of the island, the trashcan to the left and three drawers to the right. The cabinets are attached to the floor – a 2×4 is attached to the floor and the cabinets are then attached to that as well as each other.
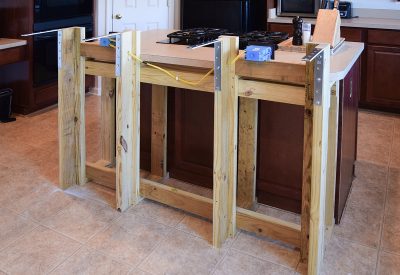
Step 3: Add any additional framing
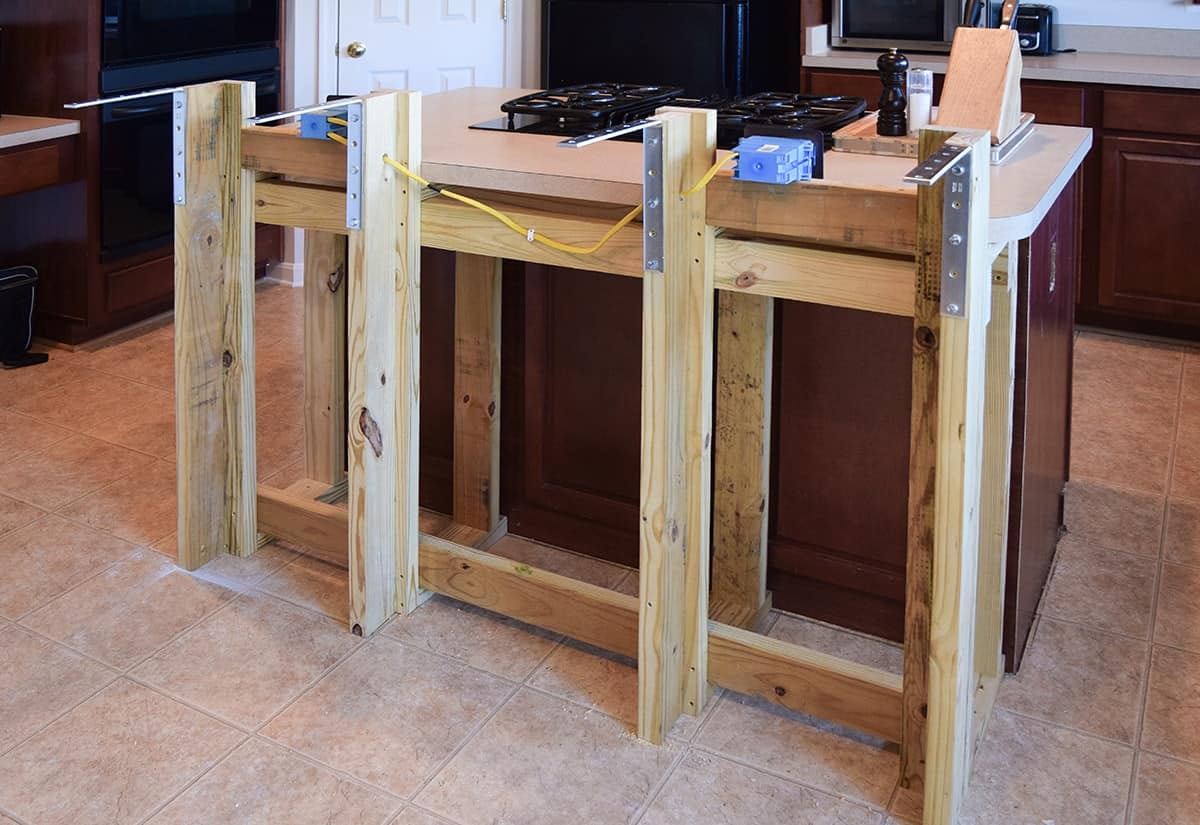
We wanted to build the kitchen island beyond the existing stock cabinetry. This was as simple as adding additional framing to create a breakfast bar.
The heavy duty brackets support the weight of the breakfast bar. The breakfast bar is positioned so that over half of the depth/weight will be on the framing, not the brackets. This is important to keep the brackets from ever teetering and to counterbalance.
We also moved the electrical outlets from the sides of the bar to the top to make them much easier to use (and more hidden).
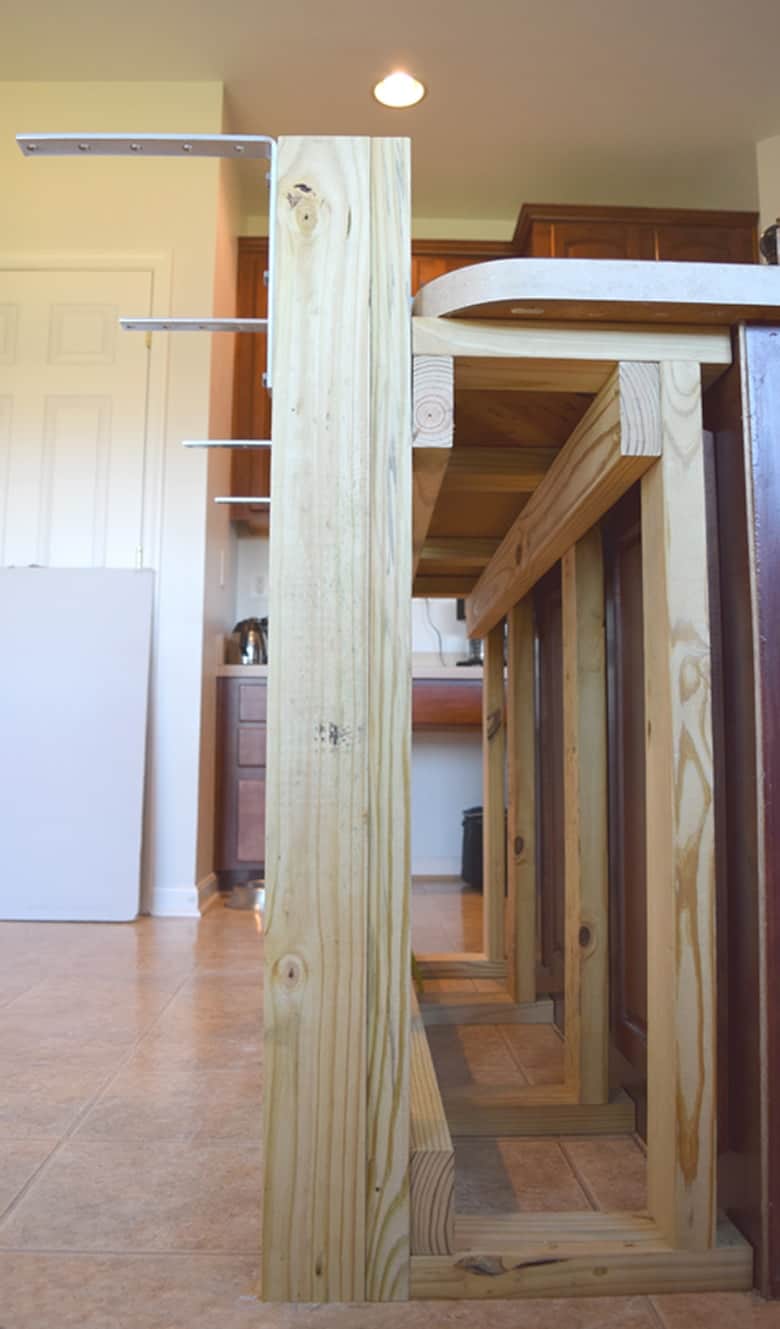
Here is a side-shot of the frame. The frame is screwed into the joists in the floor as well as to the original island. It’s sturdy. Over-engineering is what we do around here.
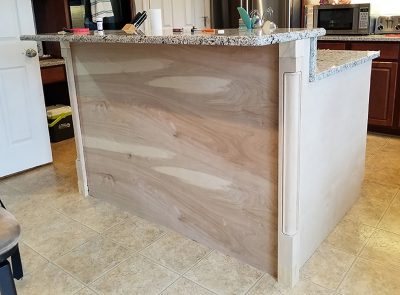
Step 4: Wrap Framing
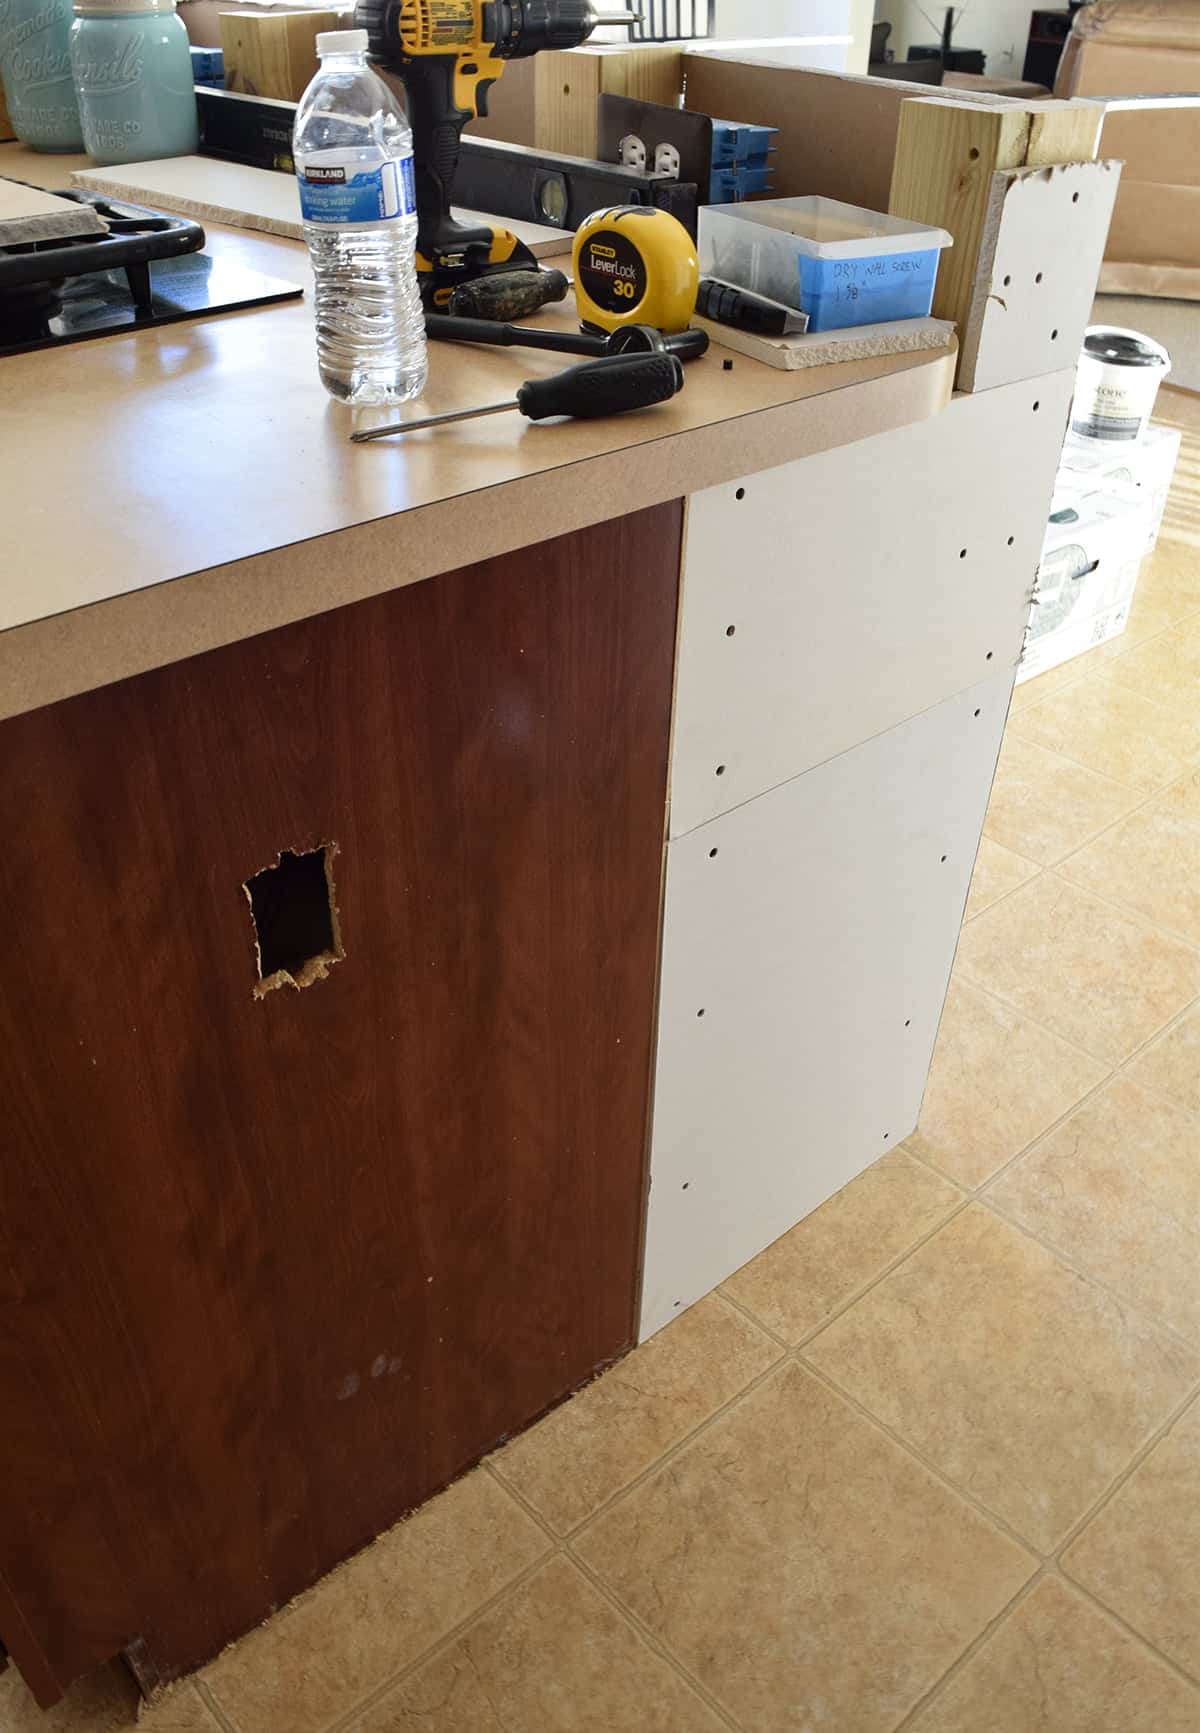
After the framing, we added the drywall over the frame and made it flush with the existing side. The original reason that this was done was to utilize the existing cabinet sides to cover in air stone.
QUICK TIP:
I find it generally easier to give a once over with 180 grit sandpaper to flat surfaces before I attach trim. There’s less corners and hand sanding required this way, although wood filler and nail holes will still need to be sanded later.
If you like a Rustic Stone style, you can see our Airstone Kitchen Island tutorial here.
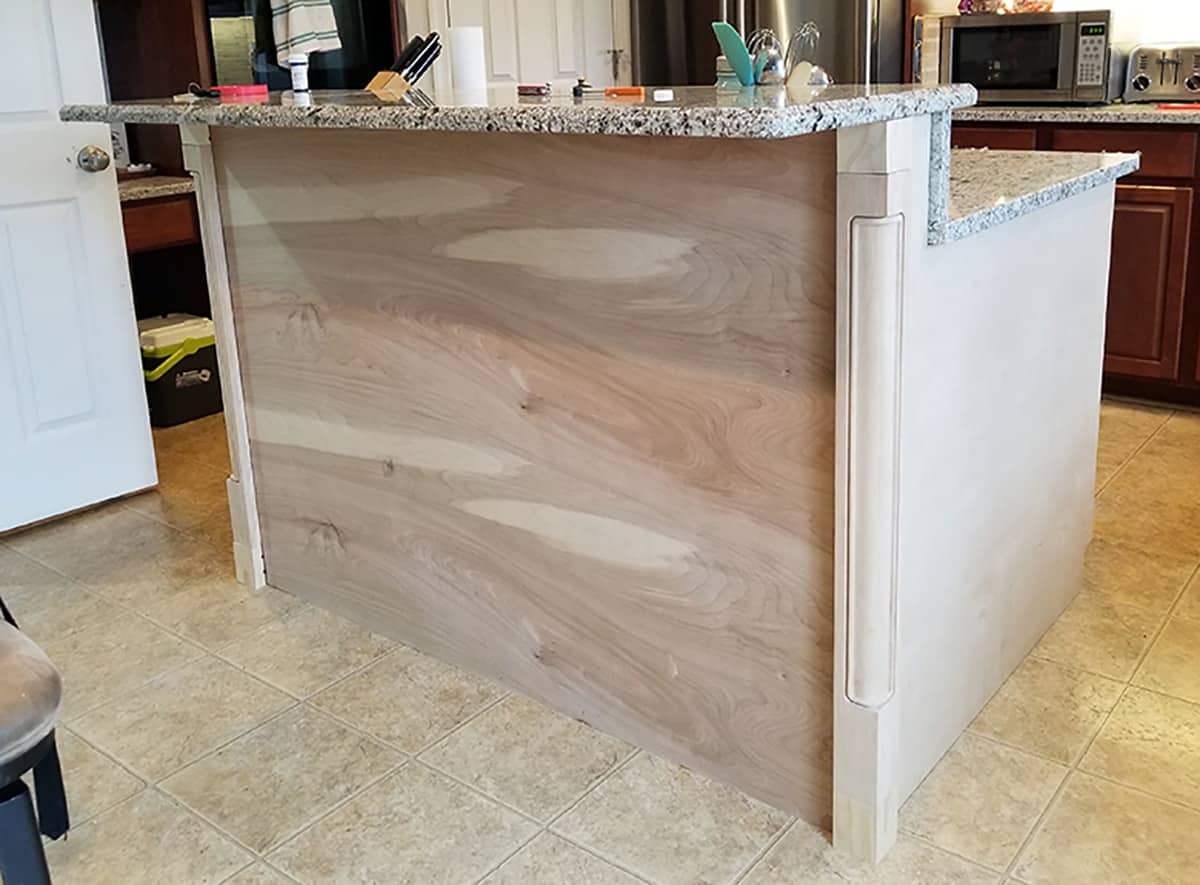
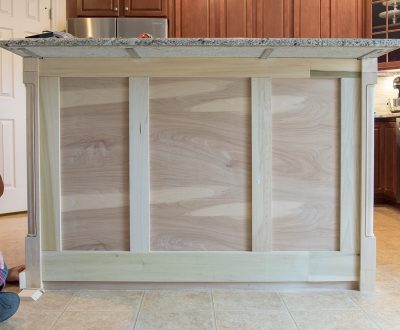
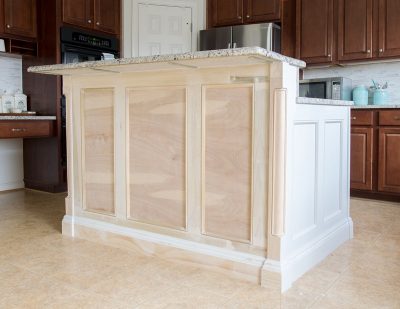
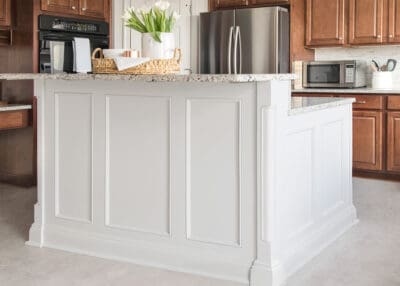
We wrapped the entire island in ½-inch-thick plywood, but most would use ¼ inch. I filled in any knots or pin holes and added corner columns to each side.
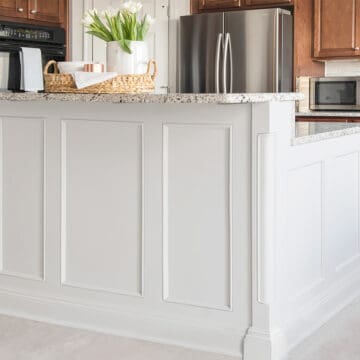
We could have added some baseboards, painted it, and that would have been perfectly great. However, we went a little bulkier by adding additional trim all over it.
*If you want to see how we added the finishing work, we have a lot of tips and tricks in how to add trim to a kitchen island here.
More Kitchen DIY Projects You May Enjoy
FAQs
Yes! By using stock cabinets, you can create a custom island sized perfectly to your needs in a variety of styles to match your kitchen.
It would depend on the cost and number of base cabinets, as well as countertop material. A DIY island can cost about $1000 or less depending on size, whereas professional install is at least $3,000-$5000.
To keep the island from moving, it is attached to the floor using a 2×4. The 2×4 is attached to the floor and then the cabinet is attached to the 2×4 with nails or screws.
Ideally, you want 42 inches space between the surrounding countertops and an island, but I would not recommend less than 36 inches space.
Although islands can be as large as you like, they should at least be 4 feet long and a little more than 2 feet deep at minimum. Another important consideration is that it must also have room for people to move and work around it.
Our seated bar top is 22 inches deep. I would consider this the minimum for eating and enjoying the space.
In order to determine how many stools will fit at your kitchen island, home experts recommend you allow 24 to 30 inches for each seating space. Divide the length of your island’s counter by 30 to find out how many stools will comfortably fit.
A kitchen island is standard countertop height, or 35-36 inches. That height depends on the thickness of your countertops. Base cabinets are 34.5 inches in height. Bar height varies up to 42 inches, which is also the height of our breakfast bar.

Grab our free series "Weekend Home Projects that will Transform Your Life" Sign up below to receive updates including free printables, organization tips, home improvement projects, recipes and more! |
More Great Kitchen Ideas

PS I love seeing your creations! Be sure to take a photo and tag #cravingcreative on Instagram! You can also stay in touch with me through following me on Instagram, Pinterest, and subscribing to the newsletter!
How To Build a Kitchen Island
Tools
- Drill Bits
- Bar Clamps For installing new cabinets
- Brad Nailer Can be done without one.
Supplies
- Interior framing boards at least 2×4 size
- 4 L Brackets If you have an extended breakfast bar
- Wood Shims
- Trim Boards ¼ or ½ inch thick depending on your overhang
- Baseboard Trim
- Sandpaper 120 and 220 grit
- Paintable Caulk
- Paint of choice
Instructions
- Create measurements for your island. Use painter's tape on the floor while you are still deciding on the design. It's easy to see if you can walk around easily as well as additional problems like door clearance.

- Purchase base cabinets. If you have no existing island, the easiest way to get an island with drawers and cabinets is to buy stock ones at your local hardware store. You can mix and match stock cabinets and it is relatively inexpensive.

- Install Base Cabinets. Attach cabinets to each other so the fronts line up. Cabinets must be shimmed to level for a proper countertop installation before attaching to the floor. To keep the island from moving, 2x4s are screwed to the floor and the cabinets are attached to them.
- Add framing boards around base cabinets. The frame can extend both on the sides or the back if you wish. It is important that the framing be at least every 18-24 inches vertically and cross braced. Cut the 2×4 boards to length and insure that all framing is level and plump (perfectly vertical). One bad measurement can cause headaches with the countertop installation or the wrapping.

- Wrap the framing to create a smooth, continuous surface. Depending on your design, you can wrap the island with drywall, ¼-1/2 inch thick plywood without knots, beadboard, or other veneer. Apply a bead of wood glue to the outer edges of the 2×4 framing. Lay the plywood in place and secure it using 1-inch wood screws under future trim pieces or finishing nails where exposed. Use a nail setter to sink the nails just enough so they don't stick out.

- Add trim and decorative elements as desired.

- Add baseboards. Make sure to miter the corners of baseboards (cut at a 45 degree angle). This gives a much more professional look.

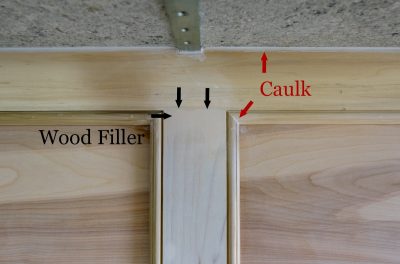
- Fill gaps and nail holes. Paintable Caulk is used to cover joints that need flexibility or when two different materials meet. Fill all nail holes with wood filler. Sand all the parts, especially where two boards butt against each other. The smoother the joints feels, the better your finished product will look.

- Add countertop. I do not recommend ordering a countertop until after the island is built because variations in cabinet sizing and lumber can cause minor changes in the overall dimensions.

- Paint. For this high-traffic bar, I used a primer, two coats of a highly durable enamel paint and a protective topcoat, all with a sprayer.
Megan says
Do you have measurements and a step by step to how you built the breakfast bar?
Rachel says
I am currently in the process of updating all old posts with additional information and step by step guides. Interestingly, my husband and I are in the process of building another kitchen island from scratch (the one in this post was an extension around an existing set of cabinets). While the new one will definitely have a step-by-step guide, I do not expect to have that project and tutorial complete until at least Spring because we just finished building a custom set of cabinets and still have the doors and custom columns to build. I wish I could have it sooner, but if you have any specific questions, maybe I can help with those.
Rebecca says
Wow! Things are really coming along! I’m so excited for the next post…I think it’s already up. SQUEAL!
Bonnie @ Our Secondhand house says
We had something very similar in our last house and it is one of the features I miss most. Thanks for sharing with us at the Home Matters Linky Party. I hope you will party with us again this Friday. #HomeMattersParty
~Bonnie
Rachel says
Thanks for stopping by, Bonnie and for the follow! Love your party and the name.
Amy | Canary street crafts says
Love the progress! Can’t wait to see everything finished!!
Rachel says
Sometimes it gets worse before it gets better. This week hubby is ripping out the walls because we are doing under cabinet outlets and lights. Everything is being rewired. That’s the DIY roller coaster for ya, though! Thanks for following along and for your bloggy friendship. Hugs!
Sheila johnson says
awesome!!!