Revive your vintage, antique, or dated furniture with this raw wood or natural furniture finish. This tutorial shows you how to bleach wood furniture to lighten the natural color and remove stains including black spots. Create a fresh, modern vibe in 3 easy steps!
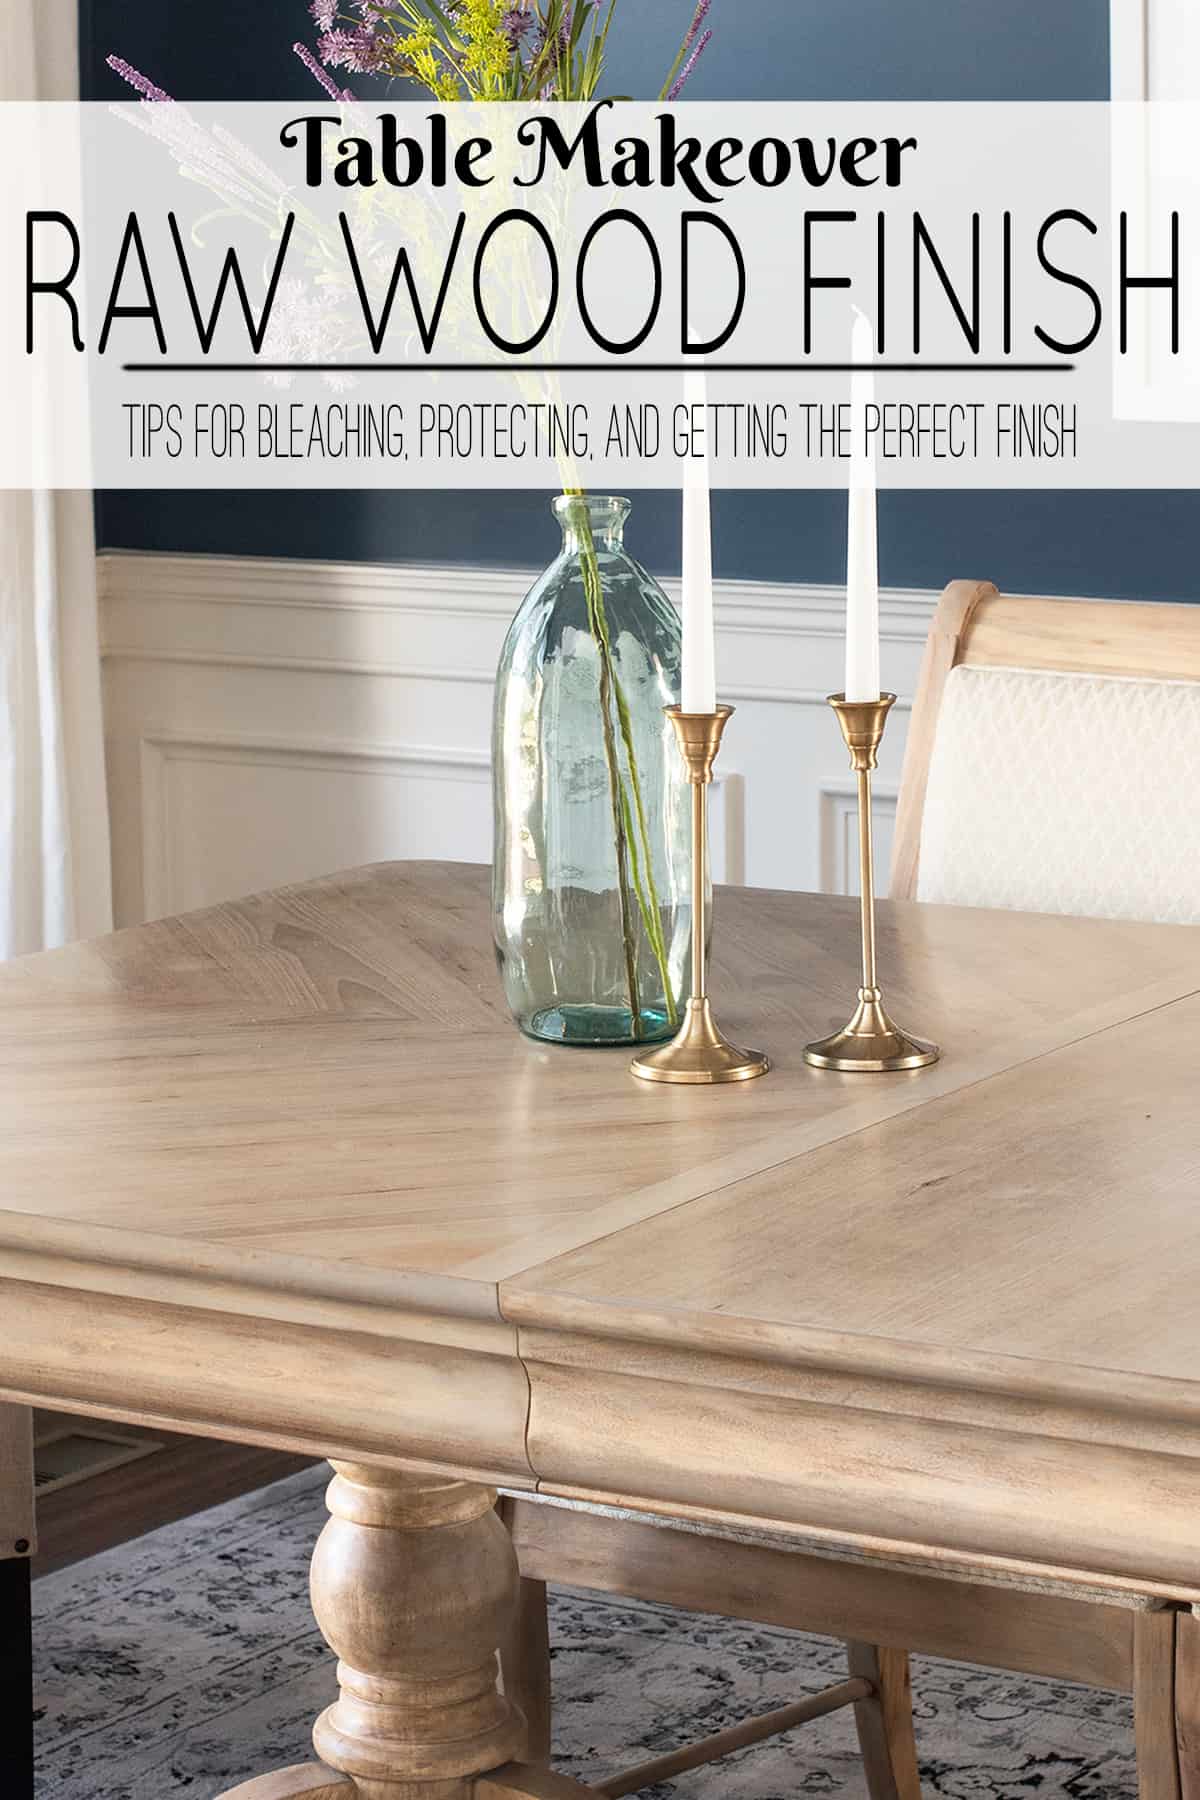
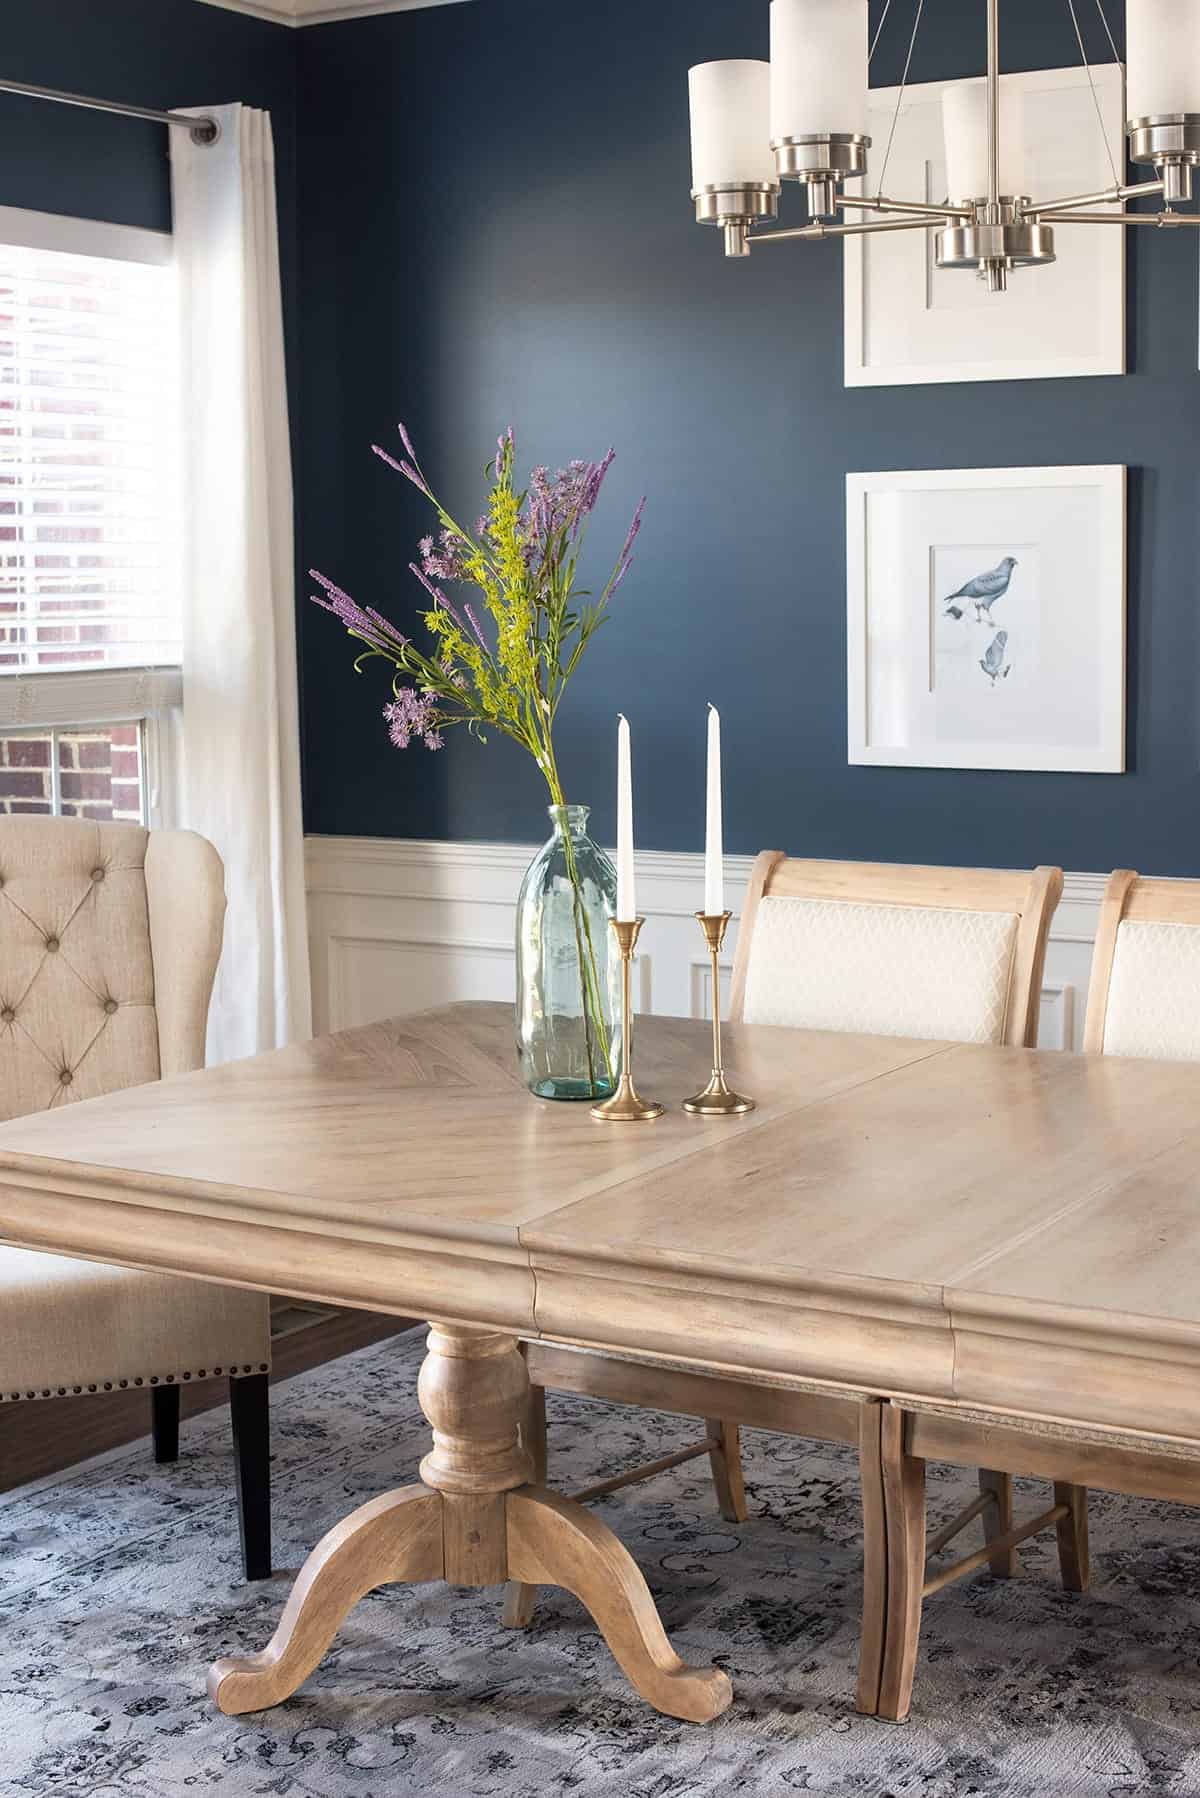
Recently, I blogged about stripping our table as part of the dining room makeover. After stripping the layers of dark stain away, I unearthed the table’s beautiful wood grain pattern.
It was a capital heart eyes moment!
I knew the organic beauty of this piece of furniture deserved to be highlighted rather than covered with paint or more stain. I’ve done similar furniture in grey or whitewashed wood, cerusing, and even colorful painted furniture. Here, I went for the DIY raw wood style currently gracing the showroom floors of Ashley, Pottery Barn, and other high-end furniture stores I can’t afford to shop in.
Because the table utilizes many species of wood, the wood’s natural color varied significantly after stripping. I decided to DIY lighten the wood to even out the color and remove excess stain residue. Although there were no black stains or iron stains like you find from weathered nails, this process will greatly reduce that as well.
Recommended Supplies
- A piece of furniture, stripped of all finish (you can see how we strip furniture here.)
- Rubber Gloves – Use other safety equipment such as closed toed shoes and goggles as well.
- Plastic Tarps – To protect the floor and other surfaces.
- Lint Free Rags – These work great but clean, cut up men’s T-shirts work just as well.
- Sponge or Brush – I like sponges better as they are much faster.
- A Fume Mask – These chemicals do cause toxic fumes. Please protect your lungs!
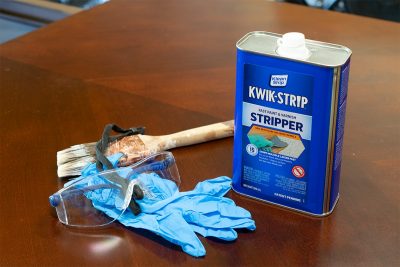
- This wood bleach kit – If it is unavailable, I would recommend Savogran Wood Bleach although I have not used it.
- Distilled Vinegar– Neutralizes the wood bleach.
- Topcoat of your choice (recommendations below).
After stripping, but before bleaching:
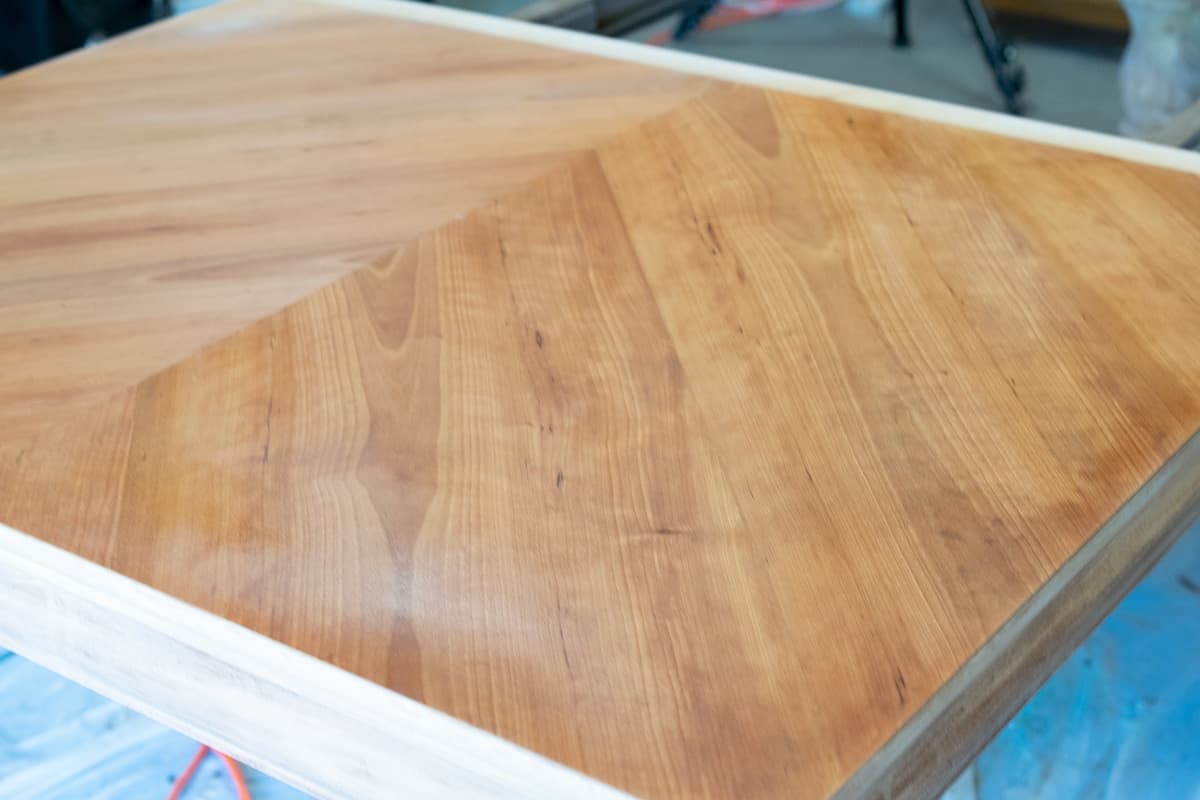
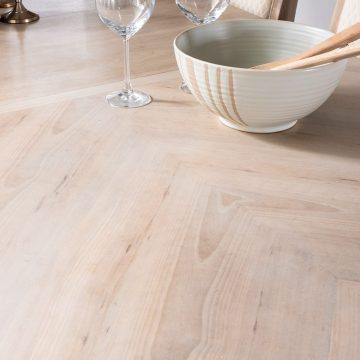
This particular table is constructed of 3 different types of wood. The tabletop is made of black cherry wood with oak pieces at the ends. The pedestals and side molding are either birch or maple. Full disclosure – I am not a wood identification expert so I am making educated guesses.
Types of Bleach
First things first, bleaching wood is not as simple as pouring common laundry bleach on the table and calling it a day. Please don’t do that! Household bleach will remove dyes or stains but will not affect the wood’s natural color and may damage the wood.
You need to use a 2-step bleaching product meant specifically for wood. This is a powerful peroxide-based bleach and safety precautions should be used. The first step pulls the tannins up to the surface of the wood. The second step lightens the color, which provides an even finish and won’t damage the wood itself the way household bleach can.
Another wood bleaching product is called Oxalic acid. This will remove water and rust stains, plus black iron stains from nails, and can be used to lighten the graying effect of weather-exposed wood. However, I generally use a deck wash for removing gray wood. Oxalic acid is considered quite toxic.
How to Bleach Wood
For this tutorial, I use a 2-part peroxide bleach kit. There is no mixing or hot water involved. It also removes stubborn stain residue left behind from sanding and requires far less coats. I lightened this cherry table in just 2 coats!
The process is super easy too!
- Put on your safety gear and prep the space. These chemicals do have fumes. Make sure your piece of furniture has been stripped and all of the stripper residue is removed.
- First, you wipe on solution A with a sponge. Be generous to keep it wet until the next step. The color may intensify during this step and that’s ok. You can brush it, but I like using a sponge as it is faster.
- Wait 5 minutes for soft woods like pine or poplar or wait up to 10 minutes for hardwoods like cherry or oak.
- Then wipe on the second solution with another clean sponge. leave overnight to dry.
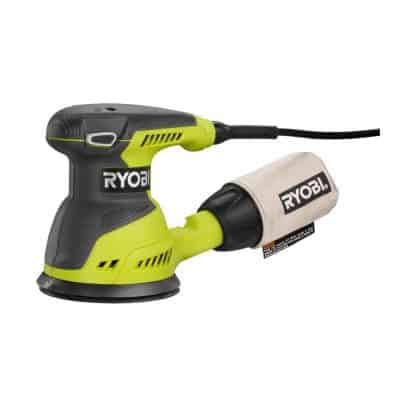
- Lightly sand for evenness of color with 220 grit sandpaper. If a second bleaching is desired, do it after you have left it overnight or several hours.
4. Use distilled vinegar to neutralize the bleach if you use more than 1 application.
Tip: During the first step, the tannins (color) lift to the surface. This took me by surprise because the table turned very dark. So don’t be alarmed if your furniture gets darker or takes on an orange hue while waiting for the second step.

Do I Have to Bleach Wood?
If you are happy with the finish without bleaching, you can skip it. However, if you add a topcoat finish, it may alter the original hue. Keep that in mind when making the decision “to bleach or not to bleach?”

Which Top Coat is Best to Use on Raw Wood?
The million-dollar question. Specifically surfaces with hot plates of food on them- like dining room tables. In fact, I have written several articles about the best topcoats for painted furniture here.
Finding a durable, protective topcoat finish that has NO color shift in raw wood is the holy grail of the woodworking industry. All polyurethanes (even water-based ones), naturally darken or change the wood tone when applied.
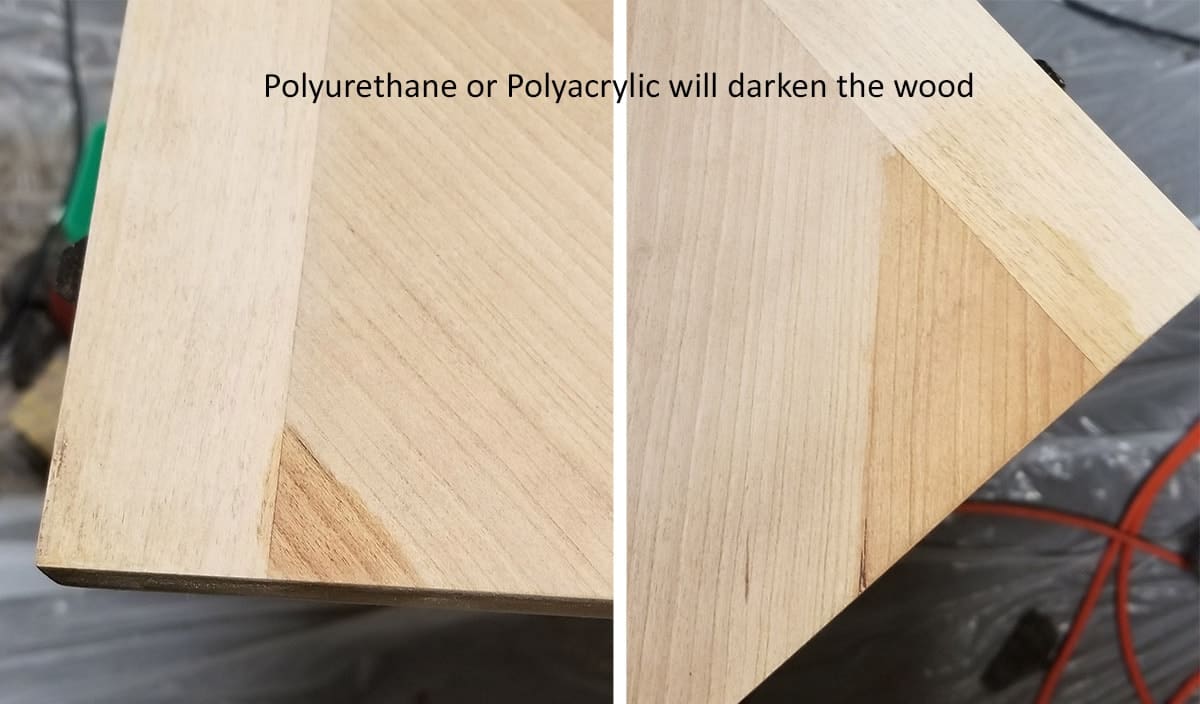
Recently, new products have come on the market that have increased durability without ambering or yellowing over time. What you want is a product that is considered “water-white”. However, water-white describes the lack of color in the can, not what it will do to your surface.
For Low Traffic Furniture
Wax: Most beginner friendly. It is easy to apply and can be buffed easily to produce an even low Lustre finish that won’t color the wood hardly at all. The downside is that wax is not durable, waterproof, or heat resistant.
There are two wax options: cerusing wax or paste wax. Cerusing wax is a decorative white wax that is designed to get into crevices and lines and leave bits of excess white. You can see our Cerused Table Makeover here for an example. Cerusing wax will remove some of the orange hue from wood to enhance a piece’s natural look. So feel free to try both to see which one you like best for your project.
For High Traffic Furniture
Grey stain + water-based poly: This is the most beginner friendly durable option, but it’s not perfect. The grey stain helps to fill in the grain and counteracts the darkening from a water-based poly. For our outdoor dining table, I washed it with Varathane Sunbleached stain first. I used two coats and wiped excess away. I highly recommend testing on scrap wood to get the right products and technique.
Sherwood CAB Acrylic Lacquer: A durable, optically clear and non-yellowing lacquer. This is a professional grade lacquer that probably needs to be special ordered from a Sherwin Williams store. This product is meant for professionals, meaning it is more difficult to work with and I suggest doing more research. It is very durable, but more expensive.
Sher-Wood Water White Conversion Varnish or other Catalyzed Varnish: This product is seeing more recommendations lately in woodworking forums. They are the most durable, waterproof, and long-lasting finish. However, these are ultra-expensive products that require much more knowledge, sanding, and dedication than most DIYers or homeowners want.
Weather-Wash Dead Flat Varnish: It comes in quarts and promises to provide a durable, non-yellowing crystal clear dead flat topcoat.
Rachel’s Note: I am currently working on a brand-new post to find the best option for protecting a natural looking table that won’t amber or yellow over time, while sealing the wood and providing a durable, hopefully waterproof surface. To be clear, I have not yet tested all of the above options. Stay tuned… I am waiting on a back order from my local store. (Thanks, virus that shall not be named.) I will update when I am able.
For more information or other techniques to try, you can check out Maison de Pax’s post for her go-to techniques for finishing natural wood.
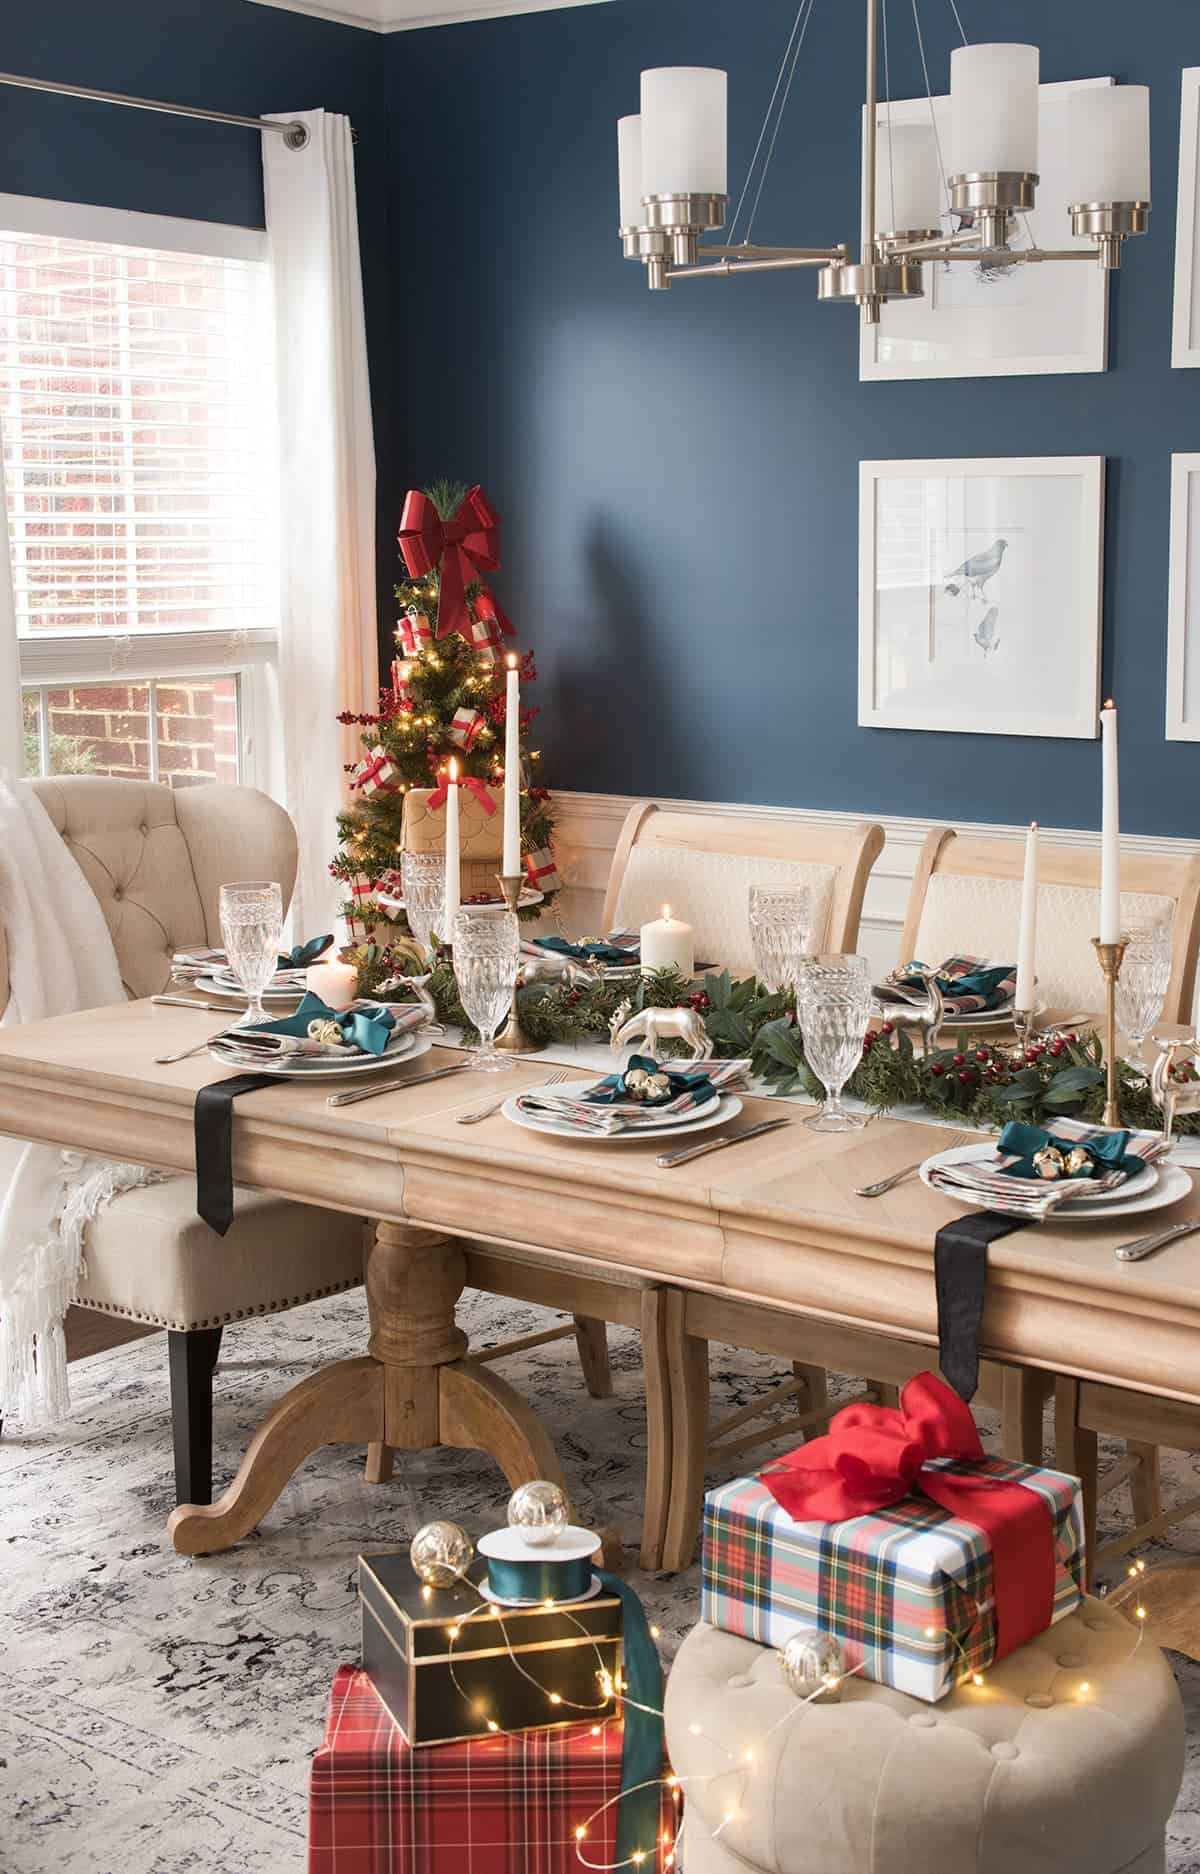
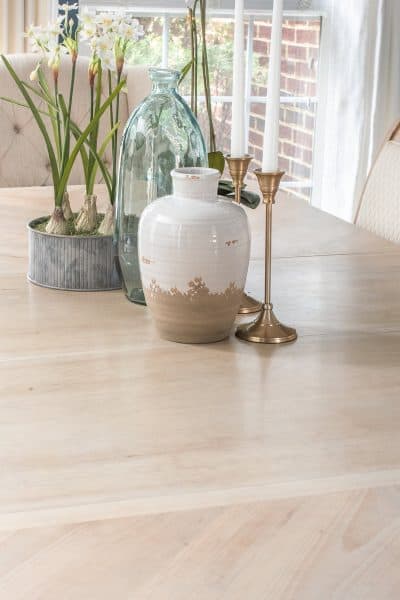
Our Project Results
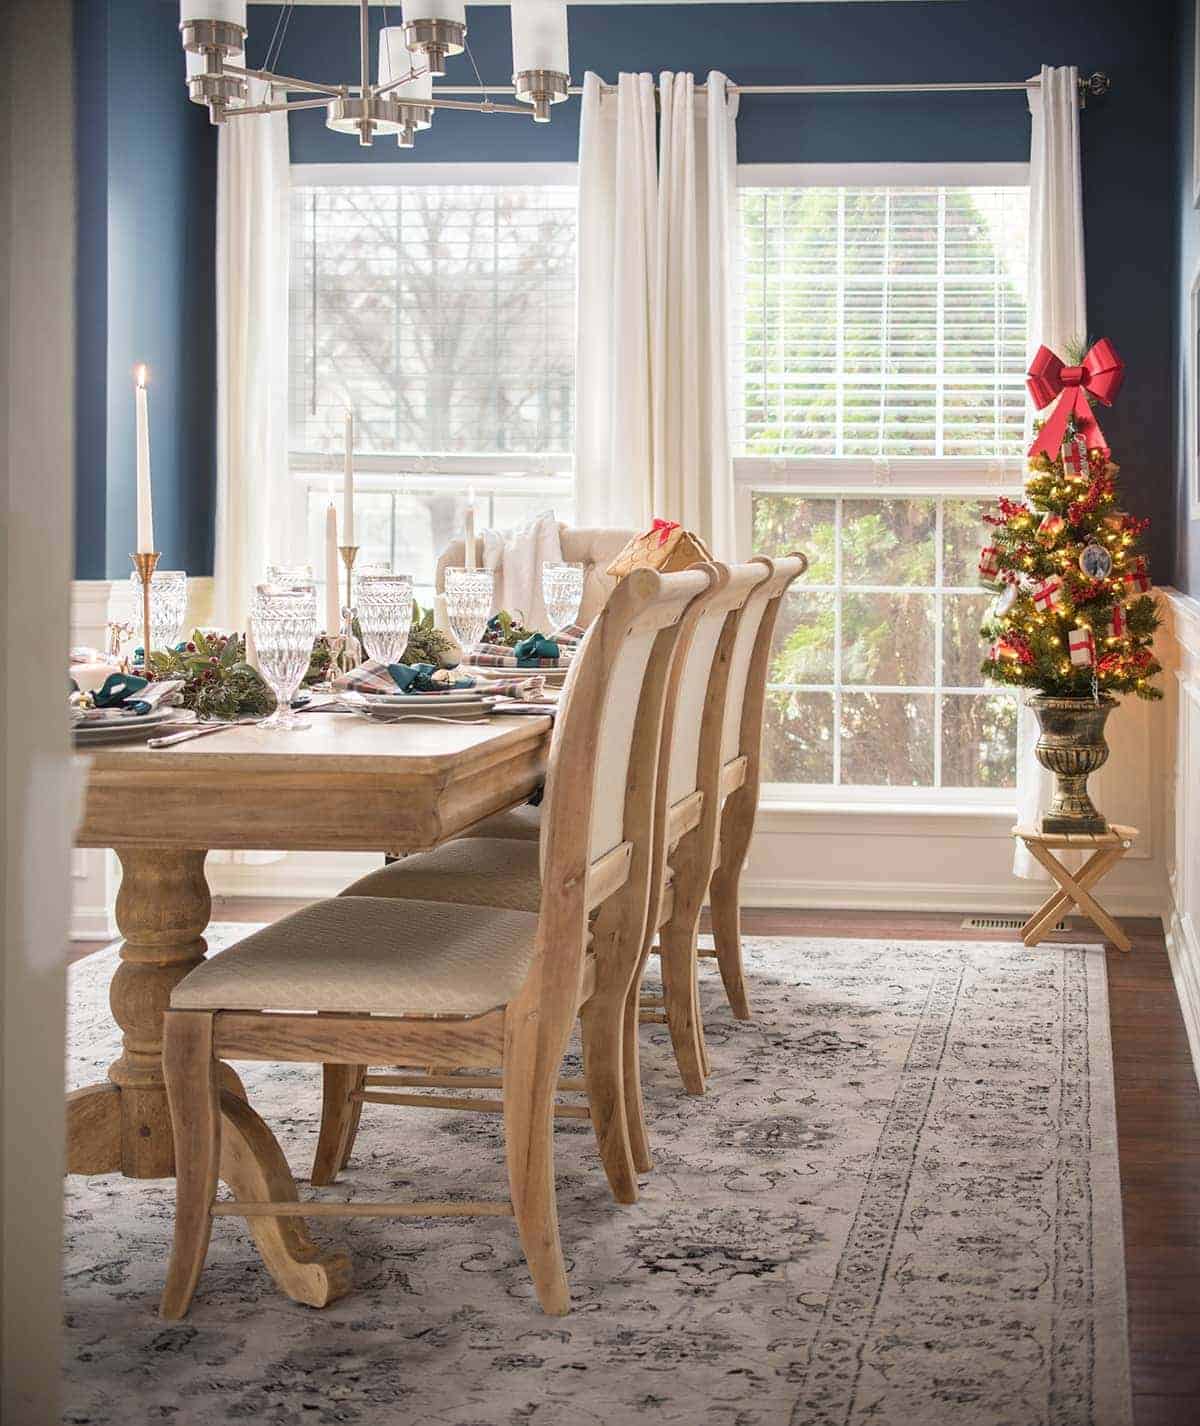
This table has been the centerpiece to many celebrations. Plaid Christmas table decorations with the whole family gathered around the table make my heart happy. We share our stories and count our blessings and laugh until our ribs hurt. I couldn’t be more pleased with the new life this special piece has breathed into it.
More Furniture Makeovers and How-Tos
It’s ready for more memories to be shared. Happy transforming!
FAQs
NO! The poly will not bond at all. Wax must always be the last step. If you have a previously waxed table or furniture, the wax needs to be completely stripped beforehand.
It depends on your desired aesthetic and the quality of your poly. One isn’t necessarily better than the other and there are entire books written on finishes. However, you will want to use a water based acrylic polyurethane or lacquer over painted furniture. Oil tends to amber and yellow over time.
While household bleach or laundry bleach will remove some surface staining, it won’t change the natural tannins and coloring of the wood.
Yes. After neutralizing the wood bleach and allowing to dry completely, the wood will take up stain just fine.
The primary lightening agent in wood bleach is a chemical called oxalic acid or a peroxide-based bleach combination of sodium hydroxide (caustic soda) and hydrogen peroxide

Grab our free series "Weekend Home Projects that will Transform Your Life" Sign up below to receive updates including free printables, organization tips, home improvement projects, recipes and more! |
More Furniture Guides


PS I love seeing your creations! Be sure to take a photo and tag #cravingcreative on Instagram! You can also stay in touch with me through following me on Instagram, Pinterest, and subscribing to the newsletter!
How To Bleach Wood
Supplies
- 1 Wood Bleach I love this product as it works fast and evenly.
- 1 Safety Gear: Gloves, face mask, protective eyewear
- 1 Plastic Drop Cloths
- 6 Lint Free Rags
- 1 Distilled White Vinegar
- 1 Protective Top Coat Of your choice
- 1 Stain Of your choice
Instructions
- Put on your safety gear and prep the space. This stuff does have fumes.

- Wet a lint free rag or sponge with solution A. Be generous to keep it wet until the next step. The color may intensify during this step and that's ok. Wait 5 minutes for soft woods like pine or poplar or wait up to 10 minutes for hardwoods like cherry or oak.
- Wipe on solution B with another clean sponge or lint free rag. Leave overnight to dry and it will lighten.

- Lightly sand for evenness of color. If a second bleaching is desired, do it after you have left it overnight or several hours because it will lighten as it dries.
- Use distilled vinegar to neutralize the bleach if you use more than 1 application. Allow to dry completely for 24 hours before adding any stain or finish.


Pat says
beautIfUl. ty for sharing the steps!
Alisa says
I have the exact table and was in the process of stripping it when I found your post. Love what you did and you may have got me convinced to try something different. I originally was thinking of just stripping and bleaching the table and painting the chairs black but I love what you did and might do the same. I actually was hoping if you could tell me how you pulled the wooden plugs without breaking them.. 😁
Rachel says
Glad you like it! I think you are referring to the plugs on the chair backs? I gently pryed and popped those out with a screwdriver (like using a screwdriver to get under them and brace against my thumb to pop them out). If I remember right, there was some glue but it didn’t cause a problem.
Alisa says
Thanks so much. I was thinking of doing the same but since you did it first I wanted to see if you encountered any issues.
Jacqueline says
What would happen if I just used the light gray stain without bleaching? I guess I’d get a darker finish? I’m not sure what species of wood I’m using, it’s not oak. I’m refinishing a piece of early 2000’s farmhouse side table from Ethan Allen I picked up a garage sale. The top had a stain that gave it a sort of oaky look, and some kind of poly top coat. We’ve stripped it and now trying to create that beachy teaky look. I like the sound of your second top coat option. The light grey stain and water based poly. I note that the reviews of the stain you recommend on Amazon, suggest it’s dark, but often the link the wrong reviews to products. I’ll do some more research before choosing a stain. Thanks for the info on the bleach… Other bloggers are recommending dollar store bleach, which I will now avoid.
Rachel says
The process of bleaching takes out not only the old stain from the pores, but also tannins present. For example, I am not the best at wood identification, but I am fairly certain the top of this table is cherry with two birch bases. I wanted to mute the natural red and orange colors that the poly would have brought out in the cherry. If you just stain it, it may be a slightly darker and may out the undertones. I had another oak table that I used the stain on and didn’t feel the need to bleach it before applying the grey stain. You can see a comparison on this post about how to waterproof outdoor furniture.. Good luck with your table! You can always try a small section without the bleaching and sand it off if you don’t like it.
Christine says
On your bleached dining room table, you had not yet applied a top coat to protect the wood. The last thunk I saw was you were waiting for Sher-Wood Water White Conversion Varnish or other Catalyzed Varnish. what finish you ended up using that would not change the color.
P.SI am at the same place in transforming my table and do not to ruin the hard work I have already done when I love the way it turned out.
Rachel says
Unfortunately, I developed major health problems last year and many projects are still waiting for my recovery. The dining room table, building our basement cabinet doors, and an unfinished media console are just some of them that I hope to get to working again on them this summer or maybe fall.
Brooke Sitkowski says
Hi ,
I have a table similar I am wanting to refinish like this. What color and brand of stain did you use?
Thank you!
Rachel says
This one is washed more than stained, as I wiped the stain off before it dried. I used Varathane Sunbleached.
Yvonne Z says
which wax did you use on this?
Rachel says
I have rewaxed it a few times with different products. Annie Sloan and Fusion Mineral’s clear wax have been the easiest to work with. I wasn’t a fan of Behr’s decorative wax and Minwax was a little fumy smelling, but it didn’t bother me since I am pretty used to that from remodeling and refinishing.