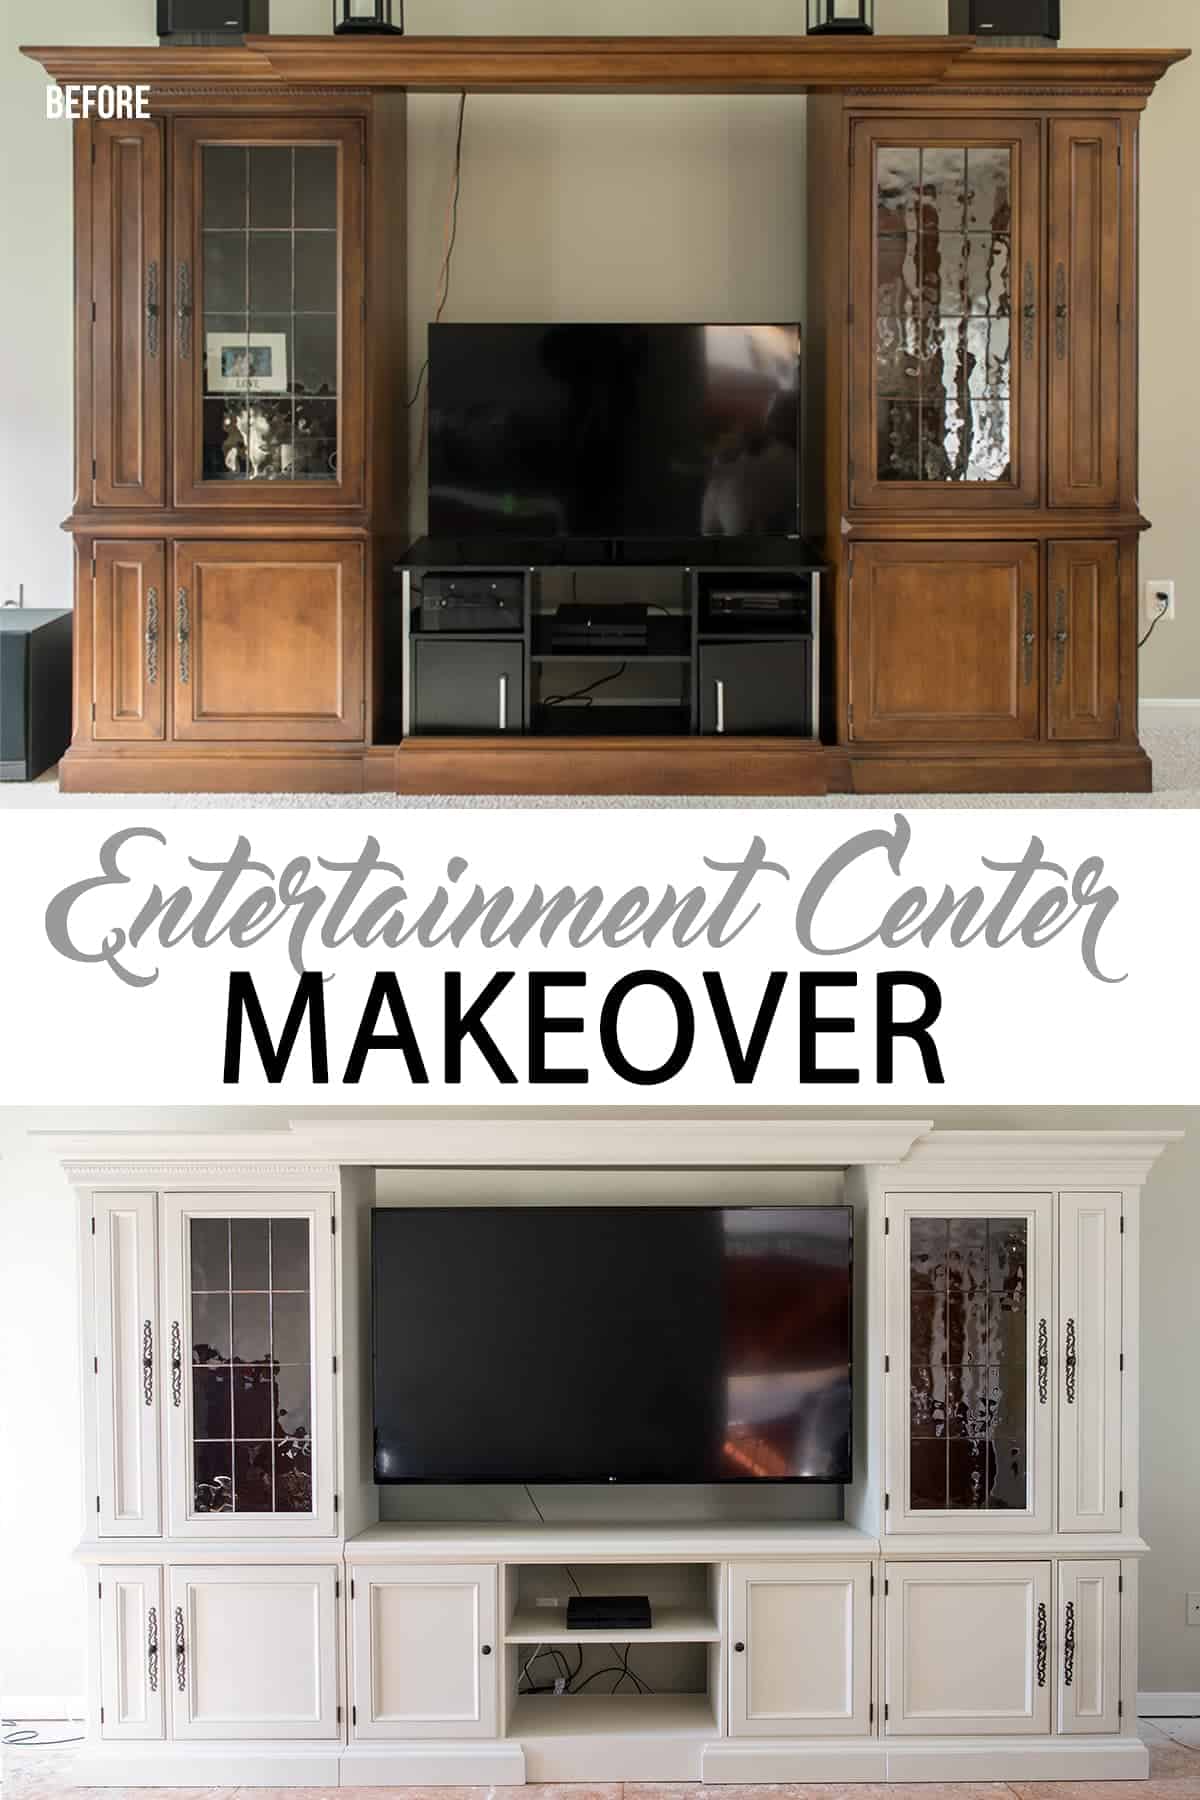
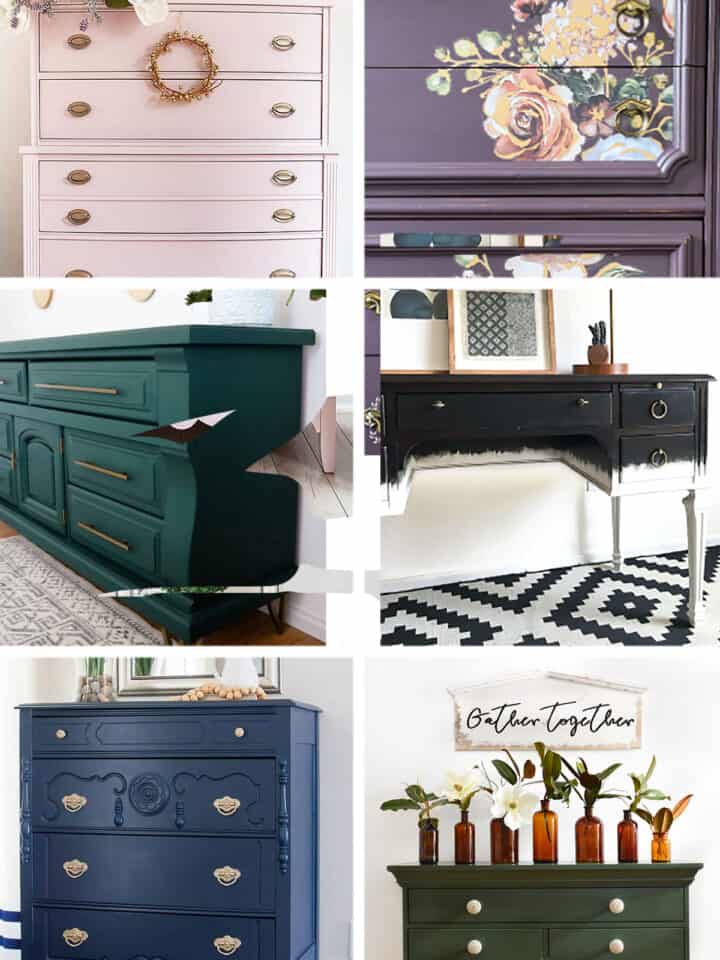
DIY Entertainment Center makeover featuring Fusion Mineral Paint. See this incredible before and after unfold and learn pro tips for painting large pieces of furniture with the right tools and products.
(Updated for 2023 with clarity and more information.)
In my exhausted haze of caffeine and dreams, I’m thrilled (thrilled!) to show off the one of the most intricate furniture projects we’ve ever completed!
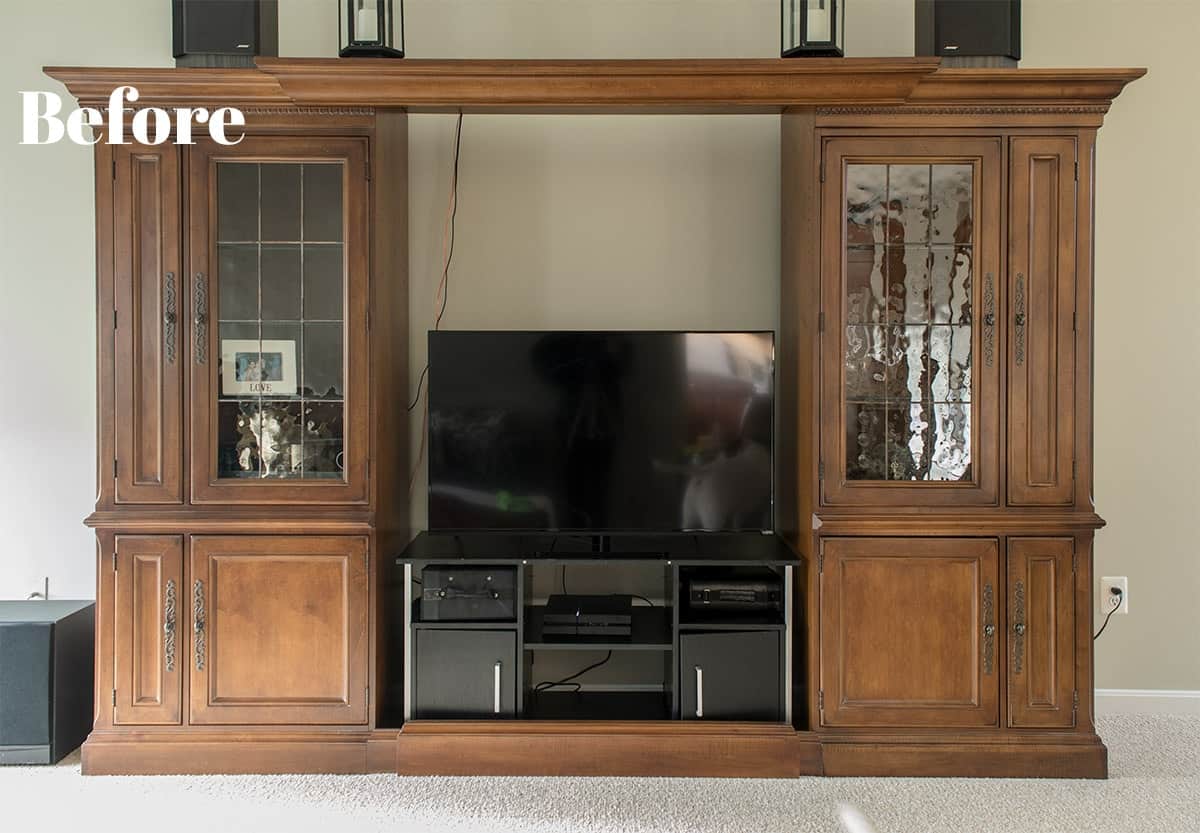
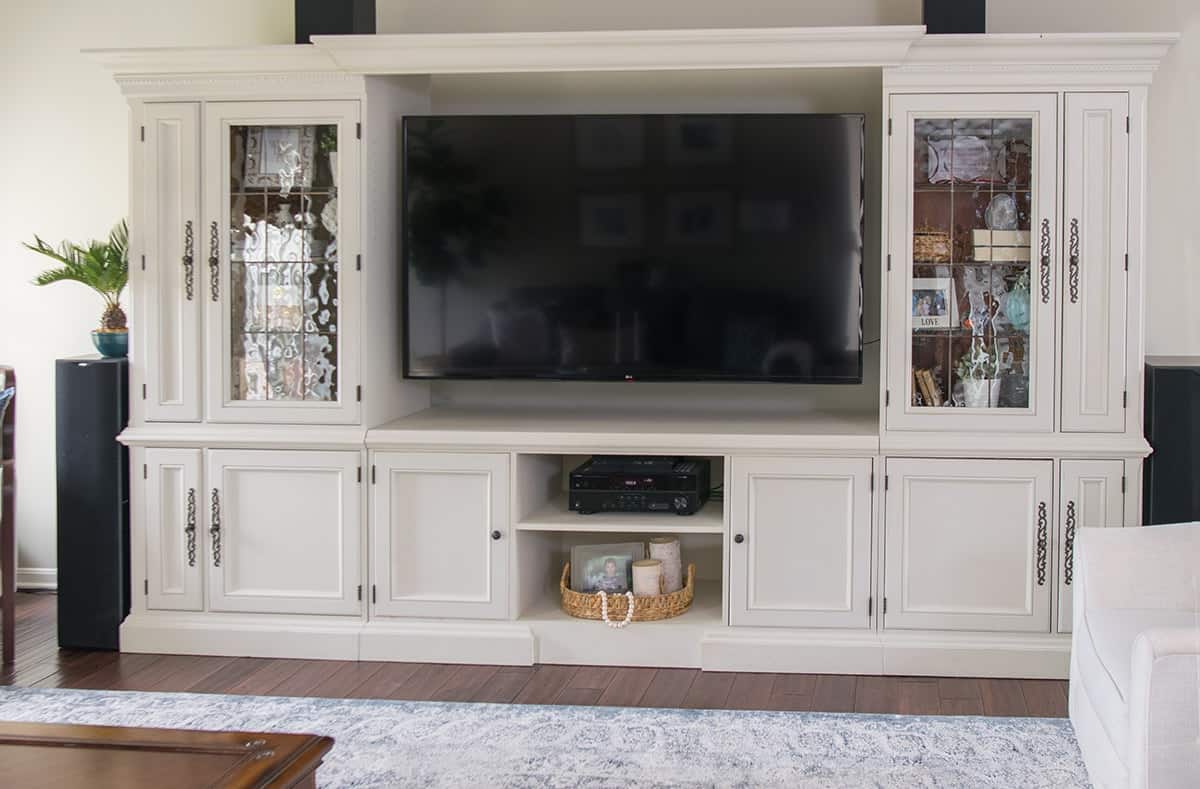
A mashup between a Craigslist find and a castoff TV console, the before photo is practically begging for a furniture makeover. At over 12 ft long, our entertainment center offered an abundance of storage, but it grossly lacked cohesive style.
So, what’s a budget savvy couple knee-deep in-home renovations to do? Custom build, naturally. Our mission: build a center piece to accommodate a 65-inch television and integrate it seamlessly with the two side bookcases. Refinishing this piece put our collective woodworking, building, painting, and designing skills to the test!
Recommended Furniture Painting Supplies
- Good Quality Furniture Paint
- Primer
- Microfiber Roller
 – Make sure it’s for smooth surfaces and won't shed fibers.
 - Paint Brush - taklon brushes for details like around the handles and a 2.5 inch angled Purdy Brush for the rest.
- Wood Filler and/or Paintable Caulk- to repair any holes or dents.
- Something to stir the paint with
- Drop Cloths
- Orbital Sander - A nice one with high OPM (orbits per minute) saves time.
- Sandpaper - 100 or 120 and 220+ grit
Related: This is a list of my usual furniture makeover supplies, but I focus mostly on the particulars of this project in today’s post. Check out my post on Painting wood furniture for an in-depth and step by step tutorial that is perfect for beginners and advanced painters!
5 Tips for Painting Large Furniture
I have some great advice in our tutorial on painting furniture white, but these tips are specific to painting very large pieces like our entertainment center.
1. Start with a plan
What look are you going for? How will you keep dust and pet hair out of the paint while it dries? Will you need to spend a long time on a ladder to do the top?
Not sure which paints are best for furniture? I've tried all the top brands and included my top pick for the best furniture paints and why.
2. Cut Time with a Paint Sprayer
For very large pieces, I recommend using a paint sprayer if you can. There are so many benefits to painting with a paint sprayer over traditional brushes and rollers. But never fear, I brushed and rolled this entire furniture piece!
3. Use a roller on large flat surfaces.
On large surfaces like dresser tops or the sides of this entertainment center, paint will start to set up long before you can finish brushing it, leaving steaks and blemishes.
I highly recommend brushing any inside corners or edges and then using a roller – it will be faster, easier, and smoother. Just look for rollers specifically made for smooth surfaces - they often say made for doors and trim.
Pro Tip: Don’t load too much paint on a roller or it can give you an orange peel effect as you try to push it out. Thin coats are your friend for smooth results.
4. Always complete all prep work first.
Sometimes we all just want to move on and see some progress. However, you are likely to blow dust and maybe make different decisions as you move along. The prep work is the most boring part – get it over with at the start.
5. You don't have to clean your brushes and rollers every day.
Most furniture pieces require more than one coat of paint and more than one day of work. Washing your brush/roller after each coat of paint can be a huge pain.
Instead, I wrap my brushes/rollers in foil and place in a ziplock bag in the fridge. As long as they are sealed, you can leave them in the fridge for a few days without the paint drying.
Pro Tip: I also rinse fresh, dry brushes in water before dipping them in the paint – this allows the paint in the bristles to dry slower and makes cleanup easier.
By doing this, you generally only have to clean most of your supplies once!
Painted Entertainment Center Before and After
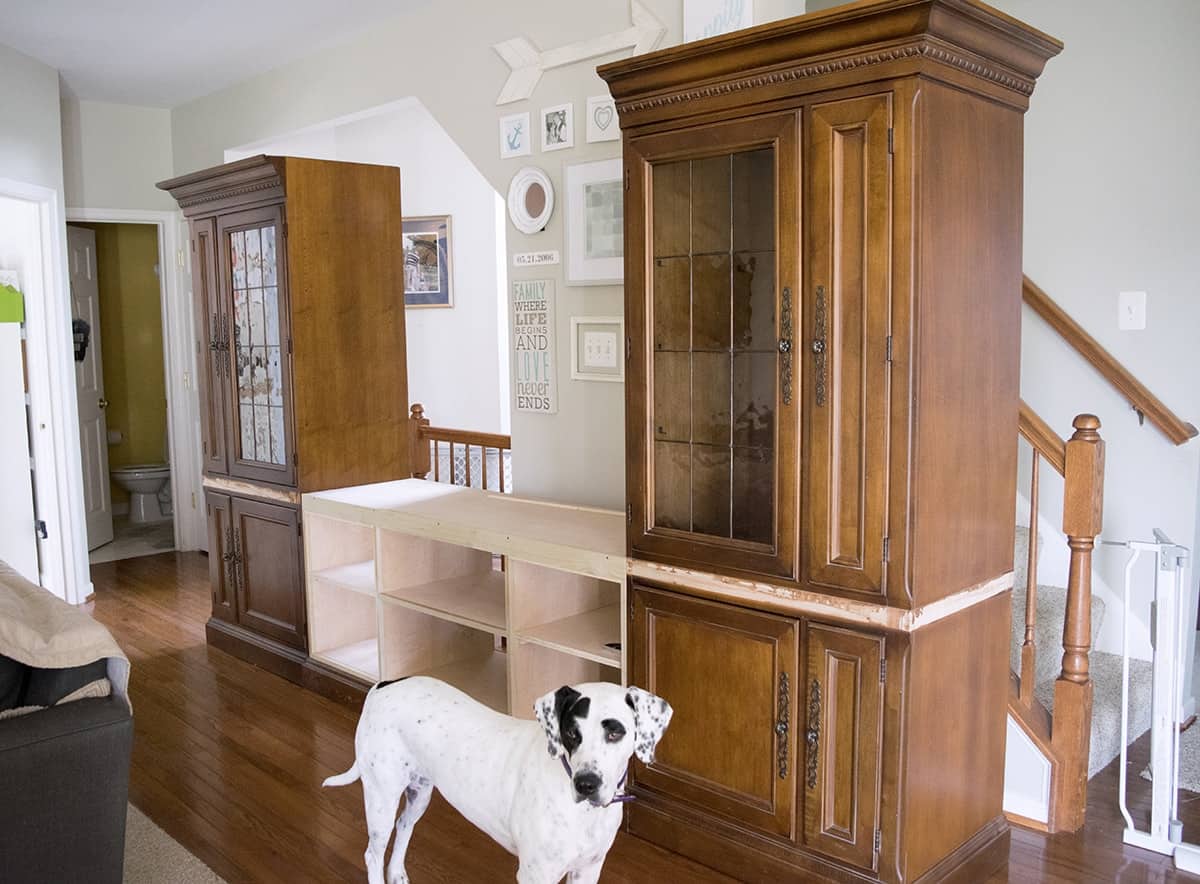
We chose to divide and conquer. Hubby worked on building the TV stand while I started prepping the rest for painting.
Our Design Decisions
My first tip was to make a plan, so this area lists some of the problems we encountered and how we dealt with them in our particular entertainment center.
First, our bookend shelves weigh approximately 300lbs each. Portable, they are not. So, they needed to be painted smack dab in the family room. Thus, I made sure to use a zero VOC paint so we would not have to deal with any toxic paint fumes.
Second, the original trim could not be matched, so we pulled off the center rail and replaced it all the way around.
As you see in the before photo, we did have a long piece of bottom trim. We saved that and cut it in half to make the transition on the bottom seamless. Even though the trim does not extend across the bottom of the centerpiece entirely, it looks intentional.
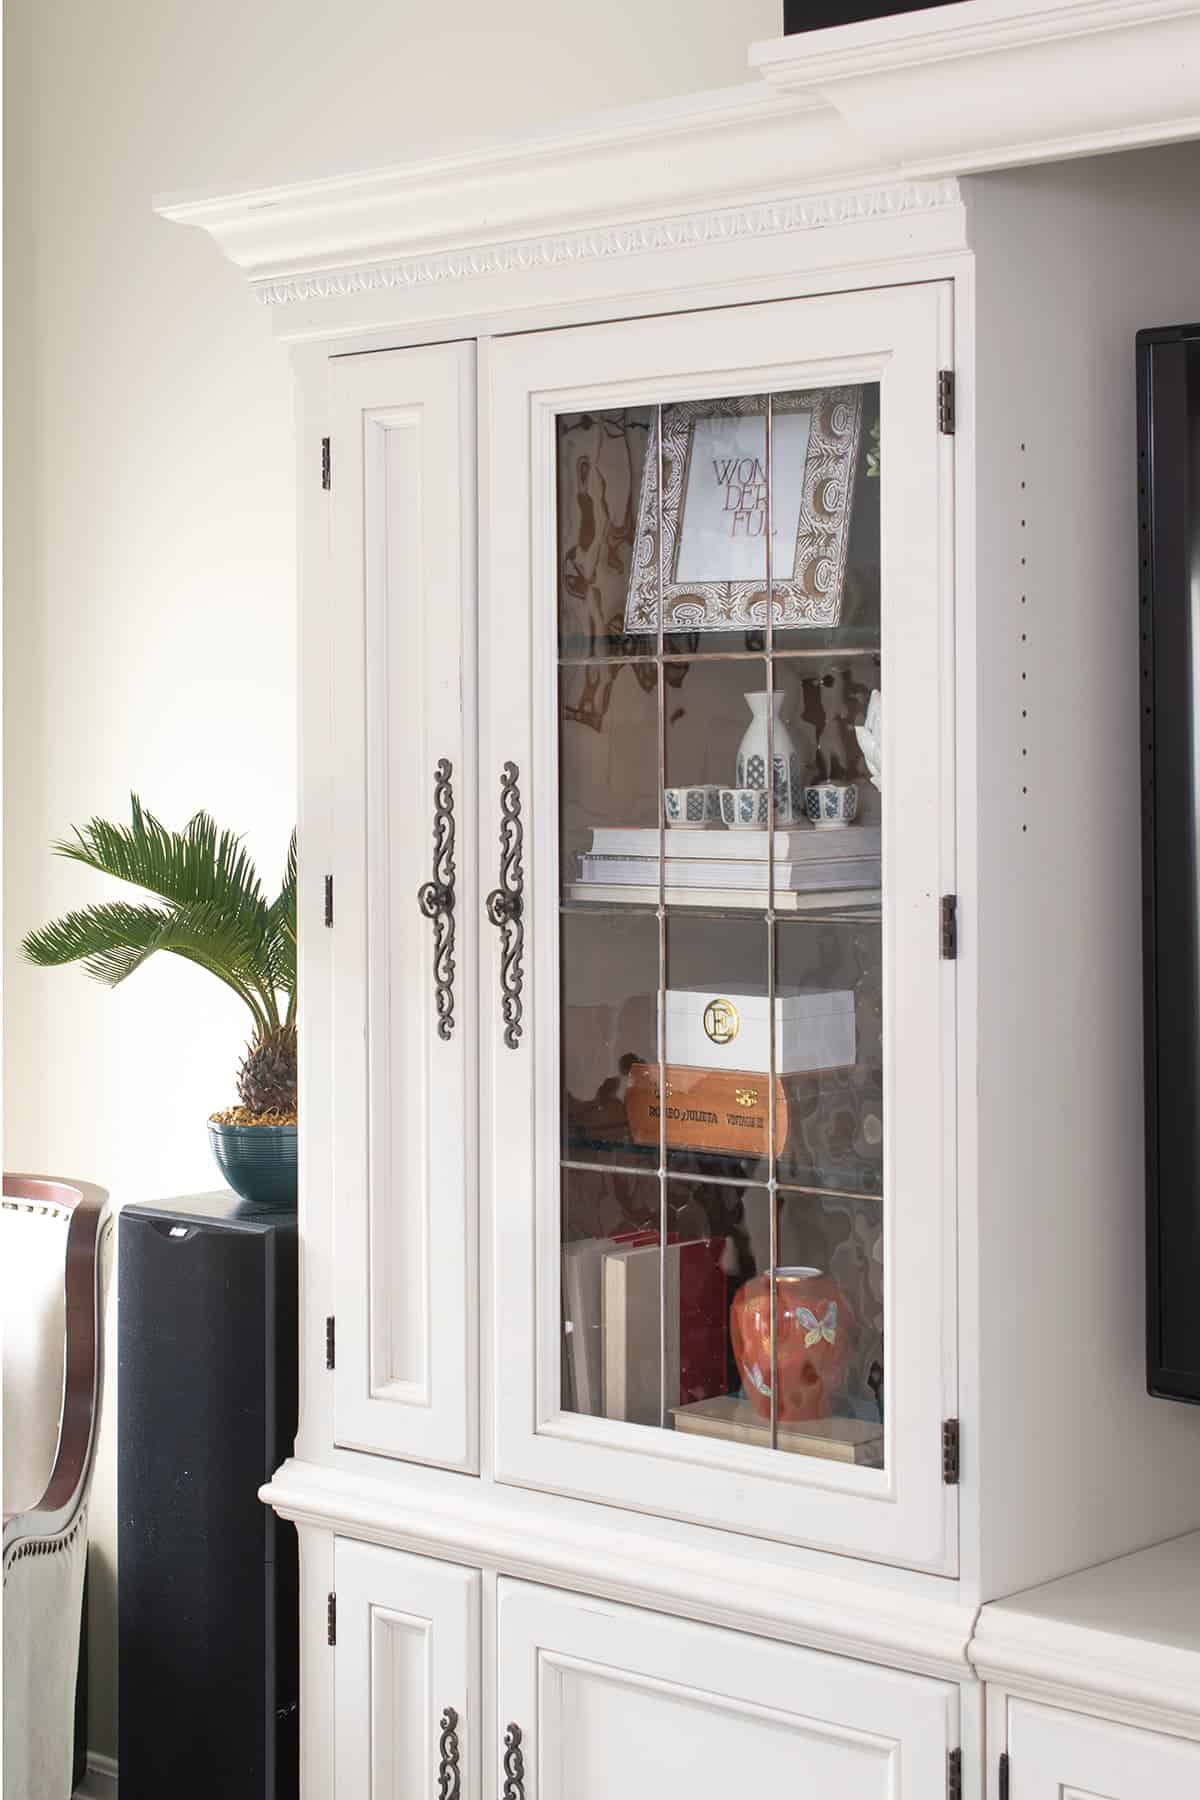
Lastly, I left the interiors of the display shelves dark and unpainted. They have lights and I felt this would be detracting from the exterior.
Beyond these problems, there wasn’t a lot of prep work. I gave it a good sanding around all of the exterior.
Painting the Entertainment Center
The first coat was actually Fusion Mineral Concealer. They do not appear to make this anymore, but it was a cheaper alternative used as a paint undercoat to help transition the dark wood to white without as many coats of expensive paint. I also did a second coat of this.
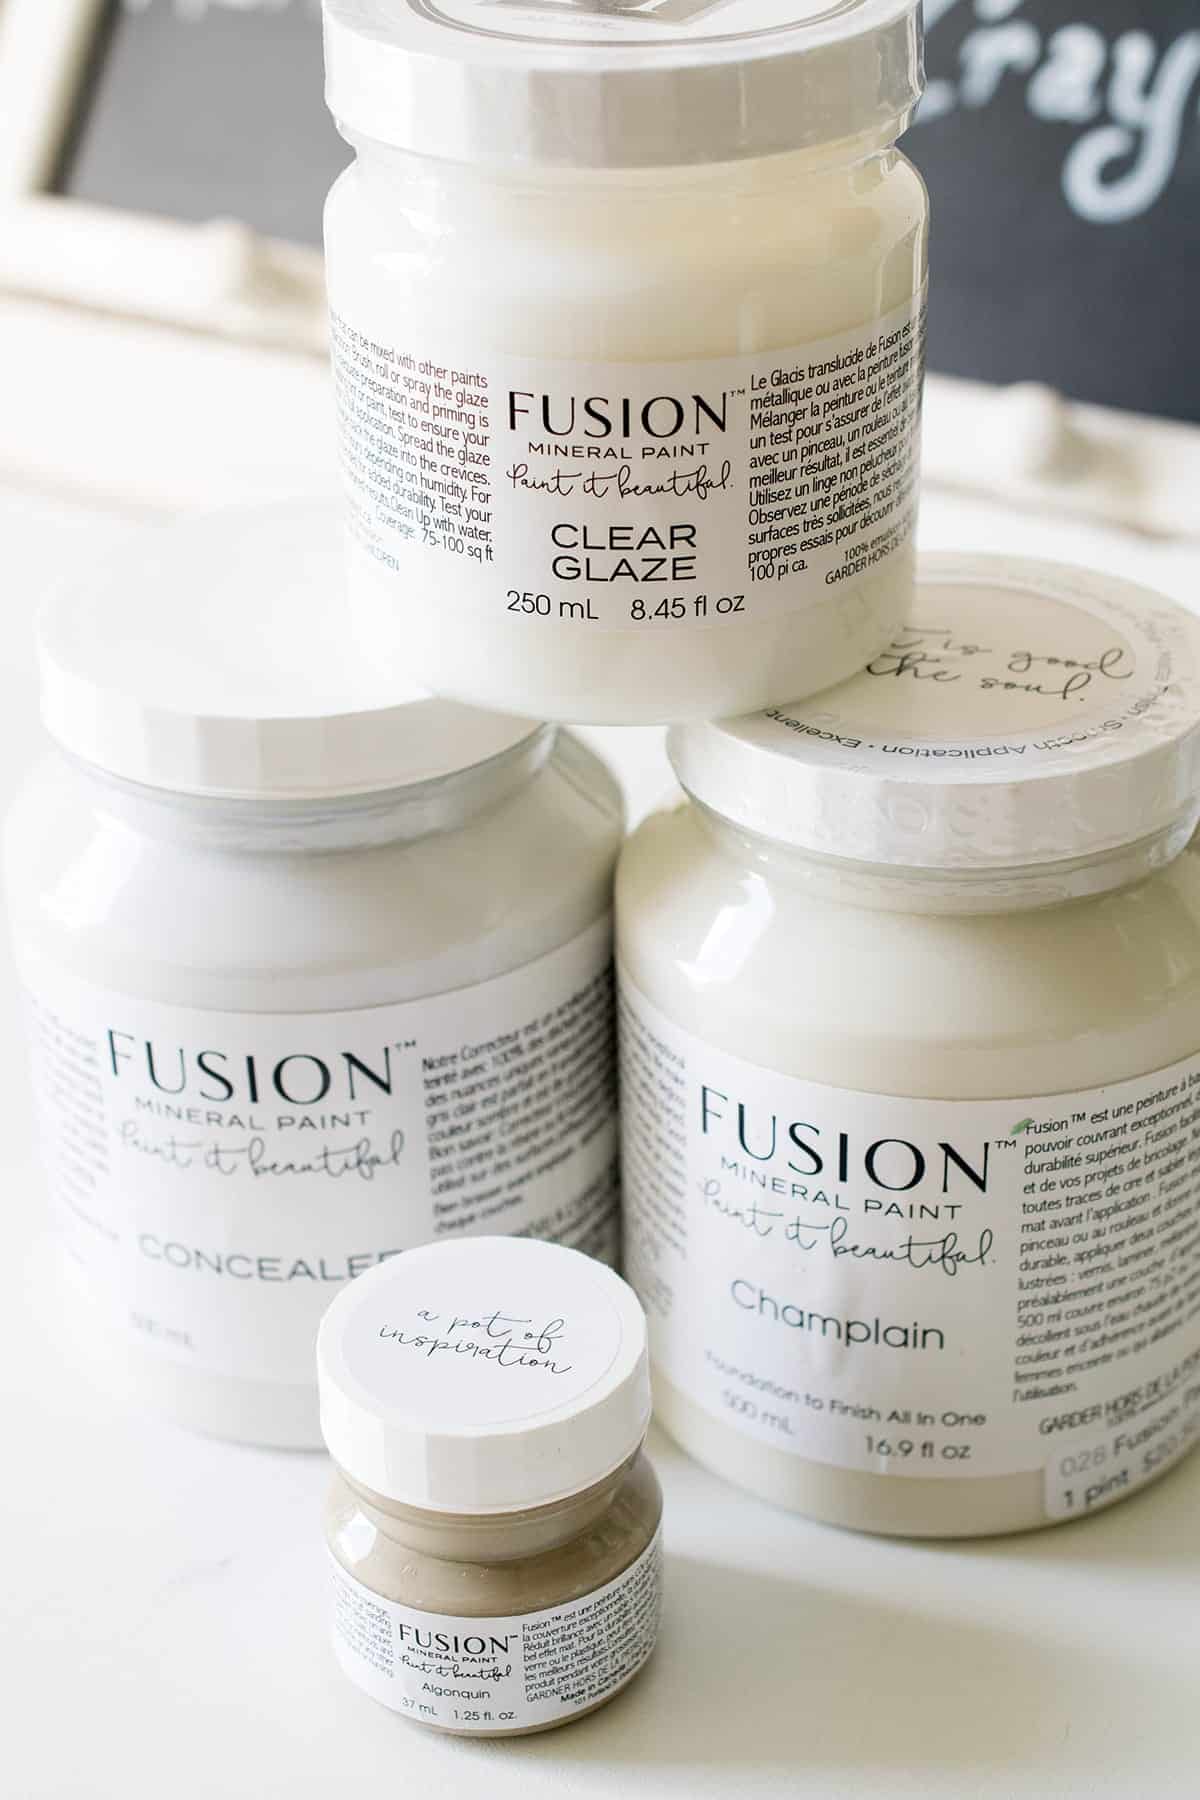
The final coat is Fusion Mineral Champlain. It’s a warm white that felt comfortable and cozy. It’s durable and easy to work with.
To add a slightly antiqued style, I handpicked a few spots and door corners to sand. As I painted, I discovered there were pin holes and natural distressing in the original stain, so a little paint distressing in the paint made design sense.
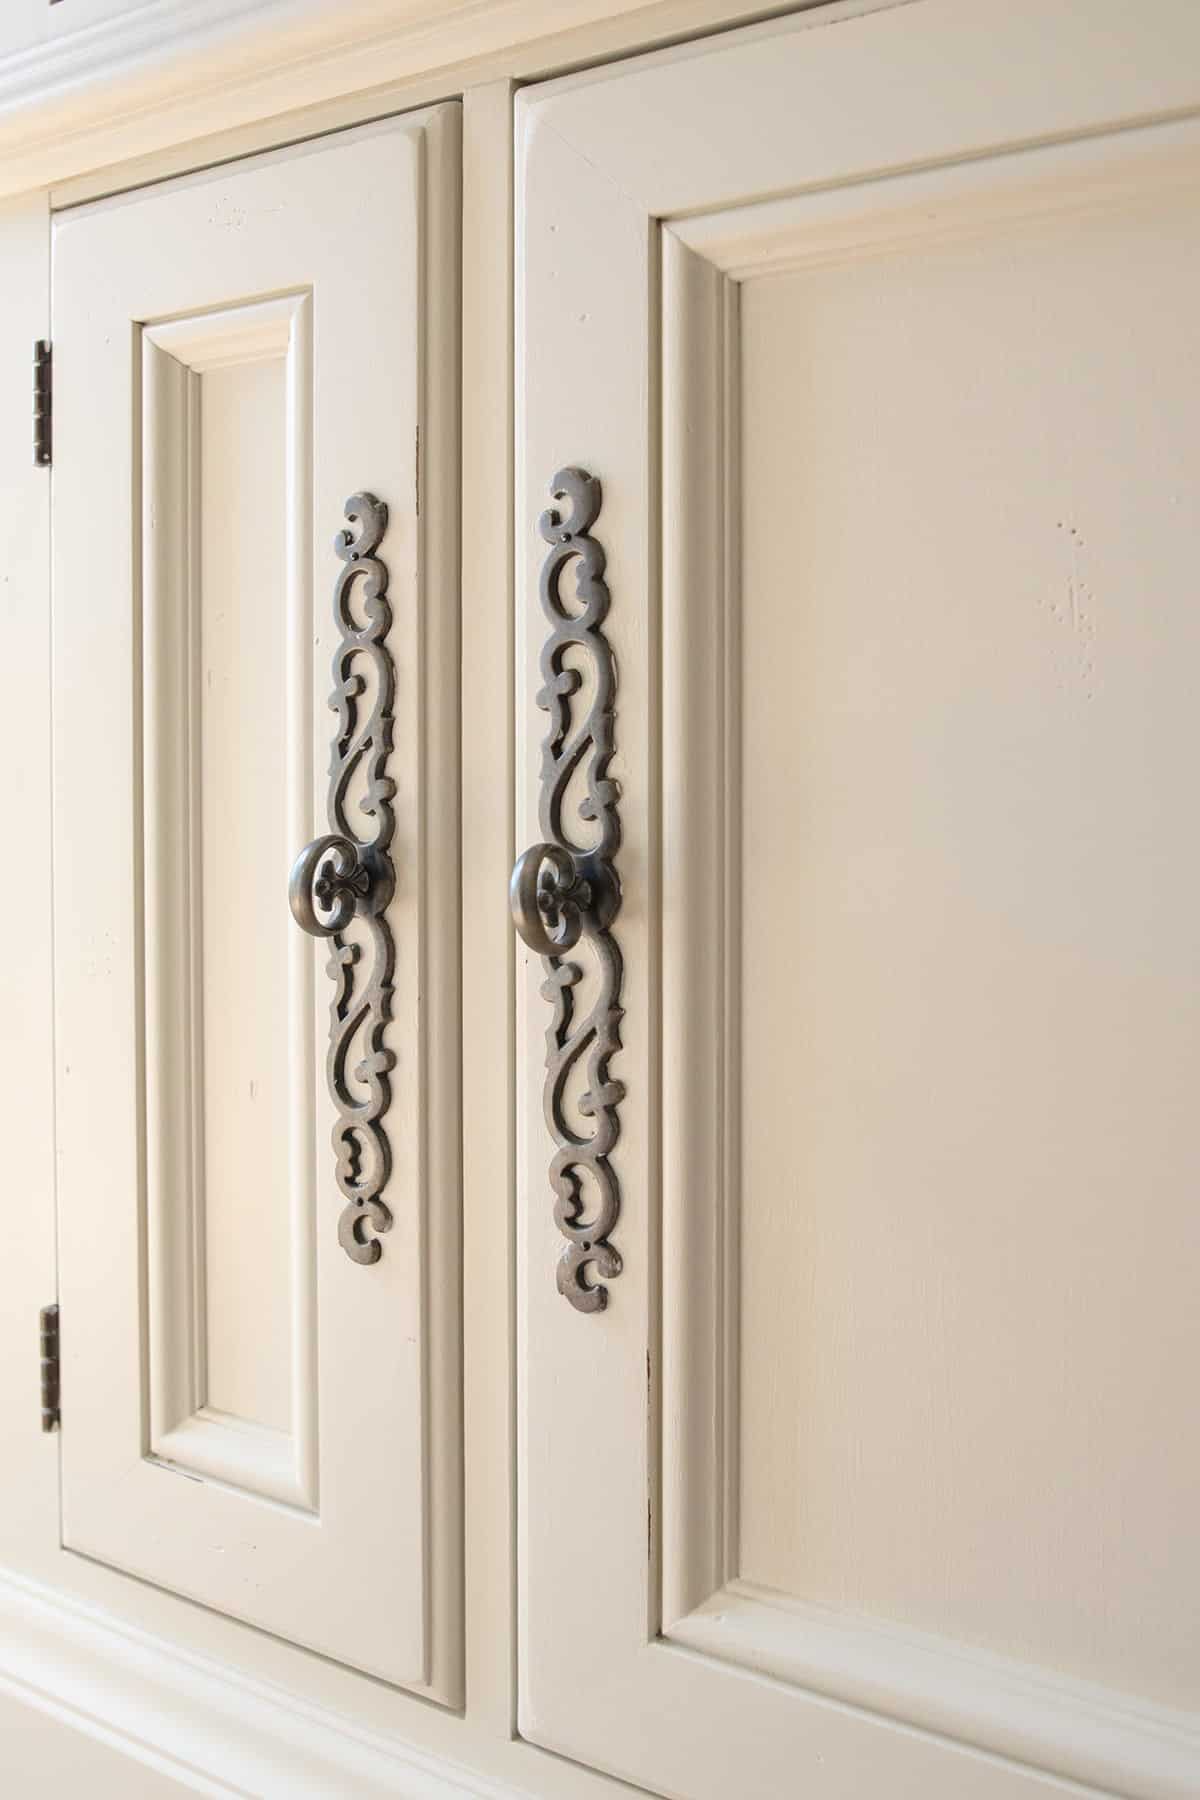
The original handles could not be removed, so I spent hours (days in fact!) with a teeny-tiny brush hand painting around them. You could barely see these pulls in the original dark finish, and they stand out beautifully now!
Just look at this stunning after!
Because this piece is almost exclusively used for display, I felt I could get away with not adding a topcoat of any kind – no wax, poly, polyacrylic, or glaze and it has held up great for years!
How We Matched the Doors
Our entertainment center was a steal originally because the seller wanted to keep the center piece. It had a top, but not a TV stand. So how did we make the entertainment center look like it was this way all along?
We built one! The custom center entertainment console looks like it was built in. It’s seamless and makes a HUGE DIFFERENCE!
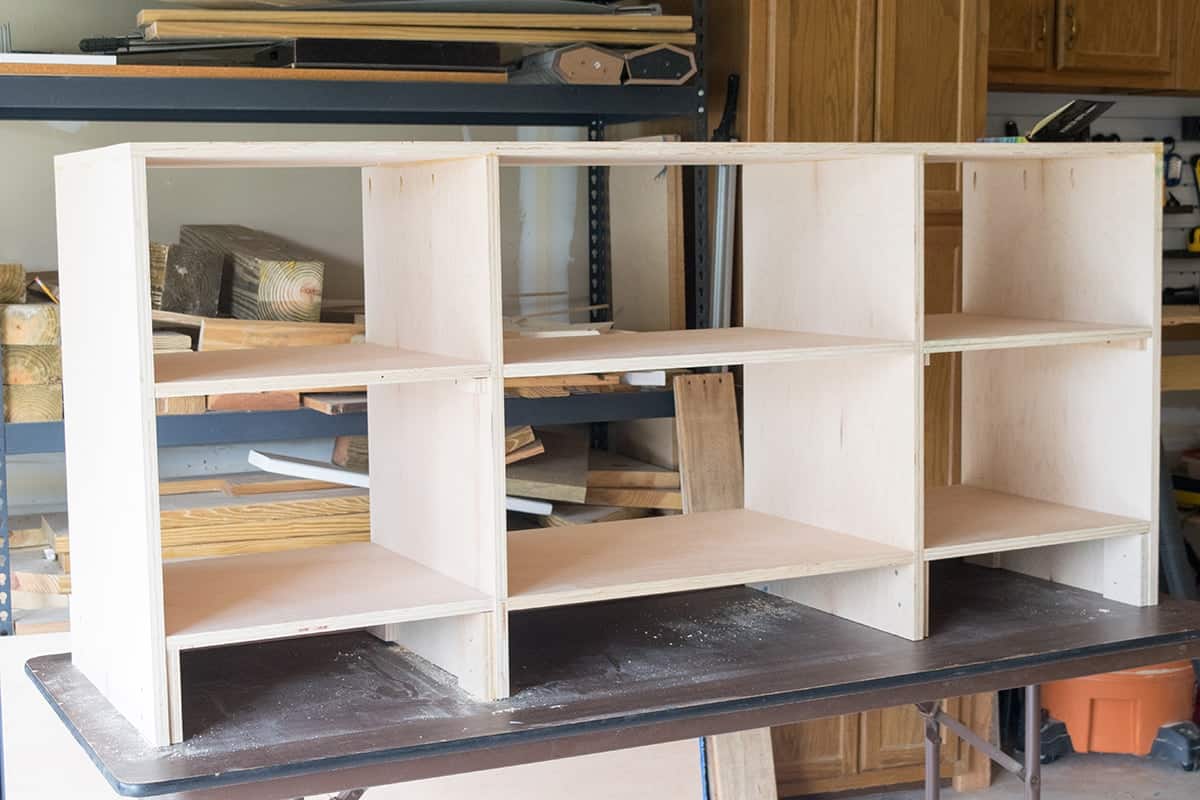
First, my husband put together the basic foundation for the center console. As seen above, it’s made only from good quality plywood in a frame of shelves. I designed and helped to add the trim and doors on either side.
The doors in the center match the rest of the unit. I found new hinges that matched perfectly but knew that finding those ornate pulls would be impossible. So, I got simple new knobs in the same antiqued bronze color. I feel the simplicity is actually better!
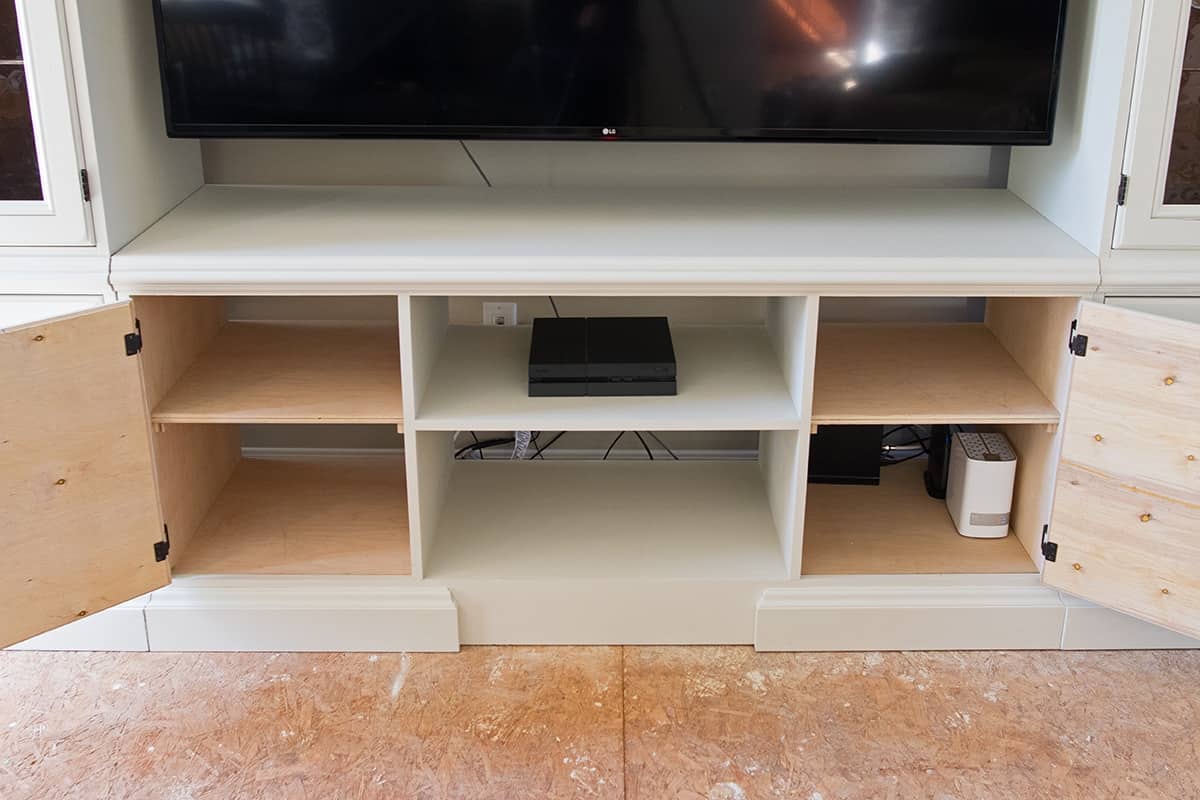
The doors themselves are created from thin plywood and then we mitre cut and glued 1x3s to the front of the panel. We used a router table and roundover bit to curve the edges of the doors. Lastly, we layered some stock trim around the inside of the 1x3s that matched the existing doors.
At the time of completion several years ago, this was our largest furniture project ever and our first foray into furniture building. But that’s the whole point of sharing this- success comes through a process of trial & error. If we can do it, you can too!
Share your comments and questions below! I’m always happy to answer questions for those gearing up to create something new and unique.
Check out Our Post with Tips on how to Start a Room Makeover to see how we incorporated this huge piece of furniture into our Family Room.
Looking for more furniture makeover ideas? Check these out!
- Laminate vs Veneer: Painting Tricky Surfaces
- Colorful Painted Furniture Makeovers
- Best Tips for Painting Furniture White
- How to Lighten Wood
- DIY Media Cabinet Makeover
Frequently Asked Questions
Use light neutral colors for your TV stand like white and grey to make your room appear brighter and more spacious. Bold colors can be a fun punch and black can be beautifully dramatic but has a tendency to show dust.
Fusion Mineral Paint is waterproof and washable whereas chalk paint would need to have a sealer to make it waterproof. Fusion is matte in sheen but not as flat or velvety as chalk paint.
Expect to pay about $120-150 in materials and supplies (sandpaper, paint, primer) and up to $500 or more for labor if you have a professional do it.
Absolutely not, although it depends on the condition, age, and other factors of course. One man’s trash is another man’s treasure and having an updated look can bring more value.
Overly matching furniture pieces is a thing of the past. It’s better to be cohesive than to match perfectly. Mismatched TV consoles and coffee tables can create a unique aesthetic in your family room.

Grab our free series "Weekend Home Projects that will Transform Your Life" Sign up below to receive updates including free printables, organization tips, home improvement projects, recipes and more! |
Like Furniture Makeovers? There’s more!
PS I love seeing your creations! Be sure to take a photo and tag #cravingcreative on Instagram! You can also stay in touch with me through following me on Instagram, Pinterest, and subscribing to the newsletter!
Michelle says
I have that very entertainment center, but with the center console and the bottom doors have fabric for internal speakers. After seeing this, I’m ready to paint mine! We are getting away from the orange woods in our house (cabinets, floors, furniture…) My entertainment center takes up an entire wall so it’s definitely a focal point; just need to make it not so obvious because it’s so large and soon to be a non-cohesive color. Any way I could get your step by step for prepping the wood: stripping, sanding, priming, and painting application? Thanks so much! Can’t wait to show my husband our unit’s potential!
Rachel says
Ours had fabric inserts meaning you could swap between the wood and speaker mesh fronts of the doors. It’s fairly in-depth (using my son’s bed as an example), but I have a tutorial on how to paint furniture step by step here.
Erica says
Wow! You did a fantastic job, beautiful work.
Joe says
Looks awesome , we are going to buy the same unit second hand and plan on refinishing it ourselves. How did you make the doors on the center console? Where did you get the door hinges? And why didn’t you extend the base molding across your center console?
Great work!
Rachel says
When we built/modified this particular entertainment center, we upgraded to a 75-inch tv. My husband loves his big TVs, haha. The top of the center piece is extended as far as it can go. The bottom molding piece wasn’t as long, so our solution was to cut it in half and style it as you see now. The hinges and door pulls on the center piece are from Lowes.
I designed the doors to mimic the other doors on the piece, and my husband and I built them. I just designed another set for a different set of cabinets and hope to show those in better detail. I hope this makes sense, as it is hard to describe without step by step photos. For the new doors, we used a piece of birch plywood (you can see it on the one photo where the center doors are open). Then we glued/brad nailed a 1/2 thick board on top around the outside. Using a router table, I created the exact same curved edge that is present in the rest of doors. Then we put a piece of stock molding (from lowes’ – it is similar to what is on the other doors) around the inside of the board. It honestly looks pretty darn close and hard to tell that the center piece of the console was built afterward. I hope that help and makes sense.
Joe says
Thanks so much for your detailed response and everything made absolute sense. And yes the center unit you made looks like it was part of the original unit.
I just have a few more questions. 1.) I assume your birch base for the doors was only a quarter or 3/8 thick? 2.) what router bit did you use for the wood you used for your door trim . Was that wood just pine? 3.) did you apply veneer edging Tape to the edges of the ply wood you cut for the top and shelves . Just wondering I’d you needed the tape to create a smooth finish? 4.) can you share a you higher resolution picture of the unit ?
Thanks for sharing what you did , it really is inspiring. Great use of furniture that may have gone into the trash.
Rachel says
1. That’s probably about right, between 1/4-3/8. I’m currently on travel so I don’t have it to look at unfortunately. 2. We used a roundover bit similar to this one. We sank it a little bit deeper to get the inner straight edge and then the round outside edge. I am not sure exactly of the wood species used there, but I generally use poplar or better. Poplar is smoother, but only a little harder than pine. Poplar is fine for something that isn’t going to be banged a lot. 3. Since this is painted, I filled the edges rather than using veneer tape. I was going to add tape to the front of the inside shelves, but never got around to it. I do still own the unit so if you would like, I can send a closeup of any area you are interested in. For many technical reasons, I can’t load huge photo files to the website. Unfortunately, I won’t be returning home until next month though.
Barb says
Hi ..I have a large entertainment centre very much like yours. I have been thinking about painting it and after seeing how awesome yours looks , I`m going to do it.What a great transformation. You did an amazing job as well as your husband.
Amelina says
I absolutely love this idea. I’ve had my entertainment center for over 10 years and needed to change it up. I told my fiancé that I wanted to paint it white and he thought I was crazy. I showed him your pics and he was able to understand my vision. Thank you so much for sharing.
Pam Conn says
How did you extend the top. It looks like the same piece but I can see it is larger? Looking to do the same to my entertainment center but husband thinks I’m crazy.
Rachel says
The top piece is original. It was just a piece of plywood that covered the tv area and lays on top of each bookcase.
Angela, Blue i Style says
I am so impressed! That is crazy good building and painting, and so worth all of your hard work!
Shannon Rogers says
Do you have details on how to build the center piece? I have a large entertainment center with the 2 bookshelves on each side and the top that lays over each book shelf. My only problem is that it didn’t come with a center piece. Over the years, we have used different center tv stands and none of them look good. I finally found one that I can live with but it doesn’t look like it belongs. I would love to build one that actually looks like it is part of the entertainment center.
Rachel says
I do not since we designed it specifically to fit this piece. Using trim to match the doors and wraps around the outside bookshelves with new trim was how we got the new piece to match. It is extremely expensive to try to match the trim that was existing, so we chose to replace it instead with chair railing from lowes.
katyashadeofteal says
It looks so great! You guys did such a good job, can’t wait to see the rest of the room!
refashionablylate says
Wow what a transformation! It looks amazing!
Rachel says
Thank you! It was a lot of work but it is definitely worth it. I am so excited to decorate for Christmas now.
melaniealexander says
Looks fantastic! That was a major project, I am sure you are glad it’s finished. Great job!!
Rachel says
Thank you! I am very glad it’s finished. Home stretch now.
The Red Painted Cottage says
What an amazing transformation! I’ve never used Fusion Mineral paint, but I’ve heard nothing but good things about it. Looking forward to seeing the reveal.
April R - Uncookie Cutter says
whoa!!!! What a change! It’s looking fabulous! Pinning!