A beautiful architectural statement, wainscoting is an inexpensive way to make a room feel upscale and custom designed. This tutorial shows you how to install wainscoting with basic materials.
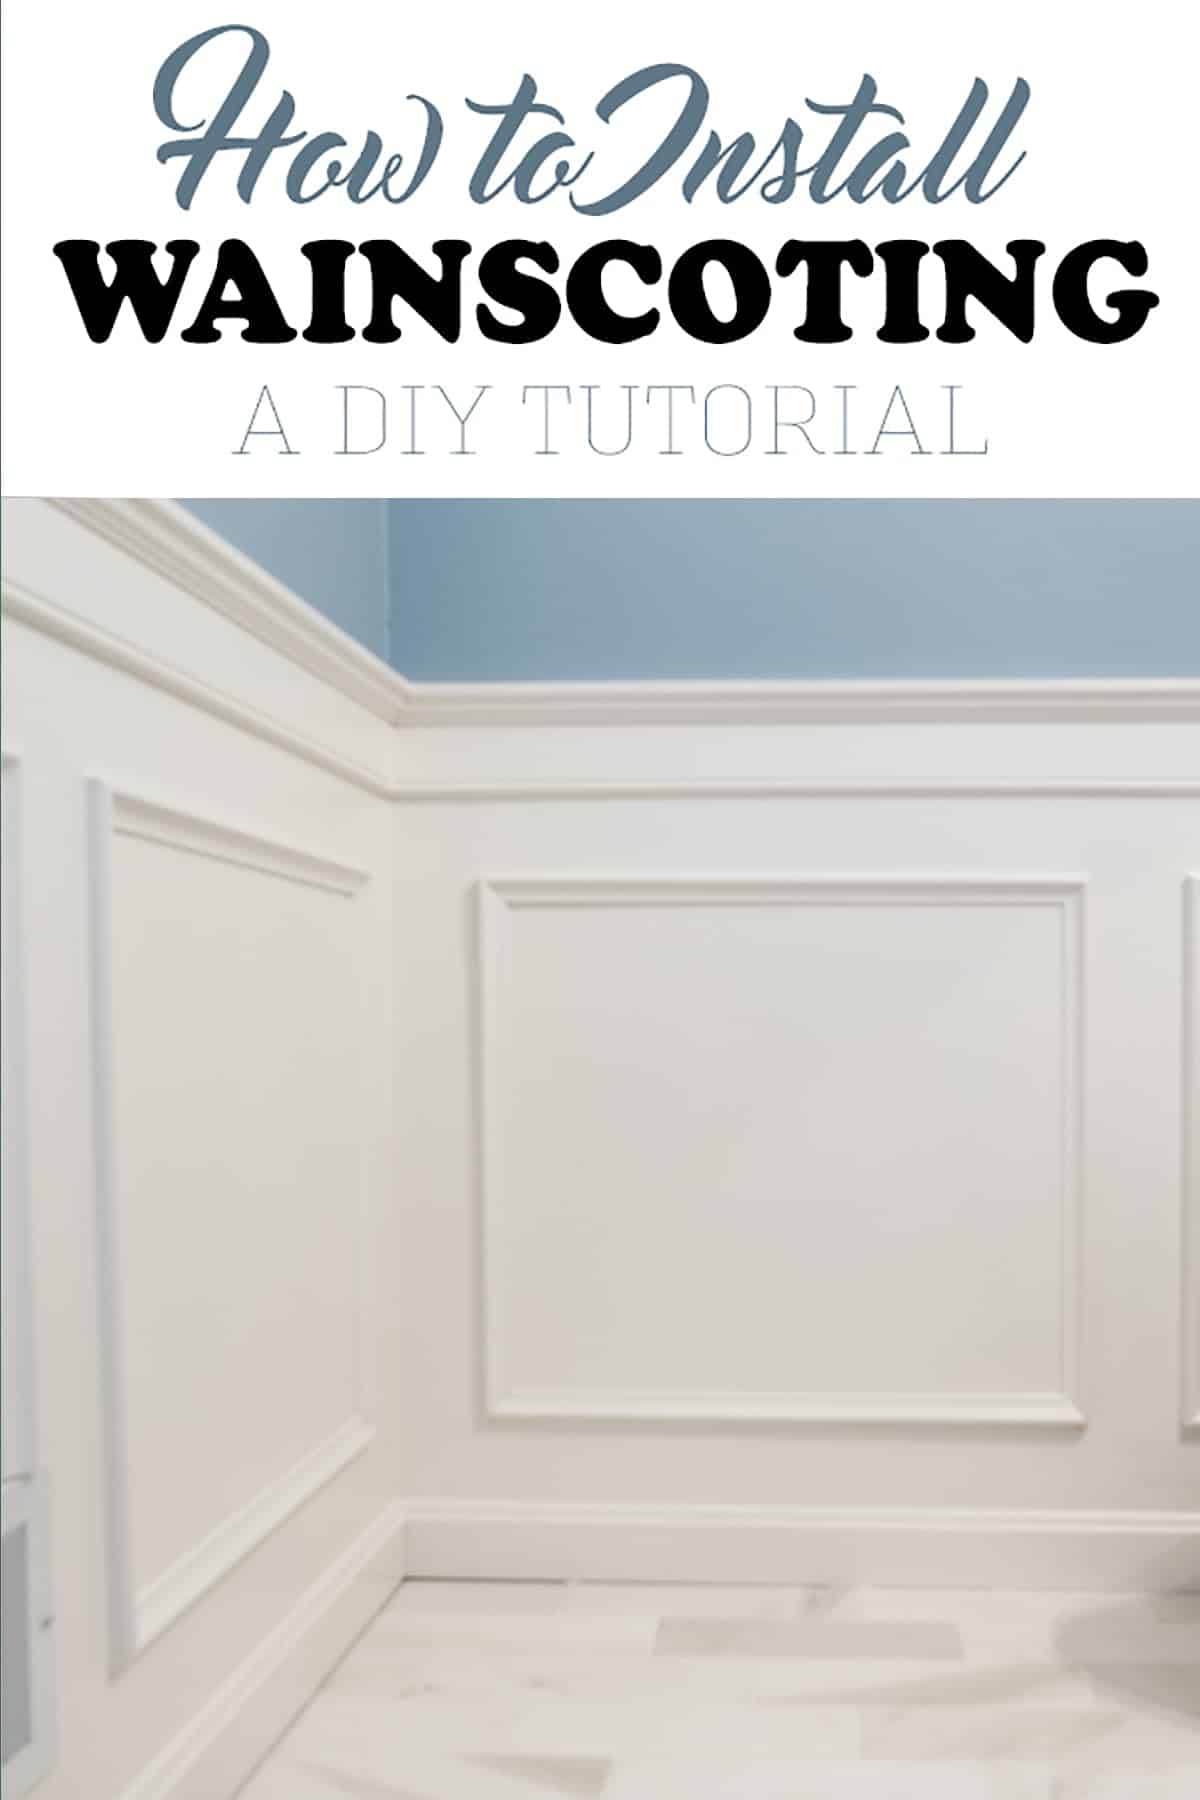
A few weeks ago, I shared that for the longest time, I had this terrible yellow bathroom and I hated it. Installing wainscoting added a classic, upscale style and broke up the space in a way that makes it feel elegant.
Recommended Supplies
- Trim
- Chair Rail Moulding – you can see our design below, but there are multiple variations.
- Compound Miter Saw
- Tape Measure
- Painter’s Tape (recommended)
- Level
- Wood Filler
- Brad Nailer or Finishing Nails and Hammer
- Wood Glue
- Paintable Caulk
- Paint
I personally do not like pre-made panels you can buy at big box stores, because you can’t adjust the sizing. This leaves you ending in awkward places, especially on small walls. So we created our own!
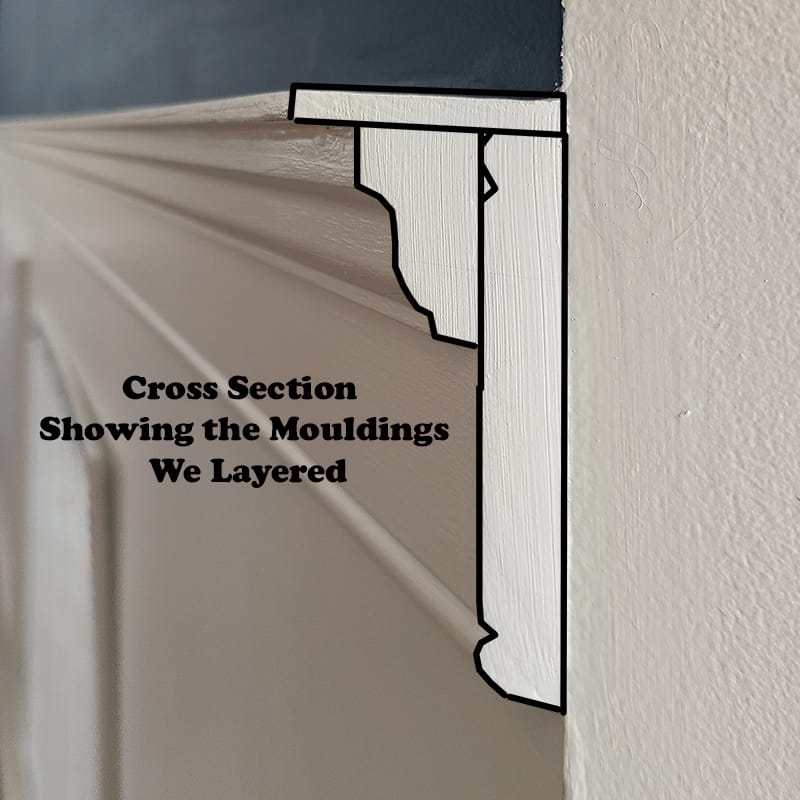
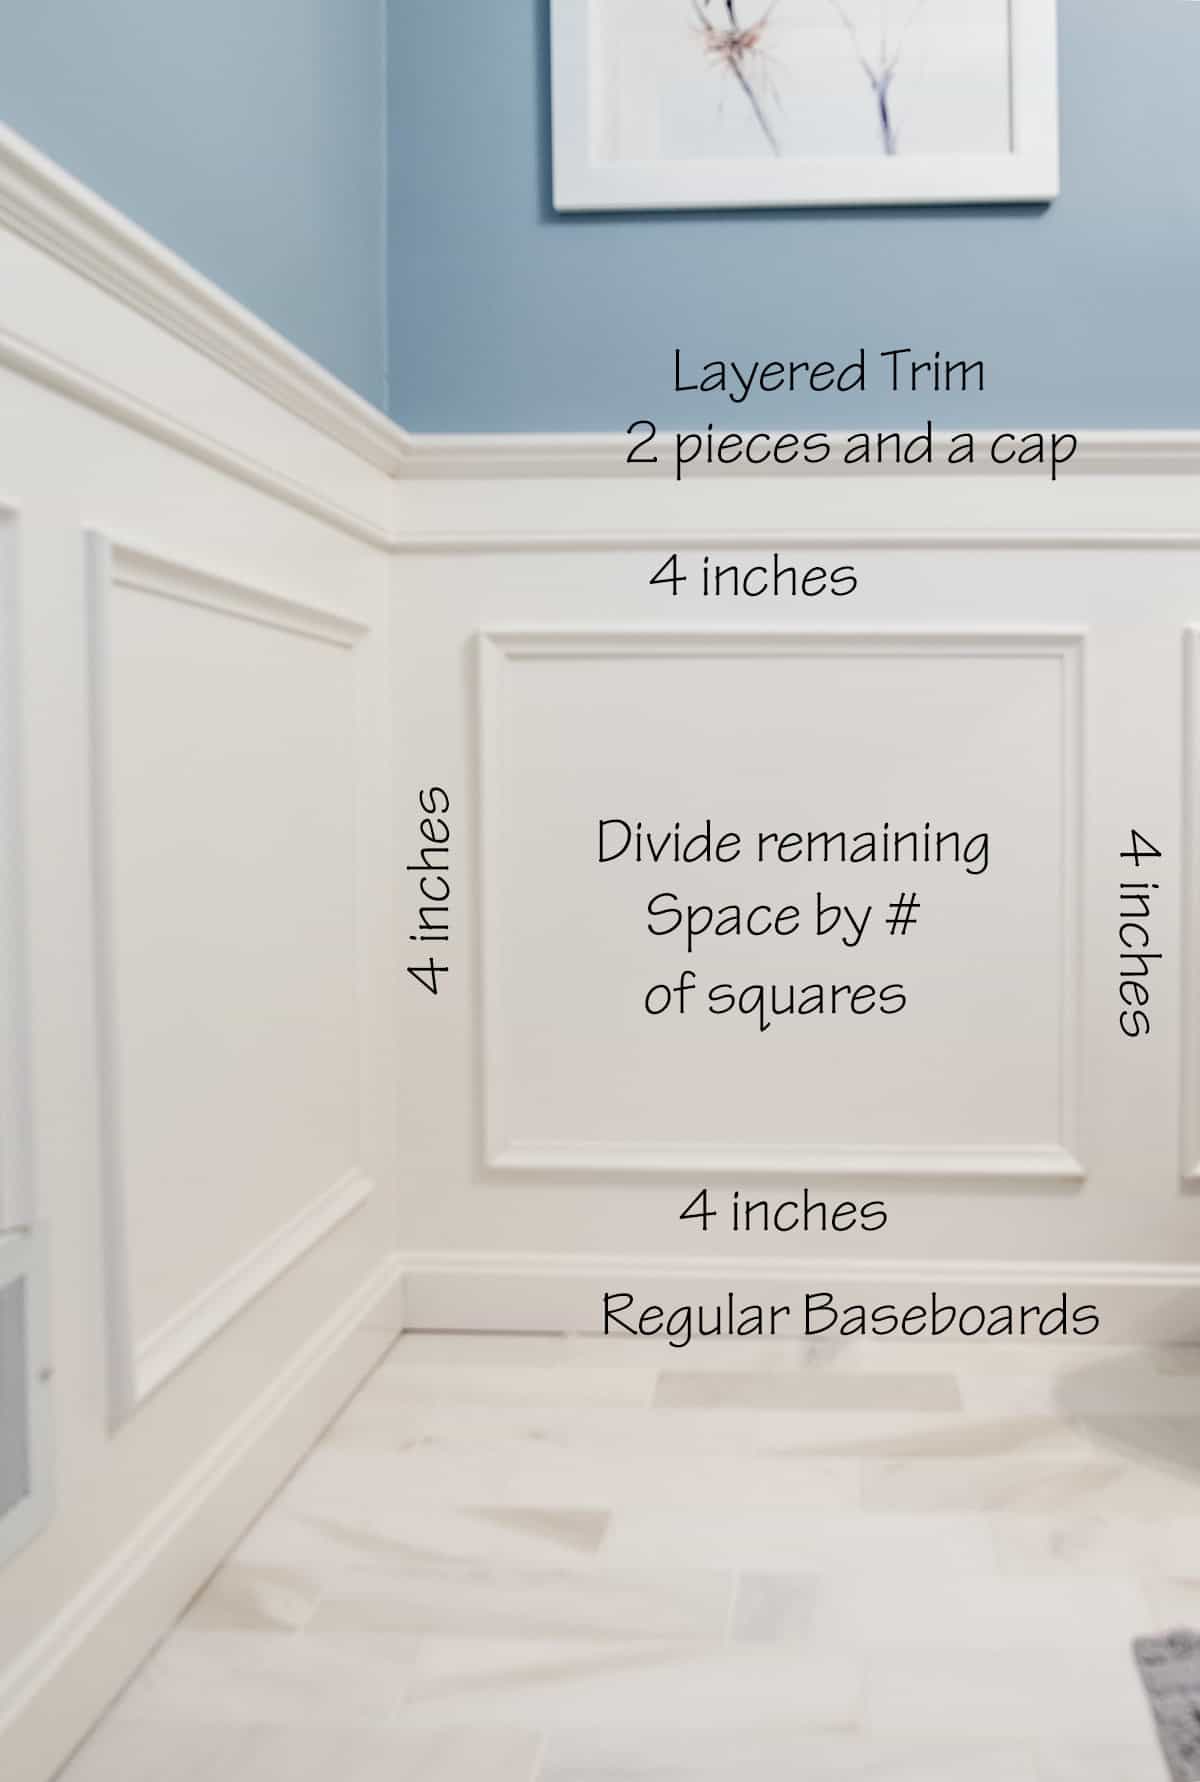
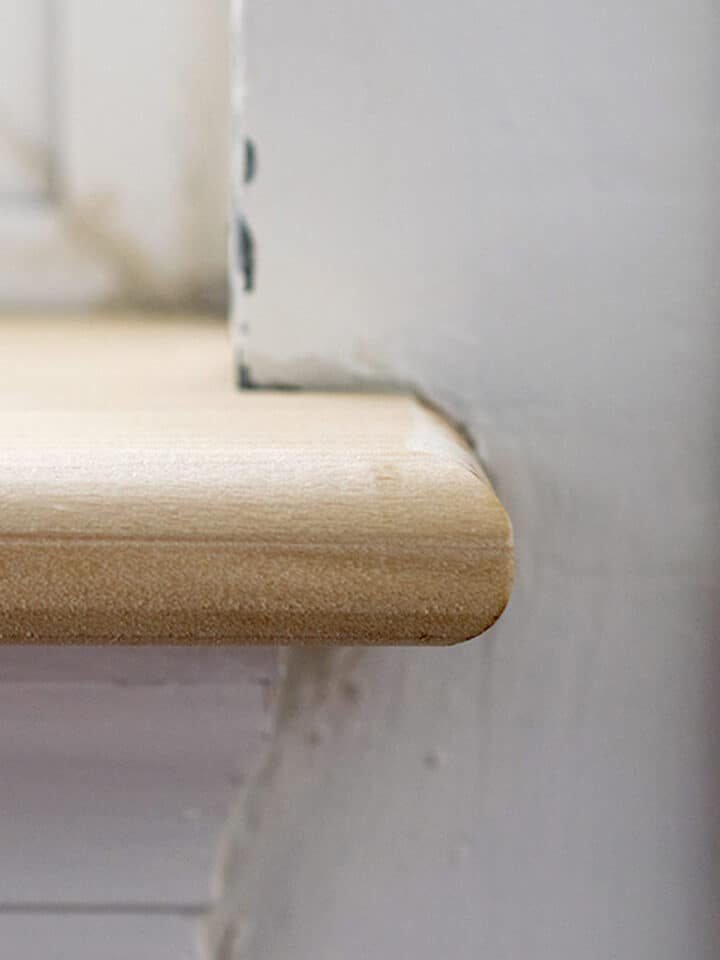
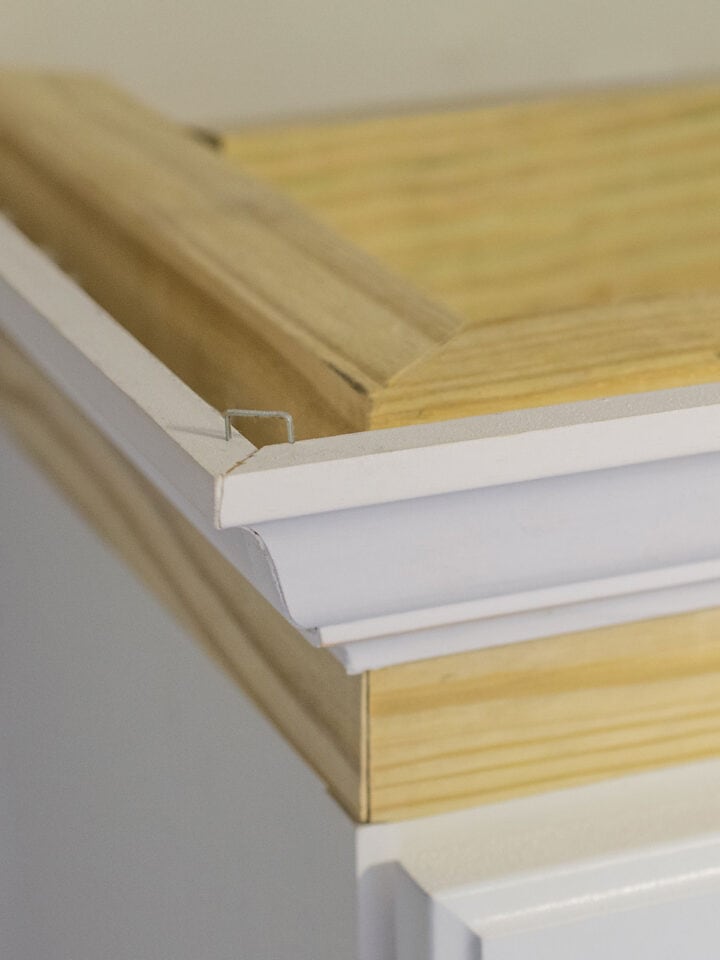
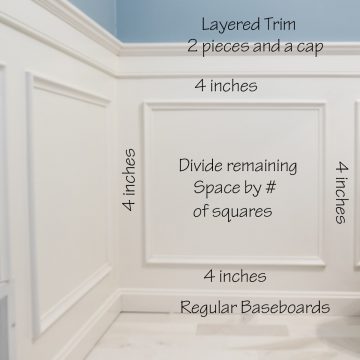
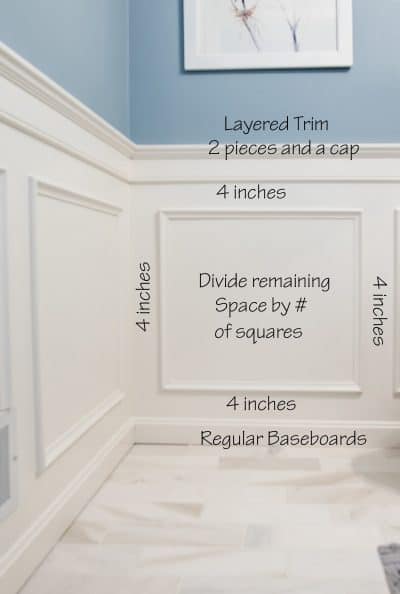
Our design is a combination of a few trims, particularly for the chair molding area. We glued and nailed them together. We used this Chair Rail Backer Moulding, along with a Small Crown Moulding, and a flat cap. Below is a 45-degree angled cross section of our dining room wainscoting, which is similar.
Deciding Your Wainscoting Design
For this or any type of wainscoting design, draw your design before you purchase materials. This will help you visually see how everything will look.
You can adjust the height as needed and the sizing. This will also help you see anything that may interrupt your design such as wall vents, a sink, a doorway. For our bathroom, we had to work around the sink and a wall vent, but we did not change the size of the squares and it looks fine. Check the corners of your squares with a T-square or vertical level for perfect 90 degrees.
QUICK TIP:
Use painters tape while you are still deciding on the design. That way you only have to mark once. I still recommend drawing out the squares once you have decided the sizing.
And of course, measure twice before purchasing your materials!
How To Install Wainscoting
Of course, first make sure your walls are in good repair including repairing any cracks, priming, and fix baseboards so they are in good condition.
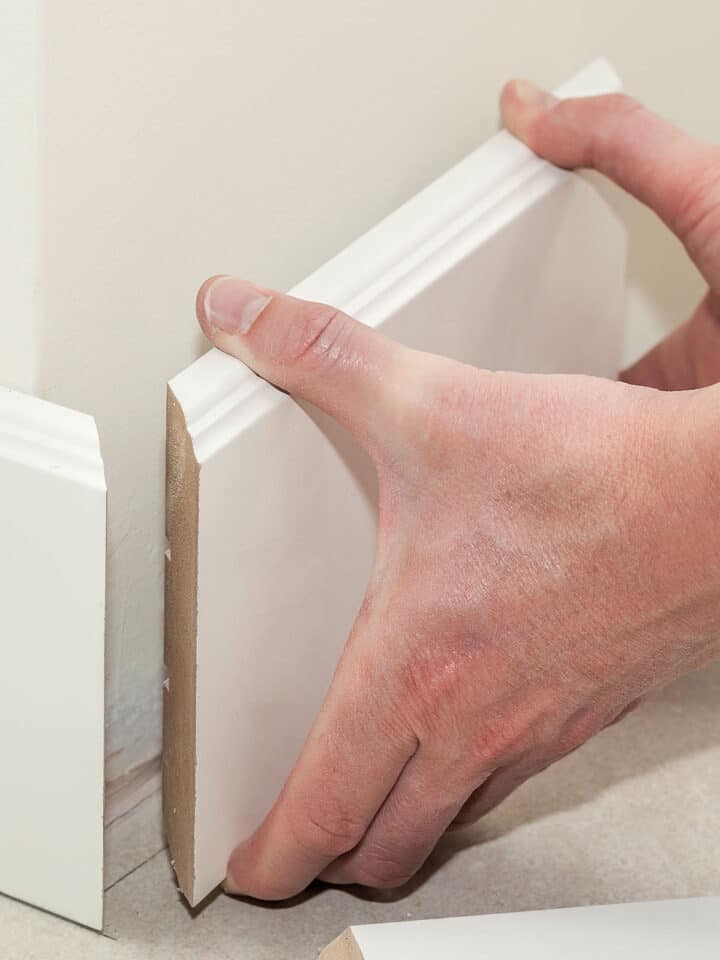
Step 1: Cut pieces to size using a compound miter saw.
The corners are mitered (i.e. cut at 45-degrees to line up). I personally prefer to cut one piece at a time and tack them as we go around.
If you are layering trim pieces like we did for the chair rail, I recommend putting them together and then cutting each piece.
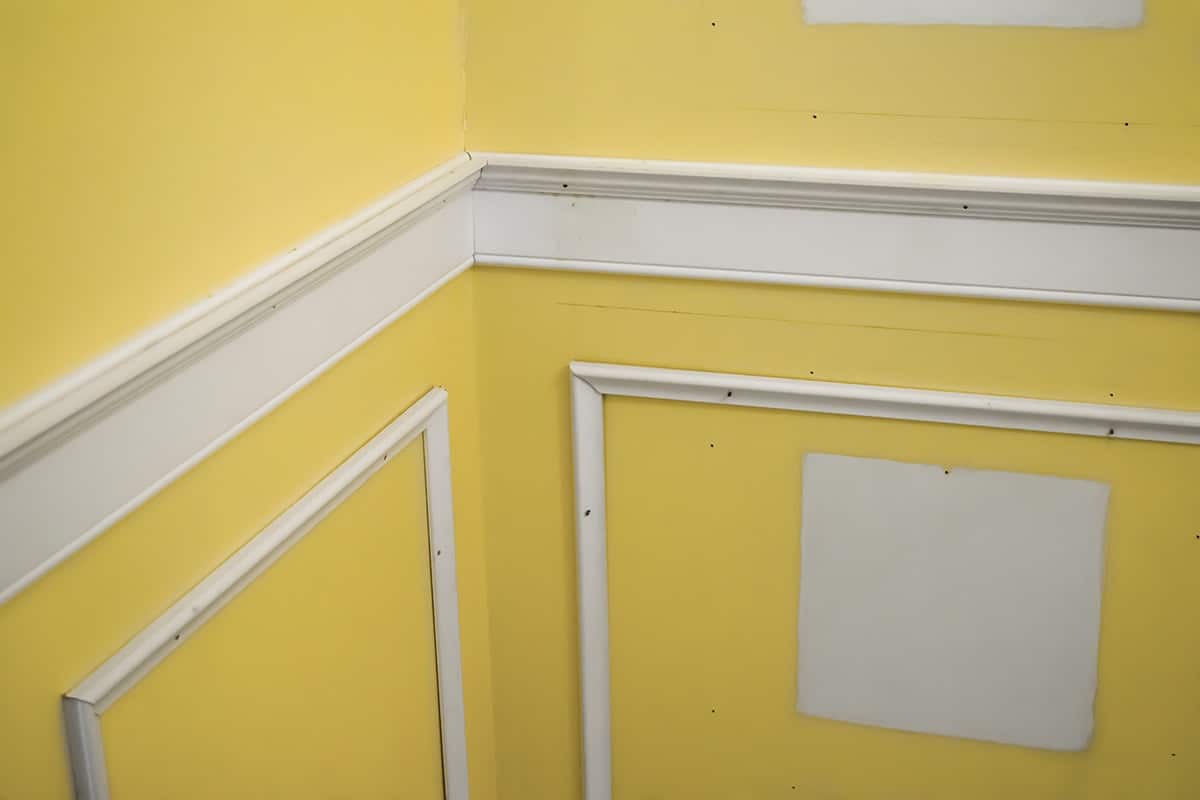
Step 2: Attach to the Wall.
These easiest way to attach is to run a small bead of caulk along the backside of the trim and then nail into place. Use a level to make sure tops and bottoms are straight.
Although nails and a hammer will work for this project, I highly recommend a brad nailer. It’s fast and requires a lot less hole filling.
Fill any nail holes as necessary but gluing with caulk will cut down on how many nails you need.
QUICK TIP:
Label your cut pieces as you go so you aren’t searching for where they belong when tacking them to the wall.
Nail at an angle when tacking the boards to the wall where there isn’t a stud behind the drywall. This gives a better and tighter hold.
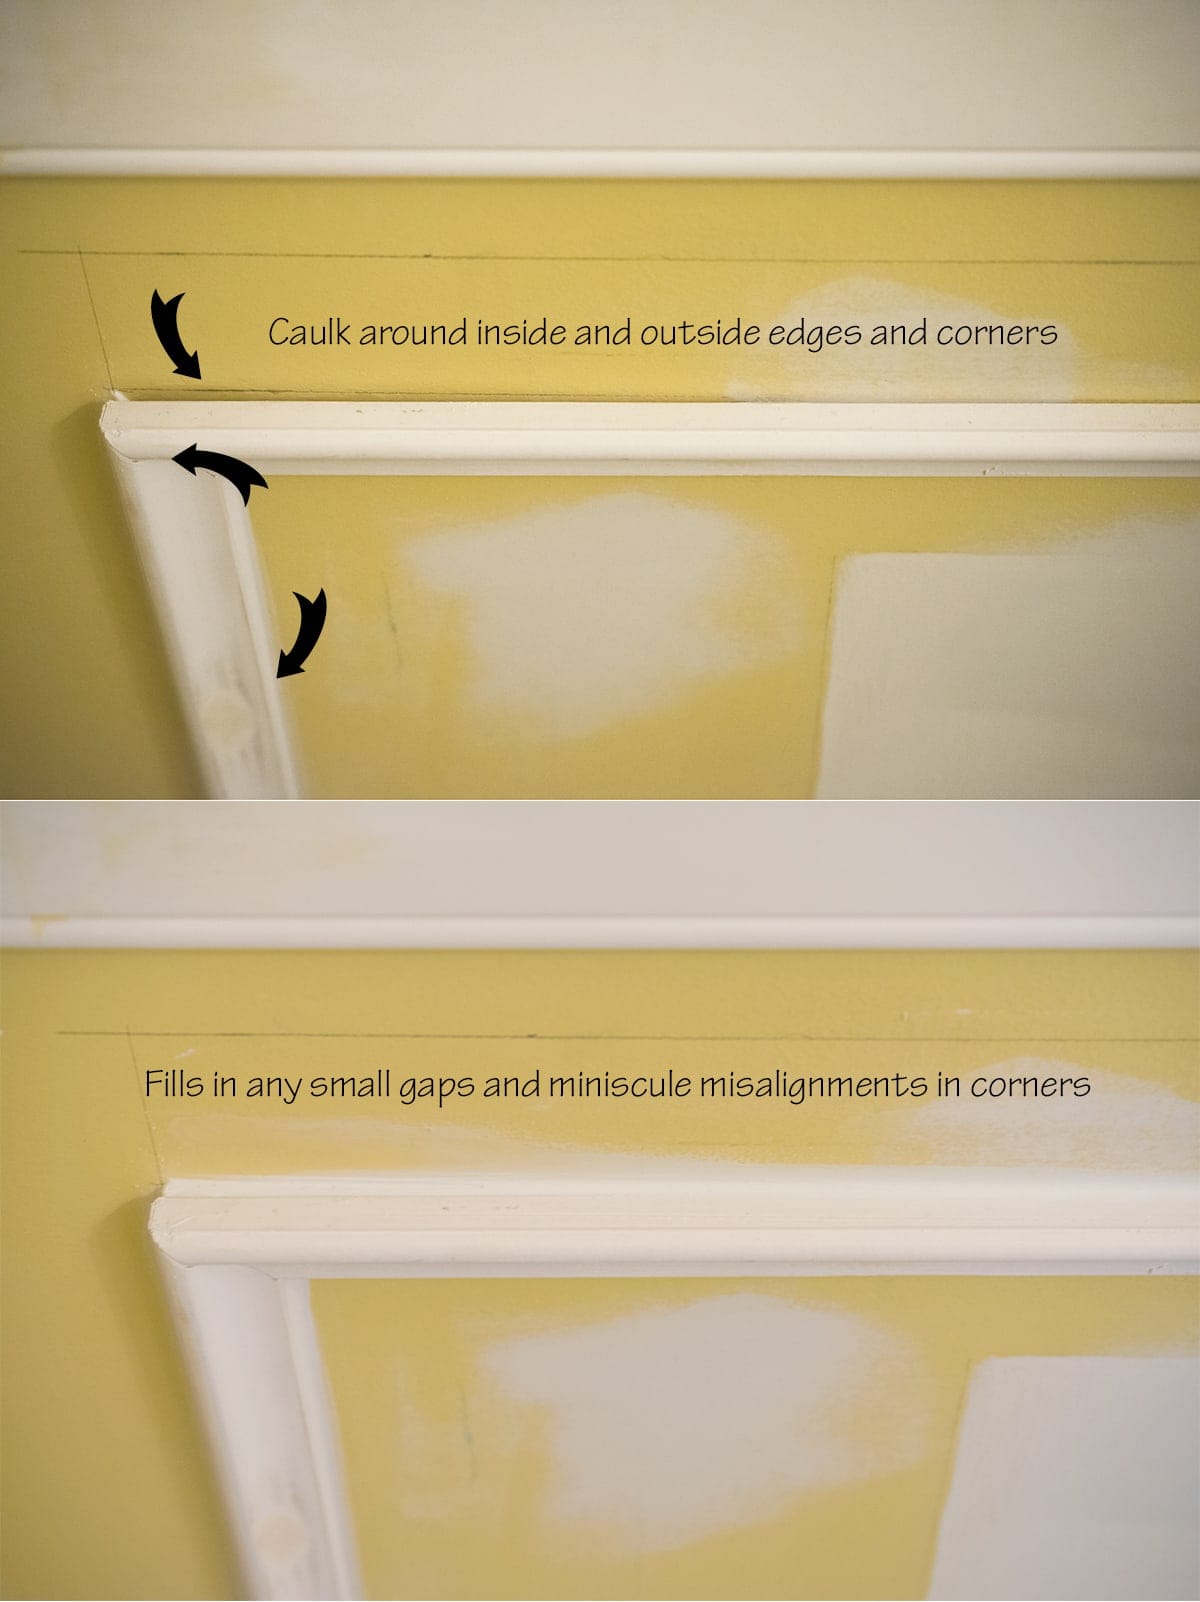
Step 3: Caulking around the Frames
Here’s the thing… walls are NOT perfectly flat, even brand-new ones. Taping, mudding, and patching create imperceptible bumps in walls. Therefore, you may notice that not all of the wood pieces lay perfectly flat against the wall. That’s ok!
To get professional looking results, use a thin bead of caulk around every edge that touches the wall. Make sure to use paintable, interior caulk. For more tips on the best way to caulk, I repaired and caulked the baseboards last year. Caulking can be a bit of an art.
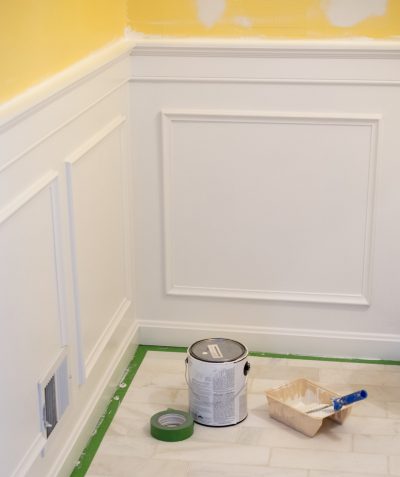
Step 4: Paint
I used trim paint that matches our baseboards throughout the house. Since I used pre-primed wood, I did not have to prime.

Final Thoughts
Installing wainscoting can be a tedious process, but it gives a look that you really can’t reproduce any other way. In total, we spent just under $200 on all of the wainscoting and supplies, which includes the crown molding we added to the top as well.

It has been lovely not to have those horrid yellow walls smacking me in the face and the lighting color is so much better than it was before.
More Simple Home Improvement Projects
- Building a Custom Closet
- Tips for Easy Install of Peel and Stick Glass Tile
- Modern Drop Ceilings ideas
- How to Paint a Garage Floor to Last
- How to Start a Room Makeover
Frequently Asked Questions
Both paneling and wainscoting or board and batten are styles of architectural additions to walls. Paneling may cover a wall floor to ceiling, while wainscoting normally covers ¼-2/3 of a wall.
It depends on the style and mouldings that you choose. Traditional wainscoting costs about $10-17 per panel for materials. Hardwood paneling is more expensive, depending on the species.
Wainscoting by itself doesn’t make a room look larger or smaller. The paint colors that you pair with wainscoting make a bigger impact. Dark or bold colors will feel smaller, more intimate while light, airy colors will feel larger and casual.
Wainscoting’s purpose is mostly decorative, rather than functional. Particularly when paired with deep colors like navy and black, wainscoting helps create a bold statement without feeling overwhelmed by the dark, moody color.

Grab our free series "Weekend Home Projects that will Transform Your Life" Sign up below to receive updates including free printables, organization tips, home improvement projects, recipes and more! |
More Easy Trim Projects
PS I love seeing your creations! Be sure to take a photo and tag #cravingcreative on Instagram! You can also stay in touch with me through following me on Instagram, Pinterest, and subscribing to the newsletter!
How To Install Wainscoting
Tools
- Straight Edge or Level
Supplies
- Trim and Moulding
- Nails
- Wood Filler
- Caulk
- Paint's Tape
- Paint
Instructions
- Cut pieces to size using a compound miter saw. Label your cut pieces as you go so you aren't searching for where they belong when tacking them to the wall.
- Attach the trim to the wall using a small bead of caulk along the backside of the trim and then nail into place. Although nails and a hammer will work for this project, I highly recommend a brad nailer. It's fast and requires a lot less hole filling.

- To get professional looking results, use a thin bead of caulk around every edge that touches the wall. Make sure to use paintable, interior caulk.

- After drying, paint the wainscoting in desired trim paint of choice. If using pre-primed wood, there is no need to prime before painting.
Notes
- Use painters tape while you are still deciding on the design. That way you only have to mark once. I still recommend drawing out the squares once you have decided the sizing.
- The corners are mitered (i.e. cut at 45 degrees to line up). I personally prefer to cut one piece at a time and tack them as we go around.
- Although finishing nails and a hammer will work for this project, I highly recommend a brad nailer. It’s fast and requires a lot less hole filling.
Morgan says
Great tutorial! Would you be able to give some pointers on how you painted the moulding pieces? Did you use a brush or a roller? More specifically .. what kind?
Really appreciate any help!
Rachel says
I used a brush, just like most other trim in the house. I used a smaller roller for the flat areas like the walls inside the boxes. For the brush, I am not as picky as some, but I do generally use a 2.5 inch angled brush, usually either the Wooster or Purdy brand.
ankur says
Nice work! Do you have a link to the layered pieces and cap you used? Thanks
Rachel says
Unfortunately, I do not because it is very difficult to be sure it’s the exact ones from Home Depot’s website. I find it much easier to find them in store.
ankur says
Thanks! Im going to give it a try soon.
Martie says
This tutorial is the total package! Perfectly explained, easy to follow with great visuals! Since I can’t cut trim to make a good enough square, I will use a perfect square template as a pattern to cut my trim pieces. Thanks for the awesome easy inspiration!
Liz says
Can you show how you went around the sink?
Rachel says
We have a small pedestal sink in that bathroom. The railing at the top of the design is higher than the sink. The bottom of the railing is a few inches above the sink. The box designs go around the pedestal but end into the sink where necessary. We did not remove the sink for installation.
Sam says
Hi, can you tell me what the floor tiling is in the picture with the blue wall? Thanks so much!
Rachel says
That is a white marble 3×9 tile. It is real marble, but if I had to do it again, there are many better options available now. I would go with a porcelain tile that looks like marble as it is much easier to maintain. Real marble is porous, and I seal this floor every year since this is our most used bathroom.
Stephen Merf says
Our wall has a little texture, do you recommend covering the wall?
Rachel says
It would depend on how much texture and where you want that to show. If it’s small, you can usually sand the wall smooth. If it is moderately textured, it may be easier to cover it with a thin, flat material. There are also designs today of wainscoting that is made from panels, so that might be the easiest.
Lauren says
What size flat cap did you use?
Rachel says
It varies depending on the thickness of your other trim. Ours dining room is 1-3/4 x 3/16 and the bathroom is 1-1/2 x 1/2 (actual measurements, not nominal).
Helen says
What type of paint did you use for wall with panels on and the panels we have just had these fitted to our wall thanks
Rachel says
We used trim paint to match all of the trim in the house.
Sharon says
Was the white on the wainscoting semi glossy?
Rachel says
I use a satin trim paint, but you can use a semi-gloss if you like. Before I painted the wainscoting, it has a primer on it that was more matte than semi-gloss.
Sirlei says
Could you pretty please make a video explaining step by step on how you achieved this breathtaking wainscoting!?! I’m dying to do/have one exactly like yours. Thank you very much.
Rachel says
Thank you so much for the suggestion. Video is something I am working through for the site. At this time, however, I do have a large backlog of tutorials to work through. I answer all my emails, though it might take me a few days if I am in the middle of a project. Feel free to ask any specific questions you need.
Courtney says
May I ask what color is on the walls?! We currently have Wayne’s coating like that and we love that blue!
Rachel says
I’m pretty sure that the color on the wall is Benjamin Moore Winter Lake.
Jo says
Really useful post, did you prime the wood and wall before paining and if so what type of primer did you use?
Rachel says
The wood we used was already primed, so I didn’t prime them. You only need to prime if you have bare wood or walls that have never been painted. I also sometimes use stain-blocking primer if I am going from a very dark color to a light color. That’s more because primer is cheaper than good paint and covers better. Regardless, when I do need to prime walls, I generally use Kilz Original or Premium.
Hannah Cousar says
May I ask what you used? I don’t know how many different sizes or styles of picture rail there is. Is this just normal “go to home depot and ask for picture rail?” or do I need to pick among many different widths, kinds and styles?
Thank you,
Hannah
Rachel says
The fun thing about this is you can use whatever kind of trim you like or layer it for a fun effect. They do make pre-made frames also if you would rather go that route, but this is the trim we used.
Max says
We just started our new carpentry services and found this article.
Really appreciate you taking the time to give us instructions on how to install wainscoting. It’s a very good DIY guide.
wainscoting is an interesting topic to discuss, and you did an excellent job of keeping it entertaining. Thanks a lot!
Animeyt says
Great post. Thanks for your instruction