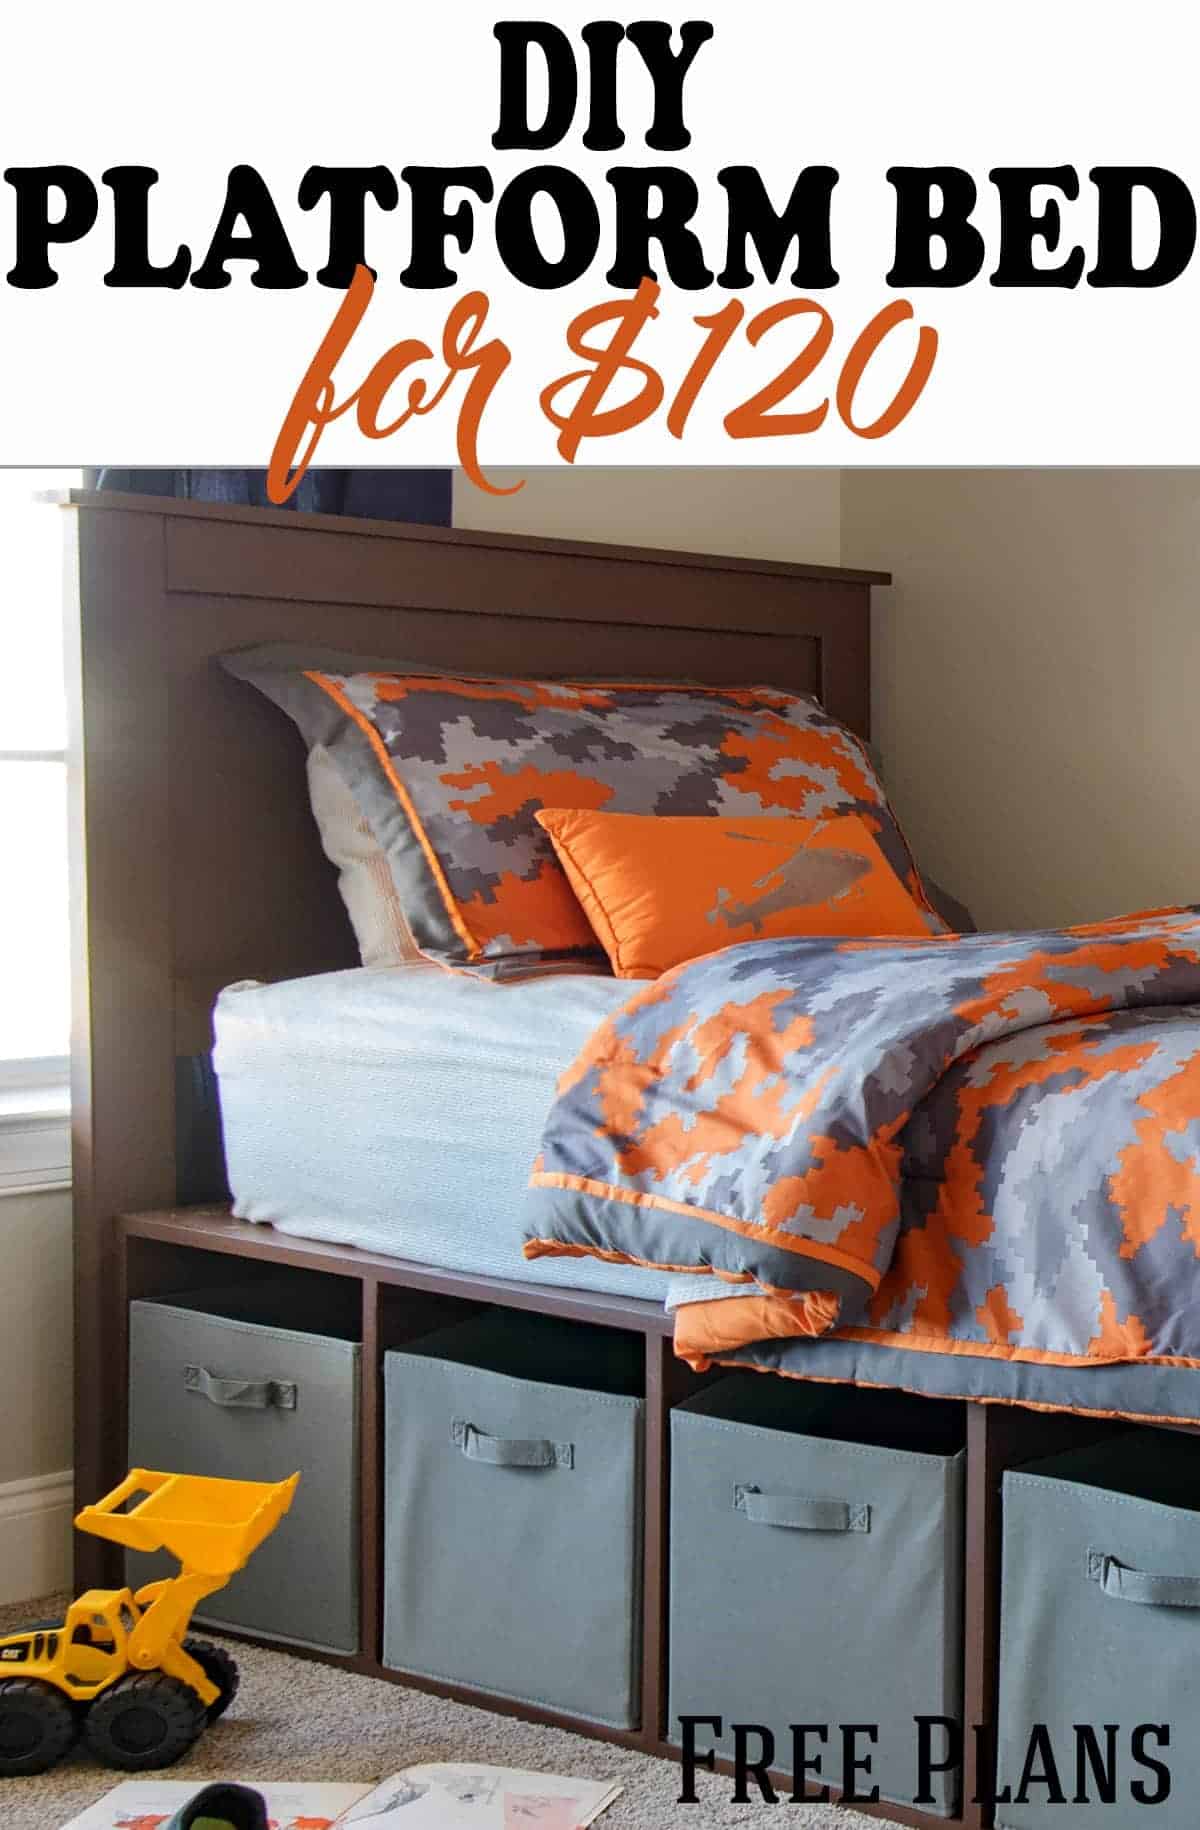
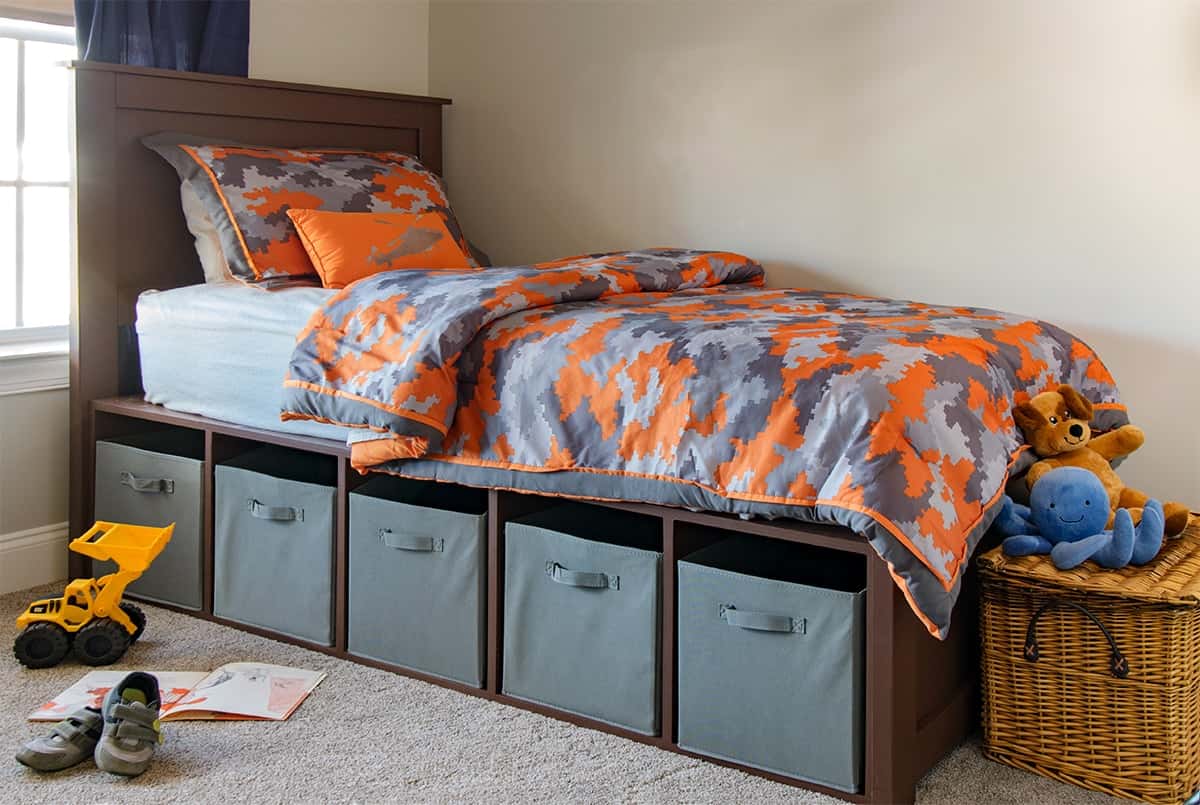
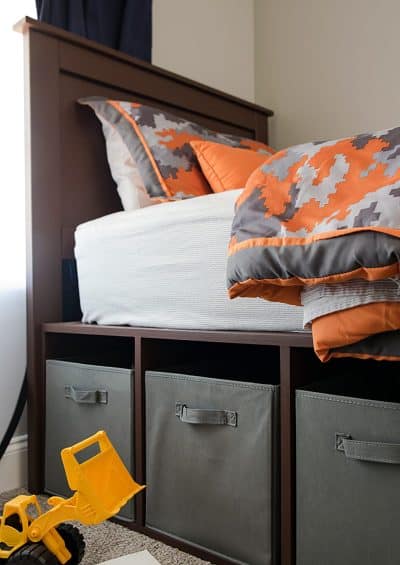
We built this DIY bed frame with storage underneath from scratch! This easy to build platform bed frame is for a kid’s twin bed but can be modified for a queen or king. Includes step by step free plans and tips for a great finish. Others have made this bed from our instructions, (which is awesome!) and you can too with the right tools and a little skill.
Kids grow up so fast, don't they? They go from a crib to a toddler bed and then a Full-size bed in a matter of only a couple years. My husband's brother just moved into a new house, and it was time for the little man to graduate to a big boy bed.
We wanted this build to be simple, durable, and have storage underneath for toys and such to keep them out of site. We had learned from our own son painted kid’s furniture that drawer handles were out (he often used them to climb into bed or banged his legs against them). Plus, this idea was simpler to build.
These plans can be easily adapted to accommodate any size mattress. It is made for a standard twin at 38×75 inches, so make sure to measure your mattress before starting the build.
Required Tools
Equipment
- Miter Saw
- Table saw or circular saw
- Pocket Hole Kit
- Wood Glue
- Drill and bits
Wood sizes for a Twin Bed (38×75 mattress)
- (3) sheets of four foot by eight foot ¾ inch plywood. Please note that each cut generally takes away ⅛ inch
- (2) 10-foot 2x4s or (3) 8-foot 2x4s
- (1) 1x4x8 foot board for Footboard and Headboard Caps
- Banding to finish any exposed plywood edges
Printable Bed Frame Design
I have included the photos below of the bed plans in a pdf document to make it easier to print and read.
*I have been previously requested for a diagram of the boards where each cut should lay. Most free plans on the internet don’t include measurements at all, and I worry about making a mistake trying to retrofit this concept into the project now. Plus, my measurements for a twin sized bed, but this can easily be scaled up to a queen or even king if you use another piece of plywood as a center support.
*Note on Sizing: We built this as a twin kid’s bed. It can easily be modified for a Queen or King. However, I have not modified the plans with additional sizing as I am not entirely comfortable unless I build it myself and I have no use for two extra beds. If you modify them, let us know how it turned out in the comments below.
How To Build a DIY Bed Frame with Storage
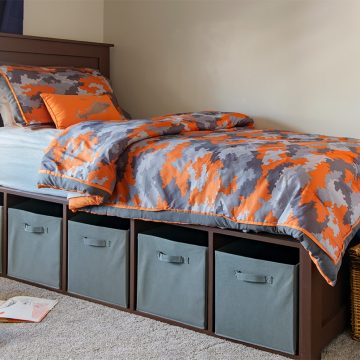
This bed is comprised of 4 pieces: A headboard, footboard, and two storage cubby units that hold baskets. It’s one of the simplest and most functional ways to build a simple bed.
Tips for Cutting the Wood
We cut all the plywood pieces using table saw or circular saw and all the rest of the 2x4s were cut with a miter saw.
Since this bed was for a child, we wanted to make sure to get rid of any sharp edges. You can either do that by using a router or sanding the edges a bit by hand.
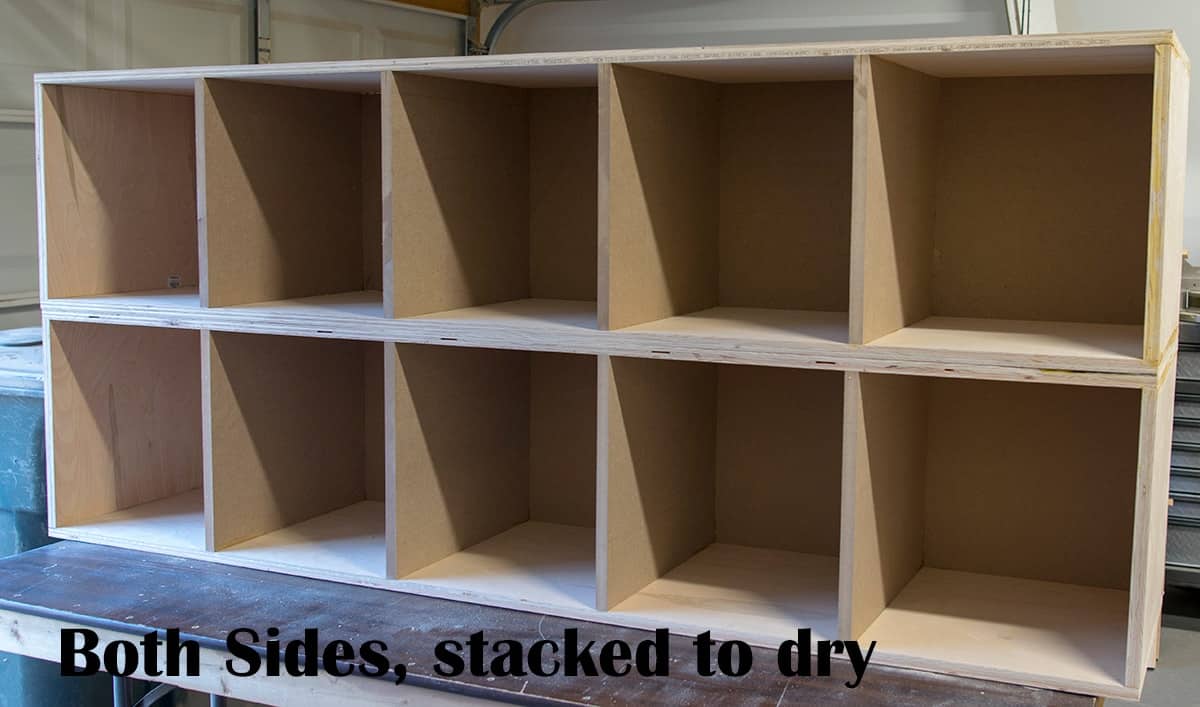
The Storage Frame
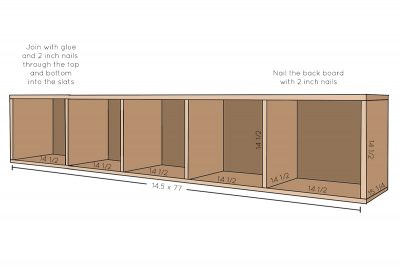
The platform storage area consists of two shelving units placed back-to-back. The measurements of the inner boxes are 14.5 x 14.5, so perfect for baskets.
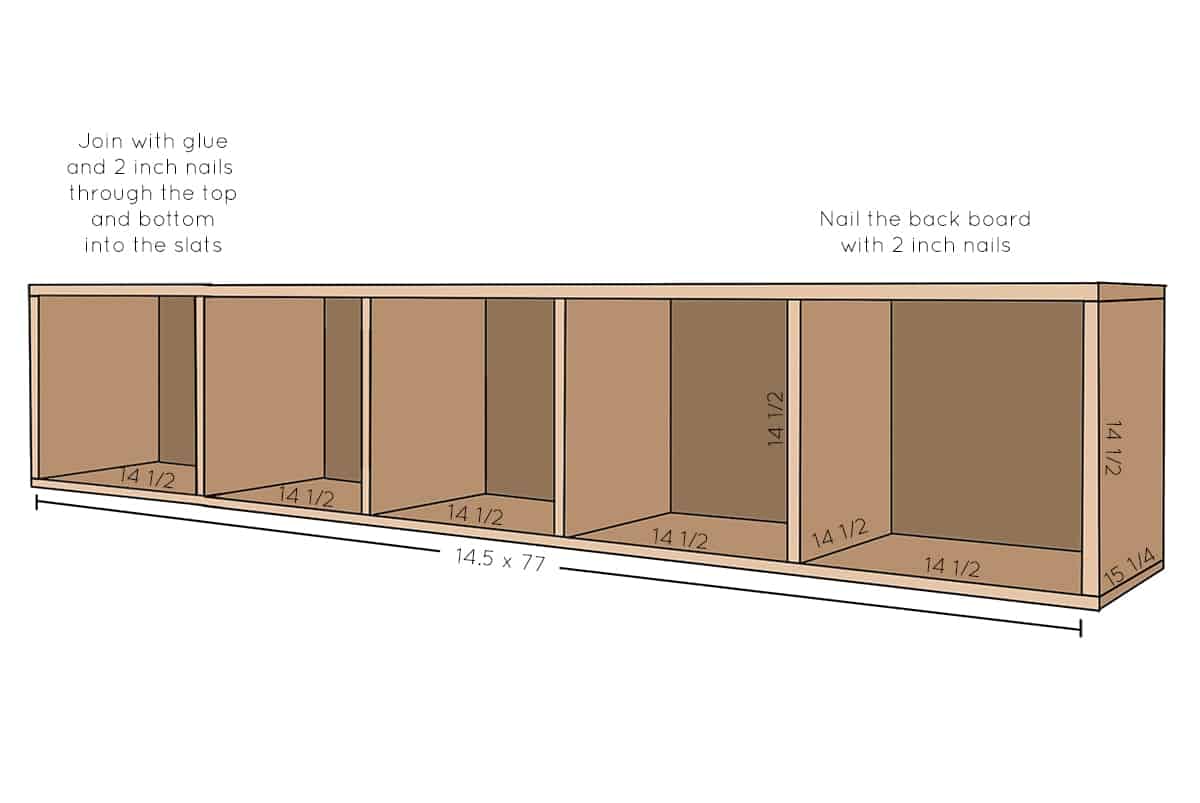
For aesthetic purposes, the boxes are glued and tacked in place from the outside. Pre-drill prior to nailing to ensure that the plywood doesn’t split. Allow to dry overnight.
Pro Tip: Ensure to clean all excess glue to minimize sanding. We love these large mats that prevent dripping glue from sticking to anything!
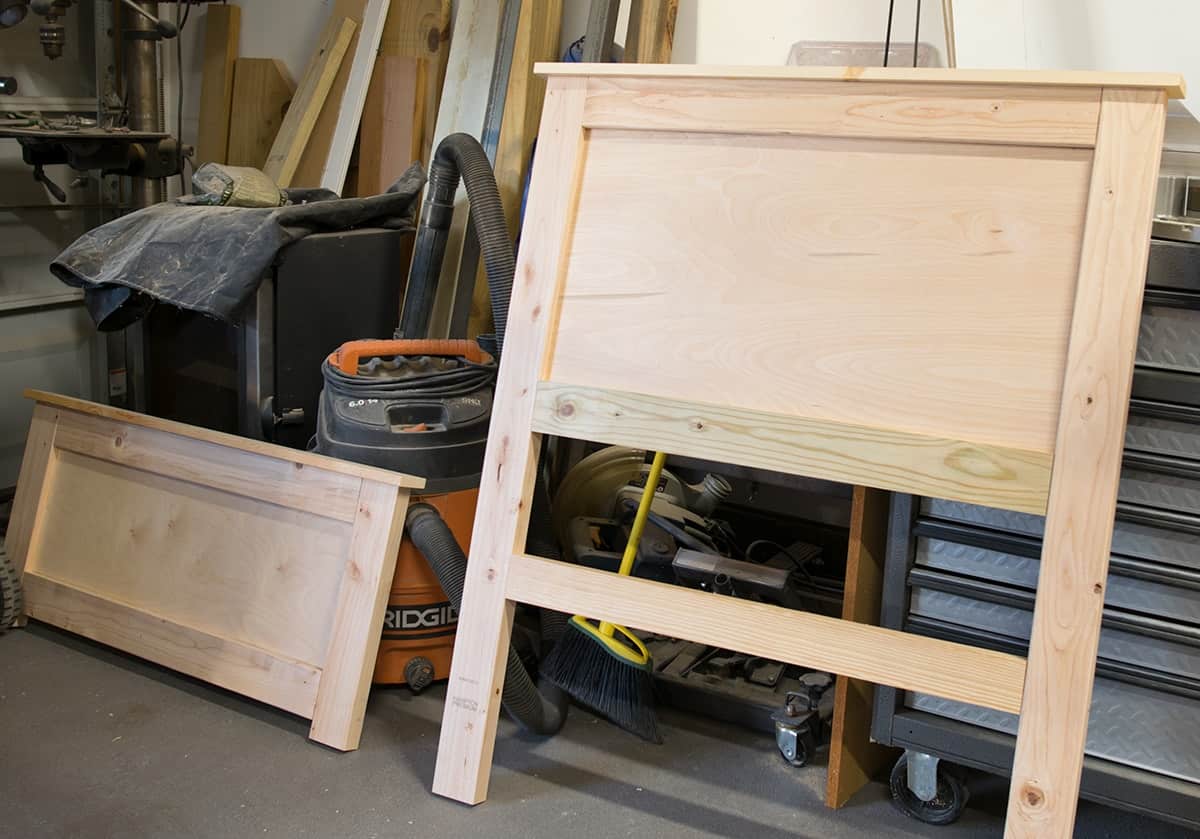
Building the Headboard
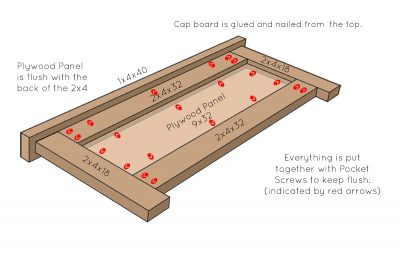
The headboard uses 2x4s and a ¾-inch plywood piece. The panel sits flush with the back of the headboard, so this is easy to push up against the wall. When it is put together, the legs are higher than the base storage, leaving a gap at the base of the headboard. Even a relatively thin mattress will cover this area and this gap is common in headboards.
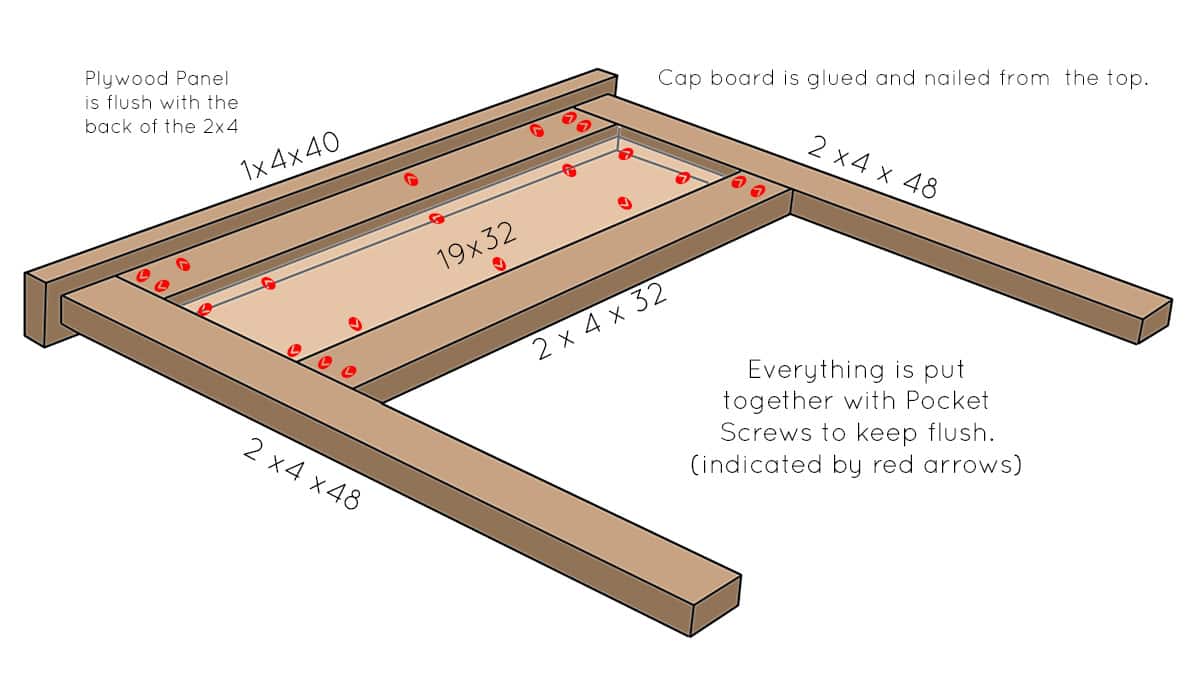
Pocket hole screw headboard and foot board frame together. Then pocket screw the plywood panel inserts to the frame. The back of the plywood panel should sit flush with the frame. The red arrows indicate where we put pocket holes.
*Note: We added a support board in the center of the legs (see photo in our garage above) because at the time, we thought my brother wanted a narrower frame. This brace is optional, but I would still recommend it.
Low Profile Footboard
The footboard comes together very similarly to the headboard, but with shorter legs.

Putting It Together
For building, place the platforms of the bed in desired location. For a twin size, they go back-to-back with no space between. Place the headboard and footboards in place at either end and lag or screw headboard and footboard.
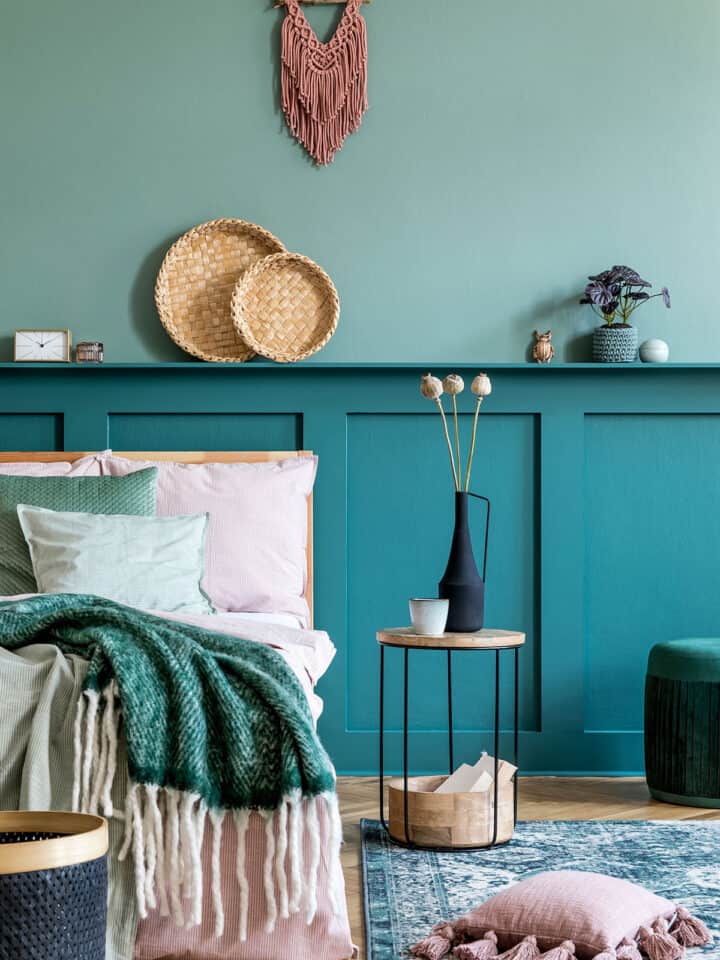
Place mattress in place and sleep! You can also add guard rails to each side to keep the mattress from moving if you like.
Expert Finishing Tips
- For finishing the exposed plywood edges, you can glue on thin hardwood banding for a stained bed or wood fill if your plan is to paint.
- We filled any knots or dings with wood filler as well.
- It’s easier to sand individual pieces before construction the bed for a smooth finish.
- Paint or stain giving enough time to fully cure.
- Notes: These plans can be modified for different size mattresses. A standard twin size mattress is 38″ by 75″
- I highly recommend our guide to Painting Furniture here for tips on a durable painted finish.
- You can add a decorative touch by adding a large letter in the middle of the headboard or even spelling out the child’s name.
More Fun Bedroom Ideas
- 20 Stunning Bedroom Feature Wall Ideas
- Boys Bedroom Makeover
- The Lazy Girl’s Guide to Making a Designer Bed
- Affordable Nightstands for Small Spaces
- How To Paint a Dresser

FAQs
We made this particular bed out of pine because the child was expected to outgrow it in a few years. However, harder woods like maple, oak, or walnut are more durable and will last longer.
A platform bed is a low-profile bed frame with a sturdy base that holds the mattress up off the floor. What makes a platform bed unique is that it doesn’t require a box spring and is often used to create additional storage under the bed.
Yes, my son’s bed has two layers of drawers, but the bed is quite tall. I would adjust the height of the cubbies underneath if you would like two rows.
As always, if you have any questions don't hesitate to comment below and especially don't forget to send us pictures if you do build this project!

Grab our free series "Weekend Home Projects that will Transform Your Life" Sign up below to receive updates including free printables, organization tips, home improvement projects, recipes and more! |
More Home Improvement Projects

PS I love seeing your creations! Be sure to take a photo and tag #cravingcreative on Instagram! You can also stay in touch with me through following me on Instagram, Pinterest, and subscribing to the newsletter!
DIY Bed Frame with Storage Cubbies
Tools
- Miter Saw
- Circular Saw
Supplies
- Wood Glue
- 3 sheets 4'x8' sheets of ¾ inch plywood. Please note that each cut generally takes away ⅛ inch
- 2 boards 10-foot 2x4s can use (3) 8-foot 2x4s
- 1 boards 1x4x8 foot board for footboard and headboard caps
- Banding to finish exposed plywood edges
- PDF Plans This is a large printable PDF with measurements.
Instructions
- It is often best to lightly sand the boards if they need it prior to construction as it can be difficult to get into the crevices.

- Build the platform storage base. You will build two of these to make the bed frame base. Build the outside frame and then add the inner slats evenly spaced apart. Join all pieces with wood glue and nail from the outside into the slats. Pre-drill prior to nailing to ensure plywood does not split. Nail or screw the backer board on.

- Build the headboard. The center plywood panel sits flush with the back of the 2×4 headboard. Cut the headboard first and then pocket screw the plywood to the frame according to the diagram. If one is particularly hard on furniture, considering adding a cross brace between the legs and attaching to the platform with extra screws.

- Secure the headboard and footboard to the base. Place the platform/cubbies in desired location leaving the appropriate spacing. Place the headboard and footboards in place at either end and lag or screw headboard and footboard in place according to diagram.
- Finishing. If desired, finish the exposed plywood edges, glue on thin hardwood banding for a stained bed or wood fill if your plan is to paint. Fill any holes or knots if necessary. Paint or stain as desired.


Breanna says
Building the shelf’s, are the end pieces suppose to be 14.5×15.25 or 14.5×14.5?
Rachel says
The depth (outside to middle of the bed) for each shelf is 15.25″ for this one, but you could make them deeper for a bigger bed. The inner measurement of the boxes both vertically and horizontally is 14.5″. The boxes will end up being a little taller because of taking the wood into account both top and bottom. There may be a gap between the shelving units in the middle of the bed, for wider beds, which can be easily covered with a sheet of wood for stability.
Brian says
I’m going to attempt this for my son’s bed in the coming weeks. Are the backs of the cubbies 1 long piece of plywood to cover all, or individual for each cubbie and flush with pocket screws? I think he’s gonna love this bed!
Rachel says
Excellent question! Yes, the back is just one piece, tacked on with screws from the back.
Lia alonzo says
Also, what are the support braces you used for the bed? Sorry for so many questions, I am a novice and need specifics.
Rachel says
The inside measurements of the cubbies are 14.5 inches (with 3/4 inch plywood making up the sides). The support braces are just the 2×4 legs on the headboard and the sides on the footboard. I will be sure to make that more clear.
Sunny says
This is fantastic!! Would you recommend having 2 layers of the cubbies under a queen bed?
Rachel says
You can definitely have two rows of cubbies, although it will make the bed quite a bit higher unless you lessen the height. My son’s white captain’s bed is very high, but it has two rows of drawers underneath.
LeeAnn says
I was curious what size screws would you use? I saw your drawing shows to use 2 inch nails for the storage boxes but I don’t see the size of screws to use in the pockets.
Rachel says
It would depend on the thickness of your wood. We used 1 1/4 coarse thread pocket screws – we use pocket screws particularly since they are self-cutting and the coarse thread since we were using pine and plywood for this bed (driving away from the plywood into the pine). You could use longer screws if your boards are thicker. The length is determined by just making sure that your screw won’t accidentally go through the other side of the wood.
Brian says
Sorry for the multiple questions, but I’ve purchased all the wood listed and am getting ready to start, however, unless I’m adding wrong, the bed platform will only be 30 1/2″. How did you get a twin mattress on with room to spare on each side if the cubbies don’t have space between when put back to back?