One of the distinguishing features of oak is the highly visible wood grain. Learn how to fill wood grain when painting cabinets or furniture with the best products and simple techniques. Painted Cabinets never looked so good!
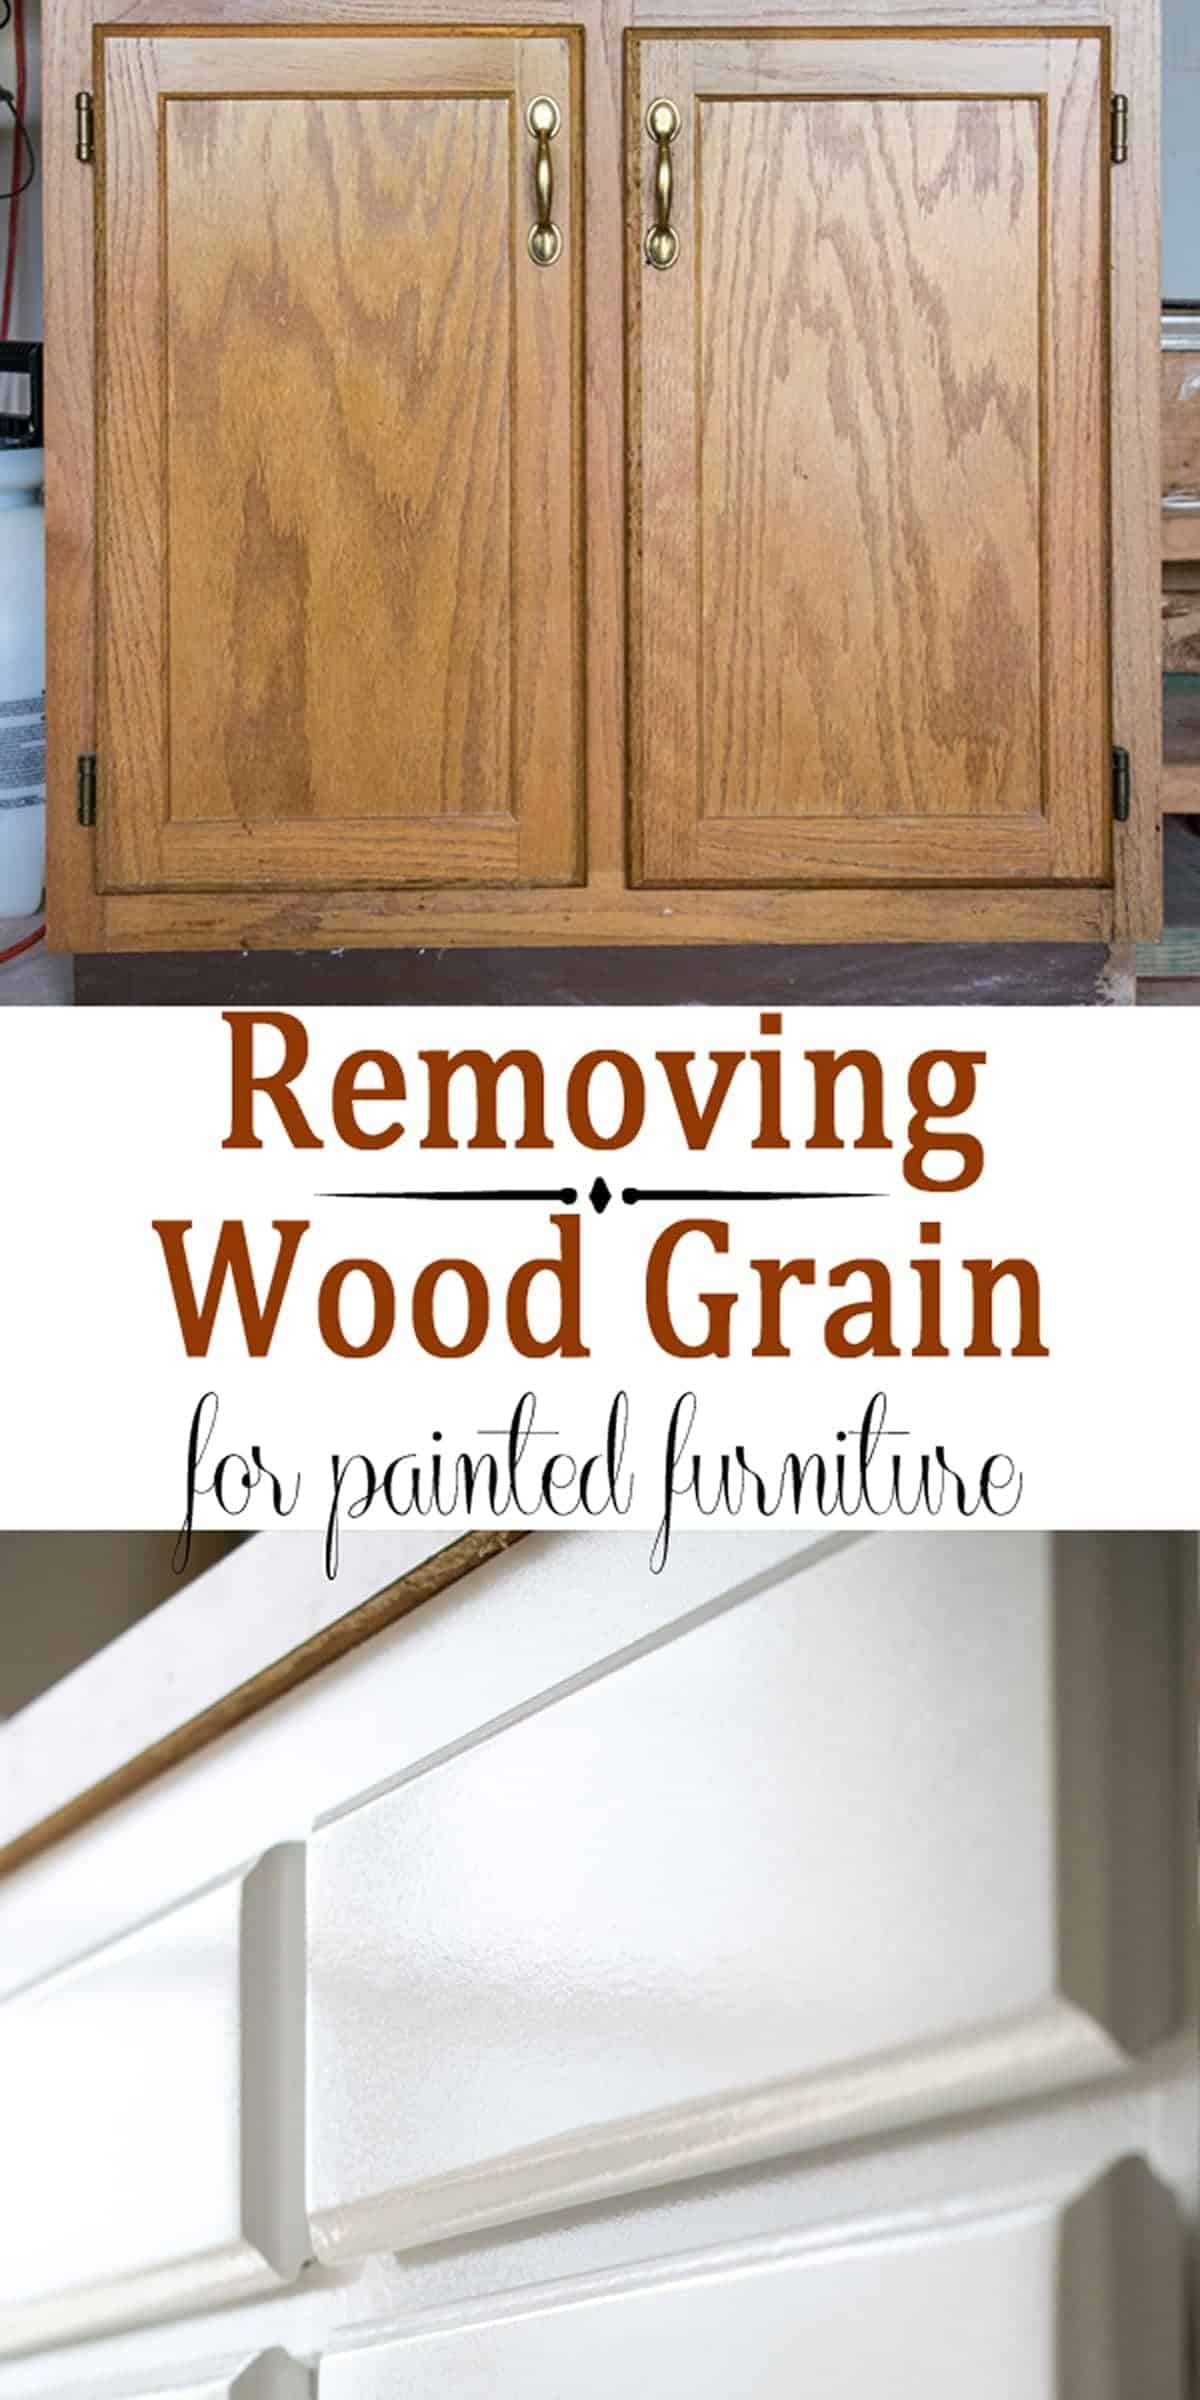
One of the most popular projects in home improvement is to paint cabinets, especially the dreaded honey oak cabinets that are very common in builder and older homes. The problem is that even if you paint oak cabinets, the grain will still show and you essentially just have white painted oak cabinets. However, I do have a solution if you want smooth cabinets for your painting project!
My method for filling wood grain has been a READER FAVORITE tutorial for years!
And it’s because:
- Filling wood grain is time consuming, but it creates a modern and uplifted appearance on painted furniture.
- This process also works great with scratches, pits, and smaller holes too.
- I have 15 years experience in woodworking and home repair – I’ve seen a lot!
By the end of this post, you know the method to fill wood grain in your woodworking projects to create a smooth finish. While I wouldn’t recommend going out to buy oak to fill it, sometimes you have to work with what you have.
You can also check out my post on the definitive guide to painting kitchen cabinets as well.
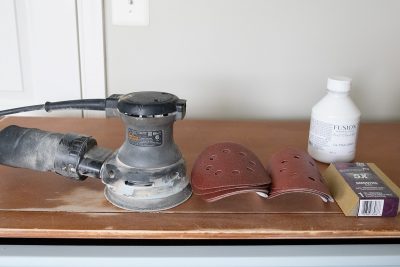
Supplies and Recommendations
Here is an overview of the equiptment I use for these projects.
- Wood filler *See notes below to decide which is right for you.
- Flat Edge Scraper – I prefer a larger one with a little flex to push the wood filler in the grain, but not too much.
- Palm Sander – This will save your hands from all that hand sanding!
- Mouse Sander or oscillating multi-tool – optional, but highly recommended for inside corners
- Sanding Blocks – I generally like the angled sanding sponges rather than paper on blocks. With sanding sponges, I use 80 or 120 grit because sanding sponges have less grit for the same rating. (i.e an 80 grit sponge will feel closer to a 120 sandpaper). For sanding paper on a block, I use 120 grit for sanding and 220 for light finish if necessary.
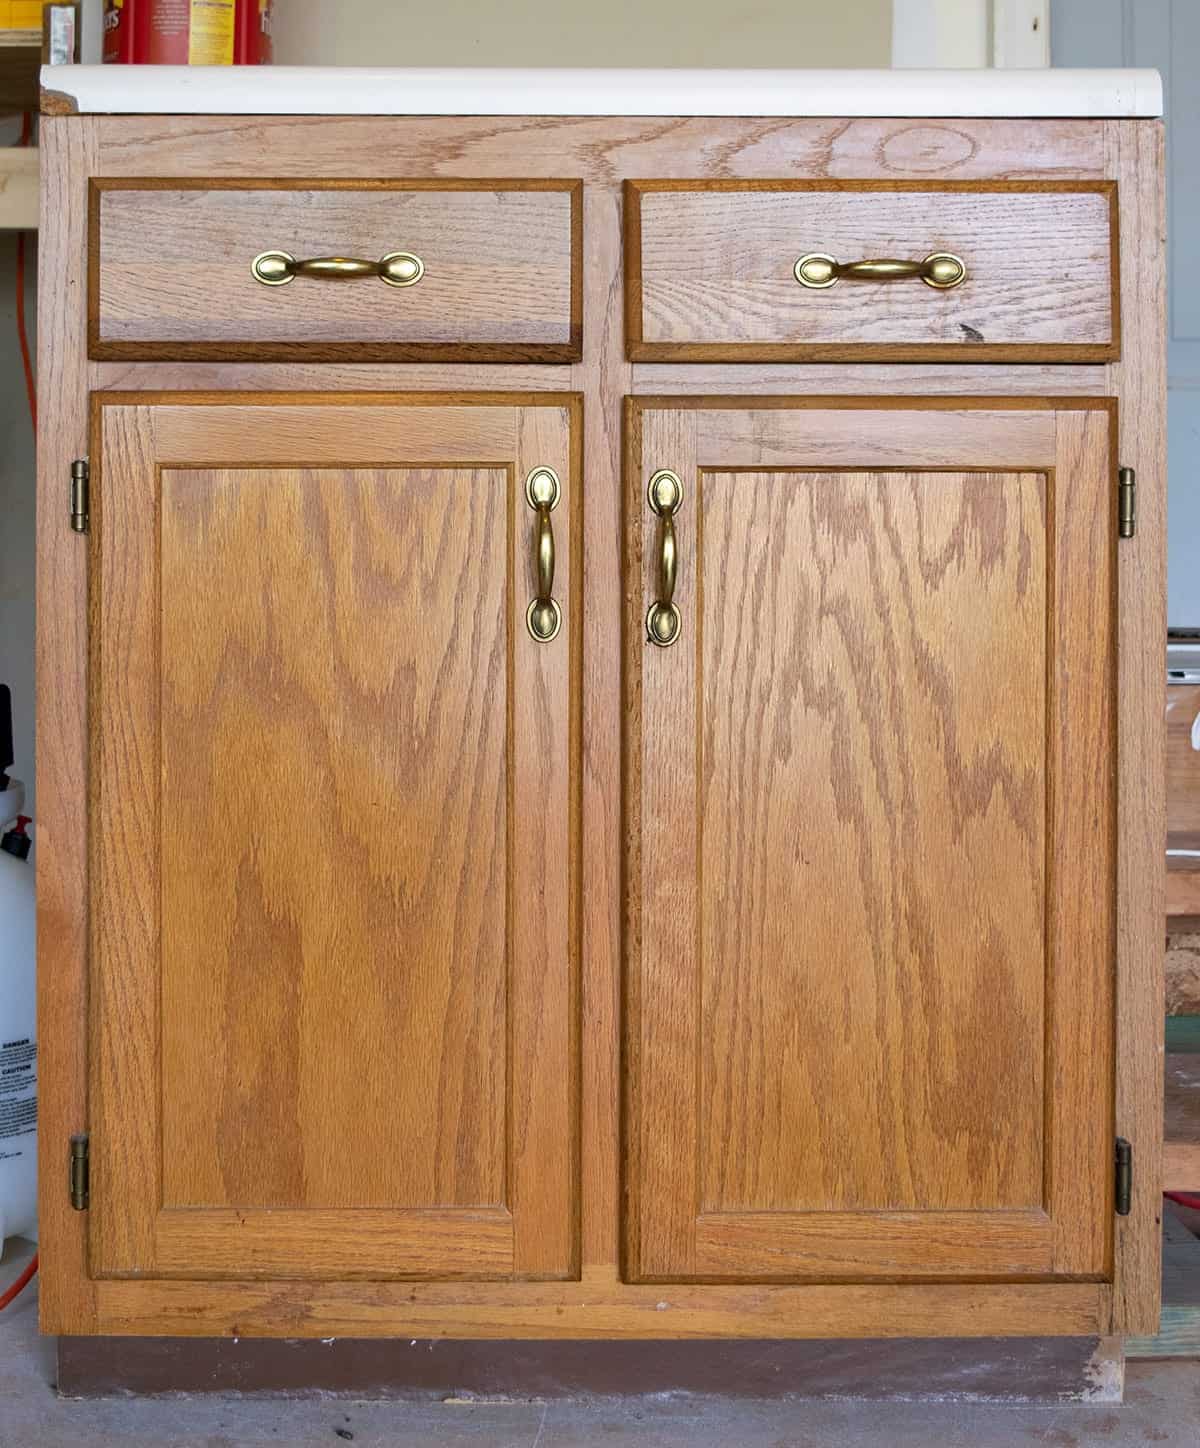
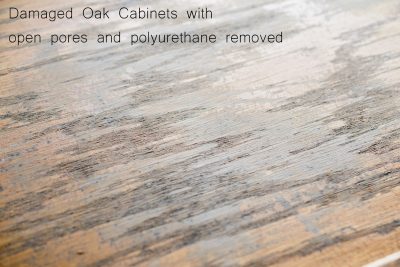
Here is a before shot of the cabinets we are working with. You can see the age, pitting, and deep wood grain.
The Best Wood fillers to Use
To truly seal the pores and level out all the ridges and valleys in the wood grain, I recommend a quality wood filler. The primary purpose of wood filler is to camouflage imperfections in the wood but to do so without impacting the way the surface itself looks.
I have used many, many wood fillers and this one is by far my favorite to use for all-purpose. For single use projects, I also really like this DAP wood filler as well, but it dries out in the can, so you can’t save any for a future project.
Also, unless you have large gaps or structural repairs, I do NOT recommend Bondo or Epoxy filler for filling grain. These products definitely have their uses but, the level of effort and skill needed is much higher without delivering a particularly better finish.
How to Fill Wood Grain Step by Step
Ok, let’s get down to the business of learning how to fill wood grain texture, shall we? The prep work is much the same as preparing cabinets for painting.
Step 1: Clean the Wood Thoroughly
Remove the hardware and clean the surface thoroughly with teaspoon or degreaser product that won’t leave a film.
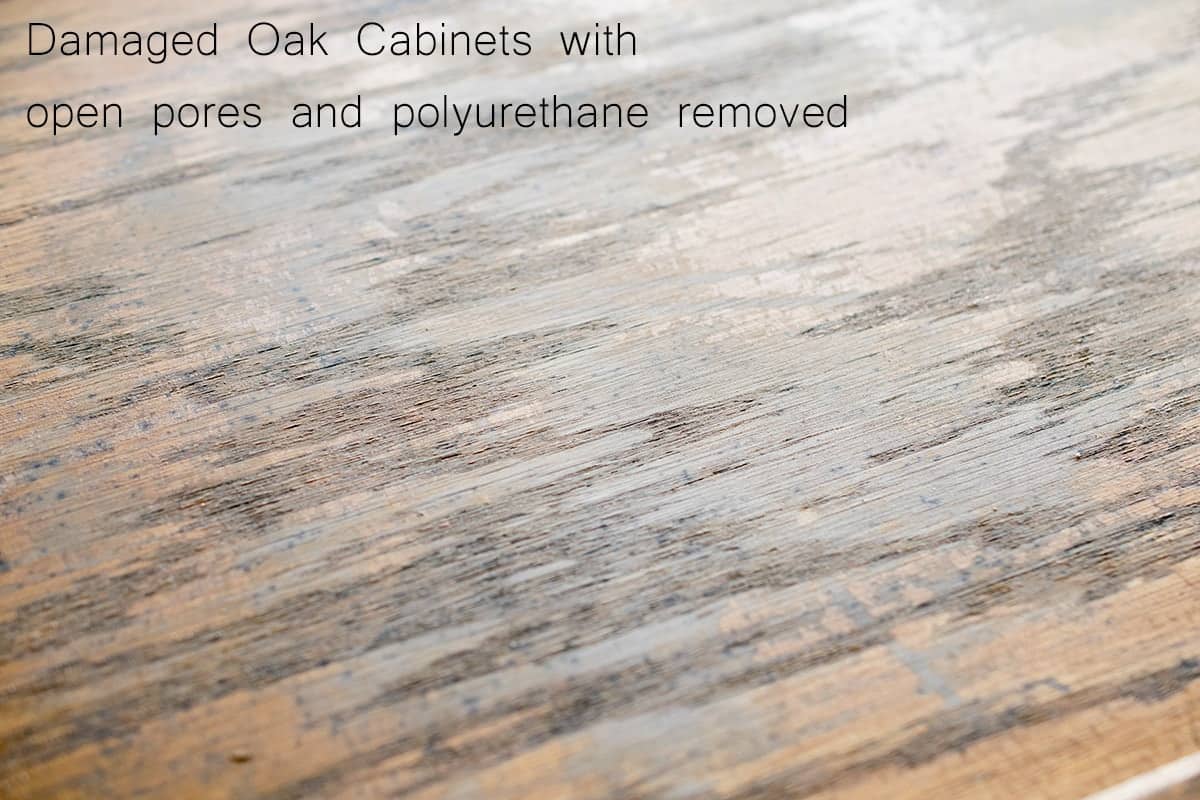
Red Oak is well known for its recessed wood grain as it dries out. Unfortunately, this means that the pores of the wood are open and will easily soak up contaminants and humidity if not sealed. The damage pictured is from the wood soaking up kitchen oils and other contaminants over the many years of their use. There was no sign of rot.
Step 2: Sand to Increase Bond
The glossy varnish needs to be removed or “roughed up” by sanding. Wood filler is designed to bond with raw wood best, so I would not recommend using a deglosser. I have used wood filler over previously painted surfaces without problem, but it is noticeable that the bond is better with raw wood.
Wood Filler is designed to work best with raw wood, so I do not recommend using deglosser or an etching product.
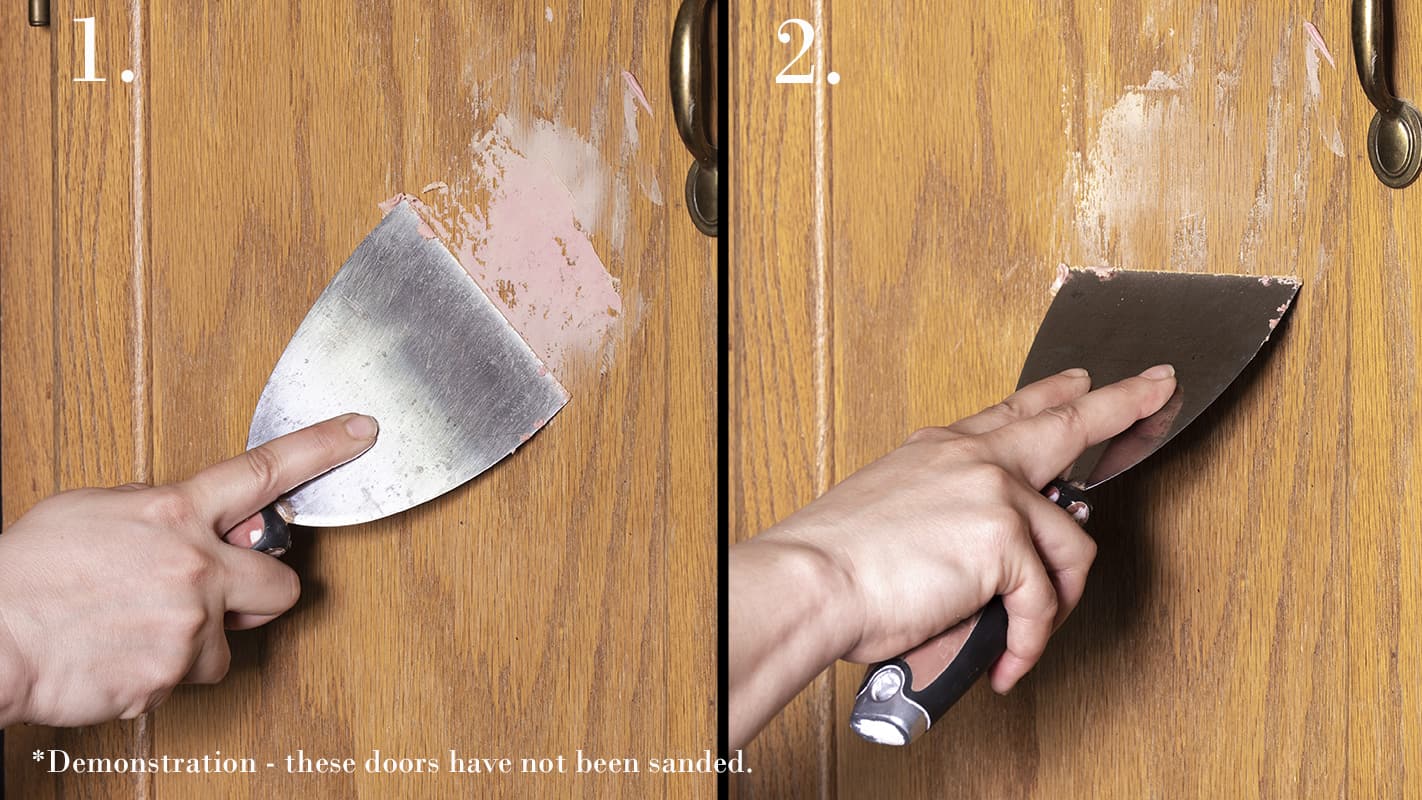
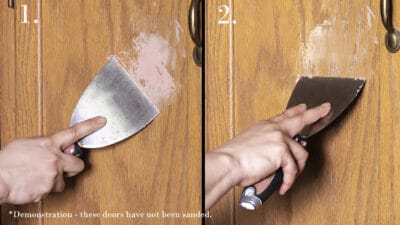
Step 3: Apply the Wood Filler
To use the wood filler, add some to a 3-5 inch scraper and spread it out over the wood grain areas. Push down on the scraper and use different angles across the grain as you spread.
Scrape the excess off to save time and effort sanding.
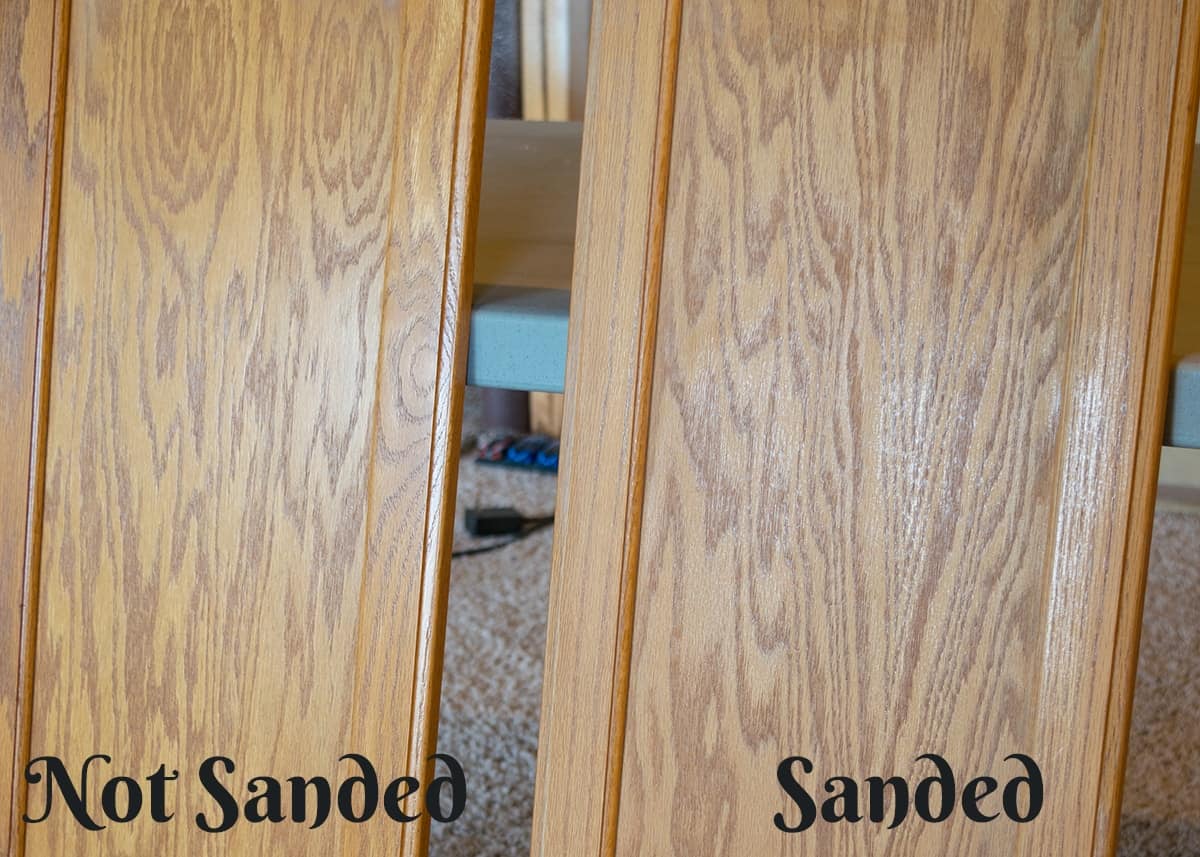
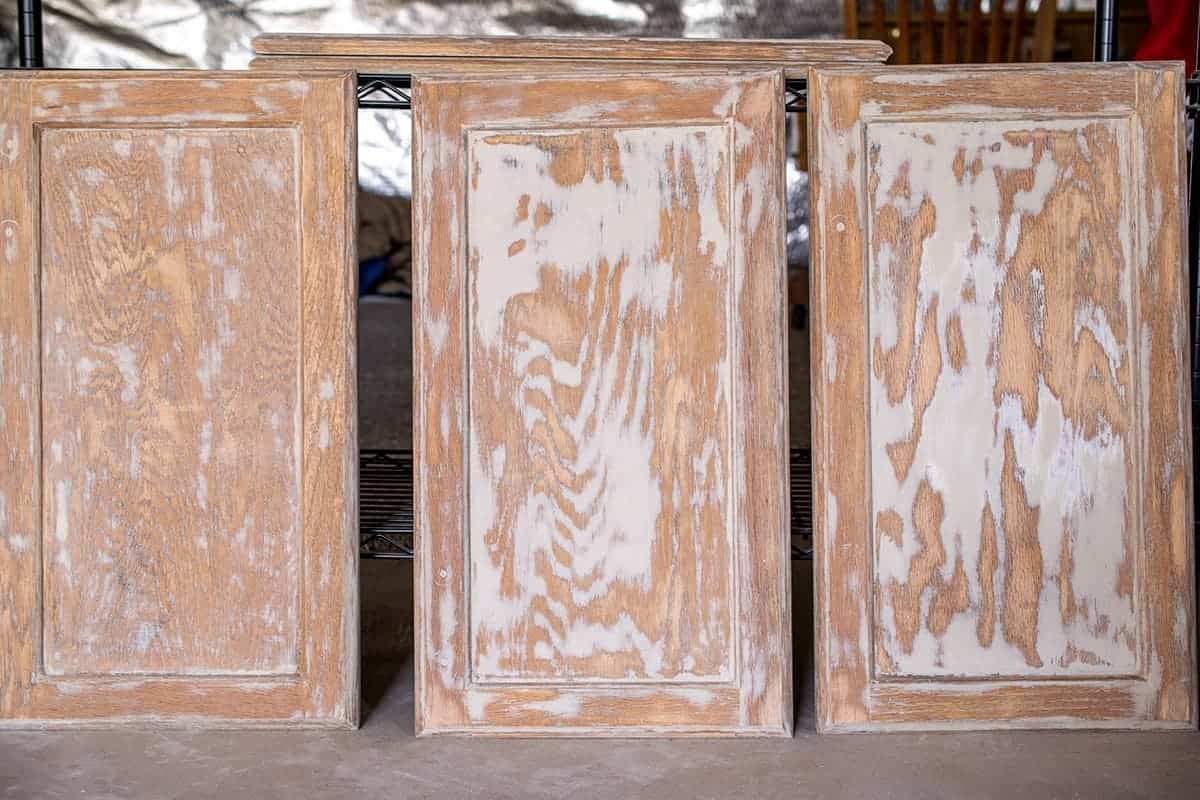
Step 4: Sand to smooth
Using a palm sander with 120 or 220 grit works well on all flat areas and saves hand sanding. I use an orbital sander to create the smoothest finish.
Unfortunately, orbital sanders are usually round so you will either need to hand sand corners and molding, or use a corner sanding tool. I use an oscillating multi-tool to get into corners, but a mouse sander also works pretty well. I hand sand rounded edges.
Step 5: Reapply as necessary
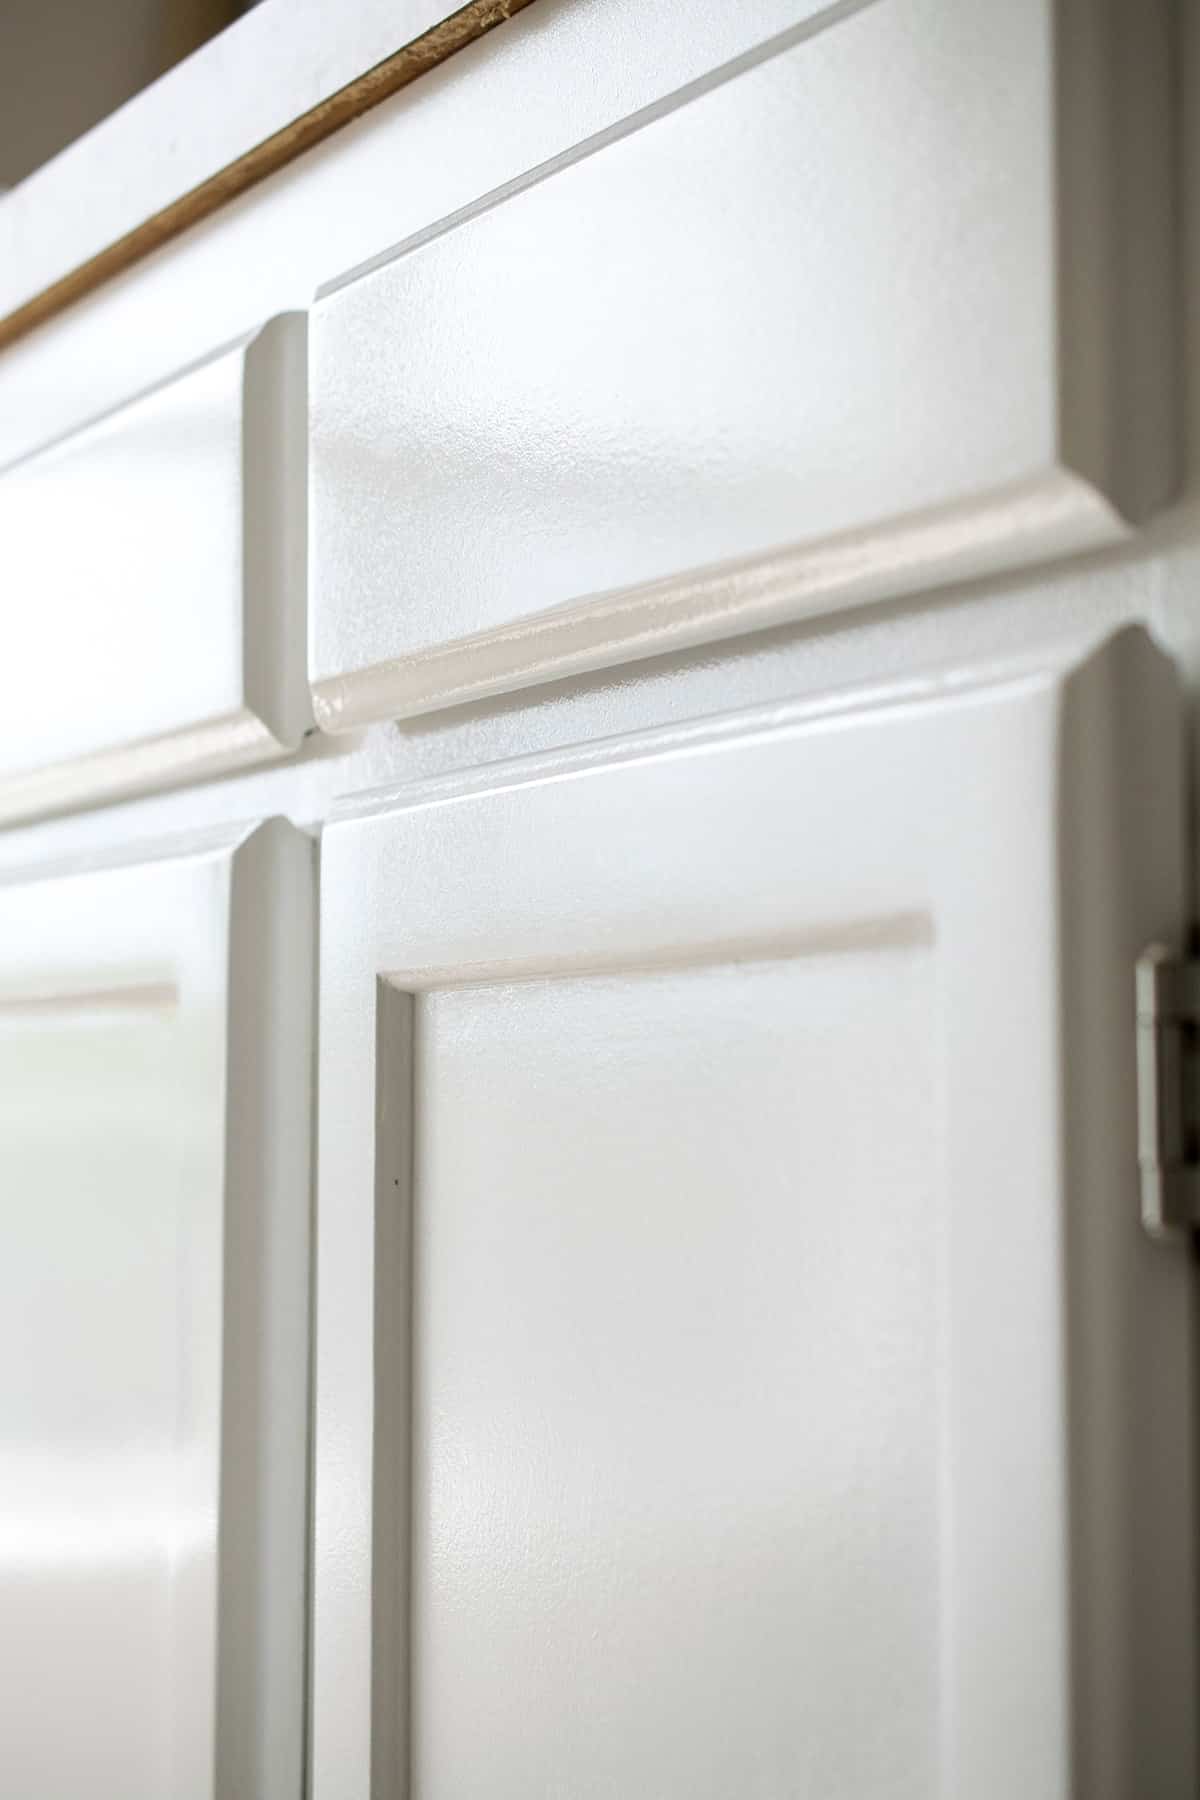
It is important for the transitions from wood to wood filler be smooth. If you can feel ridges or depressions, you may have to apply a second coat and sand lightly again. Before painting clean with a vacuum and cloth to remove any dust.
Expert Tips for Using Wood Filler
- Keep the layer of wood filler as thin as possible. Wood fillers are not flexible. Thus, it is more prone to cracking and thick layers will make it even more so.
- Make the transitions between wood and filler smooth and seamless. This is why I recommend a palm sander.
- If you are intending to stain rather than paint, you can match the wood filler to the wood grain and make it stainable. However, this will not look right unless you only have small, individual pores to fill. Large swatches like I was attempting to smooth out would not work with a stained piece. If you have small, tight pores, you may have an easier time with products such as aquacoat.
- Make sure your inner corners and molding are as smooth as possible when you let the wood filler dry.
- To reduce hand sanding in corners, use a mouse sander or multi-tool. Keep that in mind and save yourself as much work as possible!
- Make sure that the first layer of paint or primer is a thin layer. Excess moisture in the paint can reactivate the filler since most are water based. You would notice a bumpy or rough texture come through.
- Most wood fillers are water-based, so if you need to thin it a little, you can do so by adding water.
Looking for more furniture or painting techniques? Full tutorials:
- How to Choose Paint Colors: Easy Tips and Tricks
- The Best Paints for Cabinets and Furniture
- How to Protect Furniture
- The Easiest Way to Paint Cabinets (still a big job)
- Amazing Furniture Transformations
Frequently asked questions:
No, paint will bond with wood filler just fine. However, the raw wood areas will need primer, so it is best to use one coat every. A thin coat of primer
The amount of time necessary to allow the filler to dry will depend on the depth of the wood grain and type of filler. This typically takes 20 minutes to up to 2 hours.
Wood filler is made up of wood fibers or saw dust in a binder. Wood putty is generally made of epoxy, plastic, or fiberglass and does not harden the way that wood filler does.
I have used many, many wood fillers and this one is by far my favorite to use for all-purpose. Wood filler tends to be thick. For tight grain, you can use a product such as aquacoat.
As many people have pointed out to me, I could have simply painted many more coats of paint and sanded between each to remove wood grain & get a smooth front. However, that idea was FAR more work than a few layers of wood filler because of the depth of the ridges and pits. Paint simply doesn’t fill grooves very well. Also, the purpose of the filler is to seal the pores and diminish any future recessing of the grain.
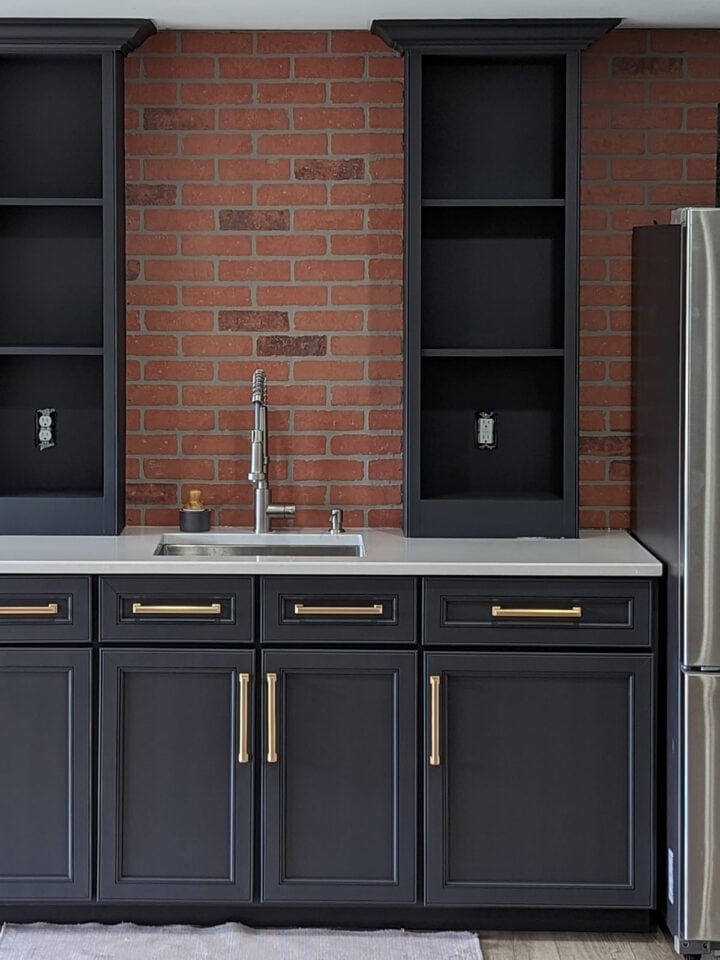
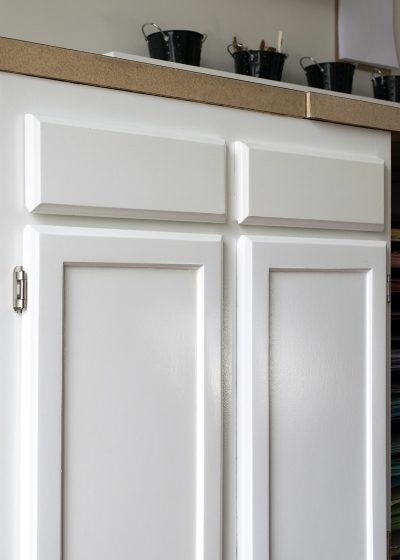
See how these painted cabinets turned out in the Craft Room Makeover

Grab our free series "Weekend Home Projects that will Transform Your Life" Sign up below to receive updates including free printables, organization tips, home improvement projects, recipes and more! |
More DIY Tutorials

PS I love seeing your creations! Be sure to take a photo and tag #cravingcreative on Instagram! You can also stay in touch with me through following me on Instagram, Pinterest, and subscribing to the newsletter!
Filling Wood Grain Before Painting Cabinets
Tools
- 3-5 inch putty knife
Supplies
- TSP or Degreaser
- Wood Filler
- Sand Paper 120 or 220 grit
- Lint free cloths for removing dust
Instructions
- Remove the hardware and clean the surface thoroughly with teaspoon or a degreaser product that won't leave a film.

- Sand the entire surface. The glossy varnish needs to be removed or "roughed up" to increase the ability of the wood filler to bond.
- Use a 3-5in. putty knife to apply wood filler and press down as you spread it into the wood grain. It is helpful to use a scraper that bends slightly. Apply in different directions to completely fill the grain. Scrape any excess filler before it dries.

- Sand the filler smooth. Using an orbital sander with 120 or 220 grit works well on all flat areas and saves hand sanding. Unfortunately, orbital sanders are usually round so you will either need to hand sand corners and molding, or use a mouse sander.
- It is important for the transitions from wood to wood filler be smooth. If you can feel ridges or depressions, you may have to apply a second coat and sand lightly again. Before painting clean with a vacuum and cloth to remove any dust.


Notes
- Keep the layer of wood filler as thin as possible. Wood fillers are not flexible. Thus, it is more prone to cracking and thick layers will make it even more so.
- Make the transitions between wood and filler smooth and seamless. This is why I recommend a palm sander.
- If you are intending to stain rather than paint, you can match the wood filler to the wood grain and make it stainable. However, this will not look right unless you only have small, individual pores to fill. Large swatches like I was attempting to smooth out would not work with a stained piece. If you have small, tight pores, you may have an easier time with products such as aquacoat.
- Make sure your inner corners and molding are as smooth as possible when you let the wood filler dry.
- To reduce handing sanding in corners, use a mouse sander or multi-tool. Keep that in mind and save yourself as much work as possible!
- Make sure that the first layer of paint or primer is a thin layer. Excess moisture in the paint can reactivate the filler since most are water based. You would notice a bumpy or rough texture come though.
- Most wood fillers are water-based, so if you need to thing it out a little, you can do so by adding water.
Alex says
This is so helpful! I’ve been wanting to paint my cabinets for ages, but my biggest concern was that I didn’t want the wood grain to show through the paint. I was worried I was going to have to hire someone to do it, but this gives me a lot more confidence to try it myself. Thanks for sharing!
Tori says
Would this process only work on solid oak cabinets or could it work on veneer oak cabinets? I’m trying to figure out if my veneer oak cabinets have a chance to be painted or if I should just stain them instead.
Rachel says
That shouldn’t be a problem unless you sand so much that you go through the veneer into a substrate like mdf. I’ve stripped and stained veneer before, as well as painted. The other issue is that if you are looking at filling in the wood grain, wood filler will not take up stain the same way as wood does, so you will end up with odd streaks.
Jo Ellen Byrnes says
Great job describing all the steps and “why” you need to do them.
Just a few typos to correct to perfect your site. Under Expert tips- #5 to reduce “hand” NOT “handing”, and #7 if you need to “thin” not “thing”.
I think you did a great job and just wanted to help you perfect your site to reflect the professional quality of your work. NOT to be critical, NOT to judge- just a fellow traveler down the road to making things better in our crazy life of refinishing. All the best to you in the New Year.
Rachel says
Thank you and I do appreciate your corrections, especially the kind way you presented them. Those are a tad hard to spot when one has poured hours over an article to get it just right, haha. I know I am not perfect, but I am trying and it’s been a bit since I looked back at this post specifically. It’s a little overdue for freshening up!
Kate says
Hi! Thanks for the article! My kitchen cabinets have already been painted by the previous owner… you can still see the wood grain. I plan to get new doors and drawer fronts but will want to fill the wood grain on the sides and front. Should I just sand as much of the paint off as I can and then follow the steps? Thank you!!
Rachel says
Wood filler is designed to work with raw wood and bond with the open pores if possible. Of course, I did this with doors that were previously stained and sealed, so it is possible if you sand or strip the previous finish off.
Val says
Thank you for the helpful info! I am getting ready to redo already painted oak cabinets. There are a lot of brush marks so I know I need to sand first. Planning to spray using Benjamin Moore advance in white color over the light gray that is there. Do you think I will need a grain filler on top of the paint that is there or will sanding the paint be sufficient? Also do you typically need to use filler on the the cabinet frames or just on the doors? That is probably a dumb question but I’m tutorials I’ve seen it seems that most people only show/mention the doors. Thank you in advance!
Rachel says
Sanding the paint should be just fine. If the grain is very rough, I would do the frames too. Most likely with oak, it is pretty rough. However, you don’t have to fill the frames and doors unless you really want to get rid of all the grain. For some people, the grain doesn’t bother them, while others dislike any grain a lot.
Adam Cole says
I am reading your blog and i get the valuable information about wood grain texture. Really you share the right info and very helpful. Thanks.
Stephanie says
How much did you thin the BM Advance paint? We are considering purchasing a sprayer to do our cabinets and already have this paint so I’m just curious as to how difficult it would be to apply it with the recommended sprayer. I’d hate to compromise the durability of the paint by thinning too much.
Rachel says
BM advance is a great paint, but I honestly haven’t sprayed it. I love it because it is durable and brushes very well without spraying. However, I know my local Benjamin Moore store staff pretty well, so I called them up to ask their opinion. They said up to 10% addition of water should be fine with a sprayer. I usually thin paints with about 1/4 cup of water to 5 cups of paint and work up from there until it flows nicely. However, be very sure to thoroughly mix the paint. This can make all the difference, so they recommended using a paint stirrer attachment on a regular drill at low speed. Hope that helps and good luck with your project!
Jerry Blandford says
I want to put grain/pore finish on raw ash, spray it with clear laquer but my supplier for the pore filler has been out of. business for forty years. Got any suggestions where I could get some filler? Asking for ash here in New Mexico also brings a puzzled look from our lumber dealers. Could you also send me some sources for hardwoods?
I saw you on the internet but may not be able to find it again. Thanks for your work. I know it helps a lot of people.
Rachel says
Depending on whether you are using an oil-based or water-based top coat, I like Famowood for water based. Alternatively, you can obtain the same result with multiple coats of wipe-on poly with sanding between coats, but it takes more time. I am surprised that local lumber dealers would have trouble locating Ash. It’s native and popular for woodworking.
Tony says
Where are you located? We are full time professionals qith no time to do redo our Oak cabinets, but it must be done to remove the grain.
Are you available to do this for us, or can you recommend someone? We are in Franklin, Tennessee.
We truly admire your work & skills,
Tony
Rachel says
Hi Tony! Unfortunately, I am based out of DC although I grew up near Nashville. There are many furniture refinishers you can hire probably in your area to do the work. A quick google search found Bella Tucker in Nashville, and Fresh Furniture, although I don’t know either of them personally. Another option to cut down on the amount of time needed is to have new cabinet doors made to fit your existing cabinets. Then you only need to fill and paint the frame which is much less time consuming and easier. I hope that helps and good luck with your project!