Discover the secrets to achieving professional-grade results by painting kitchen cabinets with a sprayer. Learn expert tips, step-by-step instructions, and insider techniques to say goodbye to dated cabinets and hello to long lasting, smooth, and beautiful cabinets.
I have been receiving a lot of questions lately about cabinets and I am painting a large set of kitchen cabinets for a client. I’ve lost count of how many sets of painted cabinets we have painted, so I thought this would be a great way to talk through the process of using a paint sprayer for cabinets.
This house is being sold and the owner is completing a few budget updates to get ready. She was a bit overwhelmed with such a large kitchen, so I helped guide her on the best products, finishes, and processes for making these cabinets shine.
Looking for some color inspiration for your project? I have scoured the internet to find specific examples and real-life paint examples in our post on Colorful Furniture Makeovers, 20 Sage Green Cabinet Paints, and the best Blue Cabinet Paint Colors.
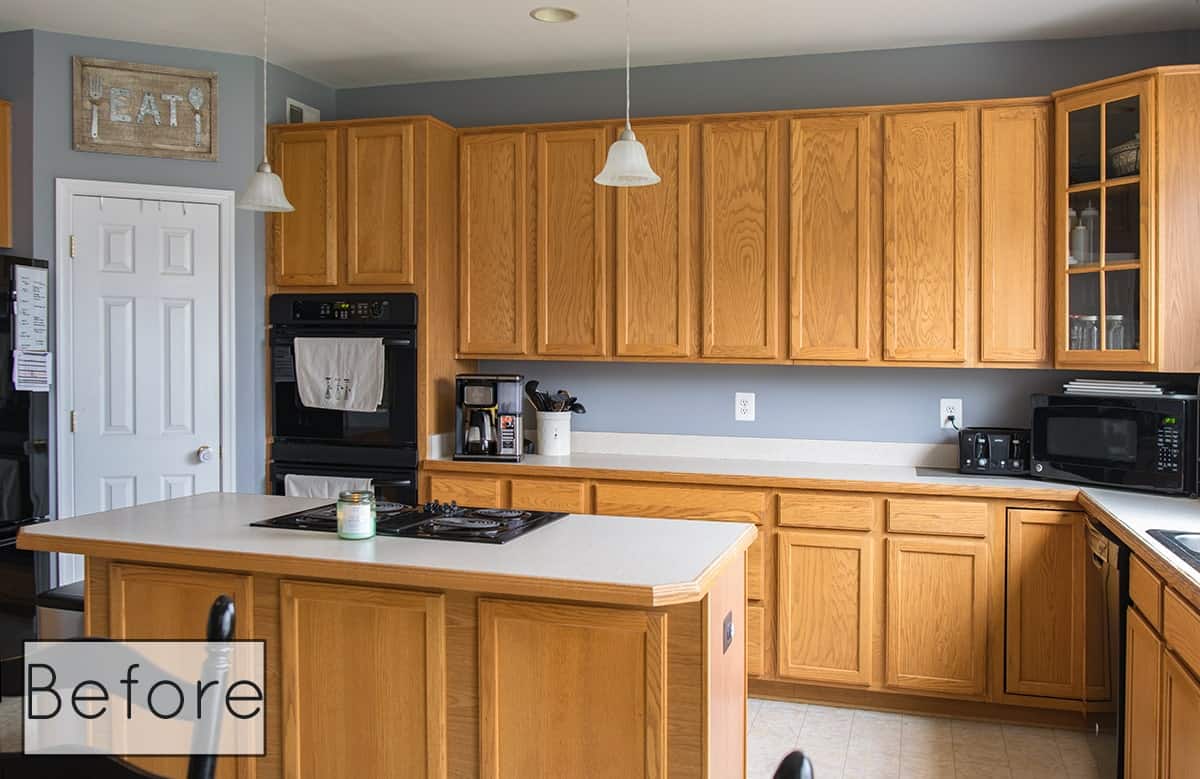
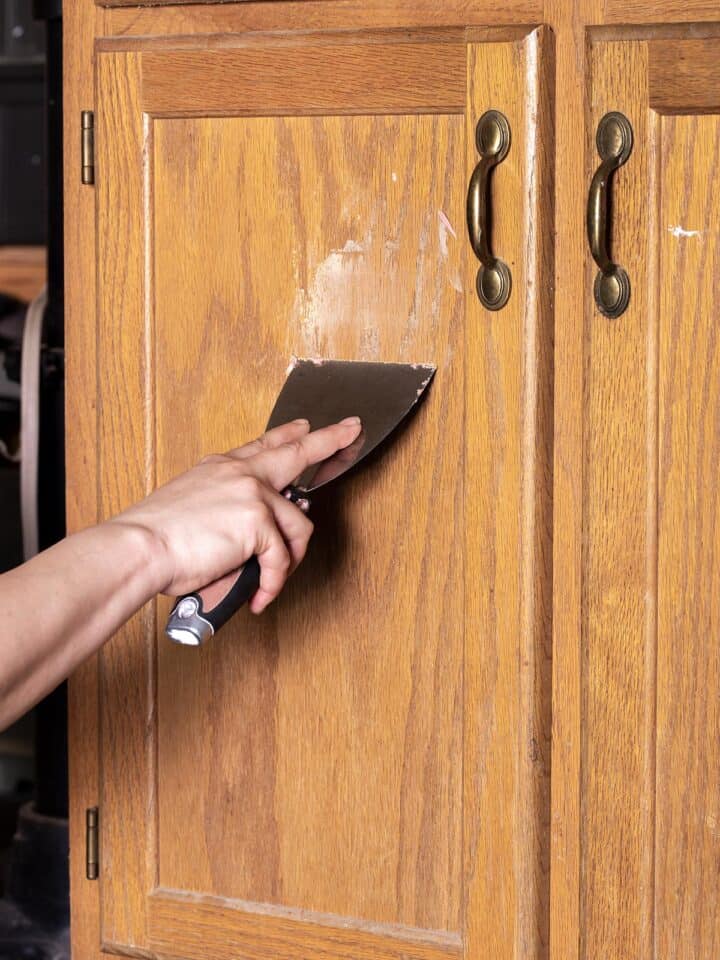
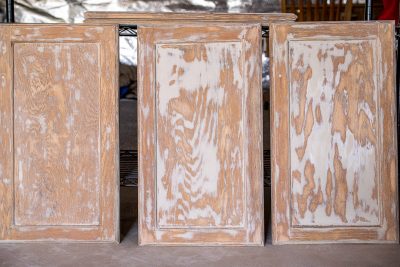
Here is the before:
Why You Need A Paint Sprayer
Painting kitchen cabinets is a HUGE job. I wouldn’t dream of hand-painting cabinets with a brush and roller. Here is why I recommend a sprayer:
1. It’s a Time Saver
Painting kitchen cabinets is a big job, even if you don’t have a huge kitchen. For this kitchen, even with 47 doors and drawers, one coat of paint took 2 hours! A brush would have required 8-10 hours per coat. A good paint sprayer is a lifesaver for large projects!
2. No Brush Marks
Nothing beats the easy-to-get smoothness of a sprayer. Period. The finish will look professionally done.
3. Less Paint Needed
A paint sprayer applies paint in very thin coats, much thinner than a typical brush. Therefore, even with the same number of coats, you get even coverage but use less paint.
*Note: We have a step-by-step printable guide to painting kitchen cabinets at the very bottom of this post. You can click jump to tutorial at the top of this post or read on for all our tips expert advice.
How to Prep for Painting
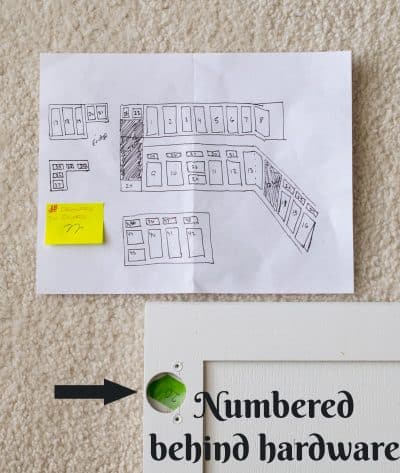
Especially for a large kitchen with multiple-sized doors and drawers, I HIGHLY recommend numbering them and making a chart. It will make it so much easier on you when you need to put everything back together.
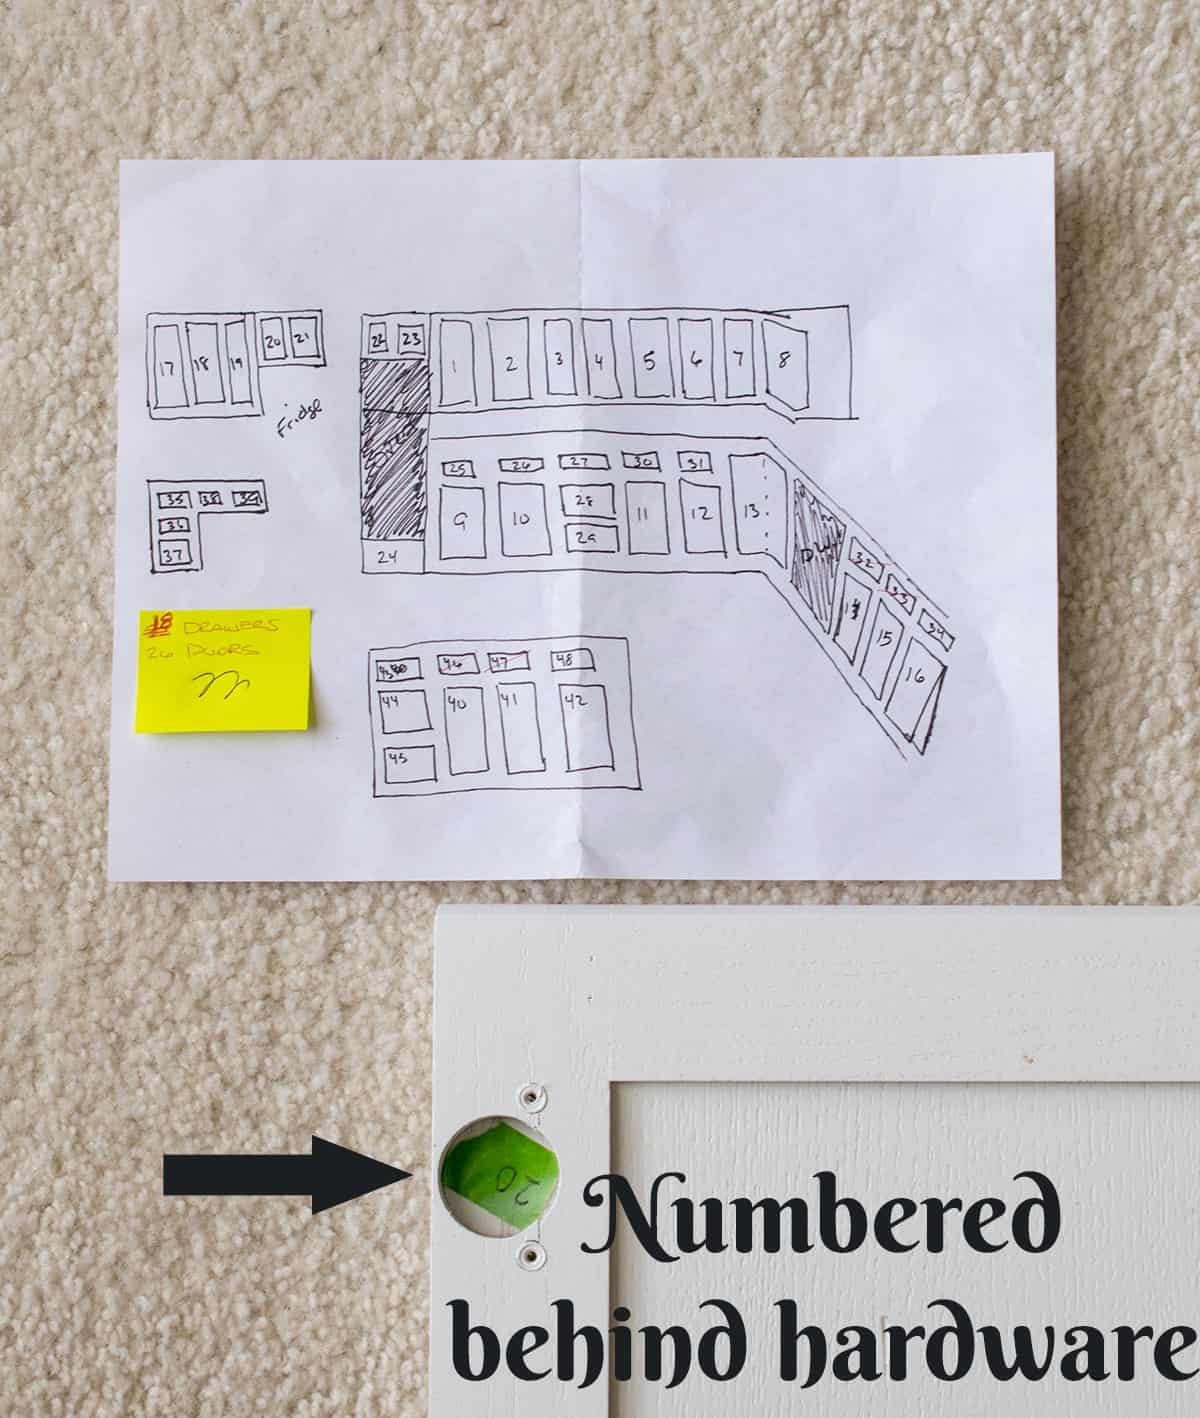
As you can see, we used painter’s tape and put the tape in an inconspicuous place behind the hardware that we removed. We did the backsides first with the tape on the front, and then moved it to the back to paint the fronts.
With painting anything in the home, the basic steps remain the same – Clean with TSP, sand, wipe thoroughly to remove dust, prime, and paint.
With that being said, there are two questions I get asked ALL the time.
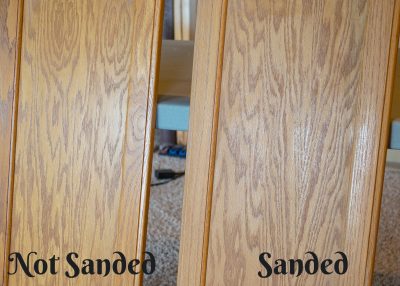
“Do I need to sand cabinets before painting?”
While many paints out there tout themselves as “no sanding required”, I still HIGHLY recommend sanding. Sanding helps paint bond and kitchen cabinets are very high-traffic pieces.
The worst feeling is to do all that work, and then realize the paint is chipping/peeling because you skipped this step. It just isn’t worth it.
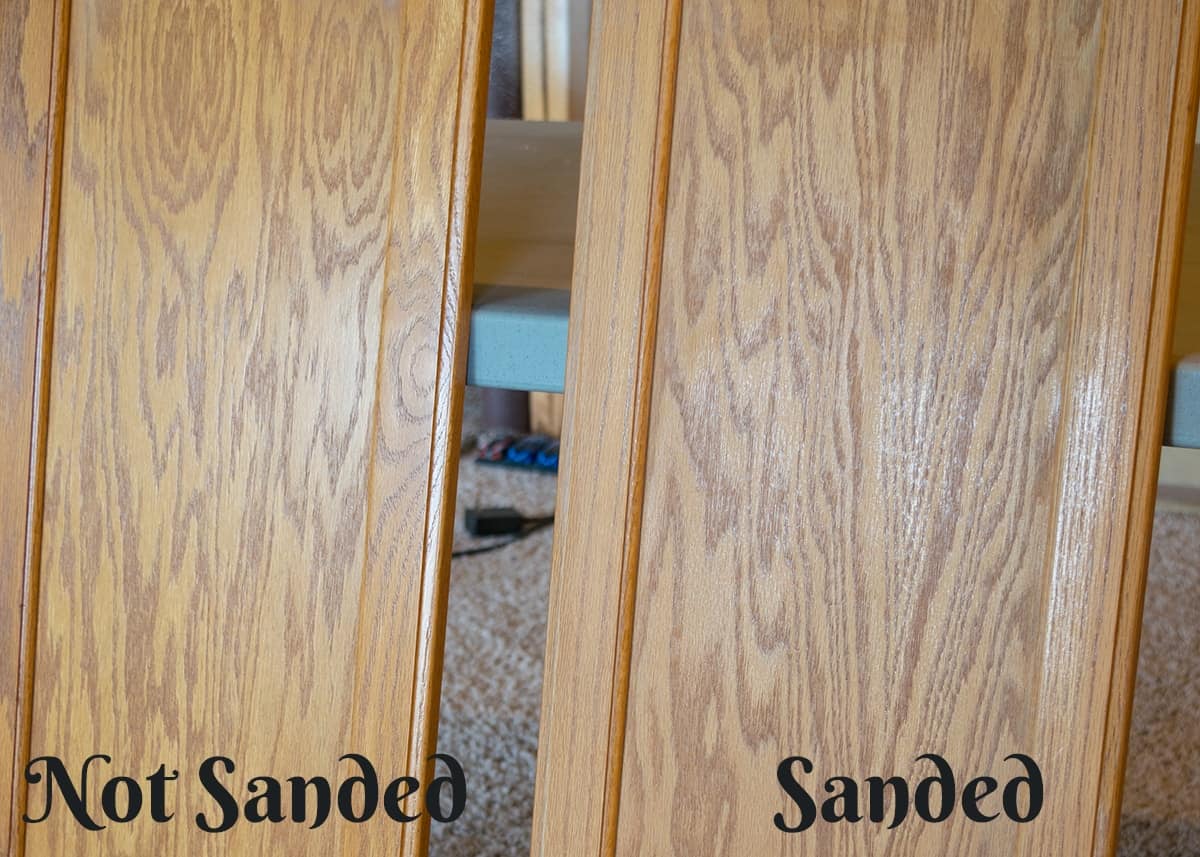
The good news is you do NOT need to sand down to bare wood. A good rough-up with 120-grit sandpaper will do for most cabinet paints. Sand in the direction of the grain or use an orbital sander and mouse sander. These two tools will almost eliminate hand sanding while making the process much faster and easier.
To get a truly smooth, professional finish, sand with 220-grit sandpaper just before the last coat of paint.
Tips for Setting Up
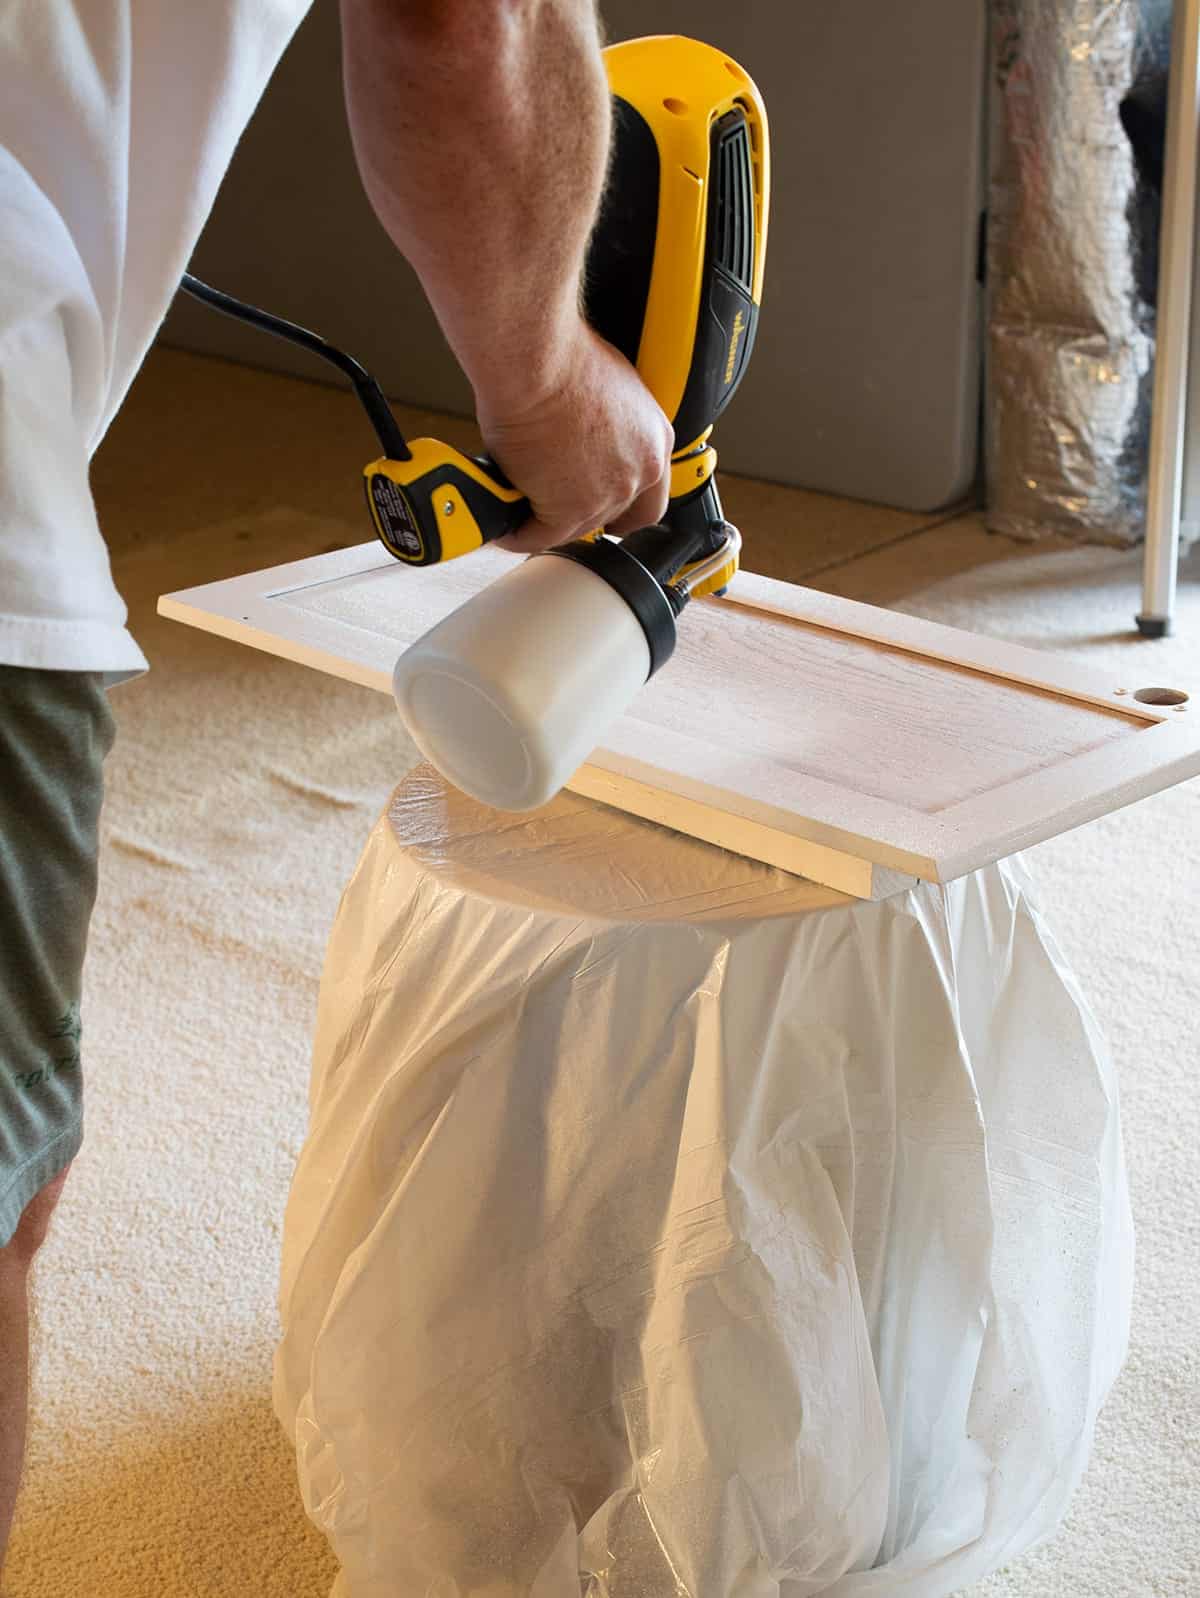
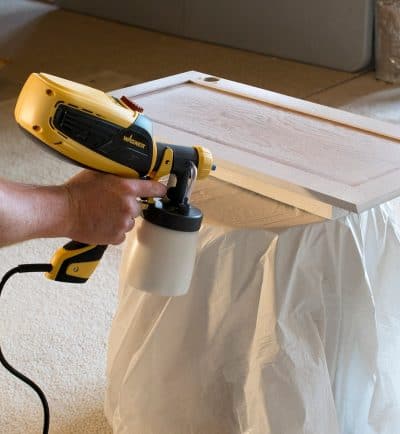
Fun fact – I own 4 sprayers! For this cabinet set, we used the Wagner 3000 sprayer. This sprayer comes with two nozzles – one for finer, detailed work like cabinets and one for larger projects like staining a fence or painting walls.
Read More>>>> Our thoroughly tested guide to Best Paint Sprayers for Your Project!
- Familiarize yourself with the sprayer you’re using, whether it’s an airless, HVLP, or a compressed air sprayer. Each has its own setup and operation.
- Paint dust gets everywhere! Close doors, lay down drop cloths and cover sensitive items with plastic sheeting. I turn off the air conditioning inside while spraying even.
- Choose a spray tip size based on the type of paint you’re using and texture. Smaller tips are better for fine finishes like cabinets where you need more control.
- Test spray a scrap board (preferred) or large piece of cardboard. Anytime you take a break from using the sprayer, always hit the test board first. This includes after refills or long breaks.
- If your paint sprayer won't spray, and you have cleaned it, check to make sure the small pinhole at the top of the suction tube is not clogged.
- Clean the sprayer immediately after use. This ensures continued quality and is all the maintenance you need. Inspect for any damage or signs of wear as well.
- Wear appropriate personal protective equipment, including goggles, a respirator mask, to protect yourself from paint fumes and overspray. Yes, I have to say it.
- You can leave the paint in the sprayer between coats. I clean and wrap the nozzle in tight fitting plastic to avoid air from drying any paint. Some sprayers can’t do this though.
- Paint in a well-ventilated area between 40 and 80 degrees and low humidity (under 70%) for the best spraying conditions.
- Adjust the spray fan width. Narrower widths are suitable for detail work, while wider widths are better for large areas.
- Determine the most efficient spraying direction for your project. This refers to the nozzle. A vertical nozzle on a air-powered sprayer has a different fan pattern than a horizontal nozzle.
How To Set Up the Sprayer and Work Area
On this particular sprayer, and most Wagner sprayers, the larger tip has three knobs to adjust: the airflow, the paint flow, and the paint width. The detail nozzle only has the airflow regulator.
Both sizes have the option to spray vertically or horizontally. Use the fine finish tip/canister (sometimes called the furniture gun) if your sprayer has multiple sizes.

Although this sprayer can handle most paints un-thinned, if you find that you just aren’t getting a super smooth finish or the sprayer is spitting, try thinning the paint with up to 10% water. I usually add ¼ a cup at a time and mix thoroughly to test.
*Note – Before adding water, ask the paint rep. A few paints, such as Benjamin Moore Advance, can be negatively impacted by adding water.
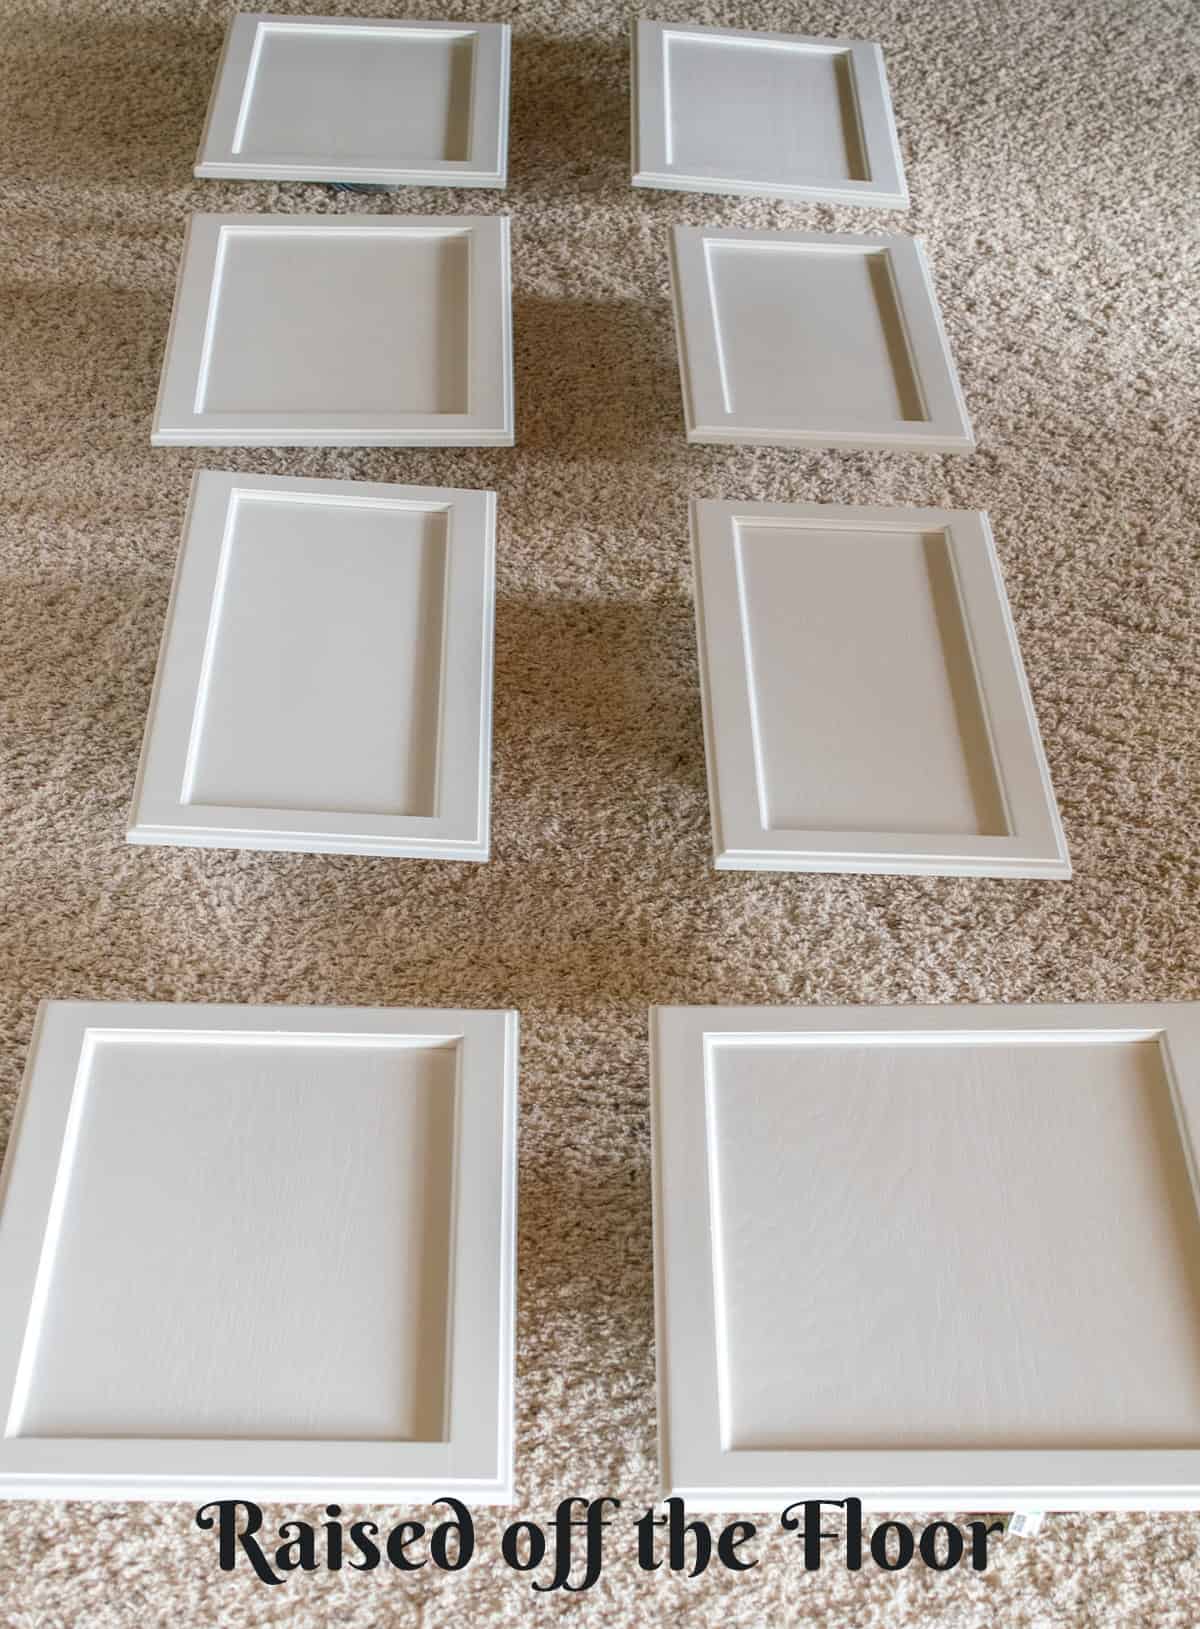
The doors and drawer fronts should ideally sit raised off the floor to keep the wet sides from touching anything while drying. We used scrap pieces of 4×4, but a pack of plastic solo cups is cheap and works great!
Start with the backside of the doors. When painting both the inside and outside of the doors, paint one side, let them sit for a week+ to partially cure, and then do the other side.

Spray your doors and drawer fronts off the ground. We used an old table and covered it with plastic to raise what we sprayed off the ground. I carefully moved the “done” pieces to their drying place. Each coat took about 2 hours, so our backs thanked us for not having to bend over.
Expert Tips for Painting with a Sprayer
Beyond the setup, using the sprayer is as easy as it gets. Just point and shoot! However, there are a few quick tips to make the process go smoothly:
- Wipe the tip with a rag occasionally as you go. Dried paint can build up on it, causing your paint to splatter.
- Start by spraying off the board, meaning engage the sprayer before you are over the top of the work product (or cabinet door in this case). Spray all the way across and let go of the trigger after you have gone off the door. If a sprayer is going to spatter, it will most likely happen when you engage/disengage the trigger.
- If you get spatter/orange peel, wipe off immediately until smooth and spray again. (A lesson I learned the hard way when I started out.) Sanding it all smooth again is much more time-consuming both to fixing the mistake and to project completion.
- Go slow enough for full coverage. Maintain a consistent speed and distance to achieve an even coat.
- You do NOT need to sand between coats. For the absolute best finish, sometimes I sand just before the last coat but not usually.
- Hold the paint sprayer gun about 10-12 inches away from the surface and begin spraying in smooth, overlapping strokes. Varying the distance can result in uneven coverage and overspray.
- Spray lengthwise, where possible. I find that the best way to spray cabinet doors is bottom to top of cabinet doors and left to right on drawer fronts because you are spraying in the direction of short side to short side. It produces less paint flashing or streaking and wastes less paint.
Check out our other post for more information on painting cabinets:
- How To Hide Wood Grain in Painted Cabinets
- Painting Cabinets like a Pro
- The Best Paints for Furniture
- What to Know Before Painting Kitchen Cabinets Black
- How to Protect Painted Surfaces with a Top Coat
I know that this sounds in-depth, but I promise after you get the hang of it, you may find yourself using a paint sprayer for all kinds of projects around the house. It really is addicting!
Quick Answers to Questions
Only use a paint durable enough for cabinets and furniture. My never-fail paints include Benjamin Moore Advance and Fusion Mineral. Other paints I have used successfully include Sherwin Williams Emerald Line, Behr Cabinet and Trim Paint, and Rustoleum Cabinet Transformations. For long-lasting results, add a protective topcoat.
There are some situations where you can technically skip sanding, although it is discouraged because kitchen cabinets are a very high-traffic surface. Sanding ALWAYS gives the best paint bond to reduce cracking, peeling, and removing the paint through scratches or dings.
I have written a great guide to the best paint sprayers for your project that will lead you to the right one for you. The answer isn’t the same for everyone.
I highly recommend a topcoat for kitchen cabinets, even if the paint says it doesn’t need one. Polycrylic (sometimes called Water-based polyurethane) will make them much more durable and easier to clean things like dried food without harming the paint finish. You can read more about my favorite polycrylics here.
The third question is about filling in the grain. If you are interested in that, you can find a wealth of information about hiding wood grain here. However, removing wood grain wasn't a request in this cabinet project.
A number of things can cause the orange peel effect or bubbling on the surface of your cabinets. Any excess moisture or working in overly hot or humid conditions can cause bubbling. Spraying too closely to the cabinet surface or not moving quickly enough can cause paint to accumulate and create unwanted texture.
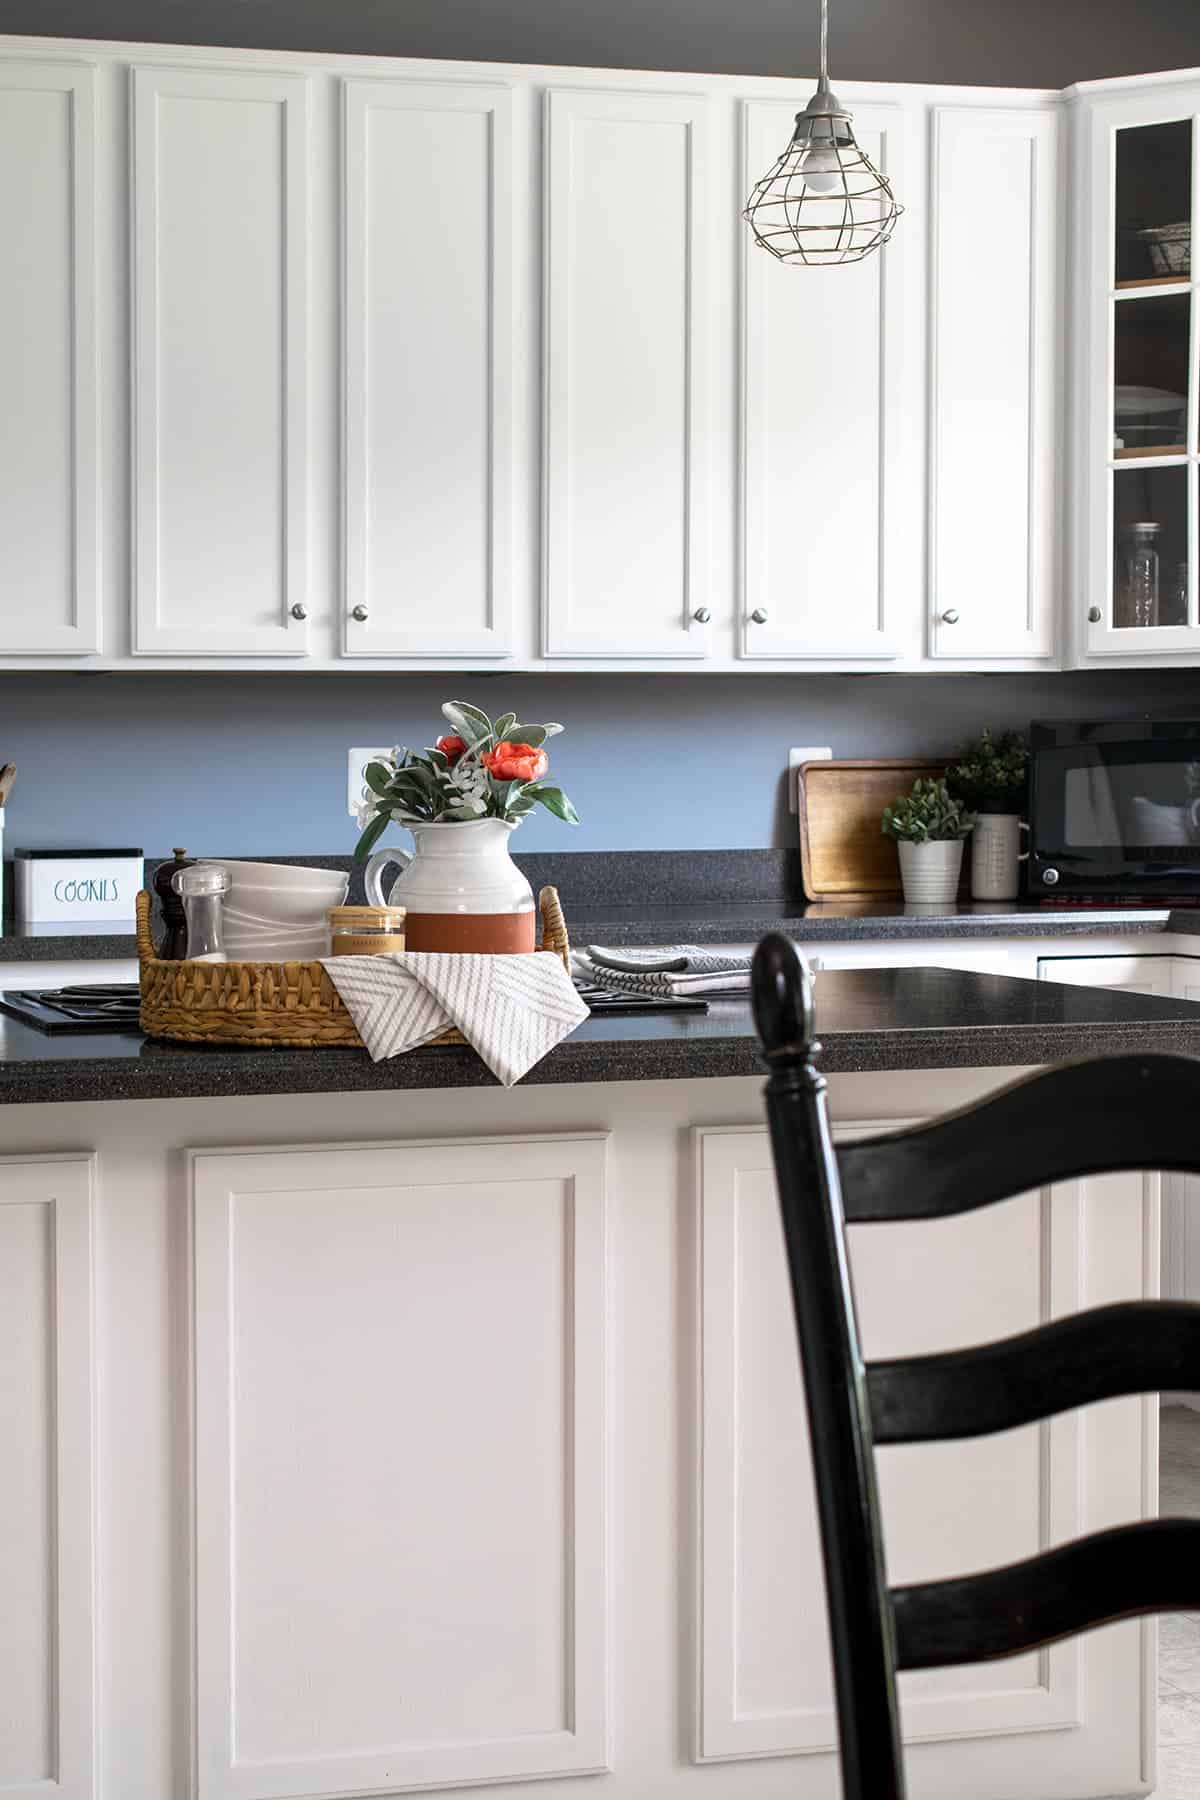
Our Project Results
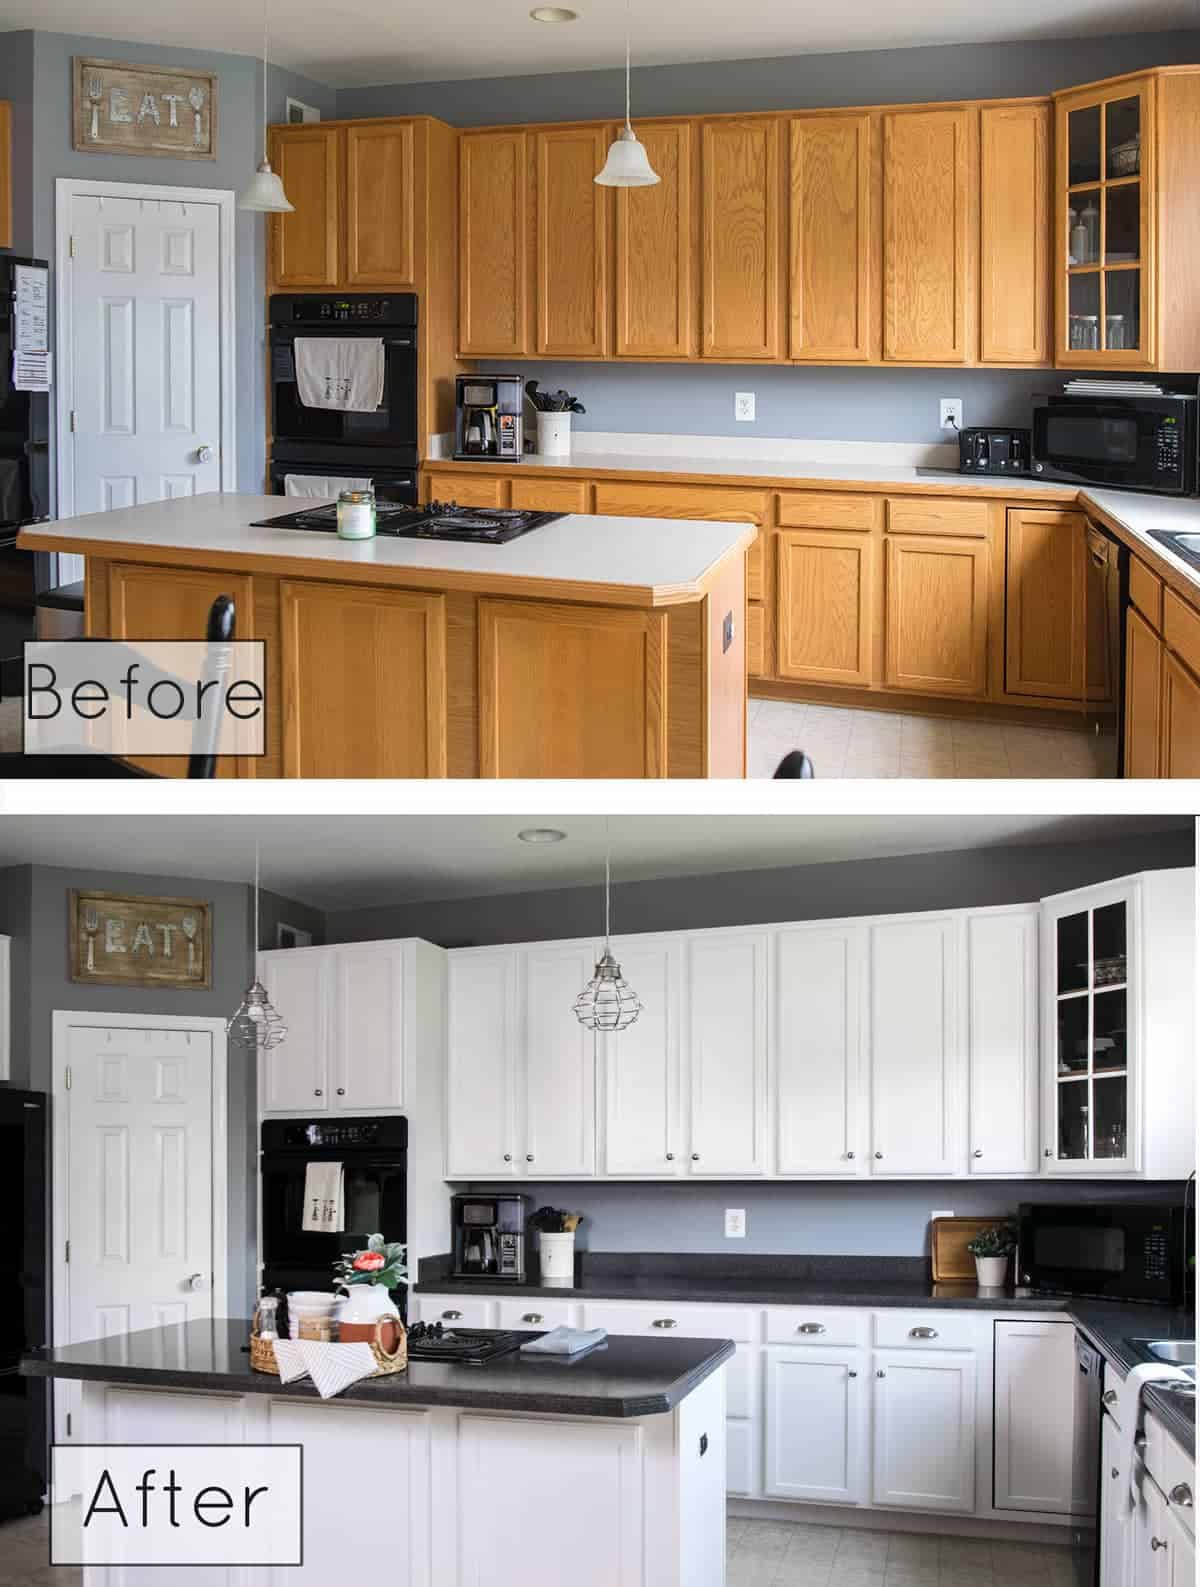
And my friend is absolutely thrilled with her updated cabinets. In fact, it even spurred her to epoxy her countertops, replace the light fixtures and add knobs. She wishes she had done this years ago!
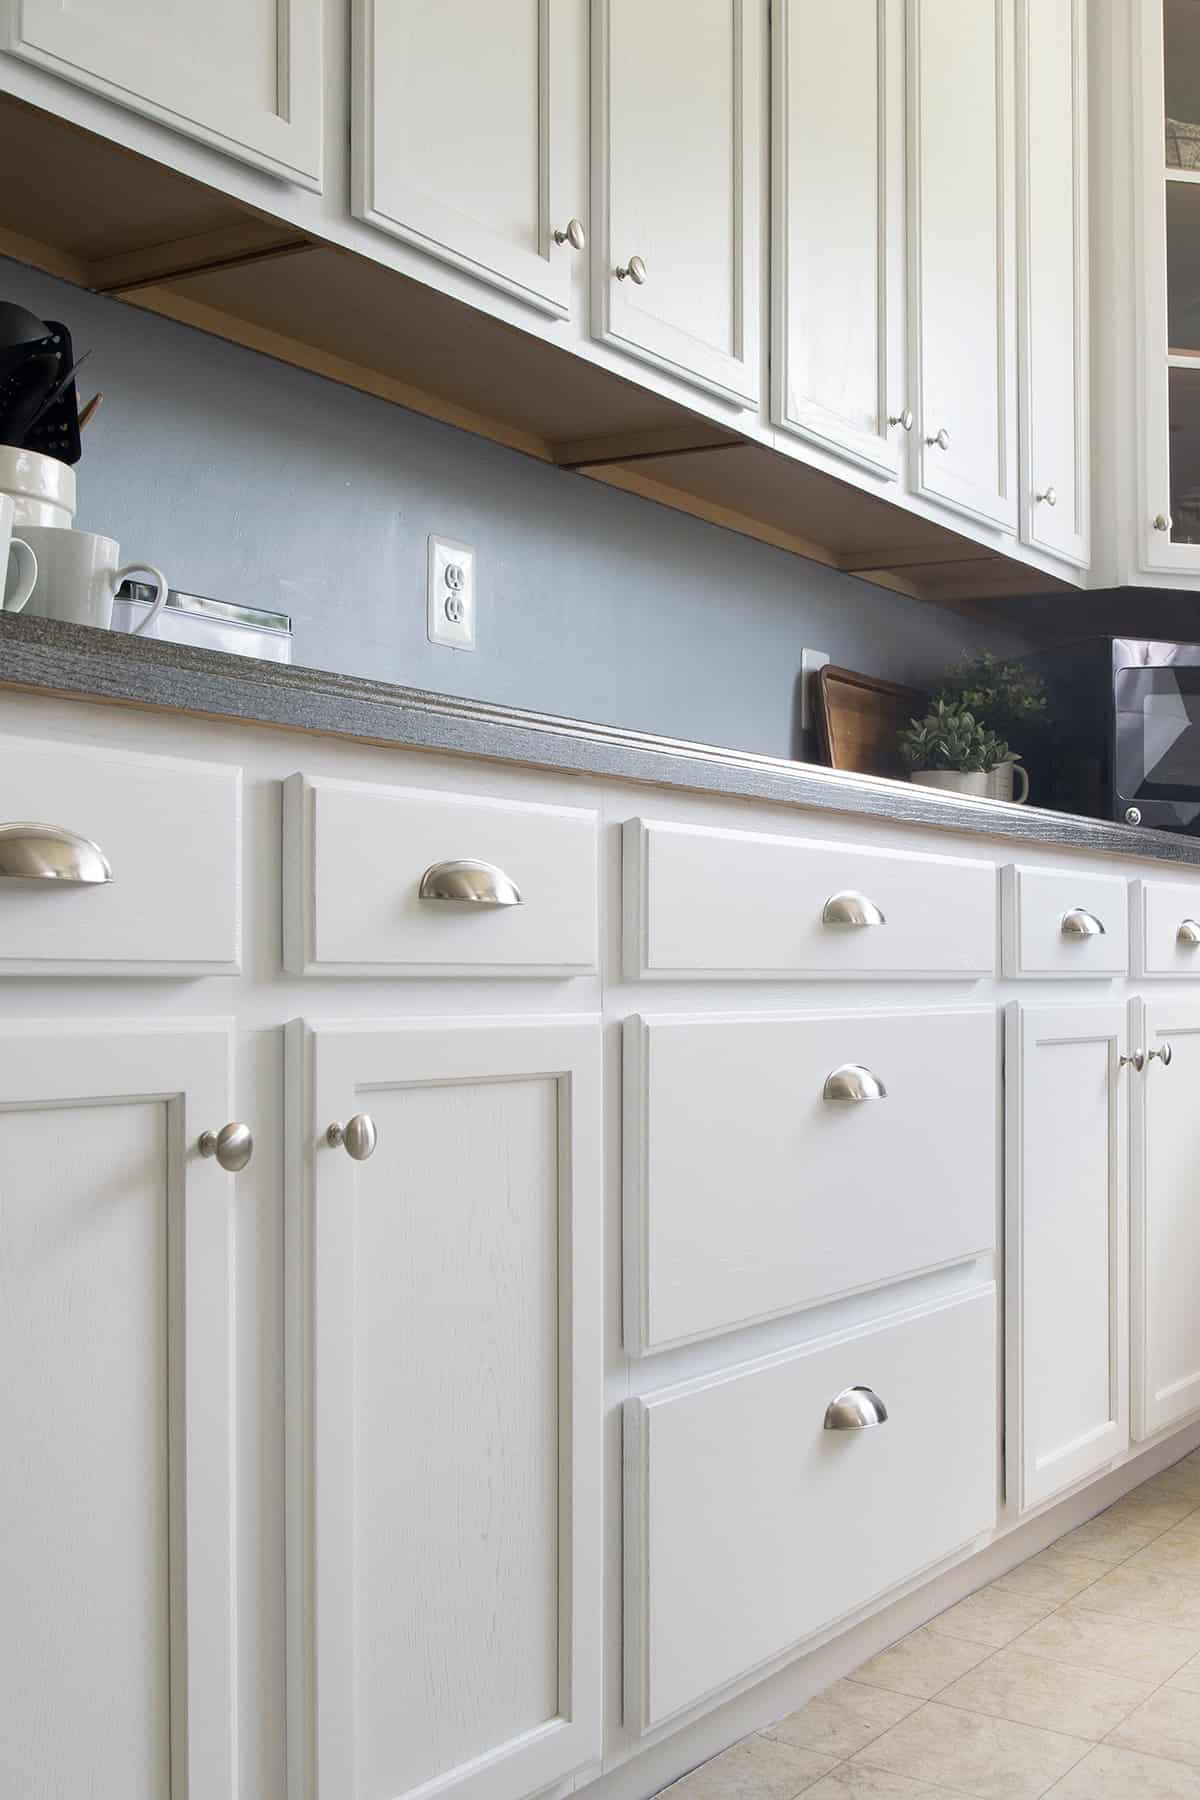
Even though we did not fill in the wood grain, the cabinets look so smooth and professionally done.

Grab our free series "Weekend Home Projects that will Transform Your Life" Sign up below to receive updates including free printables, organization tips, home improvement projects, recipes and more! |
More Home Improvement Projects
PS I love seeing your creations! Be sure to take a photo and tag #cravingcreative on Instagram! You can also stay in touch with me through following me on Instagram, Pinterest, and subscribing to the newsletter!

How To Spray Paint Kitchen Cabinets
Supplies
- TSP or Degreaser
- Sand paper
- Sanding Blocks
- Wood Filler Only for imperfections or filling old hardware
- Deglosser only if not sanding
- Paint Brushes
- Lint-free Microfiber rollers
- Paint trays
- Stainblocking Primer
- Paint
- Protective Top Coat
Instructions
- Remove Doors and drawers. Unscrew hardware. Especially for a large kitchen with multiple size doors and drawers, I HIGHLY recommend numbering them and making a chart.
- Prep the cabinets by clean with teaspoon or degreaser cleaner if you have grease or oil stains. Repair scratches with wood filler.
- Sand any glossy varnish or coating off. You do not need to sand every bit of previous stain or paint off if it is in good condition. Roughing up the surface creates a better paint bond, hands down. Use an orbital sander with 120 grit to make this much easier on your hands. Vacuum and wipe all dust off of the panels before priming.
- Setup your sprayer and work area. Cabinet doors should be dried off the ground (solo cups or wood blocks work well). For doors, start with the back sides. Prime, paint, and and allow the doors to dry before flipping over to prime, paint, and dry the door fronts.
- Prime the cabinets with a quality primer. The Kilz Premium (not original) is my no-fail primer for cabinets. For very light colors, use 2 coats of primer. Allow to dry 24 hours.
- Paint the cabinet doors with 2 coats of cabinet paint. See notes about using a sprayer.

- Allow to dry. I generally allow the doors to dry about a week before flipping over to prime and paint the fronts.

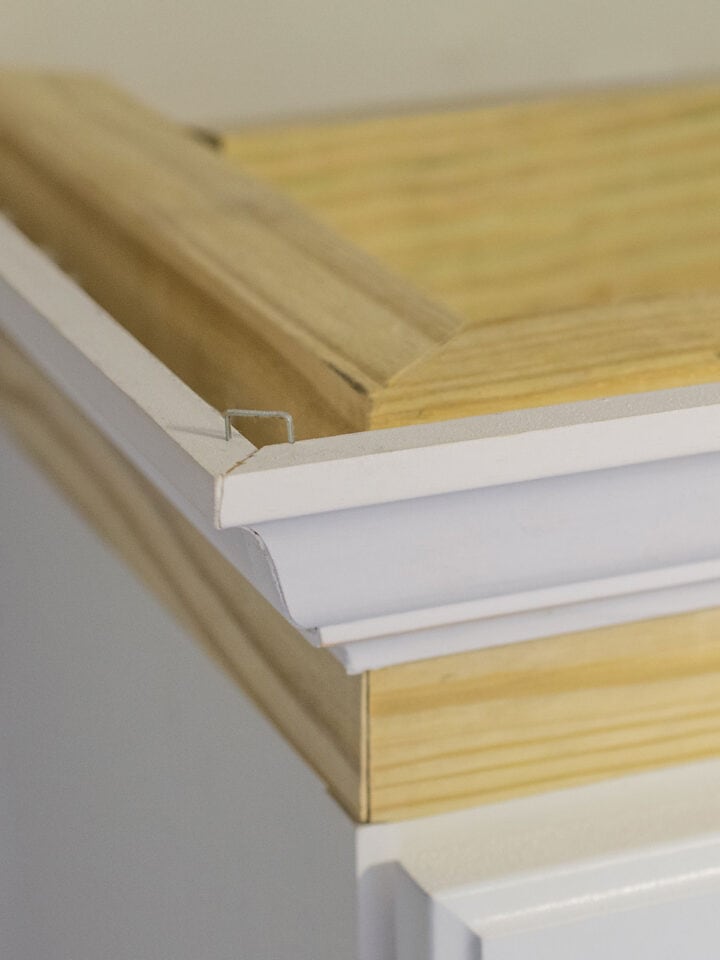
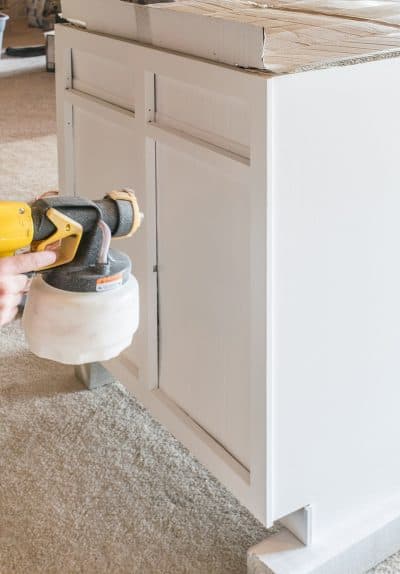
- Paint the frames. You can tarp and spray the cabinet frames while waiting for the doors to dry. You can either tarp and spray the cabinet frames (pictured) or paint using a brush and roller. Generally, there is no need to paint the insides except for glass fronted cabinets.

Notes
- Wipe the tip with a rag occasionally as you go. Dried paint can build up on it, causing your paint to splatter.
- Always test a scrap board (preferred) or large piece of cardboard. Anytime you take a break from using the sprayer, always hit the test board first. This includes after refills or long breaks.
- If after the first few cleanings, your paint sprayer won't spray, check to make sure a pinhole at the top of the suction tube isn't clogged.
- Start by spraying off the board, meaning engage the sprayer before you are over top of the work product (or cabinet door in this case). Spray all the way across, and let go of the trigger after you have gone off the door. If a sprayer is going to spatter, it will most likely happen when you engage/disengage the trigger.
- If you get spatter/orange peel, wipe off immediately until smooth and spray again. Drying and sanding smooth again is much more time-consuming,
- Clean the sprayer immediately after use. You can, however let it sit in the sprayer overnight for additional coats, but clean the tip well.
Anthony Boggs says
Hi Rachel!
I am peeping to start painting my old oak cabinets soon and I want to say how helpful your blog has been! My wife and I bought a 22 year old home with a lot of 90s interior designs, but the cabinets seem to be in decent shape so we are hoping to paint them and save the money rather than replace. I have a question about paint selection if you don’t mind! I am having trouble getting my hands on BM Advance but I think I finally found a place to buy it and I’m looking at this one: ADVANCE® Waterborne Interior Alkyd Paint – Semi-Gloss Finish 793
Gallon / 079301-001
Color: HC-169 Coventry Gray
I was wondering if you have any experience with this type or if it looks like a good one to use. If not are there any other Sherwin Williams you recommend? It seems like everywhere around me does not have the emerald line, thanks!
Rachel says
I’m rather shocked that no one is carrying the emerald line, although we have a direct SW Store. It is pretty comparable to BM advance, but I don’t often use it because of a few shortfalls like cost and color selection. Unfortunately, that is really the only one I would recommend from a durability perspective and that I have experience with. Also, Coventry gray is a popular cabinet choice and quite pretty while also being very versatile against choice of finishes, floors, and tile.
Kayla says
Can you explain the dry time in between each coat if spraying the cabinets? You say to prime the backs of cabinets first and wait a week before flipping them to do the fronts. How long should I let them dry before painting them (after the primer) and in between each coat? Also, how long should I wait in between coats on the wall cabinets?
Rachel says
Every paint brand has different recommended recoat times, usually between 1 and 8 hours. The paint you use will tell you it’s specific time between coats on the can. You should prime and paint all of the backsides, and then let dry a week or so before flipping over. With a sprayer, the coats are thin enough that you can prime and paint all coats without lines showing up. The main reason you want to wait to flip them over that the paint can feel dry to the touch but not hardened. It can be soft enough that if you set the freshly painted doors directly on something for an extended time, you can get pressure marks in the paint. Hope that makes it more clear!
Amy says
Love this! I’m getting ready to tackle my kitchen and this is very helpful.
What method do you recommend for tapping plastic to avoid getting paint inside cabinets and on walls?
Do you really need to let cabinet doors dry for a week before turning over to prime and paint other side?
Also curious if you have you ever used M-1 de glosser instead of sanding cabinets? Would you recommend it as an alternative to save time and dust from sanding?
Rachel says
So, I give my clients two options when it comes to painting the frames. I can brush/roll them or I can spray them. The rolling option takes more time (usually many hours more for all coats), but I don’t have to tarp the kitchen. Therefore, they can still use the kitchen and keep access to everything in the cupboards. If they can live without use of the kitchen for up to 3 days, we tarp and spray. The frames are usually not as prevalent and mostly rolled so the finish isn’t noticeable if I take care. For tarping inside of doors, I use very thin plastic, usually the staticky kind. I tape the edge and then stick the plastic to the tape.
I believe you absolutely need a week to dry. Otherwise, the paint may pull off when you remove the cups later, and higher durability paints take longer to cure. I don’t work with latex wall paint. While, in lower humidity conditions 3 days may be safe, it isn’t easy to fix pulled paint. For me, its just not worth it, especially with clients who expect durability.
I have used deglosser, and it’s not my top choice for high traffic pieces. I have seen many a project that has gotten away with using something like a deglosser, but truthfully paint does not bond as well as sanding. Most deglosser products also don’t have high reviews because DIYers are expecting a high level bond. For projects that I have done in the past that cannot be sanded, I usually turn to either Kilz adhesion or Fusion Mineral Tough coat (which is really just a glue I think).
Cindy Filippo says
Thank you so much for your post. I am in the middle of painting my cabinets with a Wagner paint sprayer and am having a very difficult time! Thus far, I have followed your instructions to the T. Luckily, I sprayed the backs of the cabinets first. In doing so, every single cabinet (there are 16), have some bubbles from the sprayer spitting. I also have orange peel on some of them. I did dilute the BM Advance paint by 10% and I realized after creating “stripes” that I was holding the sprayer too close and perhaps not moving quick enough. I also changed the nozzle to a different setting and held it farther away from the cabinet door – that helped a bit. However, still I find the sprayer spits a couple of bubbles here and there and just one bubble ruins the whole paint job. Any tips you can provide would be much appreciated!
Rachel says
Doing the backs first is very good for getting it right. In particular, BM Advance doesn’t like to be thinned too much, but it has excellent self leveling properties. I would try to stay under 5% if you can. I know that Wagner recommends lower air settings, I have always had the best luck with max air flow. I haven’t had bubbles before, but I do get spitting or little nubs occasionally (they kind of look like tiny balls of lint on sweaters). Since you are using an HVLP sprayer and not an airless, the paint comes out much drier and dries quickly. Usually, after the door is dry, you can brush them off and it’s like they were never there. These are caused from the paint getting caught in the tips and building up, which reduces the air pressure. Wipe the tip with a rag occasionally as you go. Dried paint can build up on it quickly, causing splatter. I hope those tips help and definitely let me know if you have more questions. I would love to see them after it’s done!
Bethany Dameron says
Hello! Thank you so much for this! I have a question: I’m about to paint cabinets before we move into our new home, and I noticed you listed two different sanders. How are and would you need both?
Also, how long were you waiting in between coats?
Thank you so much!
Rachel says
I primarily use an orbital sander that is circular sandpaper (the random orbital pattern prevents sanding marks in the wood like a belt sander leaves). However, it can’t get the inside corners of the cabinet doors. So I personally use one of those oscillating multi-tools that has a grinder/sander/cutting attachment and it works like a mouse sander for corners, allowing me to get in them.
Cathy says
Thank you for this post…wish I would have seen it yesterday. What is the best way to repair a splotchy (used a paint sprayer) paint job to cabinets after it has dried? Does the finish matter using a sprayer?
My primer coat came out great. The first coat with a paint & primer came out splotchy and I am VERY upset. I am thinking the paint was too thick.
Rachel says
I hope I am understanding correctly. If you mean that the paint didn’t fully cover, I usually spray 2 coats for even coverage. Unfortunately, if it’s bumpy in texture (like an orange peel), after it’s dried, the only way to fix that is to sand the texture off. You don’t need to sand the primer, just a light sanding to get it smooth again. Then add another coat.
Gretchen Whitfield says
Hi! Your blog is so helpful! The owners before us painted our kitchen cabinets black (oil based- so I think -I did cotton ball and achohol test and the paint rubbed off). The cabinets are chipping in several places mainly around handles where we grab a lot. Do we have to sand the paint all the way off? I bought liquid sander and cleaned well and then did a white coat on one drawer to test out and it seemed to work well. I am just so scared of doing that method for all and ending up with chipping paint.
Rachel says
I wouldn’t worry too much about removing the paint in areas where it is well bonded and intact. However, I would sand the areas like around the door handles to remove the failing paint and smooth it out.
Rachel says
What settings do you put the Wagner 3000 paint sprayer on for cabinets (air flow, spray width, material flow)? I am struggling to know what settings and on the Wagner paint sprayer will give me the best finish. I have thinned my Benjamin Moore advance semigloss paint ~10% with water, but I’m still getting an “orange peel” type of texture on the doors I’m trying to paint. Please help!
Rachel says
Sorry to hear that you are having trouble! Sprayers do take a little practice to achieve the desired result. Every sprayer is a little different for each paint depending on factors like relative humidity and such. However, I find that I honestly end up putting material and airflow on max usually with my air powered sprayers. The spray pattern should be the smaller tip and can, which is for furniture painting. Two other factors can cause orange peel as well – being too close to the surface and spraying an area for two long (not sweeping along fast enough). Spraying does go pretty fast.
Frank says
Even though we did not fill in the wood grain, the cabinets look so smooth and professionally done. How is this possible? I have applied 2 coats of primer and 4 coats of paint and you can still see the grain on my oak cabinets.
Thanks in advance!
Rachel says
Yes, you will still see the woodgrain unless you fill it. In these particular cabinets I have pictured, the client didn’t want us to bother filling the grain either and she was satisfied. You can still fill the grain if that bothers you, but it would require sanding again and respraying. This article on filling woodgrain on oak cabinets may help.
Erin says
Thanks for this post! Did I miss reading how you painted the cabinet bases/frames? I’m assuming with a brush, but perhaps you used the sprayer for this too?
Rachel says
I’ve painted cabinets several times for clients and it depends on what they want to do. Spraying a large kitchen like this is MUCH easier on me to paint and mask off the entire walls and inner frames. It takes about half a day to tape off the room, but only an hour to spray. However, spraying the frames requires that the entire cabinet contents be emptied out and you basically have to live without a kitchen entirely for a few days, more if you top coat them. For this particular kitchen, we took the doors off to spray paint at my house and painted the frames with a brush because she couldn’t live without a kitchen. Either way is fine.
Erin Robertson says
Thank you! I appreciate your reply!
Shelley Wetzel says
I’m considering painting my cabinets and saw your Pinterest post and just read your instructions, also reviewing the before/after pictures. Did you paint the front and back of all the doors? Did you paint the cabinets? or just left them as is? When you painted on top of the old table, with it being covered, did you have paint splatter to the floor? Or is that controlled by the sprayer? and last question, what would you estimate your total costs? paint, sprayer, and plastic? thanks
Rachel says
I do paint the fronts and backs of all cabinet doors and drawers. I let them sit for a week before turning over to paint the other side. I am not a big fan of painting the insides of cabinets – while a topcoat could protect it from general use, I wouldn’t recommend putting items back in them for quite some time (weeks) for full cure. If someone has shelves in bad shape, I generally recommend something like a high quality contact paper instead. The costs are highly variable depending on the size of the kitchen and the fact that I often paint cabinets and refinish furniture for clients, so my costs are different since I have tools on hand and buy things like sandpaper in huge bulk. The paint and primer cost for this job is about $200 because of the brands I use. For spraying the cabinets, the paint definitely gets on the floor and can travel a few feet either side. Beyond that it’s mostly paint dust. Our set up is an old piece of carpet that I spray on. I hope that helps answer your questions and good luck with your project. Fresh cabinets are so satisfying!
Sherry says
I do a lot of summer canning. How will the steam affect the paint paint. Will I run in to problems with peeling?
Rachel says
Hello fellow canner! I do a lot of canning too, but not much pressure canning. While normal cooking steam shouldn’t have an effect on the paint unless it is super close to the steam, I would make sure a pressure canner wasn’t super close to the cabinets, like a few inches. For clients, I have painted several sets with cabinets directly over a stove and, although they may get more grease and dirt on them (I put a top coat on those for sure), I have not had a problem with permanent damage or turning colors. I hope that answers your question and that you love your new cabinets!
Nacia Reed says
What paint brand did you use for this cabinet project? I think I read in one of your articles that you like Ben Moores Advanced alkyd paint but that it is best applied with a brush…? Or maybe that was just for that particular project that you were working on! I plan on using the Kilz premium primer you recommend but want to choose a good paint that would be long lasting as well. TIA!
Rachel says
On this particular project, we used Sherwin Williams Emerald Line, which is very comparable to Benjamin Moore Advance Alkyd, but I also like Fusion Mineral and I am about to start testing Behr’s new cabinet paint line. It just depends on what sheen you like, what method you intend to use, and the color selection. The client here had picked out a particular white already so that’s why I used Sherwin Williams. For clients, the first question I always ask is what sheen they want (chalky, satin, matte, etc.). The second question is whether they intend to put a top coat. The rule there is that the less shiny they want the cabinets, the more I will push for a clear topcoat like Benjamin Moore’s Stays Clear or Tough Coat.
It’s not that I recommend brushing for Benjamin Moore, it’s that if I have to brush, I like that particular paint best for not leaving brush strokes. All of the paints I use can be sprayed beautifully.
Delanie Doyle says
Thank you for this! I’ve heard horror stories about spray painting cabinets….but I’m so tempted to do it because of the time saver. Just to clarify, I’ll need whatever primer I want (1 layer), 2-3 coats of paint, and then a top coat? And sand/buff between each layer?? Will I need to wear a heavy duty mask or turn my garage into plastic tent?? Your pictures make it look so mess-less!
Delanie Doyle says
OH–And if I’m adding hardware, do you recommend drilling for it before or after painting?
Rachel says
It doesn’t make a difference when you drill. I generally drill before painting, in case I make a mistake on placement. It is easier to fill the wrong hole then.
Rachel says
I had to laugh at your comment that it looked so mess free! While it’s not that bad, painting anything with a sprayer inside your home will leave dust that you will be cleaning up for a few weeks. It gets everywhere! We have an unfinished basement that we utilize as long as we are using non-toxic/no VOC paints, so the garage is perfect and probably better to keep the dust out! In closed spaces, I usually use a particulate mask (N-95), but nothing heavy duty.
You are correct on the layers. 1 layer of primer (2 if you are taking really dark cabinets to white or light- saves money on paint), usually 2 coats of paint is good if you have good coverage, and 1 layer of top coat. The top coat is optional sort of, there are a very few paints that I would stand behind without a top coat. One of them is Benjamin Moore’s Advance and I am about to test Behr’s Alkyd paint but their reps are promising me that it doesn’t need a top coat (we shall see!). 95% of the others, I would use a topcoat, and I have to write posts geared towards that 95%. After the initial sanding to bond the primer, you do not need to sand between each layer, or at all! The layers are so thin, you would literally be sanding them off if you did that. The only reason you would need to sand is just before the final coat, if there are any areas that aren’t smooth to your liking.
If interested, check out our guide to choosing the best sprayer for you!
Rachel Davis says
Thank you for this post!! I read your other post on painting oak cabinets because we’re getting ready to paint ours. The other post recommended using a stain blocker, primer, and sealer should I do those coats and the top coat with the sprayer too?
Rachel says
Great question and you are definitely in the right place! So usually the stainblocker/sealer and primer is all one coat. My personal favorite is Kilz Premium. It’s my usual go-to unless I have knotty pine or really difficult stains. One time, I had a wierd deep green stain that bled through the kilz. In those situations, I would add a coat of shellac based primer like Kilz Restoration (formerly Kilz Max). BIN Zinsser Primer also works, but I don’t like the consistency of it as much. However, many people love it. If something does show through on the first coat of stainblocking primer, let it sit for a day or two before adding a second coat of stainblocking primer. That just about always works.
Yes, every coat from primer to top coat can be done with a sprayer if you choose!
Don’t worry, it’s not a million coats! With a sprayer, I would say total coats ends up being 4-5 if you spray evenly and get good coverage (1 primer coat is good in most cases, 2 coats of paint, 1-2 coats of water-based polyeurethane/polycryic top coat depending on thickness applied and how much protection you want). Unfortunately, I can’t see everyone’s individual projects, so I try to put out the most durable paint tutorials generally. White is the most popular choice but also the hardest to maintain. In my experience, many white or light kitchen cabinets that aren’t top coated start showing signs of peeling, scuffing, or stains within 2-3 years. Areas like the handles and lower cabinets that get rubbed against are especially prone. I hope that helps and let me know if you have any questions during your makeover. I just know you will love it!
Rachel Davis says
Thank you so much! Also, if I’m filling in there wood is that before the sealer and primer? Oh and if I use a semi-gloss latex paint do you recommend a top coat?
Rachel says
Wood filler is generally designed to be applied before any primer or sealer. However, it can sometimes be hard to notice every little bump and crevice before any primer, so you can fill the touchups after the primer if necessary. Latex is kind of a strange catch-all word in painting, so it really depends on what brand you use and that the paint is made for furniture. For example, latex paint doesn’t actually have latex in it.