Do you have a project that you just aren’t sure what to do with…yet? A project that just screams potential, but the reality looks much duller? Maybe the right idea hasn’t hit you yet, or you don’t have the confidence to just dive in.
Today’s project is like that. Thinking outside the box? I don’t even know where I put that proverbial box. But some projects have to wait for the right Aha! moment.
Let me back up a moment…
Old Metal Trunk Makeover
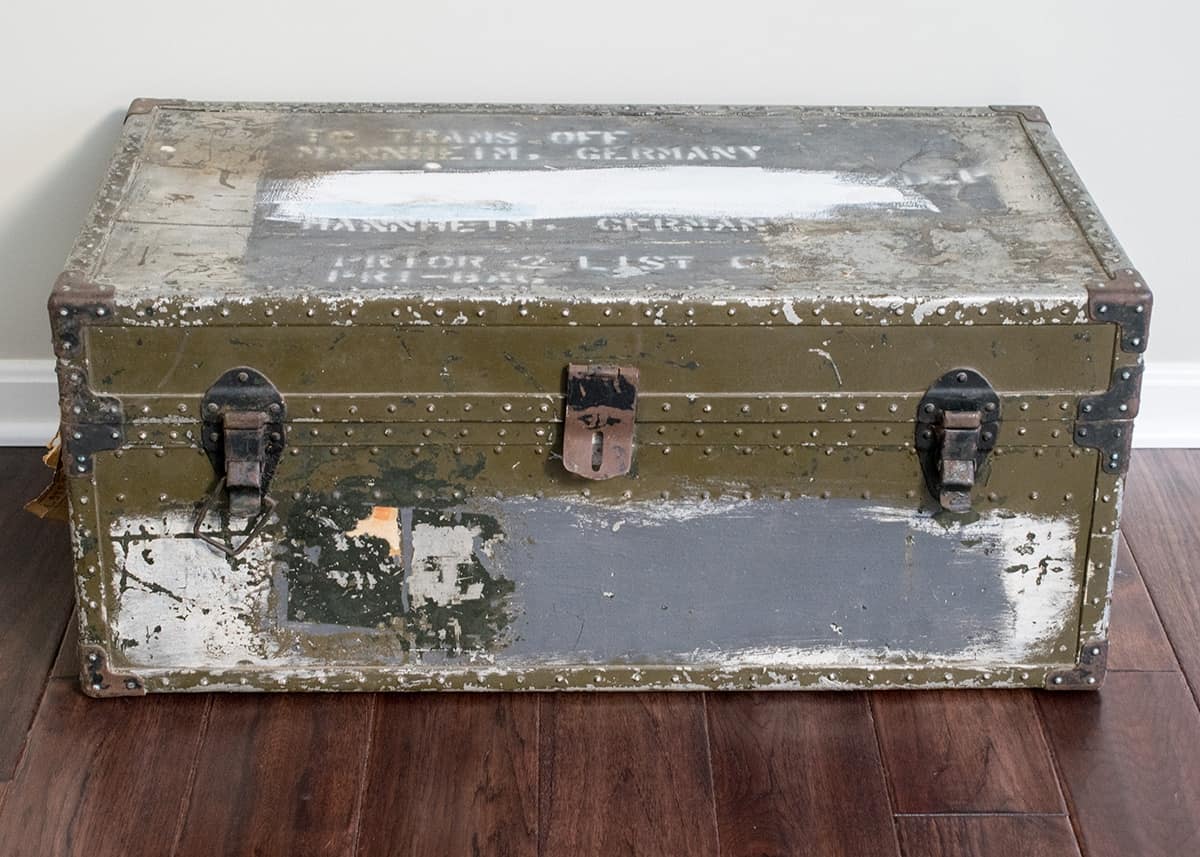
Last summer, my mother-in-law gifted me this dumpster find. Yes, she actually found this metal steamer trunk next to the dumpster and thought of me. She knows me so well!
It’s a Korean War Era army military footlocker. And, obviously, from the picture, it saw some battles of its own. Although she was excited to see what I would do with it, it sat and sat in lieu of other projects. Ones I had actual ideas to complete, but it did whisper to me that it was waiting patiently.
How to Strip Painted Metal
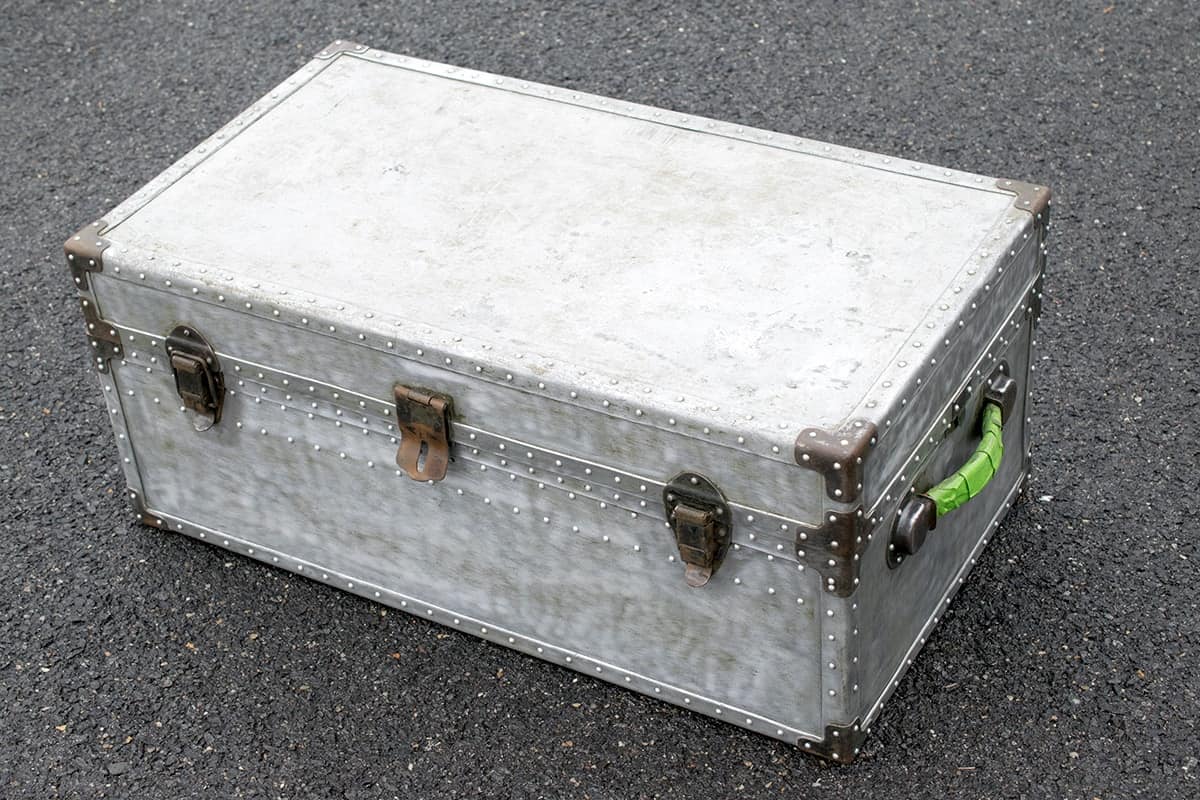
The first step was stripping all the nasty layers of paint to see what we had. (Update in 2025: The stripper I originally used to do this appears to have changed formula. I have used this stripper for other projects though and it works pretty well).
Paint strippers come in different forms, but the steps are the same. If interested, I have step by step guides to painting metal outdoor furniture and stripping wood furniture with great tips to get started.
- Pour the stripper into a container and work in a well-ventilated area.
- Using a chip brush, apply a thick layer, allowing the chemical to react with the paint and bubble (follow the directions on the stripper).
- With a rag or scraper, wipe and remove the liquid, along with the unwanted paint, repeating as necessary. Toothbrushes work well to get into crevices, but don’t use anything that may gouge or damage the underlying metal.
I cleaned the metal trunk afterward with mineral spirits and used a good rust remover. For the handles, I Ieft them in their current condition. Doesn’t it already look a ton better?
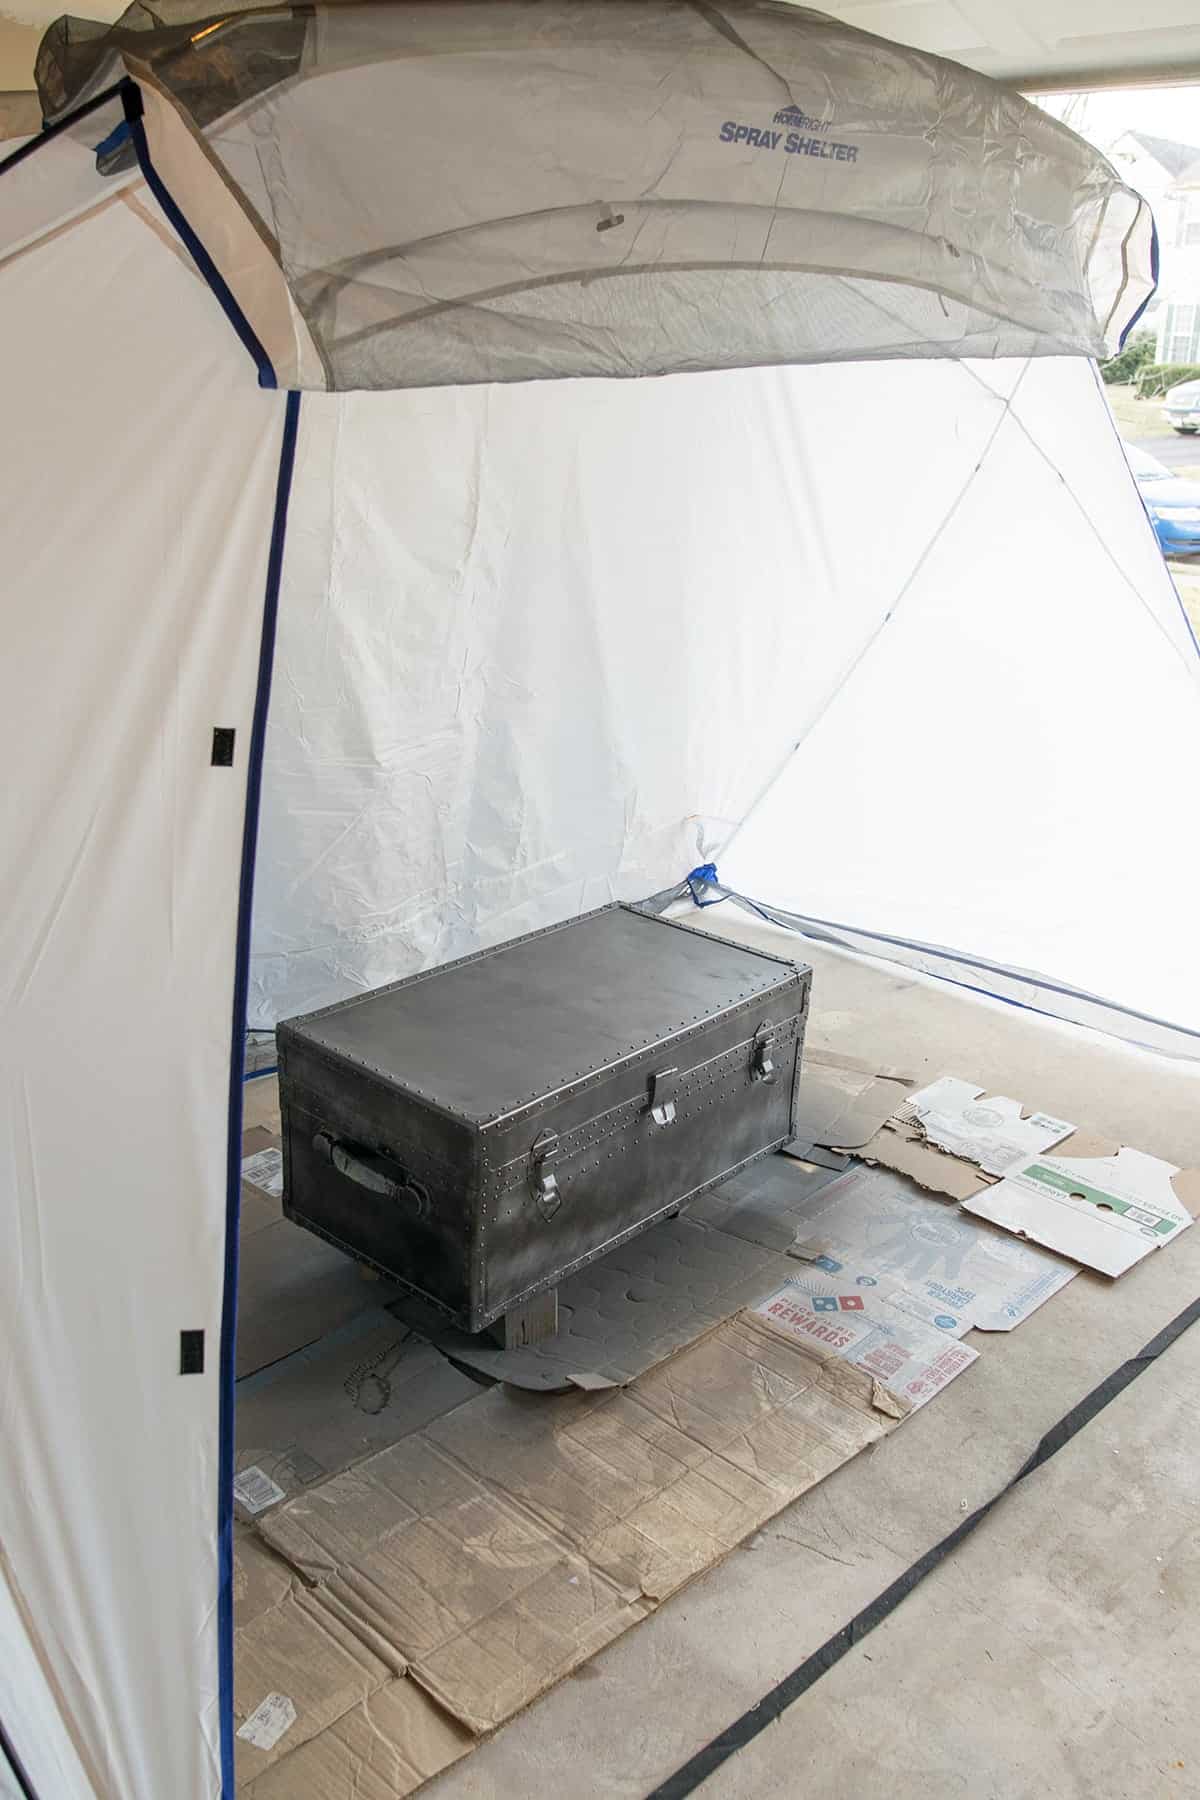
Painting Bare Metal
The trunk was banged up quite a bit. I used automotive bondo to fill in some of the larger dents. This step is necessary since I am covering the top with a paper material, but not entirely necessary if one is only painting.
Tips for painting bare metal:
- I love my HomeRight spray shelter. It helps with overspray and less dust.
- Painting must be done when conditions are between 30-80% humidity (40-50% is best) and temperatures above 50 degrees.
- Use an appropriate primer like Clean Metal Primer Spray.
- You can spray, brush, or use a metal spray paint.
I primed the trunk and used Oil Rubbed Bronze to give it a metallic finish.
Covering a Metal Trunk
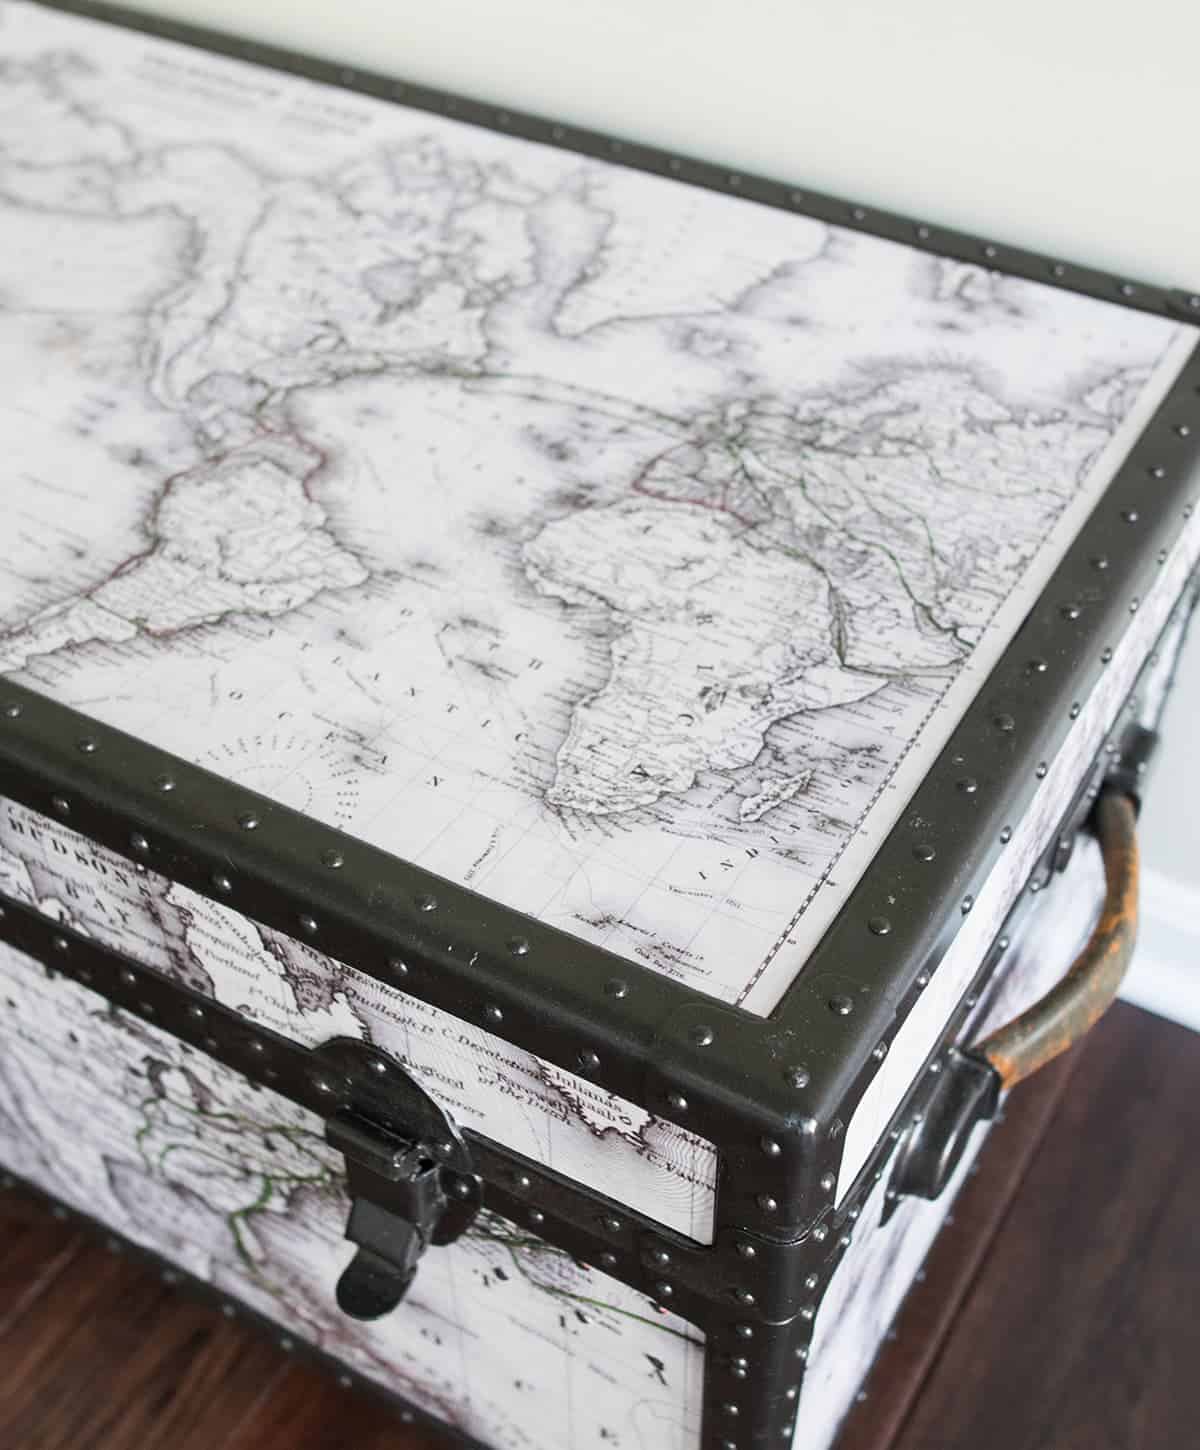
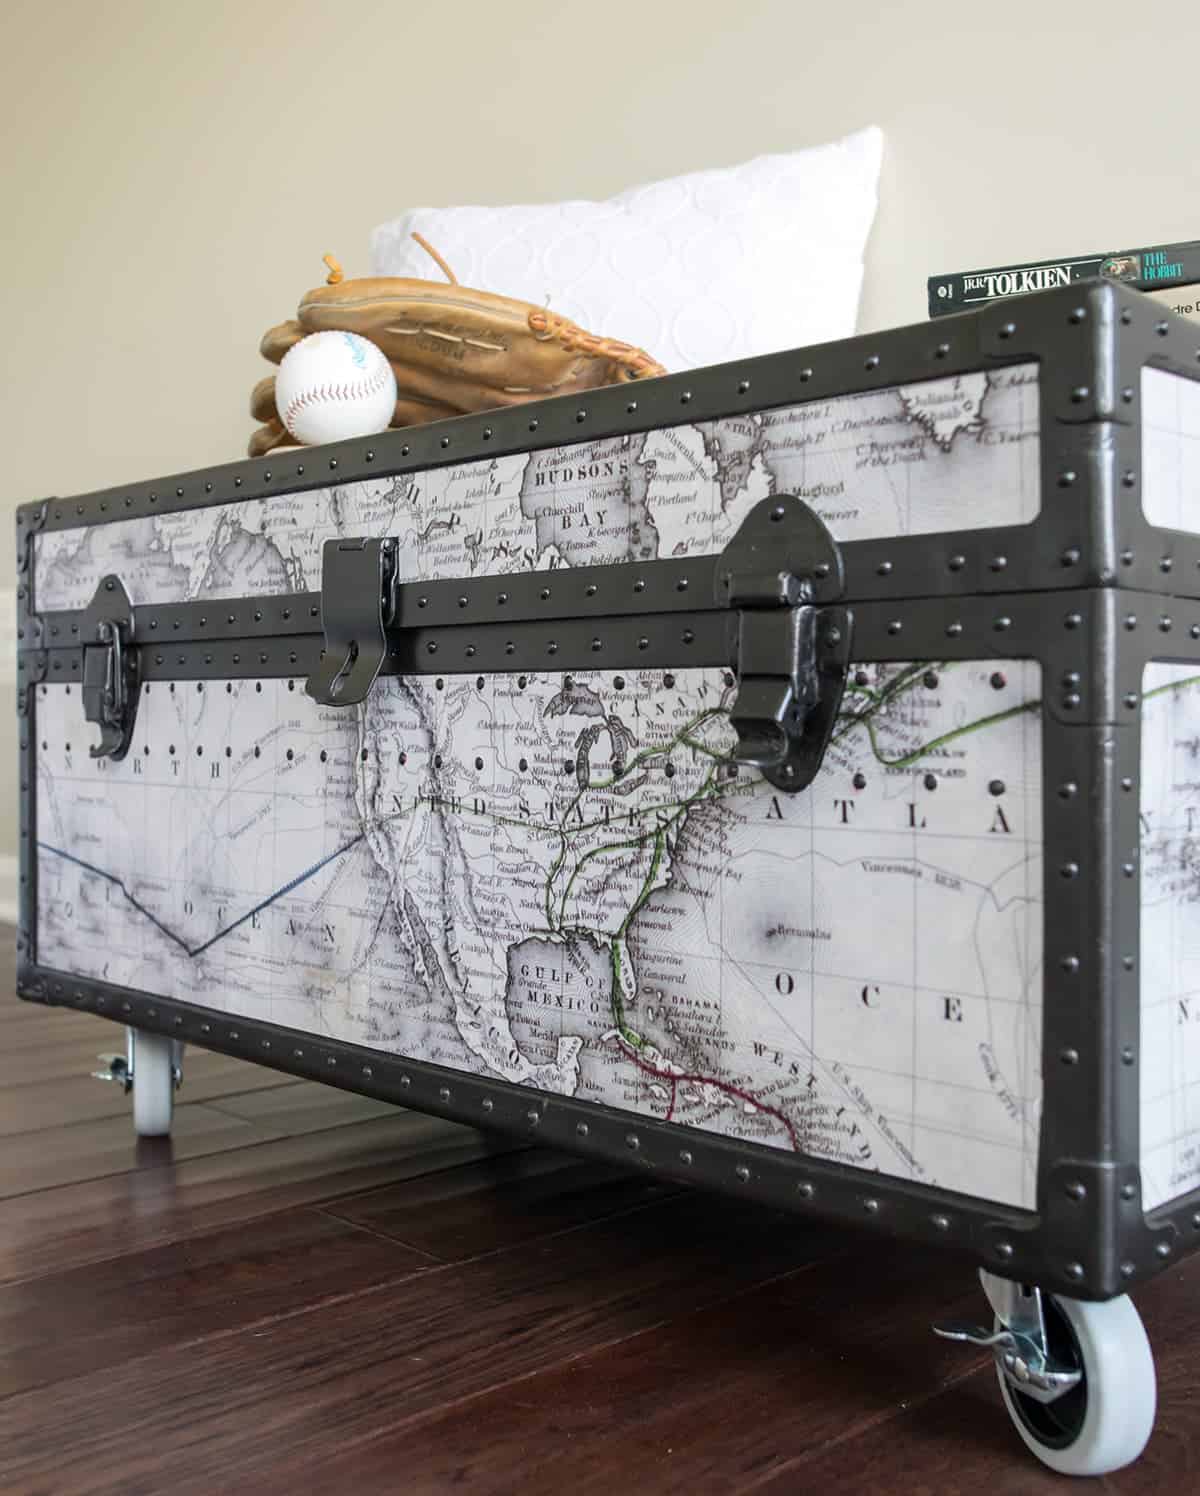
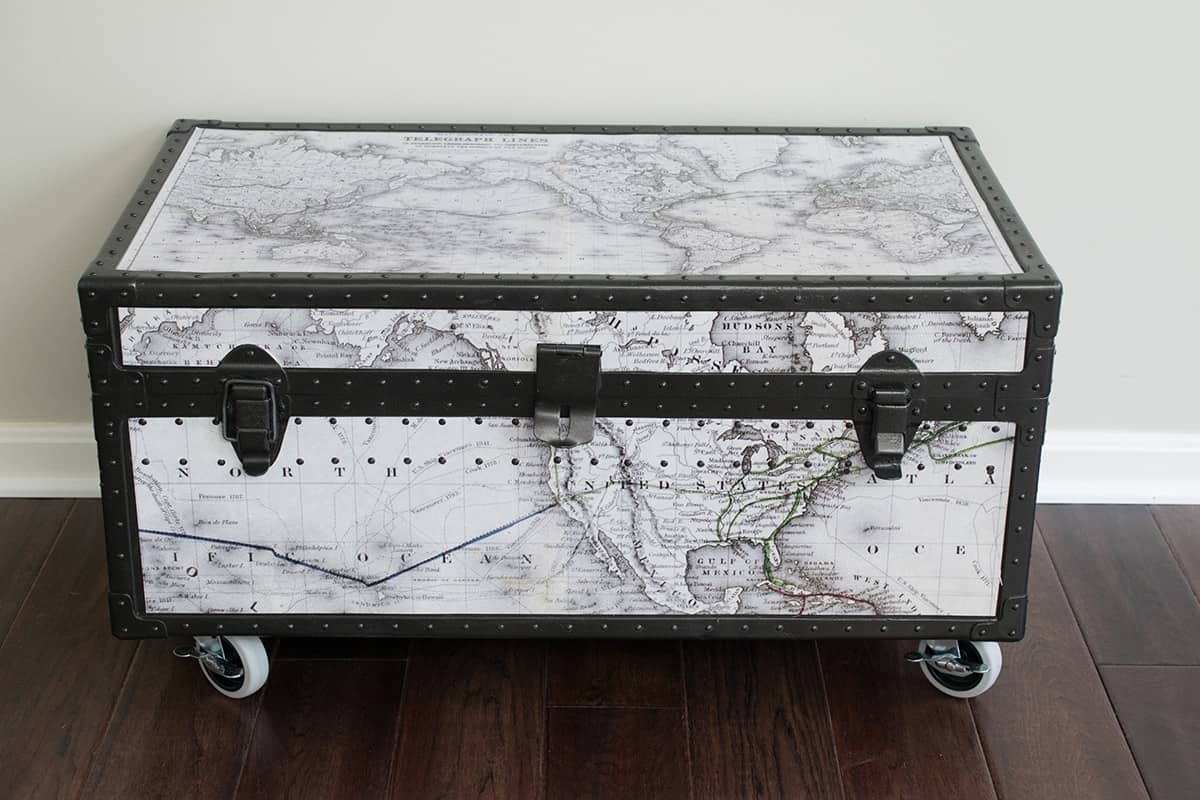
Because the trunk was so beaten up, I knew that a paint job alone would not be enough to make this steamer trunk sparkle. That’s why I decided to cover it in this vintage map. Note: My exact one seems to be no longer available, but the link is pretty close, and it is custom sizeable.
I used 2 sizes of this map to create the look. The top of the trunk is one complete map of the world with the border removed. However, the sides are a version that I custom sized to my needs. I added up the total dimensions of all four sides and cut out each part between the black metal rivets.
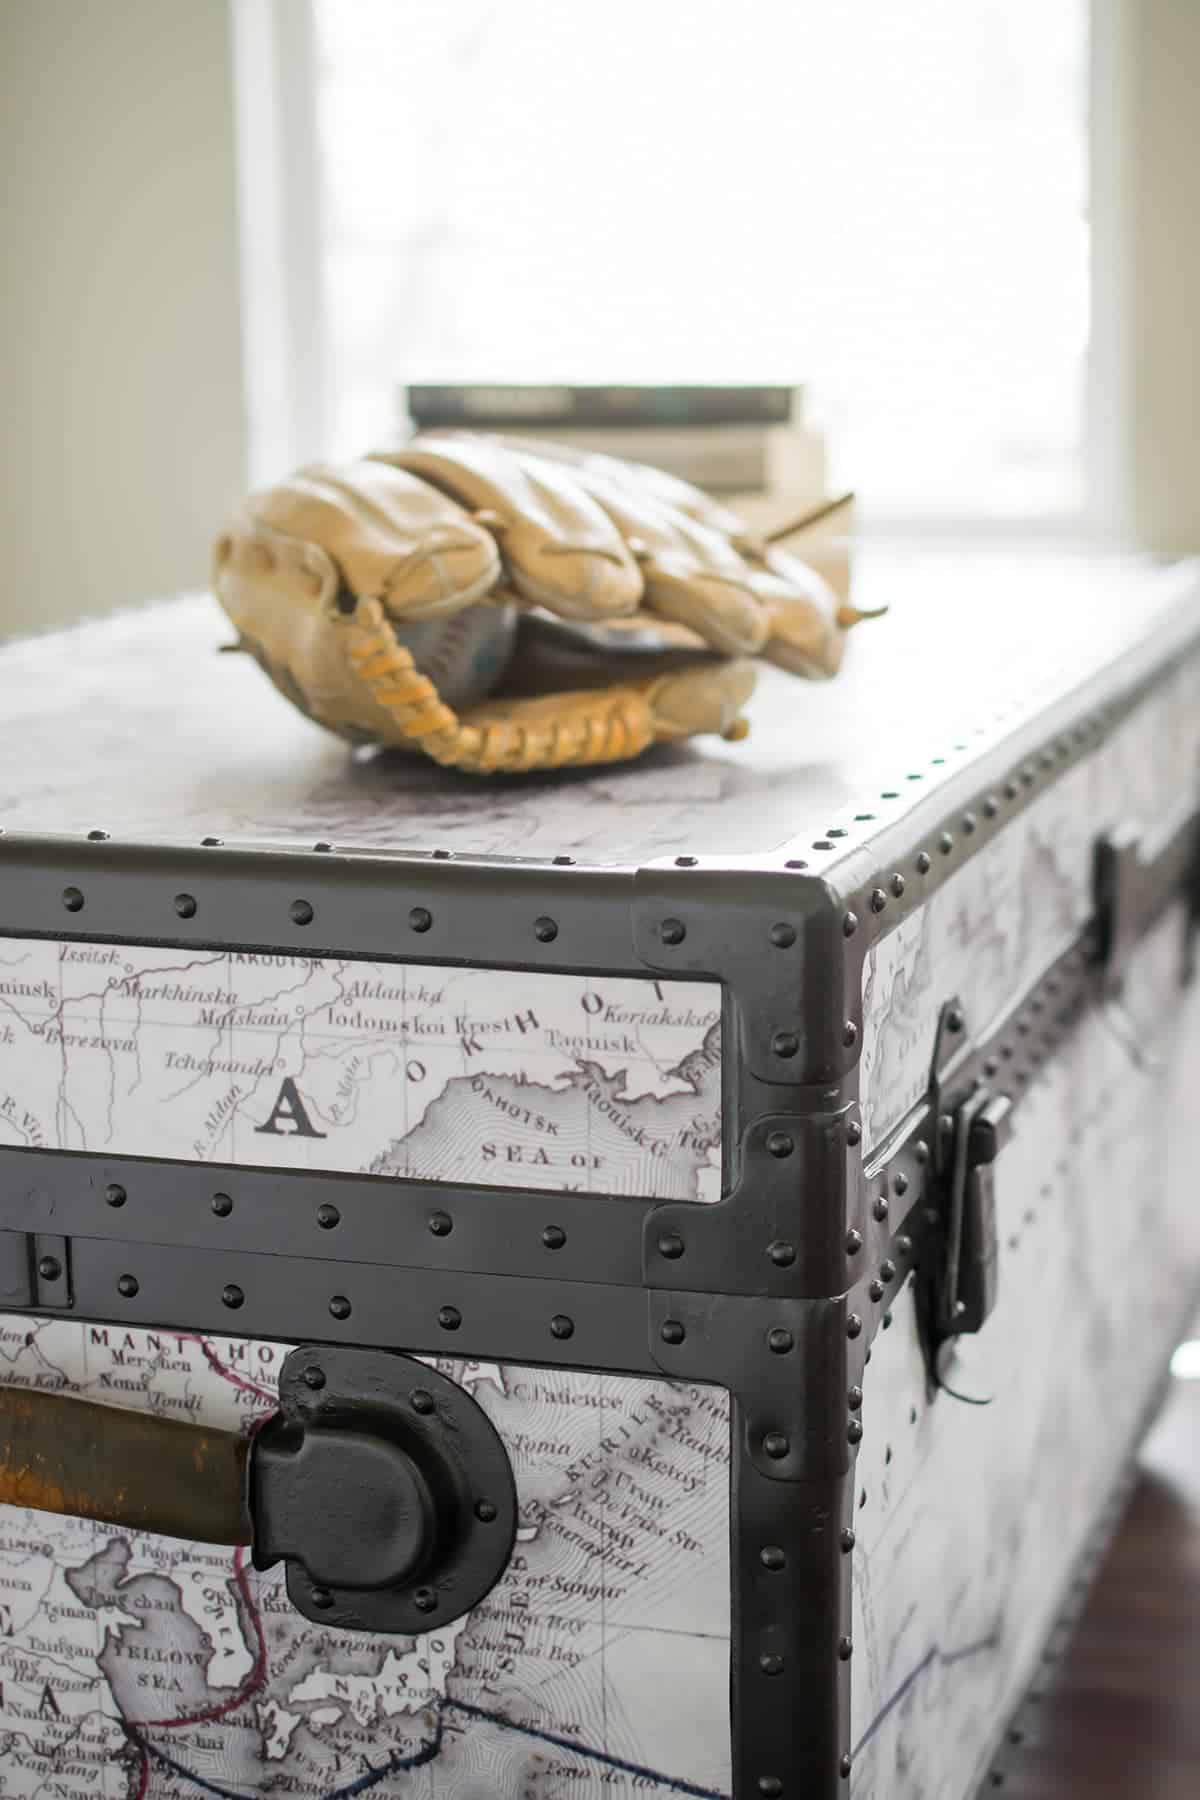
With the map, creating the template was the hardest part and took several hours. I used a craft knife to cut around the handles and locks. There is also a row of decorative bumps on the front of the trunk (see photo below), where I used a hole punch.
Tips for sealing the paper cover:
- I first sealed the paper with a few light coats of spray sealer on both sides.
- A spray was used first to avoid any of the paper stretching.
- I brushed mod podge on the trunk where I wanted to adhere the map. Mod podge works like a glue and sealer. It is thicker, so this kept the edges from rolling.
- After the map was adhered and completely dry, I brushed the top side with a few more coats of mod podge, drying in between, to further seal and make it more resistant to scratches and water.
- Although it is water resistant and well-sealed, I use coasters and am careful about water on it.
Final Touches
To add function and make it easier to move while full, we added casters to the bottom. This was done by drilling a hole in each corner to add the casters.

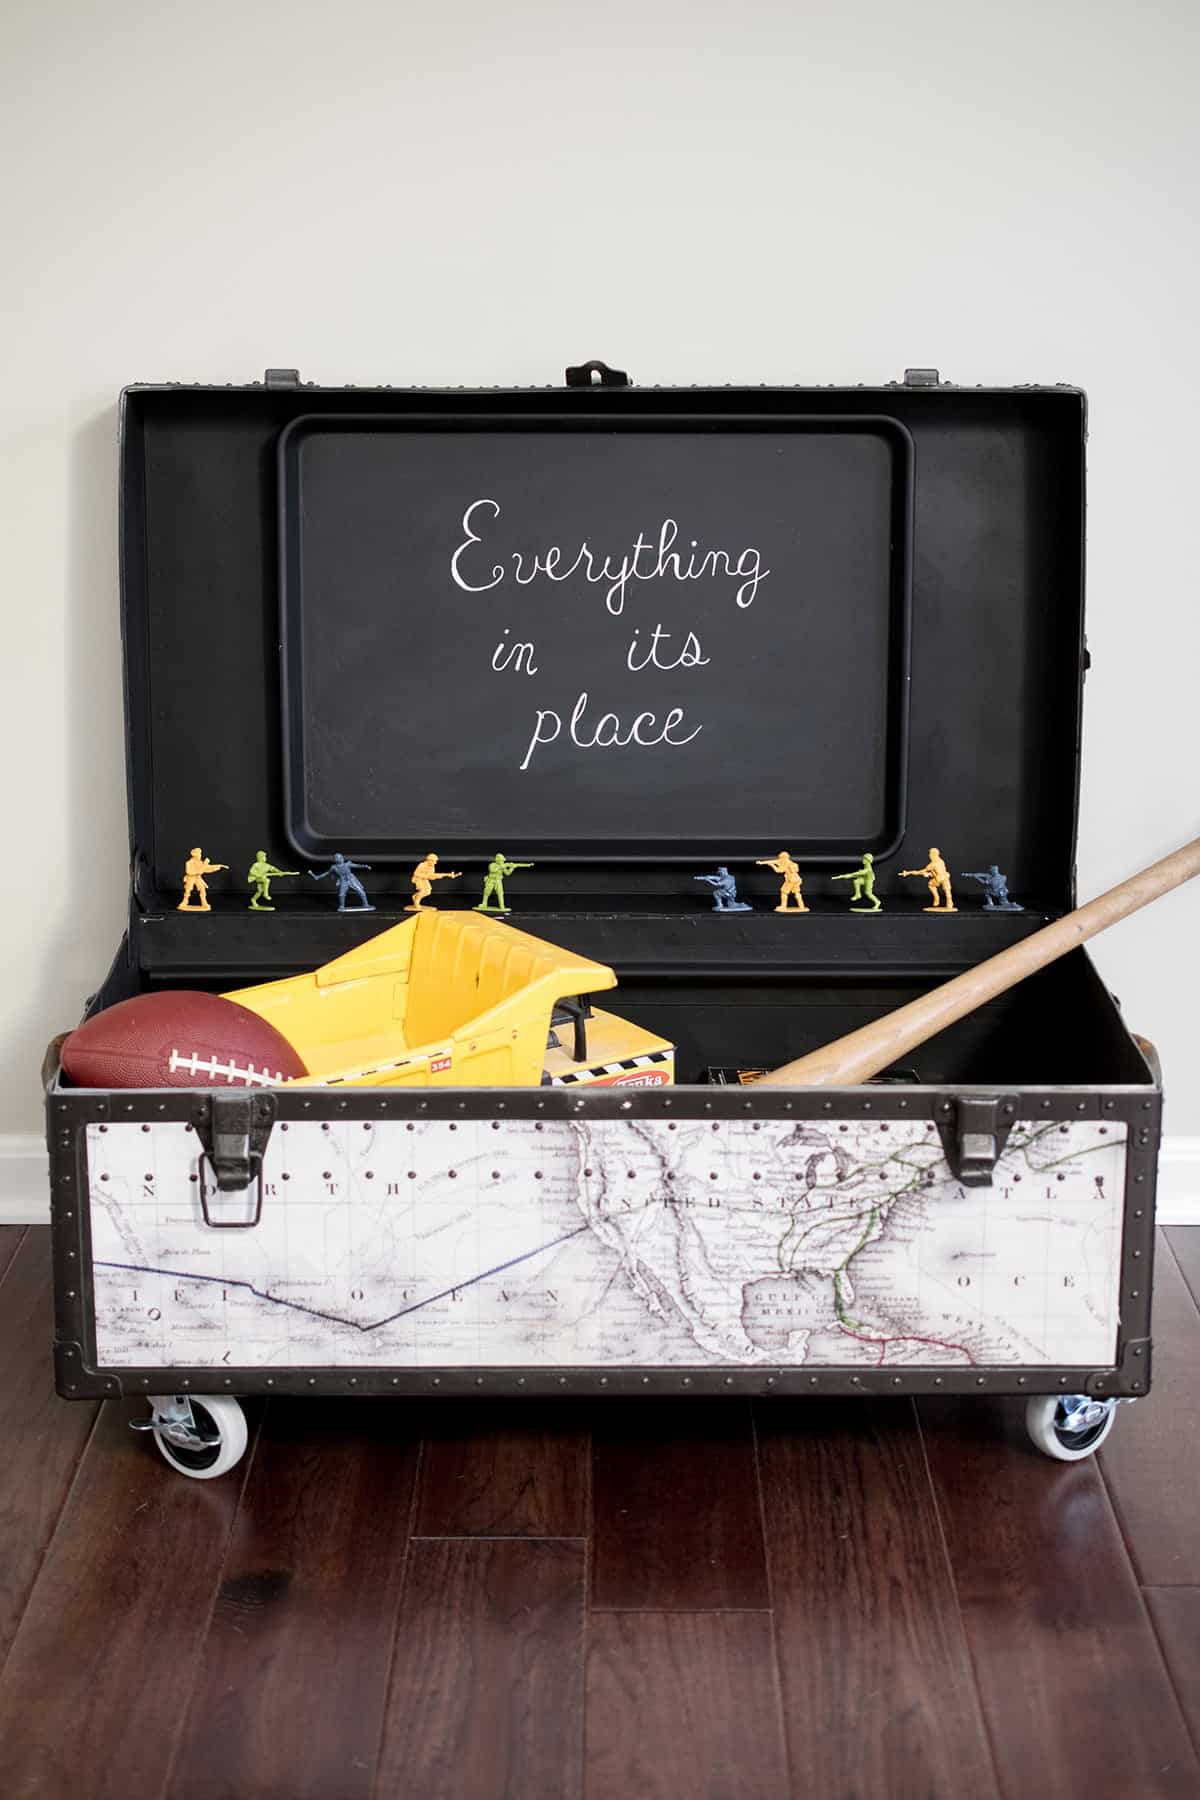
At first, I just loved the steamer trunk style, but I didn’t know what I would actually do with it. When my son saw my map plans, he begged to have it in his room. He actually promised to keep his toys off the floor if he could have it! Giant indestructible metal box and clean floors?! Sounds like a winner to me!
I took a plain cookie sheet and lightly sanded and painted it in chalkboard paint. I used velcro strips it to hang it inside the top of the box. This cookie sheet served a few purposes.
- It’s magnetic so he can add pictures or mementos. The trunk itself is not magnetic.
- The cookie sheet comes out easily and he can use it to draw or to keep his Legos at bay. #ForeverFindingLegosInTheWierdestPlaces
- I can write subtle reminders to him about his promise to clean up.
- It’s just fun!
So clearly, this was a pretty big project even though we finished it in about 4 days. However, looking at where we started with the trunk, I wouldn’t have known what it would be at first. It was just a hunch and a vision.
More furniture transformations
- Black Painted Furniture
- Paint without Brush Marks or Strokes
- Cerused Wood Makeover (Lime Finish)
- How to Paint Old Kitchen Cabinets
- How to Paint a Stair Rail that Lasts
- Executive Desk Makeover
Waiting until the right idea is sometimes the best course of action, but I hope that you also challenge yourself to get the project done and not sitting in a remote corner of the basement.
If you are still unsure, I always love reading emails and questions from readers so feel free to ask in the comments below or email me.

I hope you enjoyed this project and are inspired to share your newest painted furniture projects with me. Have a great weekend!

Grab our free series "Weekend Home Projects that will Transform Your Life" Sign up below to receive updates including free printables, organization tips, home improvement projects, recipes and more! |
More Interesting Furniture Before and After Projects
John Musgrove says
I have four of these footlockers, all completely painted light green by my mother and were acquired by my 20-year army veteran Dad. We travelled the worked with these and stored everything in them. I would like to restored them for my Grandchildren.
I need to replace a couple handles or clamps, but they are otherwise in great shape.
Thank you for showing me how easy it could be.
Lily says
Ty!! Great post 👍💞
Ginny says
Love the finished product! I have two of my dad’s old military trunks. I want to leave one pretty much as is, but add casters, so it will be a rolling coffee table. I just have to paint over his SSN. What size casters did you use?
Rachel says
I bought the medium sized casters at lowes. I would say that the wheels are about 3 inches in diameter.
Lauren Truax says
Hi! I also have a similar trunk I’m looking to redo. Did you spray paint the entire trunk or just the metal edges (that aren’t covered in the map)? And how did you stick the map on? Thanks! 🙂
Rachel says
I primed the entire box but only spray painted the exposed areas, although overspray covered a lot of the map area. The map was sealed with a spray and then mod podged on with several coats for a protective layering.
Porsha Mills says
Hi Rachel,
Did you seal the map by spraying Mod Podge Sealer on it while laid out flat first so that it did not crinkle up when attaching it to the trunk with Mod Podge ?
Is the Mod Podge you used to attach the sealed map to the trunk the regular mod podge paste that you paint on ?
Thank You…I’ve admired your trunk for a few years and getting ready to attach the map now 🙂
Porsha
Rachel says
I did use a spray sealer first, although I can’t remember now if it was specifically mod podge brand. However, the crinkling problem is exactly what I was trying to avoid when adding a thicker coat. Mod podge is really just a watery glue or at least that’s how I use it. The thicker coat does provide better protection from things like dings, although I don’t think that it is condensation proof. Also, yes, the regular mod podge paste was used to attach to sealed map to the trunk. Let me know if you have any more questions! This post is due in January for updating with better, clearer instructions and additional information.
Tammi Brown says
Hi Rachel! This is an older post of yours but hoping to still get your thoughts. I have a trunk just like this that I am working on but mine has visible water damage on the interior. Any thoughts on how I can can repair it? I couldn’t find any guidance online so when I stumbled on your pinterest post I was super excited. Any thoughts or guidance would be very much appreciated!! You did a beautiful job on yours!!
Blessings,
Tammi
Rachel says
It depends on what kind of water damage you have. If it’s just water stains, you can paint over that without much fuss. In some ways, the damage can be used as part of the charm too. You could also seal the interior after removing some of the damage and line the interior with a sturdy fabric in a vintage print. Those are just some quick ideas that I had. I hope that helps!
Corinna McLeod says
Hi.
This is absolutely amazing. I have a trunk I’ve just started working on now. Managed to finally get all the layers of paint off.
I’m wondering if you ran into the issue I have. The corners are metal but the bits between the corners look like they may be made of some kind of reinforced cardboard. It is peeling. Any ideas on how I fix these.
It looks like in your original pic you may have had the same problem
Thanks so much.
Rachel says
This particular trunk is entirely metal. However, I have another trunk that is as you describe with a plywood/cardboard combination. My plan for that one was to hand paint it like a battle-worn American flag and possible decoupage some images over the worst areas, if necessary. Then stencil The Star Spangled Banner over top of it or possibly Stars and Stripes Forever. Depending on the condition of your trunk, you could smooth out the layers with an epoxy or maybe replace or recover them with fabric.
Veronica says
Thank you so much for the inspiration I have a truck to that I need to work on but I’ve been pondering on what to do with that thank you so much !! Now I can move forward I’ll post pics♥️😊
Craig says
That is an awesome job!!!
I was in the army and actually had one of those ole style foot lockers until the newer style came out.
Brilliant work.
I have a similar project that I will share. My mom and dad had been married for 60 years. The year they were married my dad made my mom a trunk. It has been beaten and banged up. Painted a couple of times. At some point, it may have been a toy box.
Your work on the footlocker has inspired me.
Ceris says
We have 2 of these old foot lockers from my grandfather’s service in WWII. I’d like to make 1 into a toy box, but my main concern is the force behind the lid and the edges, fearing little hands getting slammed in it. Do you have any ideas of how to make it a slow close box?
Rachel says
Wonderful point and forethought. They actually do make slow close hinges for chests. Here is a link to one that would work well for these types of old footlockers.
Pamela says
I am going to use this idea for trunk that I bought for my daughter . I have just been staring at it since the summer . Just curios, what 2 sizes of the month did you Use
Rachel says
I sized my map by measuring the 3 sides and adding it together lengthwise. I did not cover the backside of the trunk. I paid attention to how I wanted the lines to fall with the front side showing North America. Then I measured the top by length and width and based the second map size off what would fit there.
Larissa ~ Prodigal Pieces says
Rachel, this is amazing! Your attention to detail made this project stunning. Bravo!!
Rachel says
Thank you! It is one of my favorite transformations.
Glenda says
It looks amazing! Did you use the iron on method to decoupage the map?
Rachel says
I have seen that technique but I didn’t use it in this case. In addition to looking fabulous, the map was added mostly to conceal the dings and dents in the metal case (I actually filled in some of the dings with automotive bondo to smooth it out, but that’s another story). Because the surface wasn’t completely smooth and some of the pieces are quite small, an iron wouldn’t have worked all that well. I would also be very careful with heat being used on posters. I sprayed a few light coats of the sealer (I used this one) on each side of the map, letting it dry before attaching it to the metal trunk. I painted the mod podge onto the trunk surface and then pressed the map into it, pushing any bubbles gently out with my fingers and a credit card. Once I let that dry over night, I painted mod podge over the top for additional protection. The sealer kept the mod podge from seaping into the paper, so I didn’t have to worry about the poster wrinkling. Hope that helps!