• Skip to primary navigation
  • Skip to main content
  • Skip to primary sidebar
  • Home
  • DIY Home Projects
  • Recipes
  • Spring
  • About

Craving Some Creativity logo

menu icon
go to homepage
search icon
Homepage link
  • DIY Home Projects
  • Home Tour
  • Recipes
  • About
  • Free Email Series
    • Facebook
    • Instagram
    • Pinterest
  • ×

    Home » Home Decorating » DIY Home Decor

    Published: Feb 10, 2023 by Rachel

    DIY Time Zone Wall Clock Display

    This post may contain affiliate links. Read my disclosure.
    276 shares
    • Share
    • Tweet
    Jump to Tutorial Print Tutorial

    DIY World Clock Wall Display is a fun wall art display for any home or office with minimal effort using this simple tutorial. Includes tips for choosing the right clocks, selecting the right tools, and creating labels.

    Patriotic Masculine Office Makeover complete with world clock wall display, patriotic decor, and antique desk makeover.

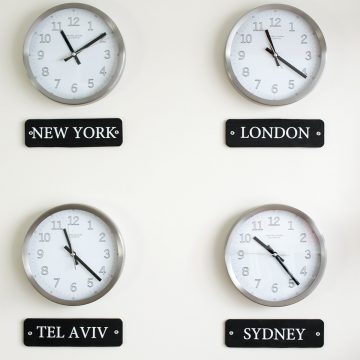
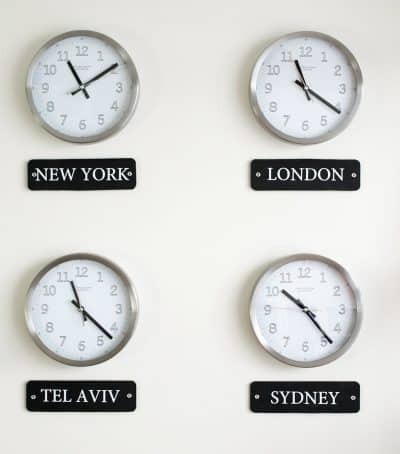
    The world clock gallery display featured in the Masculine Office Makeover is a clean and timeless (pun intended) display for any home or office.

    So, what exactly is a world clock gallery? It’s a grouping of clocks (usually 3- 6) on a wall that display different time zones in the world tied to specific displays at a glance. It’s common practice to use cities tied to the stock exchanges or perhaps fashion capitals. But take creative license! For this one, my husband chose four cities that were of personal significance to him.

    Materials and Supplies

    The key to the project’s success is having the correct materials on hand.

    • Clocks – these are similar to the ones we used.
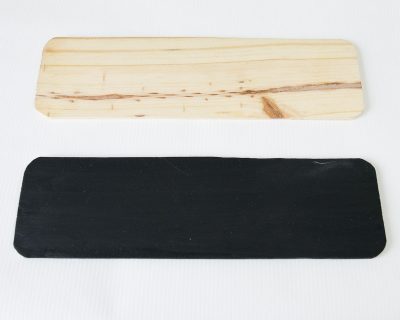
    • Thin Wood Strips, about 2.5 inches wide (I found mine at Lowe’s)
    • A drill and eyelets (optional)
    • Letters
    • Velcro Command Strips or other hanging apparatus
    Peeling back vinyl lettering from a black name plate.

    *I used a cutting machine and vinyl to create my letters. However, letter stickers work well. For more ways to create letters and designs, check out our posts on easy design transferring or making signs with stencils.

    World Time Zone Clocks

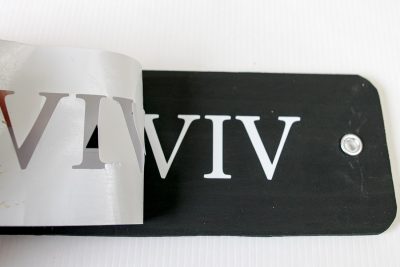
    The full printable tutorial is at the bottom of this post. Im giving a little closer look at a decorative detail that I added to the nameplates here.

    Closeup of a drill making a hole into a piece of wood.

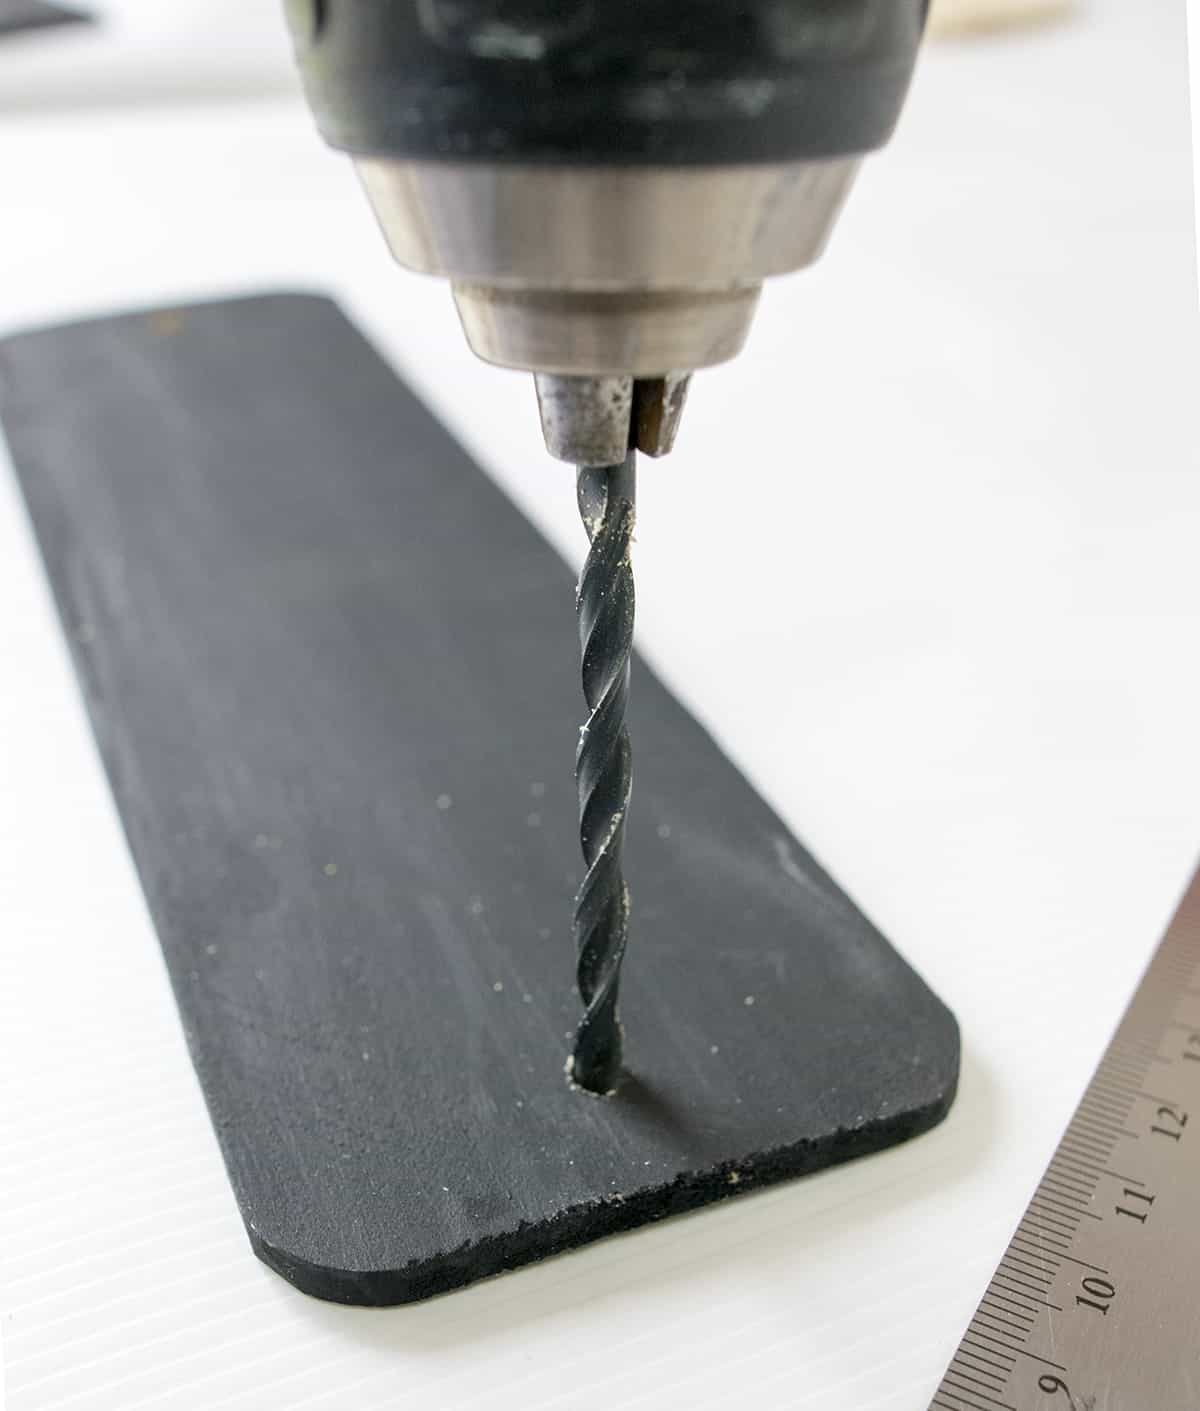
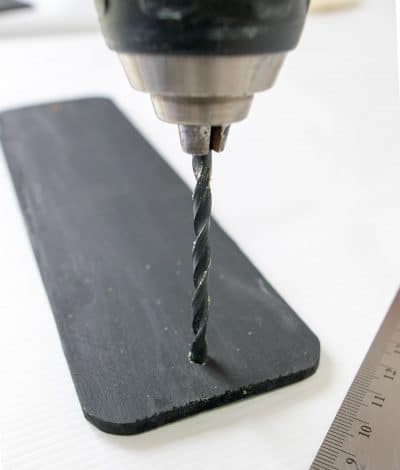
    For these time zone wall clocks, I edged the wood with eyelets for a richer textural element. It only takes a few minutes. Drill a hole just wide enough to fit the eyelets in snugly. Use a kitchen mallet or something similar to tap them in if needed.

    Project Tips

    I chose my clocks based on price and appearance. Although there were no specific complaints about the loudness of this particular model, 4 clocks all ticking in harmony was enough to make my eye twitch. It was maddening! My advice:

    • Purchase clocks with “silent” clock hands.
    • The clocks can be whatever size you like but it looks best if the nameplate size matches.
    • If your clocks are not silent, follow this video to add a light machine oil to them. It does work, but it is at your own risk.
    World time zone Clock wall with black mounted city name labels underneath.

    The location of choice for this project was right above the desk in a 2×2 format rather than putting all four in a row.

    The combination of time zones and cities got the seal of approval of course, as did the rest of the office. A relatively simple project that makes an impactful statement in the office!

    Frequently Asked Questions

    What is a non ticking wall clock?

    No tick wall clocks are silent since they move in a continuous sweep. Since the second hand is not stepping from second to second, the ticking is eliminated. Silent wall clocks are perfect for sleeping, office or study areas.

    What is the best height to hang a clock?

    Clocks work best at two height options, either between eye and chest level or above eye level. If you’re going for a high clock, it should be higher than the tallest obstruction in the room such as a doorway, window, or mantel.

    Can you hang a clock with command strips?

    Depending on the weight of your clock, the easiest way to hang it without nails is by using command strips – either hooks or Velcro. It is a wonderful renter friendly option.

    Can you do this with digital clocks?

    Yes. The project only requires that you have multiple of the exact same clock model but whether it is analog or digital makes no difference.

    Weekend DIY project. A pegboard organizer in the craft room above the desk workspace.

    Grab our free series "Weekend Home Projects that will Transform Your Life"

    Sign up below to receive updates including free printables, organization tips, home improvement projects, recipes and more!

    More Wall Ideas

    DIY map art with post title and artwork hanging in the bedroom.
    DIY Wall Map Art
    Collage of wall art ideas made from scrap wood.
    Scrap Wood Wall Art
    Collage of bedroom designs and open paint cans to choose paint colors.
    Choosing Home Paint Colors
    Collage of garage wall storage ideas including hanging cords, bins on shelves, and a pegboard.
    Garage Wall Organization Ideas

    PS I love seeing your creations! Be sure to take a photo and tag #cravingcreative on Instagram! You can also stay in touch with me through following me on Instagram, Pinterest, and subscribing to the newsletter!

    Four clocks with different locations listed below them as a world time zone display.

    DIY Time Zone Clock Display

    DIY World Clock Wall Display is a fun wall art display for any home or office including time zones or displaying cities you have visited.
    5 from 2 votes
    Print Pin Rate
    Project Time: 30 minutes
    Total Time: 30 minutes
    Author: Rachel
    Cost: $50

    Tools

    • Drill Optional
    • Saw Something to cut the wood to the desired length

    Supplies

    • 4-6 Silent Clocks
    • 4 2.5 inch wide wood strips uniform length
    • 1 set Letter Stickers *See note
    • 8 pieces Velcro Command Strips 2 for each nameplate
    • 8 sets Metal Eyelets Optional

    Instructions

    • Cut the pieces of wood to the same width as the clock faces. Round the edges slightly with a sander. Paint them black.
      Two pieces of wood with rounded edges and one is painted black.
    • (Optional) Use eyelets to add a decorative touch to the edges. Drill a hole just wide enough to fit the eyelets in snugly without falling out. Use a mallet to tap them in, if needed.
      Closeup of a drill making a hole into a piece of wood.
    • Add letters to the nameplates. You can use a ruler to apply them straight.
      Peeling back vinyl lettering from a black name plate.
    • Hang signs with velcro command strips. These make hanging a breeze and are rental friendly!
      Four clocks with different locations listed below them as a world time zone display.

    Notes

    You can also make your own letter templates using a craft cutting machine such as a Cricut or a silhouette. To keep the letters straight it is a good idea to gently apply the negative image and then the letters. Then you can peel back the negative and the letters are perfectly placed!
    Tried this Project? Tag me Today!Mention @CravingCreative or tag #CravingSomeCreativity!
    « DIY Menu Board
    Creamy Chicken Tortellini Soup »

    Reader Interactions

    Comments

      Leave a Reply Cancel reply

      Your email address will not be published. Required fields are marked *

      Recipe Rating


    1. Jessica Coffman says

      August 15, 2019 at 5:50 am

      5 stars
      What font and size lettering did you use?

      Reply
      • Rachel says

        August 19, 2019 at 10:40 pm

        I believe the font is just a basic Times New Roman. I may have re-sized the letters (squish/stretch) to fit the plates fully.

        Reply

    Primary Sidebar

    Headshot of Rachel Beach, the author of Craving Some Creativity.

    Hi, I'm Rachel!

    Creativity makes me energized and fearless. My husband and I have been renovating homes for over a decade and love to share our passion for all things home. Follow along for remodeling tutorials, recipes, and entertaining ideas sure to inspire!

    More about me →


    Popular Projects

    • Midnight blue vanity with brass handles in a grey and white bathroom.
      How to Paint a Bathroom Cabinet the Easy Way
    • Man holding up baseboards for a corner.
      How To Caulk Baseboards like a Pro
    • Behr Midnight blue painted cabinets in a classic old world kitchen with modern white accents and backsplash. Wicker chairs, copper light fixtures, and wood floors add warmth.
      The Best Blue and Navy Kitchen Cabinet Paint Colors
    • Organized linen closet with white towels and grey bins on wire shelves.
      How To Beautifully Organize Your Linen Closet
    • White painted kitchen cabinets with stainless drawer pulls.
      How To Paint Cabinets with a Sprayer
    • Completed oak painted stair railing with black handrail and white balusters.
      How to Paint Stair Railings that Last

    Featured On

    Collection of Expert Features including Better Homes and Gardens Magazine, Apartment Therapy, Angie's List, This Old House Magazine, The Huffington Post, Delish, Wayfair, and Real Simple Magazine.

    Most Popular Recipes

    • Restaurant style Mexican white Cheese Dip with pico de gallo topping in wooden bowl on dish cloth with chips.
      Mexican White Cheese Dip {Queso Blanco}
    • Ricotta Stuffed Shells with Sausage makes an easy italian meal for the whole family!
      The BEST Sausage Stuffed Shells
    • Strawberry Poppyseed salad on a platter with blueberries, mandarin oranges, pecans, red onions, and grilled chicken.
      Strawberry Poppyseed Salad (Panera Copycat)
    • Closeup of blueberry muffins on a table.
      Ultimate Lemon Blueberry Muffins
    • Shrimp etouffee in a bowl on a table.
      Shrimp Etouffee {My Louisiana Family Recipe}
    • Two glasses of blackberry sangria with straws on a wood background.
      Blackberry Sangria – Amazing Summer Cocktail Recipe

    Sweet Spring Recipes

    • Stack of lemon bars on parchment paper with top lemon shortbread having a bite removed.
      Lemon Bars
    • Slice of homemade carrot cake on a plate with walnuts sprinkled on top
      Carrot Cake with Pineapple
    • Top down view of Southern Punch Bowl Cake in a trifle bowl.
      Southern Punch Bowl Cake (Potluck Dessert)
    • Key lime pie on blue plate with a slice cut out to show texture.
      Key Lime Pie
    • Strawberries on top of cheesecake layer and rice krispies crust.
      Cheesecake Rice Krispies Bars
    • Banana Chocolate chip muffins in a muffin tin with one muffin broken open to show texture.
      Banana Chocolate Chip Muffins

    Footer

    ↑ back to top

    About

    • Privacy Policy
    • Disclaimer
    • Terms & Conditions
    • Accessibility Policy

    Favorites

    • Blog
    • Shop
    • Our Home

    Contact

    • Contact

    Copyright © 2022 Craving Some Creativity