Free up some extra space in the garage or expand your outdoor living space with this inexpensive project to make a waterproof ceiling under a deck. We added a shed under the deck this way. Includes step by step instructions, variations, and expert tips to make it last.

If there is one thing every house never seems to have enough of, it’s storage. Even if there is sufficient storage, it’s not where you need it. For example, the garage in our home is a DIY and carpentry workshop, motorcycle storage, and outdoor supplies including the lawnmower.
To say it was a bit tight would be an understatement. One of those categories had to go somewhere else. And we had just the idea of where that would be.
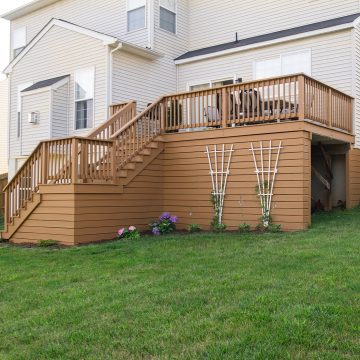
Our raised deck is 7 feet tall in front but only 5 feet in the back, rendering it useless for an outdoor living space. And we didn’t need another outdoor living space. However, we needed to provide a dry space underneath to store the lawnmower, outdoor tools, and supplies. So began the search for the right under deck storage solution.
That brings us to this project – creating a waterproof ceiling under a deck. After extensive research (and living with the project for a few years), I am happy to share a step-by-step guide of not only how we did it, but how you can add a waterproof ceiling to a variety of deck styles.
Tools and Materials
- Circular saw or Compound Miter Saw
- Cordless drill
- Drill bit set
- Safety glasses
- Stepladder
- Under Deck Ceiling System (see Choosing Ceiling Design Below)
- Gutter and downspout
- Pressure treated 2x4s
- Metal Roofing screws (you can use non-rusting decking screws with rubber washers)
- Waterproof sealant (flex seal tape, outdoor caulk)
Choose Your Waterproof Ceiling Design
Every deck is different, as is what you are designing the space for. Tool storage? A place to put the lawnmower? To entertain or an outdoor dining area? There are a few different options for designing a waterproof ceiling to look into.
1. The Cheapest Method
We used these Plastic Corrugated Roofing Panels and they are pretty inexpensive. A 2’X12′ panel was about $30 per sheet. When measuring, keep in mind that the sheets need to slightly overlap so there are no gaps.
2. Designed to look like a Ceiling
There are a few designs depending on what type of deck you have and where in the process of building it you are. Some, like
This style by Trex uses sheeting to create a trough between joists for water to flow. It’s made to be put with a trex deck and I probably wouldn’t recommend unless you already plan on replacing the top decking boards or haven’t laid them down. However, you can have a beautifully flat ceiling with this style.
There is one other design options that I am familiar with that may work for simple deck designs and have a flat ceiling look to them. Zip-Up Under Deck Ceiling (view their installation guide here on youtube)
Designs for Different Types of Decks
1. Simple Deck Design
If you have a simple deck design (attached to the house, no additional posts, etc. The ceiling will look something like this:

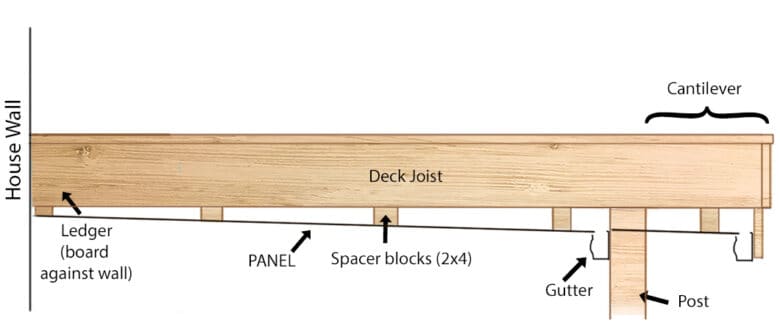
2. Decks with Cantilevers
A cantilevered deck means that there is one end of the deck that hangs unsupported beyond the posts. Usually, a cantilever on a deck isn’t more than 2 feet so you could choose to exclude this area. The other option is to double the gutter system and go through any posts if want to take it to the end.
3. Decks with Beams and Braces
Despite appearing connected to a supporting wall such as a home, a deck may actually be built as a free-standing structure. Over a certain depth, these freestanding builds require additional support and bracing. If you have cross braces or knee braces (stiffeners that run between a post and a joist to increase rigidity). There are a few options for this type of build:
- I would highly recommend consulting a professional about ways to remove the braces while maintaining proper structural support.
- Ours is only a storage area, so we elected to work around the braces (which are near the outside edges). We added boards that sloped to the bottom of the large beams that run crosswise for the deck.
Step by Step Instructions
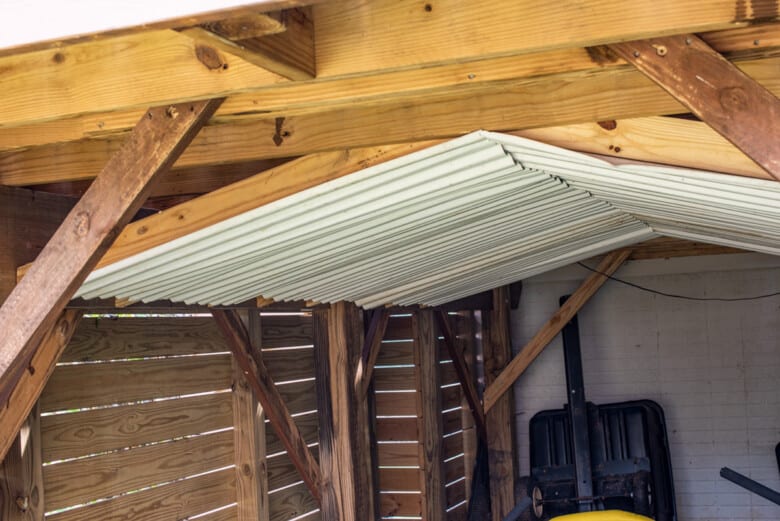
This is the deck area we started with. It is a 20×10 freestanding deck with cantilevers, 2 beams, and knee braces.

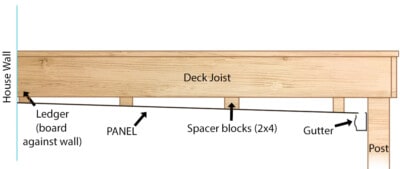
Step 1: Add the sloping structure
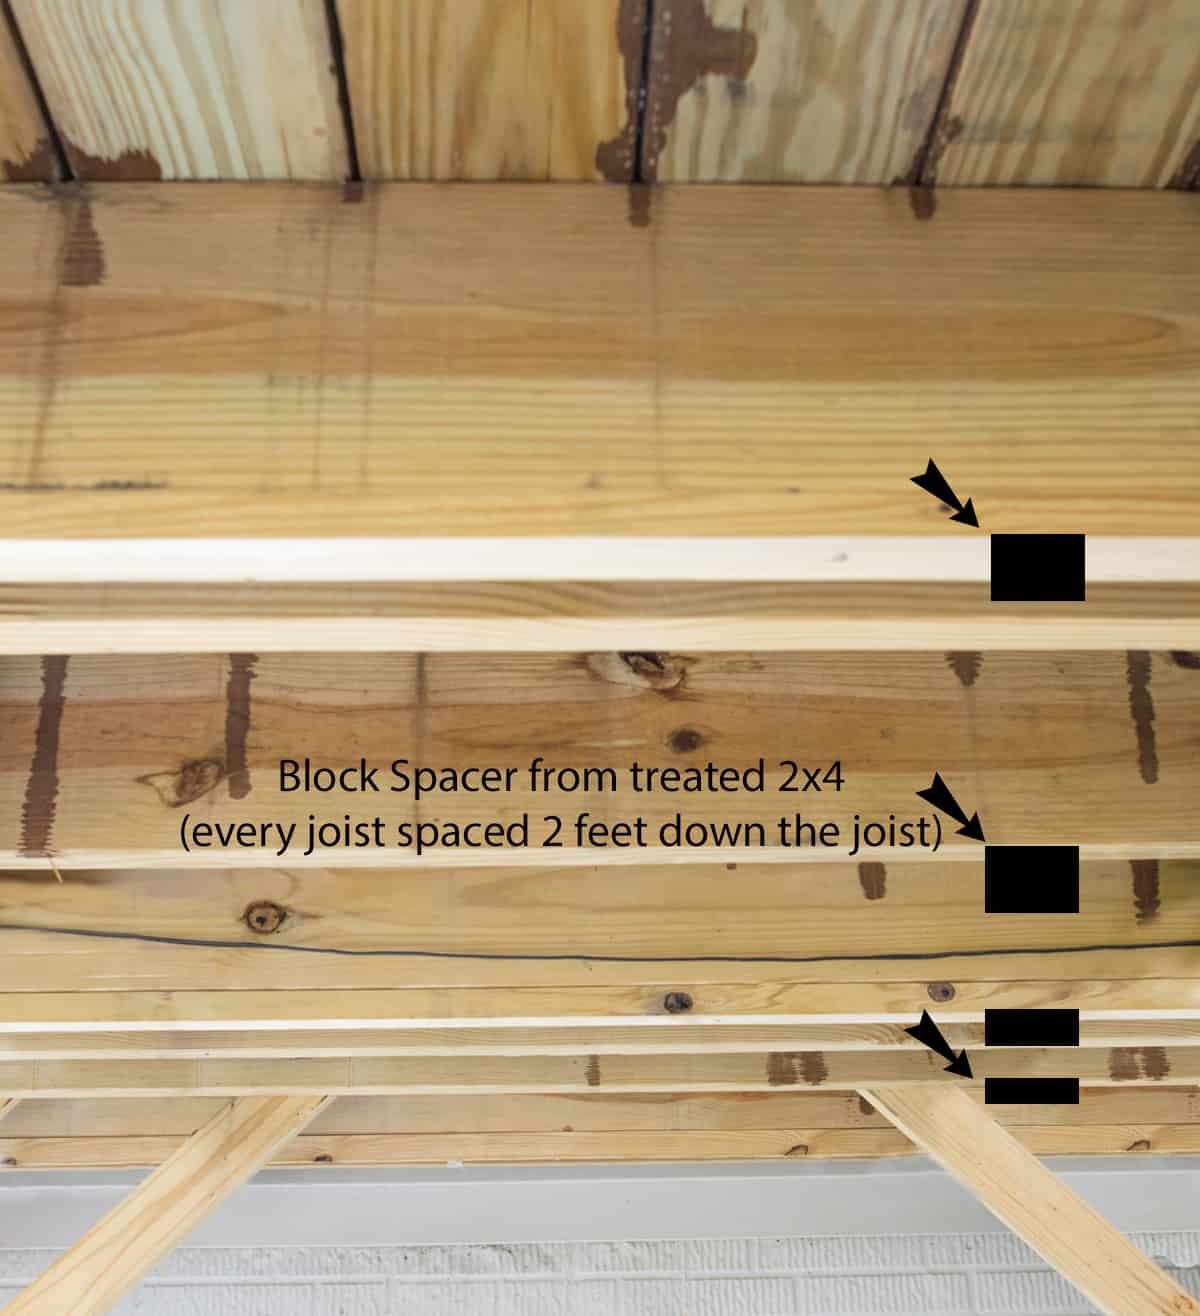
First, to the underside, spacer blocks should be screwed into the joists every 2 feet and on every joist or every other joist depending on your spacing. Each block is ½ thicker than the last as it runs down the joist. This creates enough slope to direct the water down to the edge and into a gutter.
I recommend a slope of about 1 inch over 4 feet, or more if possible. I have seen recommendations for a slope as little as ¼ inch over 4 feet. However, it is my experience that small dirt, warping over time, dog hair and debris find their way into the troughs. A higher slope will help the carry the water away better.
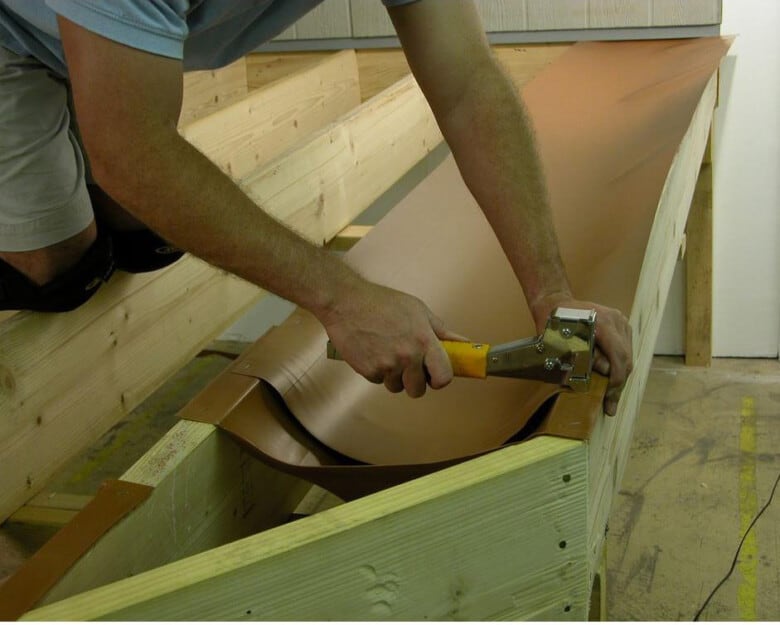
Step 2: Screw the panels to the spacers
Next, we added corrugated plastic panels like these or polycarbonate panels. Starting at one end, attach the panels to the spacers with non-rusting roofing screws or deck screws and rubber washers. Line up and screw into the high points, not the water channels. Overlap edges of panels and seal with caulk or flex tape, if desired.
Step 3: Add gutters
Adding gutters does make an under-deck ceiling more aesthetically pleasing as well as functional. Plan ahead and attach the panels so that there is space for the water to properly flow into them and for you to be able to clean them out if necessary.
Because ours is a simple storage area for the tractor, we didn’t add gutters. It drains into the gravel below which has the appropriate slope away from the house.
How We Enclosed Our Deck for a Shed
We wanted to enclose our deck to make it more attractive, and provide more protection for our outdoor tools and equiptment.
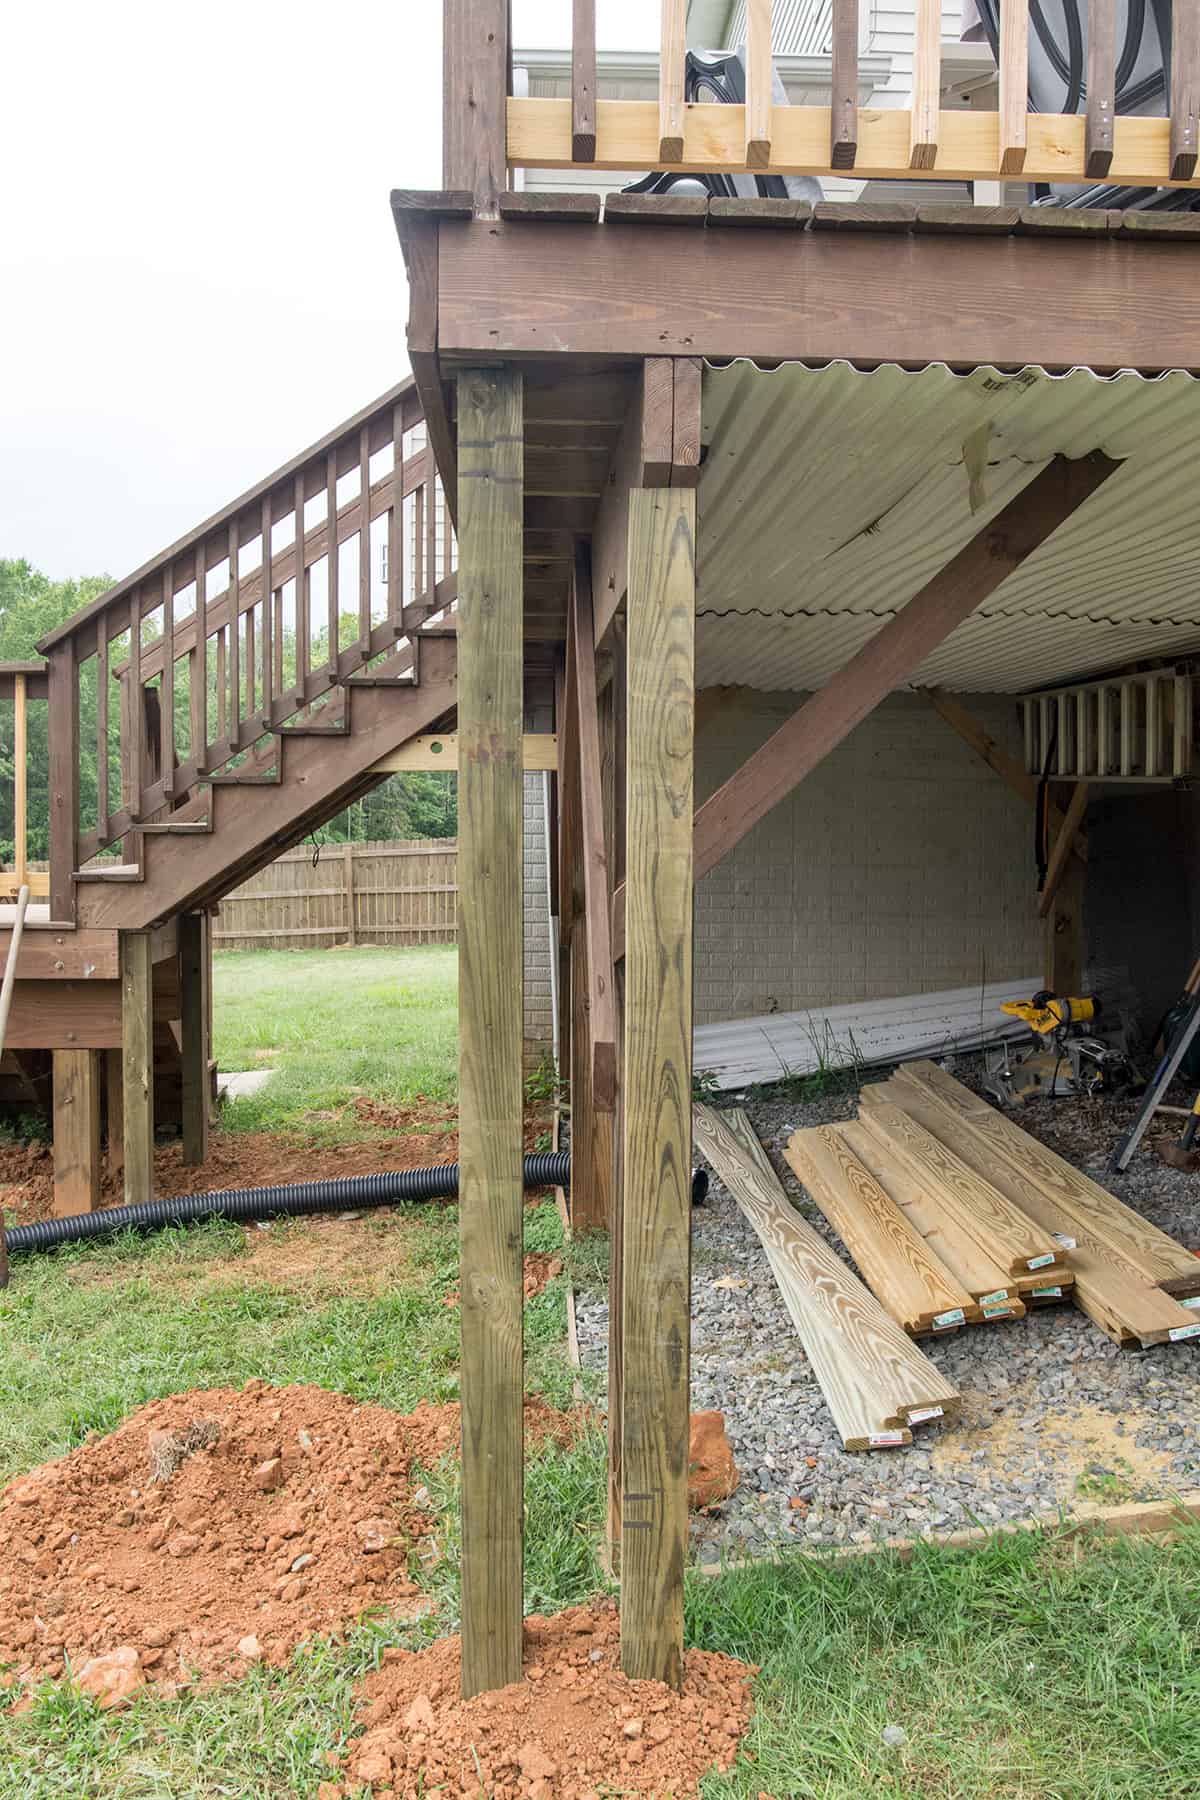
We added 4×4 posts underneath the deck, back far enough back to give space for the boards. This was definitely the hardest part, because we dug the holes by hand with a post hole digger and breaker bar. For anyone keeping count (we were!), that’s 15 posts.
One of the hardest things we had to deal with was the giant support beams that ran end to end. On the larger platform (photo above), we decided to just frame it out and leave the support beam intact.
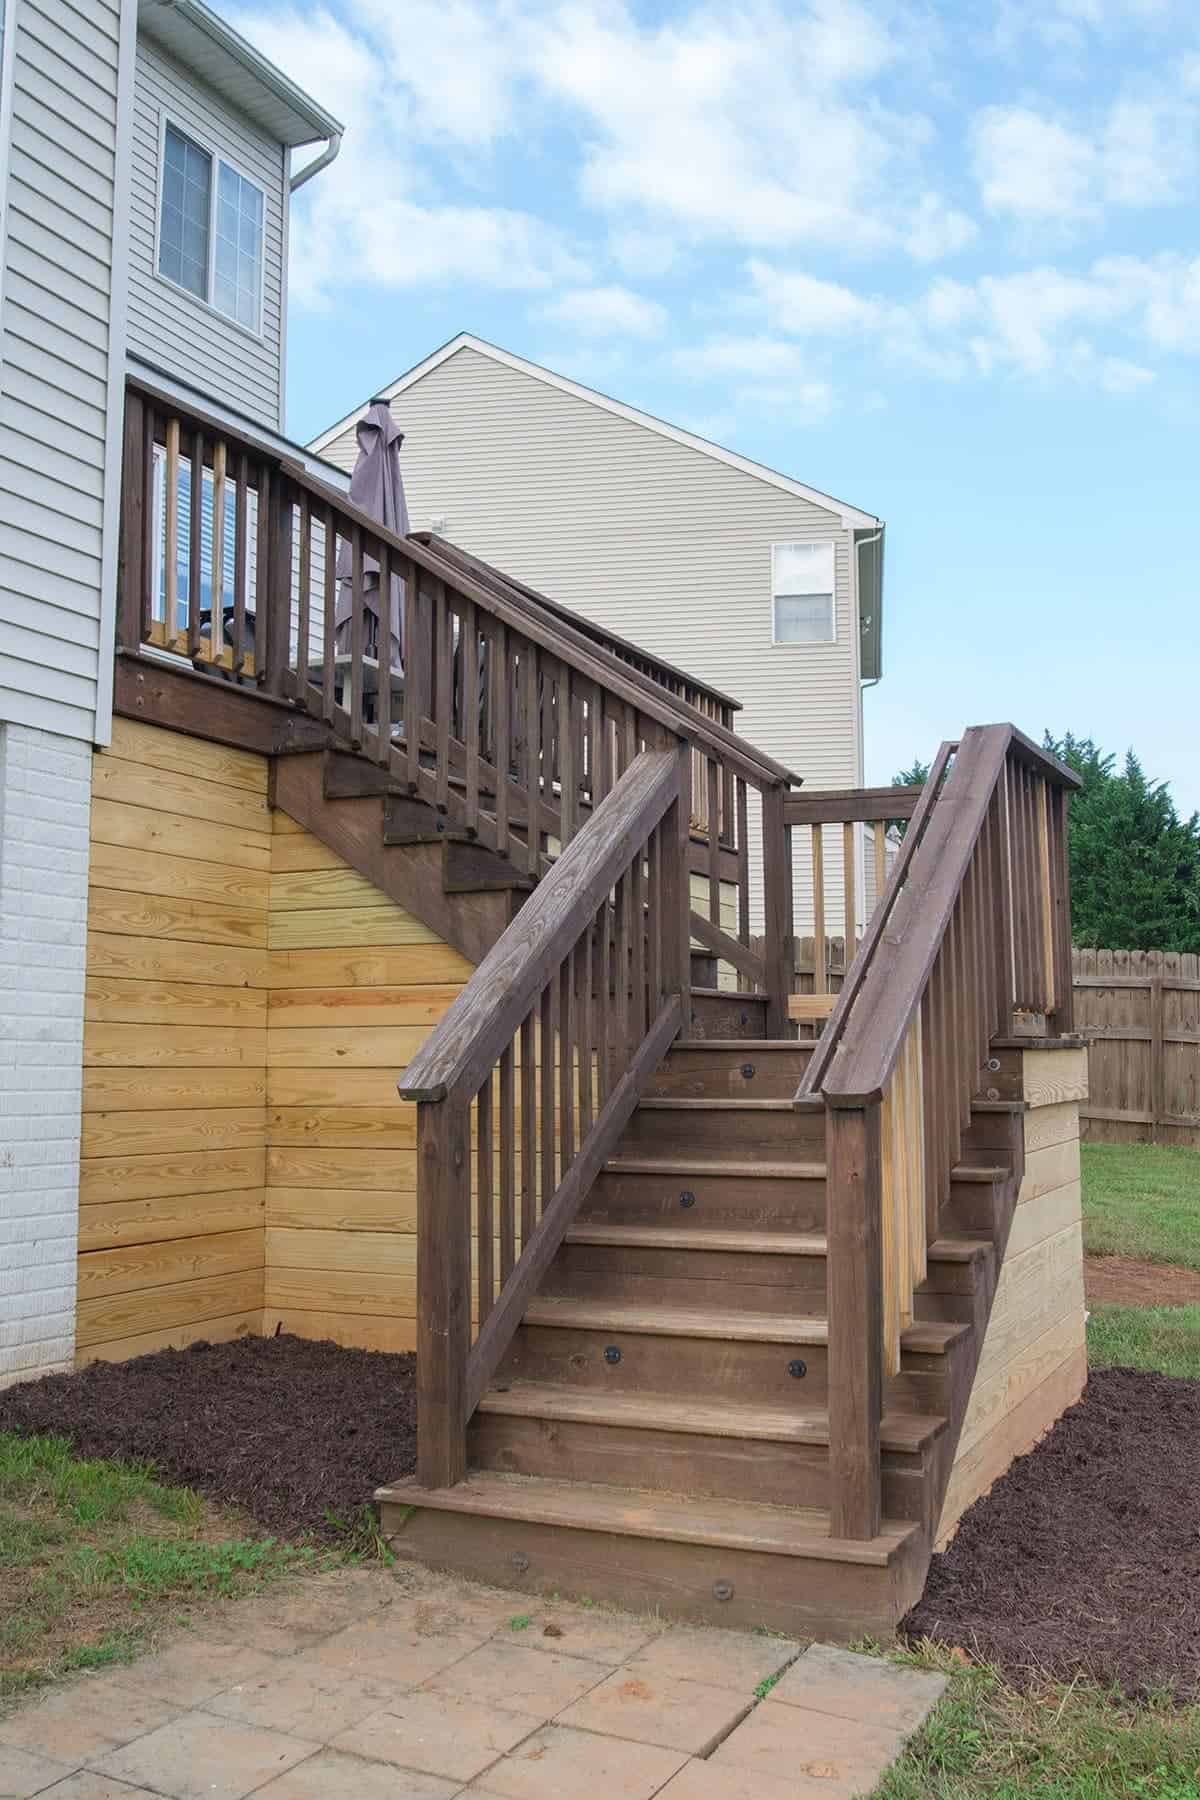
After framing, we wrapped all sides, including the stairs, with 6 inch wide decking boards.
Tips for An Expert Installation
- Screw through the highest point of the corrugation, rather than through the channels the water will flow.
- We pressure wash our deck every 1-2 years and use this time to also wash out the panels and clean the gutters. Even small debris can build over time like algae, dog hair, caked dust, and pieces of grass. We use a plant safe house wash like this one.
- Panels can be cut to length with a circular saw and carbide blade or cutting shears.
- For a plain corrugated panel, I recommend a slope of 1 inch over 4 feet, or more if possible. I have seen recommendations for a slope as little as ¼ inch over 4 feet. However, it is my experience that small dirt, warping over time, dog hair and debris find their way into the troughs. A higher slope will carry the water and debris away better.
- You can direct the corrugated drainage system either across the joists or along the joists. The first time we did this, we directed long ways, but realized it wouldn’t work for our situation because of the knee braces and debris, so we redid it.
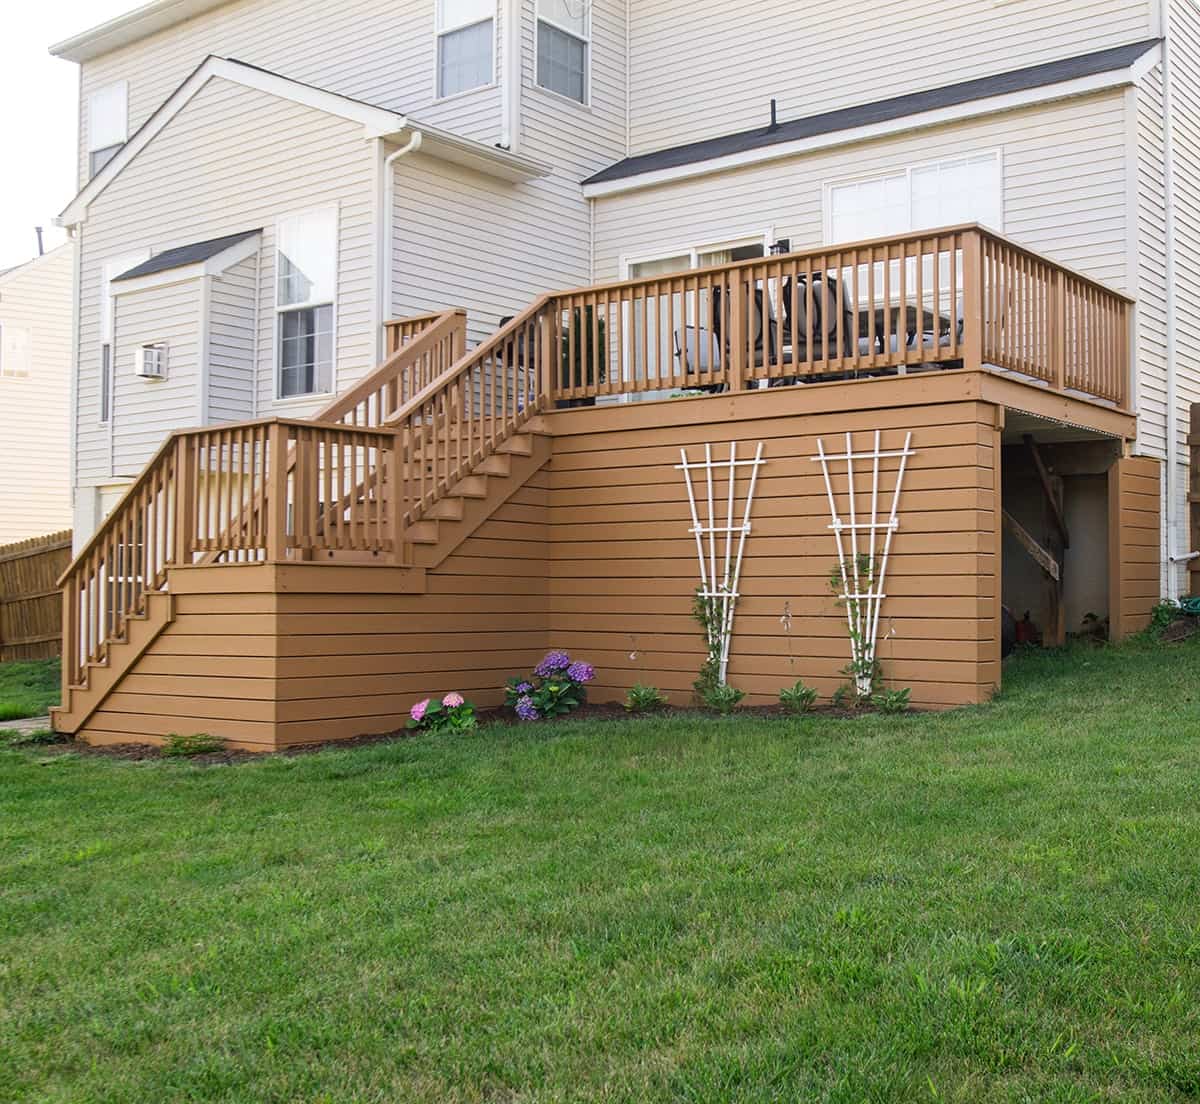
And here it finished and stained in a solid color:
Check Out Our Many Other Ideas for Outdoor Improvements:
- How to Restore An Old Deck
- 7 Ways to Refresh Your Front Porch
- Building An Outdoor Table
- How To Spray Paint Outdoor Furniture
FAQs
Different systems have different recommendations. If your boards have some gaps between them, you can use a pressure washer (1000-2500 PSI) flushing the gutters and system. Use a house cleaning agent for algae. I recommend removing the panels every few years or annually to clean thoroughly.
A few popular choices to enclose a deck space include lattice panels, fence boards, decking boards, vinyl siding, faux stone or brick, and feathered cement over concrete blocks.
With labor cost, expect to pay $1200-4,000 depending on style and which specific system. The lowest cost option is using corrugated panels and gutters which is about $20 per linear foot. For example, a 10×10 foot deck would cost about $250 for parts and supplies.
If under your deck is exposed, do not put a vapor barrier underneath as this can cause moisture to build up. The cheapest option is gravel and good drainage system or slope away from the house. Clean up leaves and debris that retain or trap moisture annually. If weeds are a concern, you can use landscaping fabric.

Grab our free series "Weekend Home Projects that will Transform Your Life" Sign up below to receive updates including free printables, organization tips, home improvement projects, recipes and more! |
More DIY outdoor Projects
PS I love seeing your creations! Be sure to take a photo and tag #cravingcreative on Instagram! You can also stay in touch with me through following me on Instagram, Pinterest, and subscribing to the newsletter!
How to Add a Waterproof Ceiling Under A Deck
Tools
- Cordless drill
- Drill bit set
- Safety glasses
- Stepladder
Supplies
- Gutter and downspout
- Pressure treated 2x4s
- Metal Roofing screws
- Waterproof sealant
- Corrugated Fiberglass or PVC panels
Instructions
- First, to the underside, add spacer blocks to every joist if spaced 12 or more inches apart. Blocks or shims are cut from a treated 2×4 and spaced every 2 feet on a joist. Each block is ½ thicker than the last as it runs down the joist. This creates enough slope to direct the water down to the edge and into a gutter.

- Starting at one end, attach the fiberglass panels to the spacers with non-rusting roofing screws or deck screws and rubber washers. Screw into the valleys, not the water channels. Overlap edges of panels and seal with caulk or flex seal, if desired.

- Adding gutters does make an under deck ceiling more aesthetically pleasing as well as functional. Plan ahead and attach the panels so that there is space for the water to properly flow into them and for you to be able to clean them out if necessary.


Jaceymae says
Do the strips that need to increase by 1/2″ need to be cut at a slant?
Rachel says
No, just increase them flatly at intervals by 1/2 inch. No slant really needed as the material is fairly flexible.
Whitney says
Hello! The 2x4s being parallel to the house, should they be the length of the deck? Ours is 20 feet so do I HAVE to use 2x4x20s? Or is there an alternative method? Thanks!
Rachel says
The spacer blocks don’t need to be full boards, and it’s probably best if they aren’t for maximum air flow. I can see where that could be confusing. The blocks are made from 2x4s, but they don’t measure 2×4 if that makes sense. I cut the 2×4 into blocks to create the slope, but the blocks are only big enough to attach the panels to the boards. For example, the first block row closest to the house might be 2 inches wide x 4 inches long x 2 inch height, and the next block row placed 2 feet down the same joist would be 2x4x2.5 or 3 inches tall. So you cut the 2×4 into blocks that are a little longer each time and then hang them to create the slope.
Whitney says
Oh! So the panels are only attached to the spacer blocks. Got it. Thanks for responding!
Lisa says
What size boards did you use to wrap
Rachel says
I used 6 inch wide decking boards that match the top of our deck.
Barbara Williams says
How is the water draining under your deck? I don’t see the pvc ceiling leading to a gutter.
Rachel says
You are correct. That was installed after I took most of these photos, but isn’t super necessary depending on how the deck is installed. We have a gutter at the edge that empties into the rain spout at the edge.
Christina says
Hi Rachel!
How much gravel did you put down originally? Did you build a floor or just the enclosure around it?
Thanks!
Christina
Rachel says
Great questions! It’s been a few years, but I want to say we originally put 4 cubic feet It’s much cheaper to get in bulk at our landscaping center and they used a wheel loader. We did not build a floor originally since we were just trying to cover the bare dirt. Grass and weeds weren’t growing in it and the dogs would go under the deck to get muddy.
Tami says
We want to do this as well. What do you do to the top door deck to prevent water from seeping in from the top? Tami
Rachel says
I wrote a post on how we added a corrugated roof here.
Steve says
I’ve tried to do something similar. I bought corrugated plastic panels for the roof, but they ended up being incredibly flimsy and even fairly light handling they’d lose their shape. Do you know exactly what product your corrugated panels are?
looks great btw
Rachel says
Thank you! We used these pvc plastic panels.