A great way to organize tools and craft supplies! Learn how to hang a pegboard on drywall and even frame it for a functional and pleasing storage.

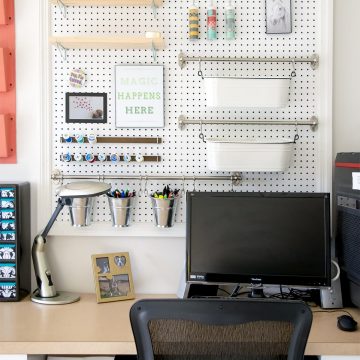
Every time I make a post from my craft room makeover, I get a ton of questions, particularly about the pegboard above my computer area. I don't know about you, but I can't think or work when I'm surrounded by chaos. I mean, the process in my mind is chaos enough.
That’s why I love a chic pegboard though! With their functionality, pragmatism, and reinvention of an iconic garage accessory – they check all of my boxes when it comes to perfect, stylish office desk organization.
It’s fast becoming one of the most popular craft supplies organization ideas for the wall and with good reason. They're simple to make, inexpensive, and ready for all the accessorizing goodies in under 1 hour.
Supplies Needed to Hang A Pegboard
- Pegboard cut to size (Mine is 3.5 x 4 ft)
*Pegboards come in two hole sizes: ¼ and ⅛ inch. This is important when selecting your pegboard accessories as some will not fit both. There are far more accessories made to fit ¼-inch style pegboards so that is what I recommend.
- 1 x 2 boards – enough to go around the outside of the frame and a brace if your making a very large board or have heavy objects on it)
- Pegboard
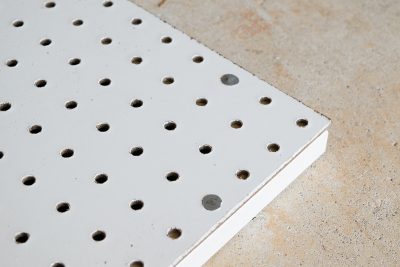
- Nails with flat heads (we used Roofing Nails, but any will do as long as it covers the pegboard hole)
- Trim
- Paint and paint brush
- Miter Saw or a handsaw and miter box
- Wood filler (for nail holes in trim)
- Wood glue
- Finishing Nails and long screws
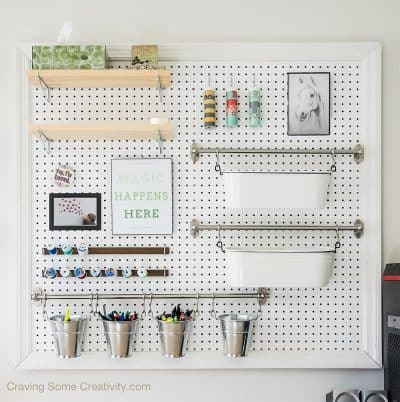
Pegboard Organizer Accessory Ideas
- Condiment stand, white
- Rail 22in, silver metal
- Rail Hooks (sold separately, 5 per package)
- Plant pots – similar
- Peg Board Shelf Bracket – I put a 1×6 piece of wood on them as the shelf
- J hooks (which I bent for the thread holders)
How To Build A Pegboard Organizer
Step 1: Mark the Studs and Decide sizing. Using a stud finder, mark the studs on the wall. I like to draw it out about where I want to hang. Then you can cut the pegboard to the size you want.
Step 2: Make a frame. Start by making a frame for the back of the pegboard from the 1×2 boards. It looks nicer if you can cut the frame at 45 degrees so that each piece fits together but it isn’t necessary. We added a brace down the center of the pegboard for stability and to prevent flexing.
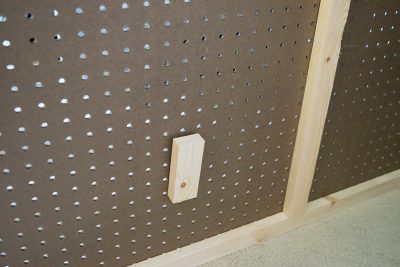
The pegboard needs to be up away from the wall for the peg hooks to fit in. So the 1×2 frame on the back gives it just enough space between the wall to hang your peg hooks & baskets in.
You can see how our framing looks (after attached from the back):

Step 3: Nail the pegboard to the frame. We used flat head nails in the corners and outside centers.

Step 4: Cut the trim framing. (Optional)
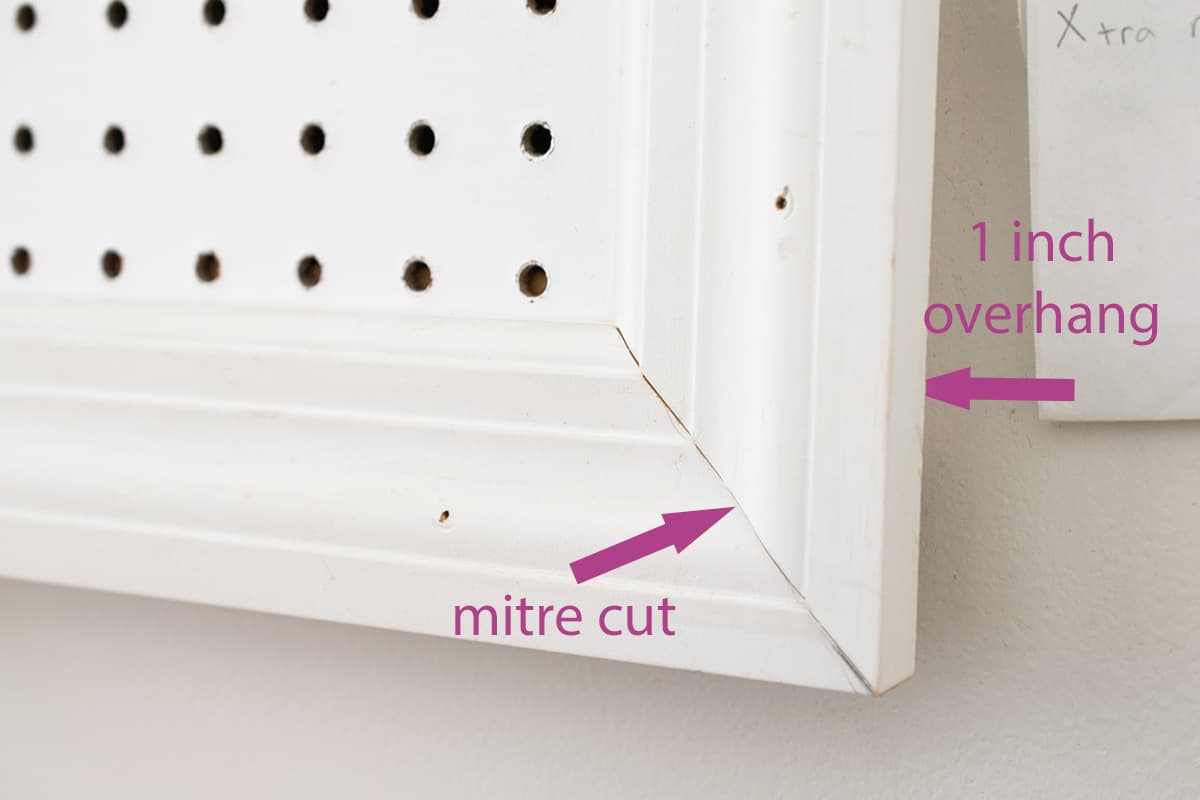
The pegboard can be hung without adding decorative trim. However, we added this to give it a more finished/traditional style since it was in the office. We used door casing for this.
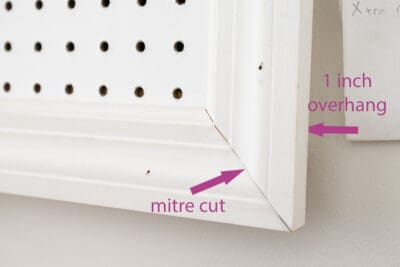
Using your miter saw, cut the trim at a 45-degree angle so that the trim pieces fits together. My trim had a 1in overhang so that the sides are hidden.
Do not attach this trim until you have decided how to hang the pegboard on the wall.
How to Hang A Pegboard Organizer
Now the pegboard needs hanging, right? I mean it’s useless until it’s on the wall. There are basically two options of attaching it depending on your priorities and the overall size of the pegboard.
Method 1 – Removeable, No heavy objects on the board
This method attaches the trim before hanging on the wall. The pegboard can come off the wall easily and be repositioned.
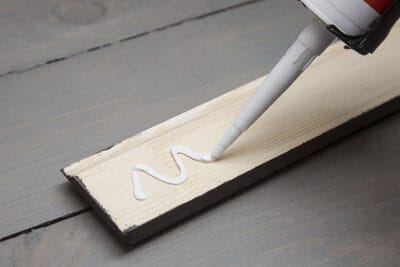
- Put a thin layer of wood glue around the edge of the pegboard then sit the nicer trim frame on top of the peg board.
- Attach the frame with finishing nails all the way around your peg board. Let the wood glue dry.
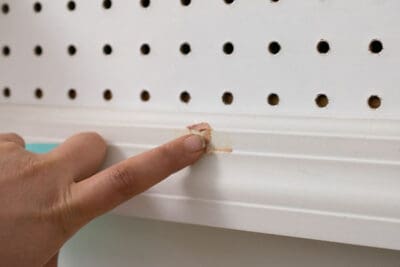
- Fill the nail holes with caulk or wood filler, let dry, and sand smooth if necessary.
- Paint the trim if desired.
- Find the studs in the wall where you want to hang the pegboard. Screw into them leaving enough room for the 1″ frame to hang on top of the screw head. If you are really good, consider lining them up through the pegboard holes which will make it more sturdy.
Method 2 – Not removable, but better attached to wall
This method attaches the trim after putting on the wall, in order to cover the screw heads around the outside. The pegboard isn’t easily removeable without breaking the frame, but it can hold heavier tools.
- Find the studs in the wall where you want to hang the pegboard.
- Screw the pegboard (without trim from step #4) into the studs around the outside of the frame. This area will be hidden by the trim.
- Working one piece of trim at a time, add a thin layer of wood glue around the edge of the pegboard and use finishing nails all the way around the trim. Let the wood glue dry.
- Fill the nail holes with caulk or wood filler, let dry, and sand smooth if desired. Paint the frame if desired.
In the end, I chose the Method #2. I have my craft supplies-pegboard directly above my computer and my pegboard only has two studs behind it. Also, everything on the pegboard can be easily rearranged without ever needing to remove the frame.
Looking for more Craft Room Organization Ideas? Look No further!
- 20 Amazing Craft Room Storage Ideas
- DIY Craft Supply Wall Organizer
- Homework Stations You Won’t Believe
How I Hung Accessories
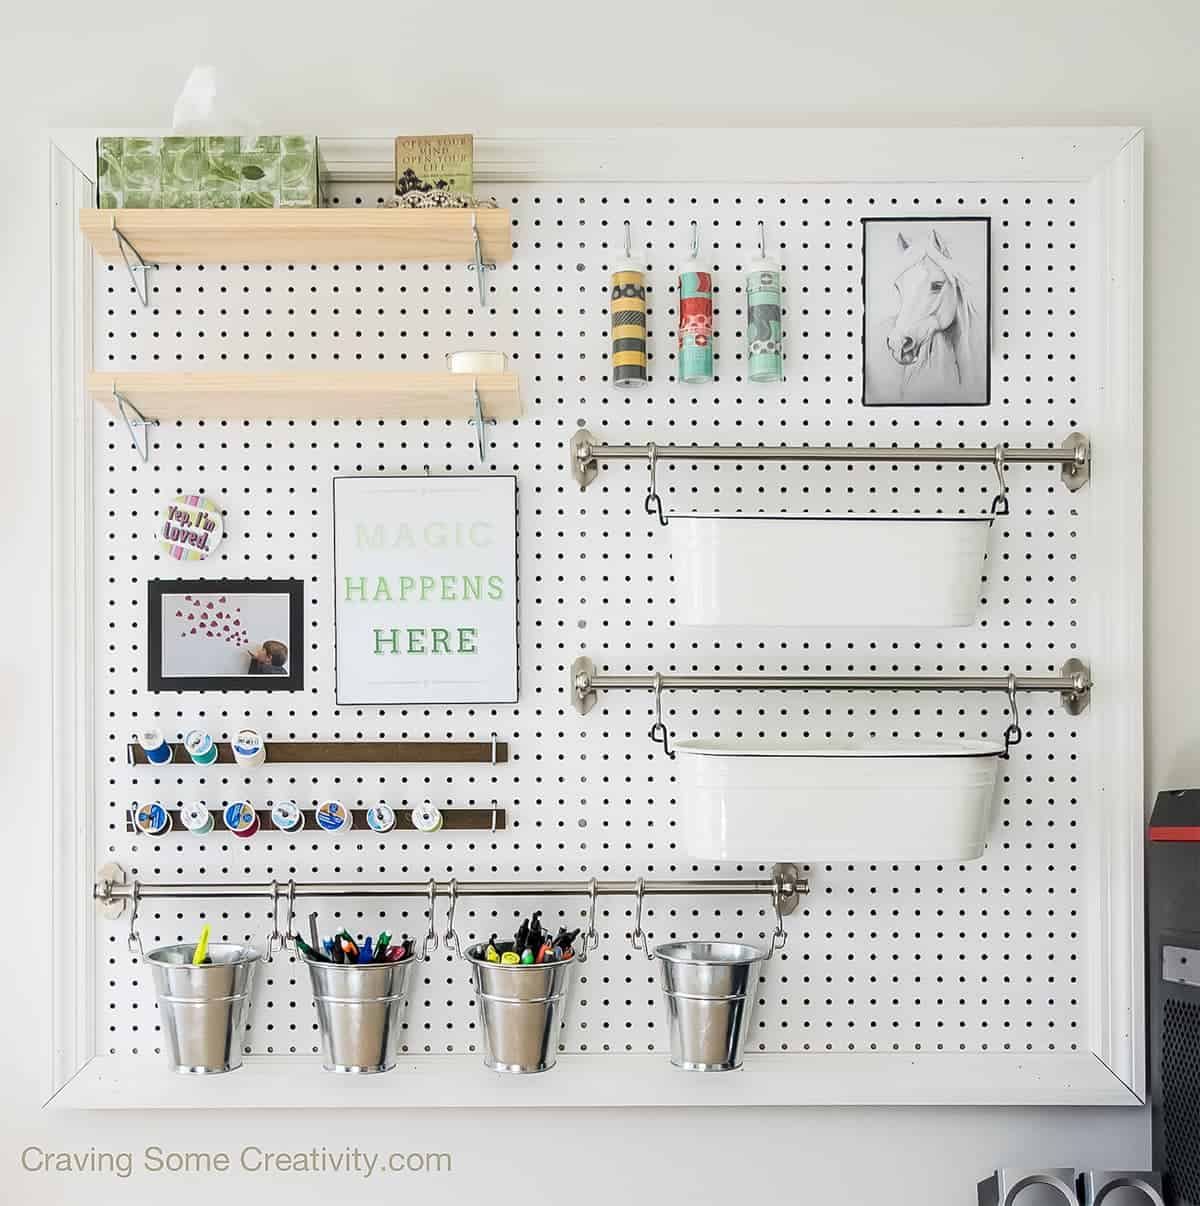
Most of the accessories on this board were hung with J-hooks like those used in tool pegboards. However, I fell in love with these nifty IKEA baskets for pens and bulk office supplies! They aren’t specifically meant for a pegboard.
I hung the baskets on rods similar to small curtain rods. In order to attach these rods, we simply placed another piece of 1″x 2″ between the pegboard and wall. Then I screwed the rod into the piece of wood as an anchor.
|
Grab our free series "Weekend Home Projects that will Transform Your Life" Sign up below to receive updates including free printables, organization tips, home improvement projects, recipes and more! |
More Home Office Inspiration


PS I love seeing your creations! Be sure to take a photo and tag #cravingcreative on Instagram! You can also stay in touch with me through following me on Instagram, Pinterest, and subscribing to the newsletter!
How To Hang A Pegboard
Tools
Supplies
- 1 x 2 wood boards
- Pegboard
- Flat head nails
- 3 ½ Inch Screws
- Wood Glue
- Door Casing to use as decorative frame
- Finishing Nail
- Wood Filler
- Paint
- Paint Brush
Instructions
- Mark the Studs and Decide sizing. Using a stud finder, mark the studs on the wall. I like to draw it out about where I want to hang. Then you can cut the pegboard to the size you want.

- Make a frame. Start by making a frame for the back of the pegboard from the 1×2 boards. It looks nicer if you can cut the frame at 45 degrees so that each piece fits together but it isn't necessary. We added a brace down the center of the pegboard for stability and to prevent flexing.
- Nail the pegboard to the frame. Use flat head nails in the corners and outside centers.
- Cut framing trim (optional). We used door casing to create a decorative frame around the outside of the pegboar. Using a miter saw, cut the trim at a 45-degree angle so that the trim pieces fits together. My trim had a 1in overhang so that the sides are hidden. Do not attach these until you decide how to hang the pegboard.
- Screw the pegboard (without trim from step #4) into the studs around the outside of the frame. This area will be hidden by the trim.
- Add a thin layer of wood glue around the edge of the pegboard and use finishing nails all the way around the trim. Let the wood glue dry.
- Fill the nail holes with caulk or wood filler, let dry, and sand smooth if desired. Paint the frame if desired.
- Hang accessories as desired.
Notes
- Condiment stand, white
- Rail 22in, silver metal
- Rail Hooks (sold separately, 5 per package)
- Plant pots, galvanized Metal
- Peg Board Shelf Bracket – I put a 1×6 piece of wood on them as the shelf
- J hooks (which I bent for the thread holders)
- Put a thin layer of wood glue around the edge of the pegboard then sit the nicer trim frame on top of the peg board.
- Attach the frame with finishing nails all the way around your peg board. Let the wood glue dry.
- Fill the nail holes with caulk or wood filler, let dry, and sand smooth if necessary.
- Paint the trim if desired.
- Find the studs in the wall where you want to hang the pegboard. Screw into them leaving enough room for the 1″ frame to hang on top of the screw head. If you are really good, consider lining them up through the pegboard holes which will make it more sturdy.
Tina says
Great ideas! I am working on my craft room now!! Had already decided to use pegboard!! Have it cut and ready to go. My husband has a neat idea on hanging it! Can’t wait! I plan on having one big pegboard and maybe some smaller ones around the room too!!
Rachel says
Nice! I really love my pegboard so multiple sounds perfect. I would love to see it when you get them done!
April R @Uncookie Cutter says
I LOVE this! Simply genius! Thanks for partying over at Merry Monday, I’ve picked you to be my feature pic for this week. Looking forward to following you :).
Christine | Where The Smiles Have Been says
I have grand visions of installing a peg board in my future dream craft room, so I appreciate all the tips and instructions you gave. Love how you have it accessorized too!
Melissa Vera says
What a great way to organize a craft room. I need a pegboard for my measuring cups and spoons. Thanks for linking up on #HomeMattersParty and I hope you will come back and link up again soon.
Erlene says
I’ve always wanted to make a peg board organizer and I love your tips. Never knew it came with two different sized holes.
Cathy says
This is amazing! What a creative idea! I would love for you to share this at my link party Making Memories Mondays going on now! 🙂
Cathy
Cathy says
Whoo Hoo, thanks so much for sharing this on MMM!! I am featuring this great DIY project on this week’s MMM, which starts on Sun night at 9PM EST! 🙂
Cathy
Lisa at Concordcottage.com says
hi how are you? I love this Pegboard office supply organization and it looks so clean and eyecatching. Thank you so much for linking up to our Something to Talk About Link Party and I’ll be featuring you at tomorrow’s Linky Party on my blog and also Social Media. I hope you can join us again, Lisa at Concord Cottage
Lou Lou Girls says
Loving this! You are so talented. Thanks for sharing this at our party. Pinned and tweeted. I hope to see you on Monday at 7 pm, so we get to party with you again! Lou Lou Girls
Logan Can says
I am always looking for more ways to organize and I LOVE this idea! I really need to keep this in mind when I create my office space after we move!
Rachel says
I bet it will look goregous! It’s so awesome to know where everything actually is in my space. Good luck with your move!
Elizabeth Turnbull says
Ooo, I need to try to make this! I’ve always loved the idea of pegboard organization inside the house!
Stephanie R says
Im totally jealous of this space! I hope to have an area like this one day.
Kelley says
I love organization. Living in a small house with 3 children has made organizing one of my passions, even if I fail at it often. 🙂 Thanks for sharing! You have added to my ideas.
Rachel says
It’s certainly tough to keep organized with 3 kids. I have a hard enough time with one and a dog. Good luck in your efforts!
Aliza B says
This looks wonderful. All your supplies are easily accessible. Thanks for mentioning where you got those hanging baskets. I would love this in my new craft room.
Rachel says
Your welcome and thanks for stopping by, Aliza! Those baskets were a tough find at first since I had a very specific idea of what I wanted.
Brooke Stephens says
What an awesome idea. Love the look and the organization. I will definately use this in my office and craft room.
Carrie @ curlycraftymom says
Thank you for clarifying two different ways to hang (and why) and also that the pegboards come in two different sizes (well, the holes!). I didn’t know that and it’ll help when I got to buy accessories for mine. I’m also excited to hear it only took you an afternoon to do yours. I can’t wait to do one for my office, I need to get on it!
Carrie
curlycraftymom.com
Rachel says
I’m so glad you noticed that, Carrie! They were both problems that we encountered when designing it. I came across about 3 tutorials that said the pegboard was hung so that it was removable but they didn’t explain how. We could not figure it out until we realized that they were treating it like a picture frame. (That kind of seems obvious to me know, lol) I think it really depends on the size of the pegboard and how many studs in the wall are present.