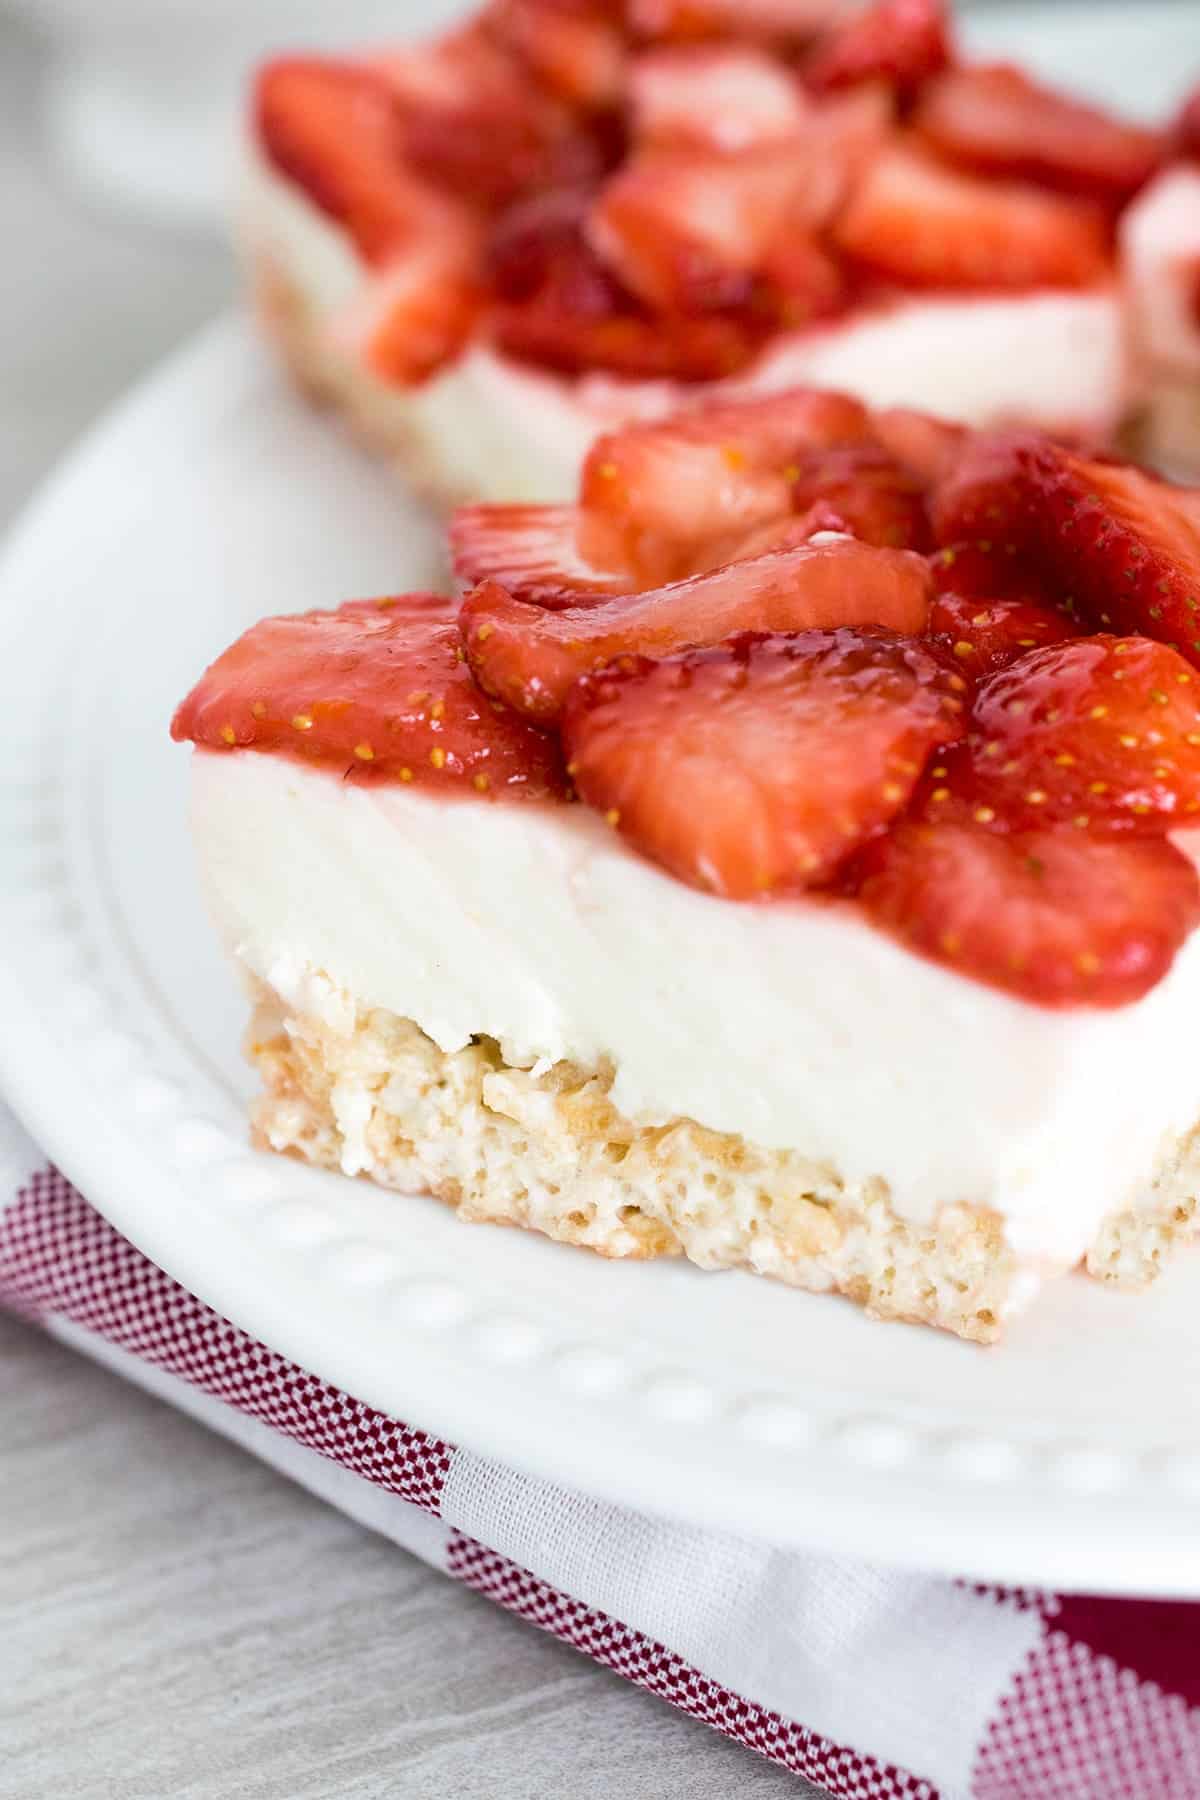
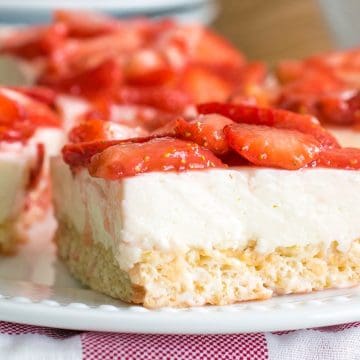
Smooth and creamy no-bake cheesecake meets a rice krispies treat crust and bright, fresh strawberry sauce in these elegant Strawberry Cheesecake Rice Krispies. A modern twist on a childhood classic, this recipe is a refreshing treat for the lazy days of summer. It might be a combination you haven’t thought of before, but it will be from now on!
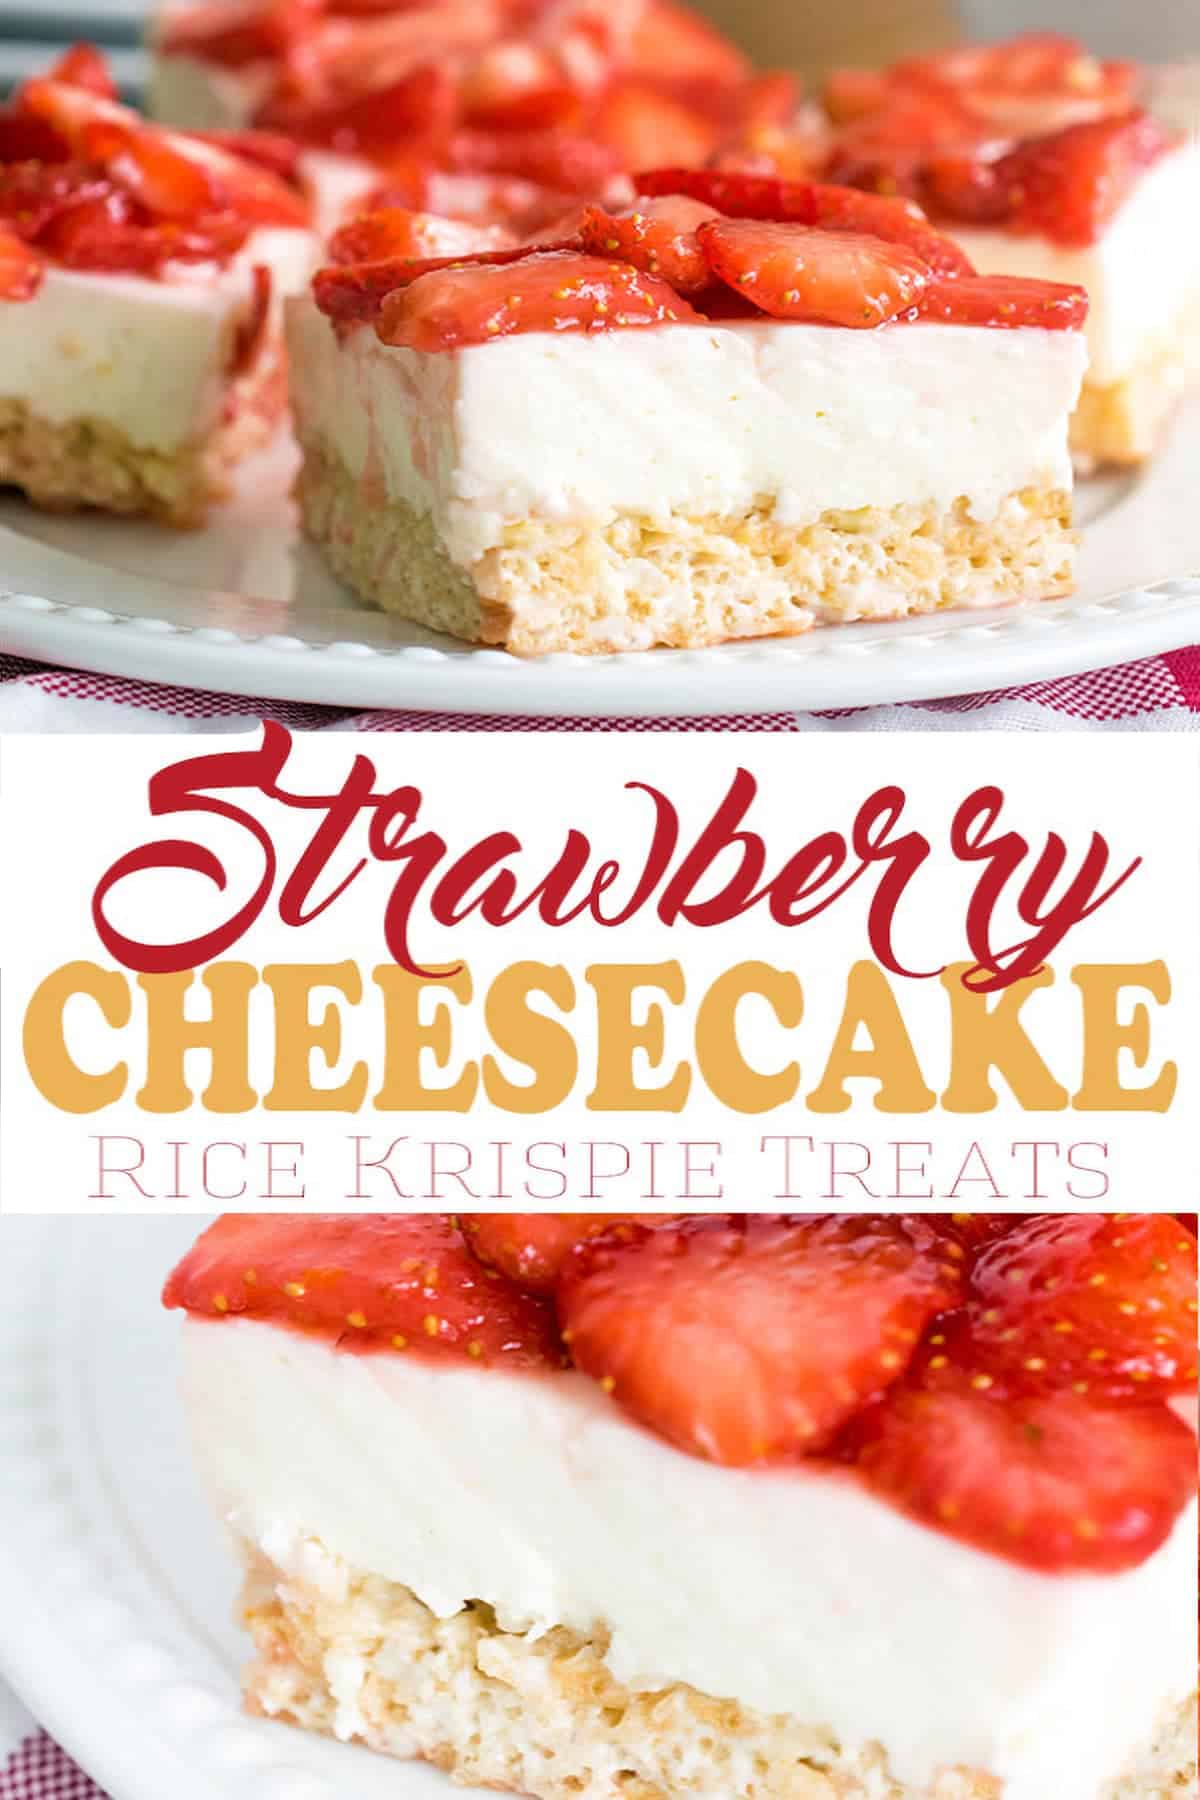
After extensive experimentation, I’ve come to the professional conclusion that cheesecake does in fact make everything better. From Strawberry Cheesecake Ice Cream, to Chocolate Cheesecake Bars, and Cheesecake Brownies– cheesecake is the ultimate upgrade for a dessert recipe. And thus, the Strawberry Cheesecake Rice Krispie Treat was born.
Here the Rice Krispie Treat acts as a substitute for a traditional pie crust. Creamy cheesecake and sweet strawberry topping is a marriage made in dessert heaven. No need to turn on the oven to have this at home. Other than melting the marshmallows, there is a completely no-cook dessert!
Much like our Punch Bowl Cake, Strawberry Rice Krispie Treats are an ideal dessert to bring to summer barbecues. These take thirty minutes to prep and require no baking. Serve chilled for a refreshing goody on a hot day.
Ingredients and Notes
Here is an overview of what you will need to make these dessert bars with notes on substitutions below.
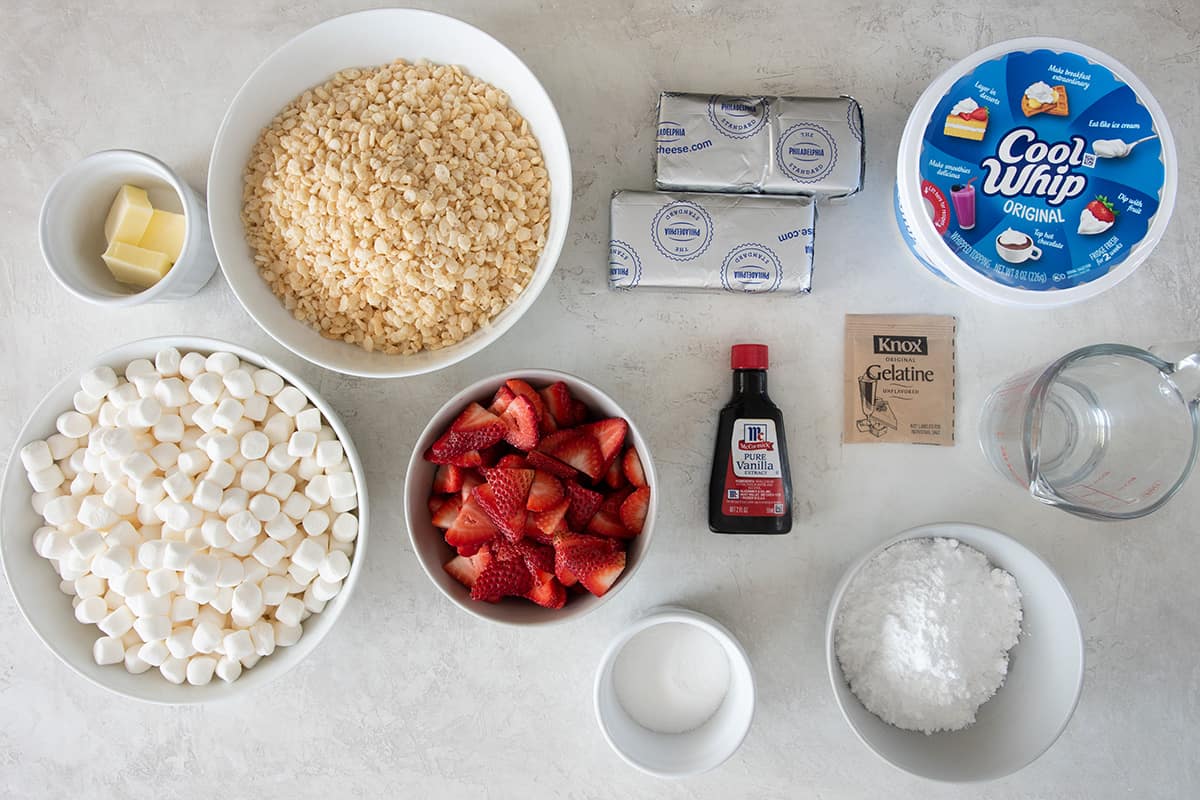
Rice Krispies Crust
- Rice Krispies Cereal.
- Butter. Salted or unsalted is fine but I prefer unsalted to control the sodium levels.
- Mini marshmallows. The quintessential ones for treats because they melt easier. One 10 bag works perfect.
Cheesecake Filling
- Cream Cheese. I use Philadelphia regular cream cheese in the bricks. Its firmer for setting the cheesecake than what you find in the tubs and reduced fat versions.
- Confectioner’s sugar. Also known as powdered sugar, this sweetens the cheesecake layer while giving it lift and firmness.
- Vanilla extract. Brings out all of the flavors and pairs nicely with the cream cheese and strawberries.
- Whipped topping. With this no-bake method, we are trying to control the moisture content so such as cool whip works well. If you make homemade whip cream, make sure it is very firm for use.
- Unflavored gelatin. This is usually in the baking aisle in packets.
Strawberry Topping
- Strawberries. The better the strawberry, the better the topping. It is also a great way to use up strawberries that are starting to turn a bit, but not mushy yet. This stuff is amazing for pancakes.
- Granulated sugar. You will be shocked how easy this syrup is! The sugar pulls all the juice out of the strawberries, and it is perfect without being too sweet.
How to Make Strawberry Topping
The full recipe instructions and measurements are in the recipe card at the bottom of this post, but I include this section as a step-by-step visual walk-through for any questions.
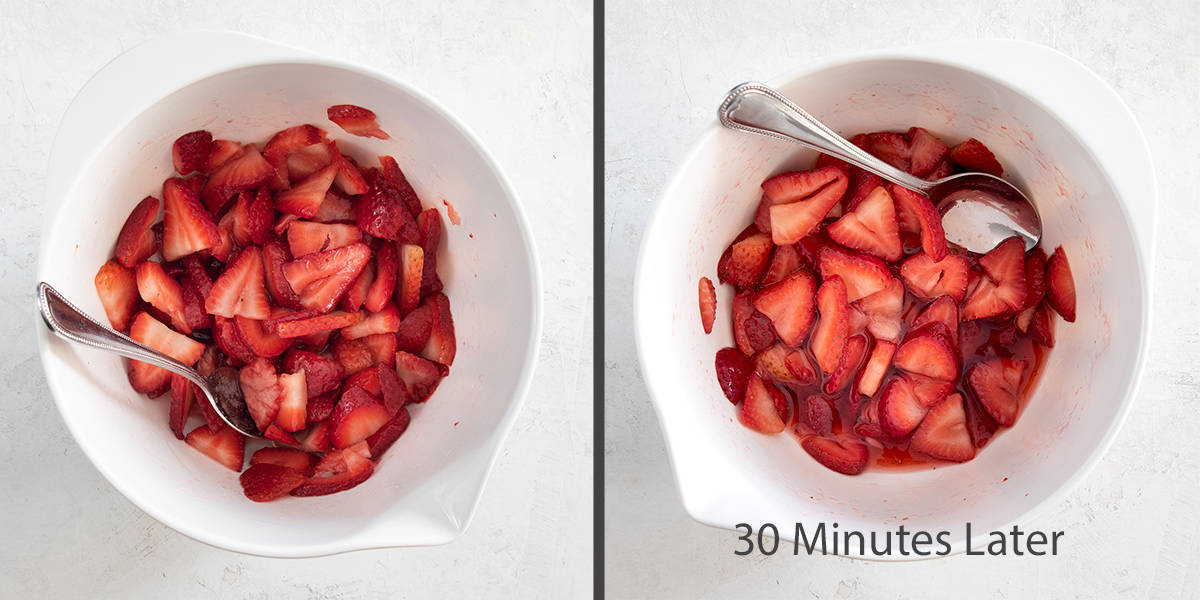
I usually start by making the strawberry sauce. The strawberries release their juices without any cooking or boiling necessary, although cooking on a stovetop does break down the strawberries more. It’s as simple as stirring the sugar in and letting it sit while you make the rest.
It makes not look super juice, but there is about ¾ cup of sweet juice in the bottom of that bowl.
How To Make Cheesecake Rice Krispies
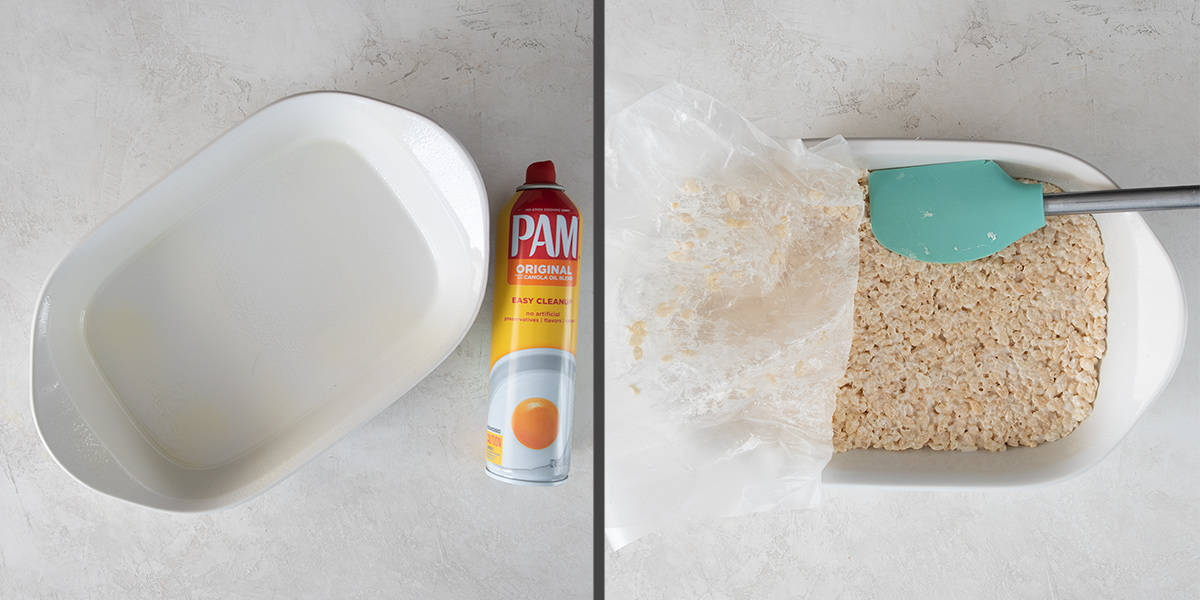
The crust of this dessert is actually a Rice Krispies Treat! Butter, marshmallows, and rice krispies are melted in a large pan and spread out onto a greased 9×13 pan.
***Recipe Tip: Rice Krispies Treats can be a huge mess. I find it easiest to use wax paper and press the marshmallow concoction into a pan. Then slowly peel back the wax paper while using a silicone spatula to scrape the mixture away from the wax paper.
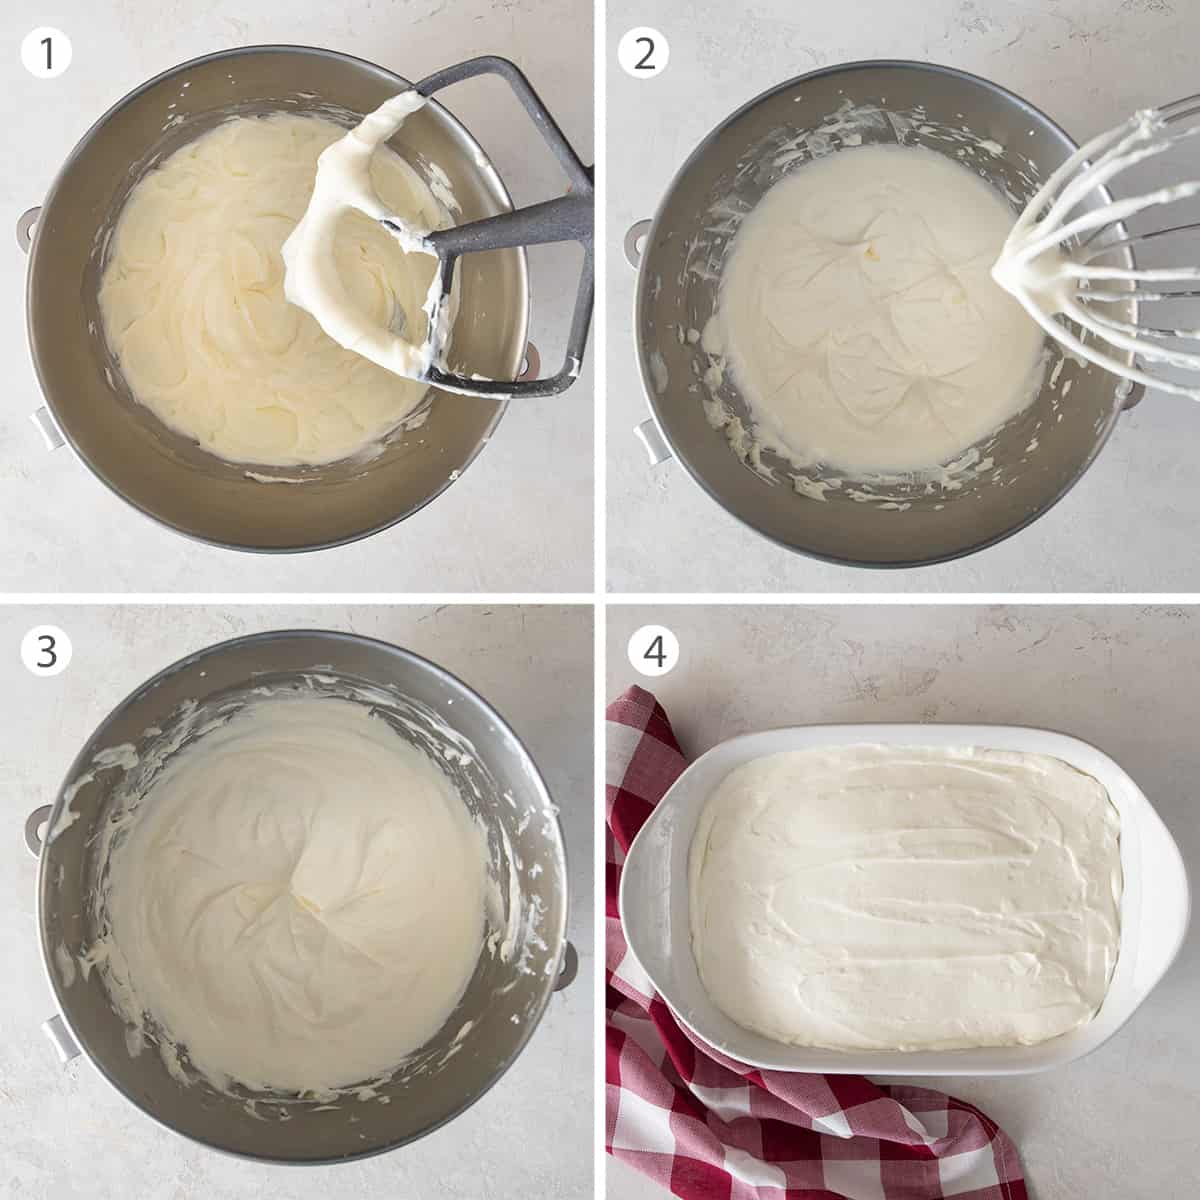
For the middle layer, I make a no-bake cheesecake. I highly recommend an electric or stand mixer for this because it is a lot of whipping.
- In a small bowl or ramekin, sprinkle the gelatin powder over the water. Stir allow to sit for 3-5 minutes. Then microwave for 20-30 seconds until the gelatin is dissolved and liquid. Set aside to cool.
- The cream cheese needs to be room temperature for this to work. With an electric or stand mixer, add the cream cheese and sift the powdered sugar over top. Whip until it looks fluffy and creamy, like frosting. A few extra whips won’t hurt it if you are unsure. (photo 1)
- Switch to the whisk attachment and stir in the whipped topping. Continue to mix, slowly increasing the speed to high, until soft peaks form (peaks that slowly bend over at the tips). (photo 2)
- Now add the gelatin and beat until the mixture forms firm peaks (peaks that stay firmly upright at the tips). (photo 3)
- Spoon the cheesecake filling over the cooled crust and spread evenly. (photo 4) Refrigerate 1-2 hours to set. Just before serving, gently spoon or pour the strawberry filling over top of the cheesecake filling or serve on the side. The strawberry sauce can make the rice krispies a bit soggy if left for a long period of time.
Serving and Storage Suggestions
Serving: After allowing it to cool in the fridge, serve with the strawberry sauce on the side or spooned over individual bars.
Storage: Store it in the same 9×13 pan in the refrigerator, sealed or wrapped in plastic. To keep it the freshest, I store the strawberry sauce separately. Lasts about 4 days.
Make Ahead: The crust and strawberry sauce can be easily made ahead if you desire. This dessert is perfect for potlucks or picnic gatherings. I often make it the day before but keep the strawberry sauce separate for transport and serve on the side. Letting them sit together for even a few hours or less can make the bottom of the rice krispies a bit soggy.
Looking for more easy summer treats?
Frequently asked questions
Absolutely! You can go with whatever fruit topping you prefer, or even go with a medley if you can’t pick just one! You may even want to try some other traditional cheesecake toppings like caramel or chocolate.
To get the creamiest texture in the no-bake cheesecake filling, be sure to allow the cream cheese to come to a true room temperature. Not rushing it will ensure you get the silkiest texture with no lumps. Do not overmix your ingredients. You’ll get the most dense, creamy texture by properly mixing but not allowing your cheesecake filling to become aerated. Once you’ve assembled your cheesecake bars, be sure to allow them enough chill time so that the filling sets up completely.

Not Sure
What's For Dinner?
Signup for recipe updates and get a free cookbook of Easy Weeknight Supper Solutions!
More Delicious and Fun Treats
PS. If you make this recipe, leave a COMMENT AND A STAR RATING in the comments section at the bottom and be sure to take a photo and tag it #cravingcreative on Instagram! I appreciate you for taking the time to read about me and my family recipes.
Strawberry Cheesecake Rice Krispies
Equipment
- Electric or Stand Mixer
- wax paper
Ingredients
Rice Krispie Crust
- 4 cups Rice Krispies Cereal
- 3 tablespoon Butter salted or unsalted is fine
- 10 oz Mini-marshmallows 1 bag, generally
- Cooking Spray
Cheesecake Filling
- 16 oz Cream Cheese, softened 2 packages
- 1 cup Confectioner's sugar
- 1 teaspoon Vanilla extract
- 1 cup Whipped topping such as cool whip
- one packet Unflavored gelatin ¼ oz
- ¼ cup Water
Strawberry Topping
- 1 lb Strawberries rough chopped
- ¼ cup Granulated sugar
Instructions
Rice Krispie Crust
- In a large saucepan, melt 3 tablespoon Butter over low heat. Stir in 10 oz Mini-marshmallows and stir until completely melted
- Add 4 cups Rice Krispies Cereal and stir until even coated.
- Spray a deep 9×13 pan with Cooking Spray. Using wax paper or a buttered spatula, evenly press the mixture into the pan. For a crust like treat, make the layer about a half inch thick. This recipe has enough to make the Rice Krispie treat layer thicker, if desired. Allow to cool in refrigerator while making the rest of the dessert.
Strawberry Sauce
- In a small bowl, mix 1 lb Strawberries sliced, ¼ cup Granulated sugar, and orange zest (optional) until well coated. Allow to sit about 30 minutes, and stir a few times, until the strawberries release their juice, and the sugar is well dissolved. Mash a few of the strawberries with a wooden spoon. If more syrup is needed, add a tablespoon of water.
Cheesecake Filling
- In a small bowl or ramekin, sprinkle one packet Unflavored gelatin over ¼ cup Water. Stir to moisten and allow to sit for 3-5 minutes. Microwave 20-30 seconds until the gelatin is dissolved and liquid. Set aside to cool.
- Add 16 oz Cream Cheese, softened in the bowl of a stand mixer and sift 1 cup Confectioner's sugar over top. Mix on low speed with the paddle attachment until the sugar begins to incorporate into the cream cheese. Then raise the mixer speed to medium and mix until the sugar is fully incorporated. Stop the mixer and scrape down the sides and bottom of the bowl as needed. The mixture should look fluffy and creamy, like frosting. A few extra whips won't hurt it if you are unsure.
- Switch to the whisk attachment and stir in 1 teaspoon Vanilla extract and 1 cup Whipped topping such as cool whip. Continue to mix, slowly increasing the speed to high, until soft peaks form (peaks that slowly bend over at the tips).
- If the gelatin has started to gel, warm it in the microwave for another 5 to 10 seconds until liquidy again before mixing it into the filling. Return the mixer speed to high and beat until the mixture forms firm peaks (peaks that stay firmly upright at the tips).
- Spoon the cheesecake filling over the cooled Rice Krispie Treats and spread evenly with a cake knife or spoon. Refrigerate one hour or overnight. Just before serving, gently spoon or pour the strawberry filling over top of the cheesecake filling or serve over individual slices. The strawberry sauce can make the rice krispies a bit soggy if left for a long period of time.
Melissa says
You had me at strawberry cheesecake-yum!
Roxanne says
These are the best!