This detailed tutorial on how to make large DIY pallet signs will walk you through building, painting, and sealing in a few clear steps. Using a few supplies from the home improvement store, you can have your own unique rustic décor to display in your home!
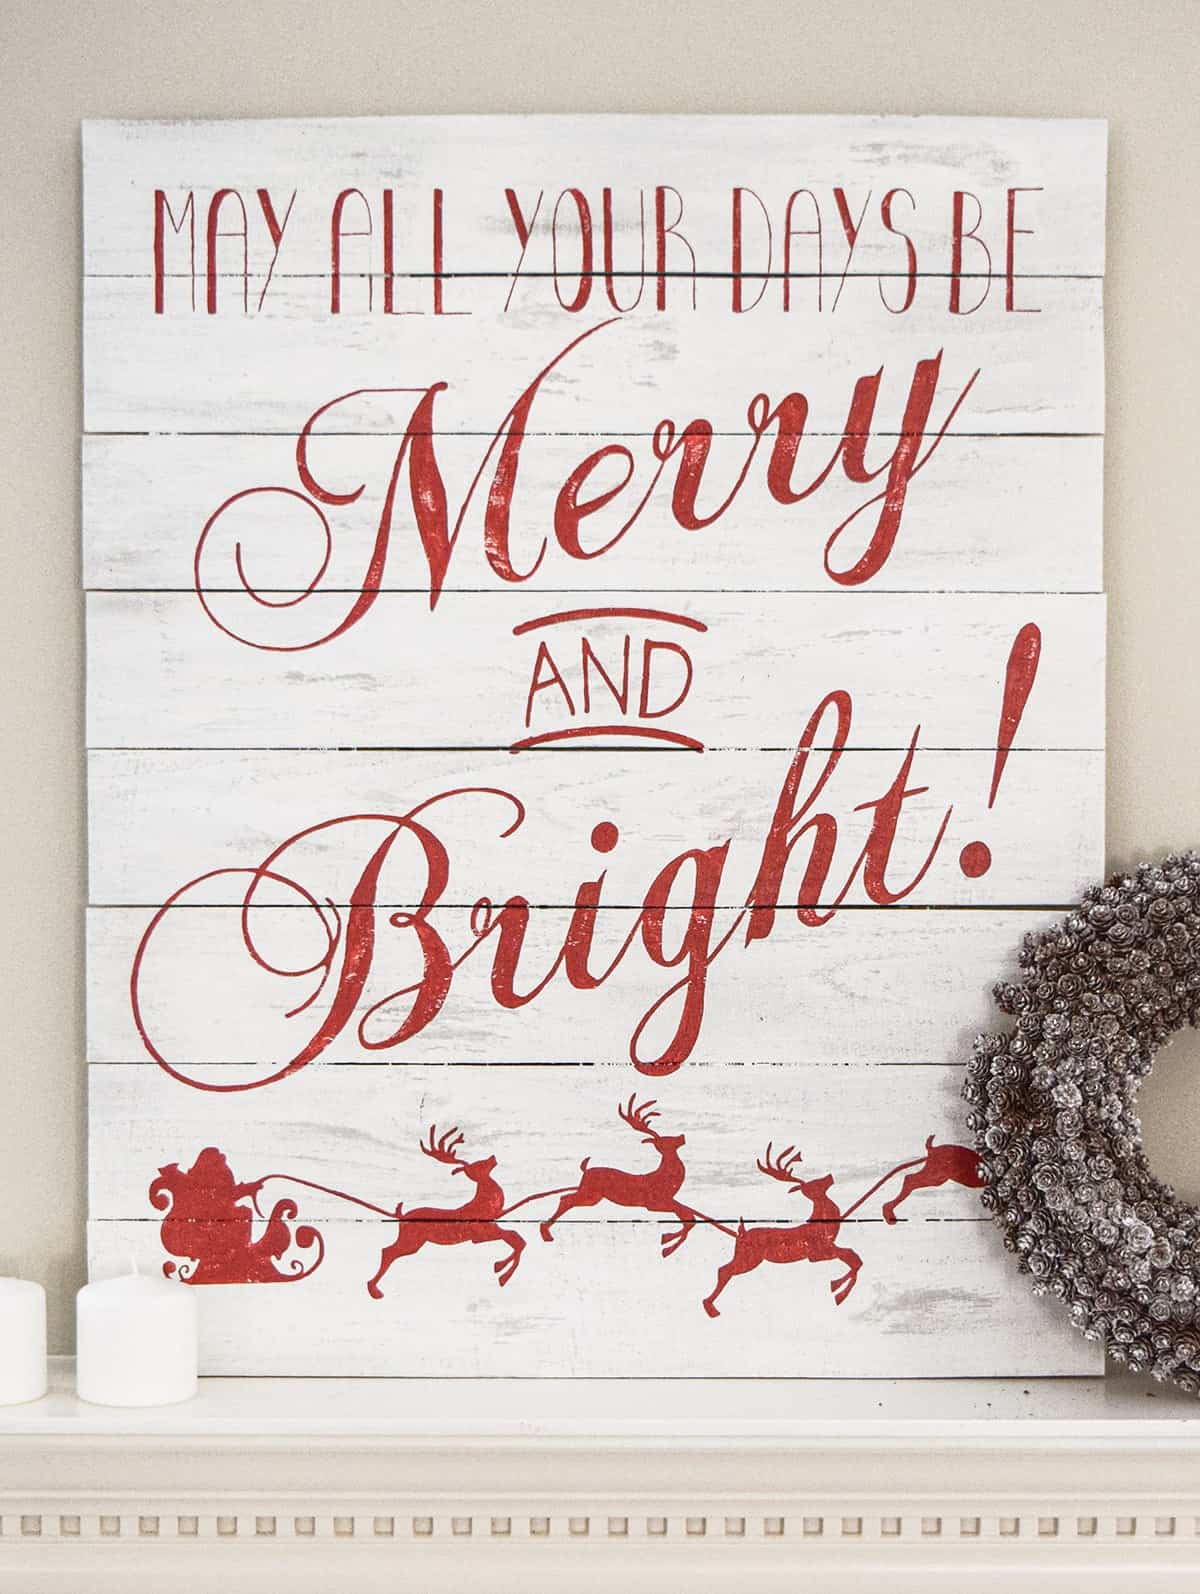
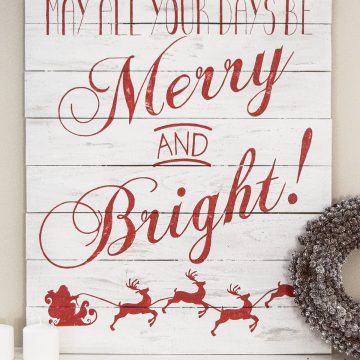
When I envisioned my Christmas mantel display, I knew right away I wanted a rustic pallet sign that matched the rest of the vintage display.
They are easy to make, inexpensive, and they only require some basic tools, but the creative options for home decor are endless!
The best part of this project is that this beautiful sign is made from a few wonderfully cheap rough cut fence slats! It’s a technique I have used before with some of my other wood wall decor projects. Since this entire project is essentially scrap materials, it probably costs about $15 to make.
DIY Sign Supplies
Links are provided to examples of the tools that I use often. There are a few ways to personalize this project for your DIY pallet sign idea, so I have included alternative methods.
Tools
- A Wood Cutting Tool – jigsaw, circular saw, or chop or miter saw. Sometimes, you can have the wood cut at a home improvement store.
- Brad Nailer - Wood glue may also work if you don’t have a brad nailer.
- Hammer and Nails may also work instead of a brad nailer.
- Paint brush
- Cricut Air or Explore Maker or Silhouette Cameo Design Cutting Tool – I've outlined other options below if you can’t make custom stencils. However, I highly recommend getting one!
Materials
- Transfer material
- 2 or More Paint Colors – one for the background color and one for the letters
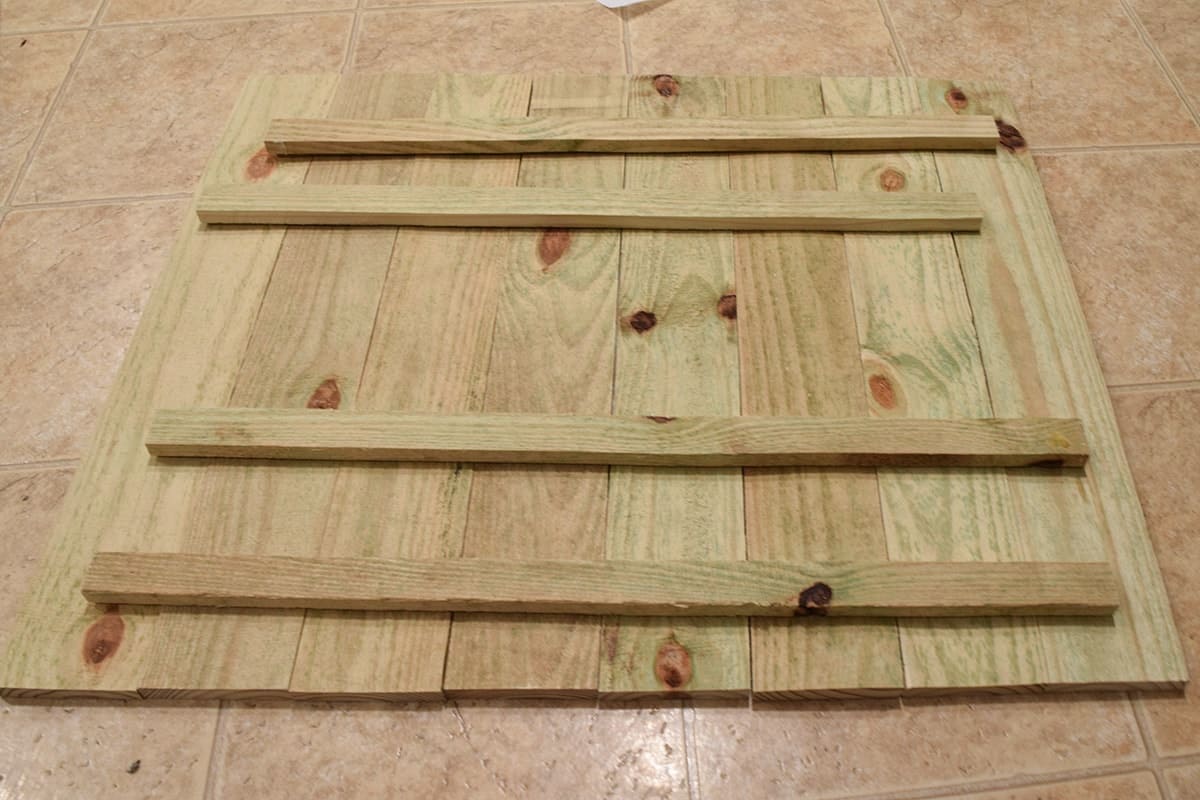
- ½-inch-thick wood slats– I purchased pine dog eared fencing lumber because they are super cheap, but if you have real pallet boards, that would be perfect.
- Contact Paper or Adhesive Vinyl - You can choose between permanent and removeable vinyl depending on whether you want to hand paint the stencil.
- Hanging Materials – wire/screws
Pallet Wood Sign Step by Step Instructions
The full instructions are in the printable how-to card at the bottom of this post, but I include tips, my reasoning, and techniques that I did specifically for this project.
Step 1: Make and Size Your Design
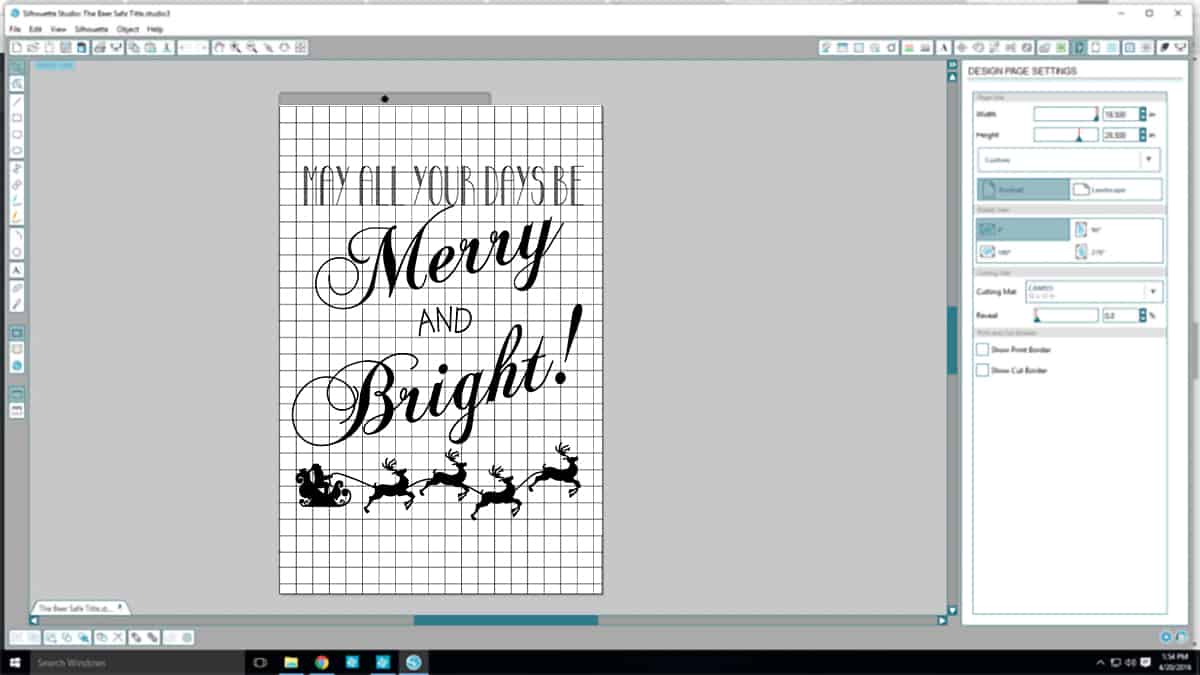
I started by making a stencil for the DIY pallet sign idea. I used the fonts Chopin Script and Mayonnaise Condensed on my Silhouette Cameo. I blew it up to the size of the sign. I highly recommend removable vinyl like this one and transfer paper for vinyl stencils.
I won’t get super technical here as there are a few different models of both the Cricut and the Silhouette cutting machine.
If you don't have a Silhouette machine, there are definitely ways of wood sign making without a cutting machine.
- You can draw something free hand, if you're good at that.
- You can also use a projector like this one and project the image in your board and trace, then paint.
- Or have an etsy shop (like this one) cut out a design for you with vinyl. Just make sure to ask that the vinyl is removeable without damage if you want to use it as a stencil.
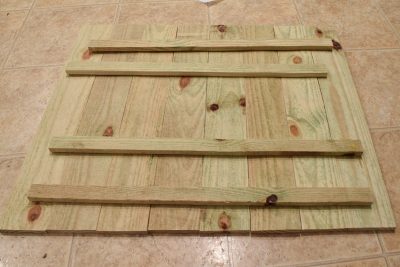
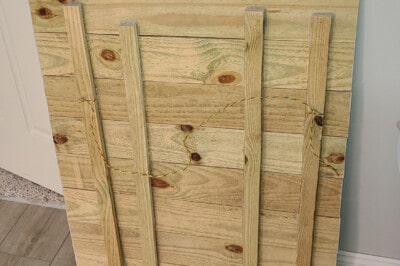
Step 2: Cut the pallet wood to size
I used leftover fencing flats from our fence project because they are cheap and rough cut. I cut them to size (26″ x 4″ each).
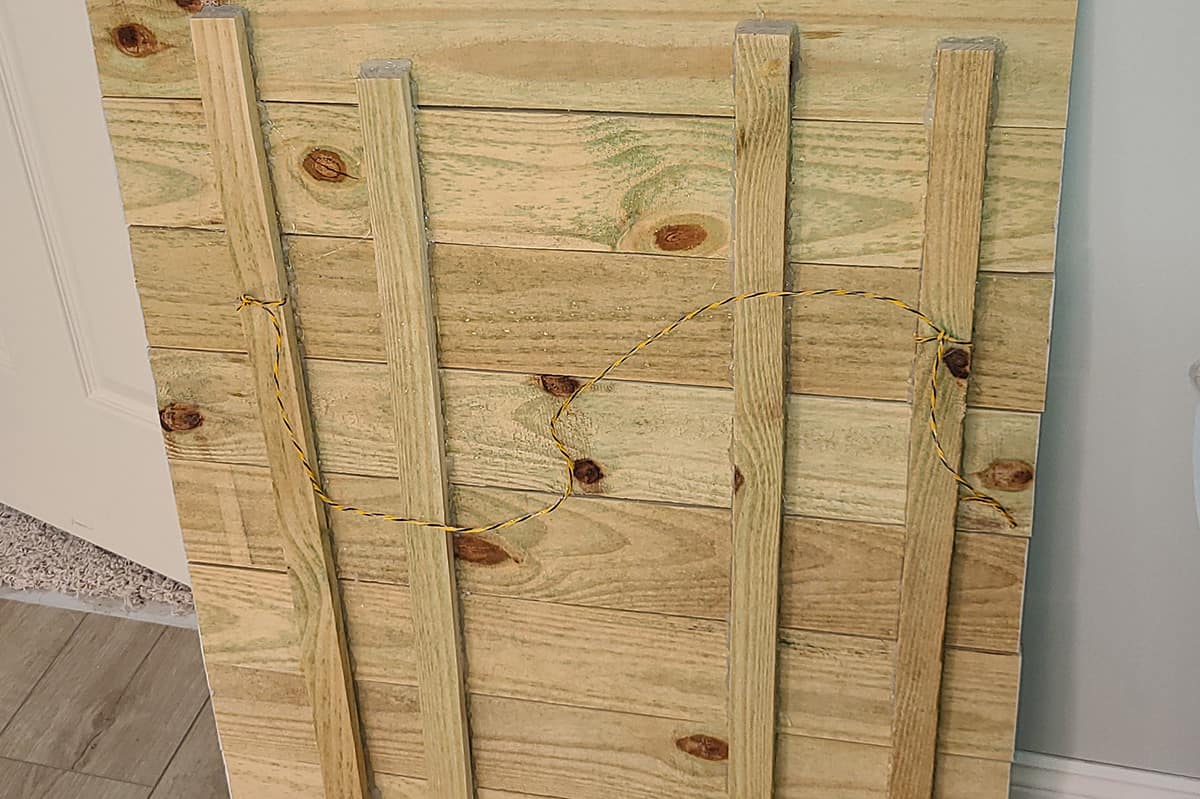
Step 3: Build the frame
The back of this frame is leftover wood slats from the fencing. Because the slats are so thin, rather than screwing them to the boards, I used a TON of wood glue. While screwing or brad nailing would be better, this sign has held together for 7 years of hanging without problem.
Step 4: Paint the background.
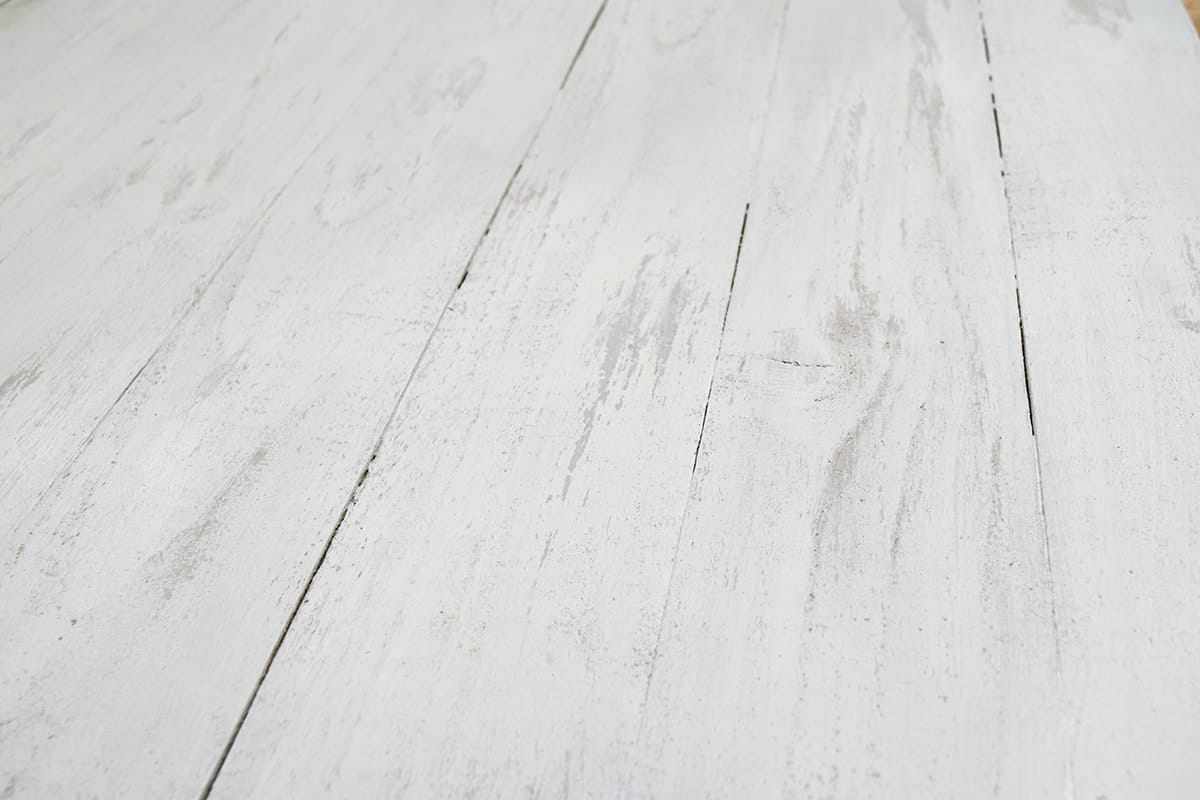
This particular DIY pallet sign has a distressed, rustic touch to it. First, I sanded the rougher surface fairly smooth, but not entirely so it would look like old pallet wood boards.
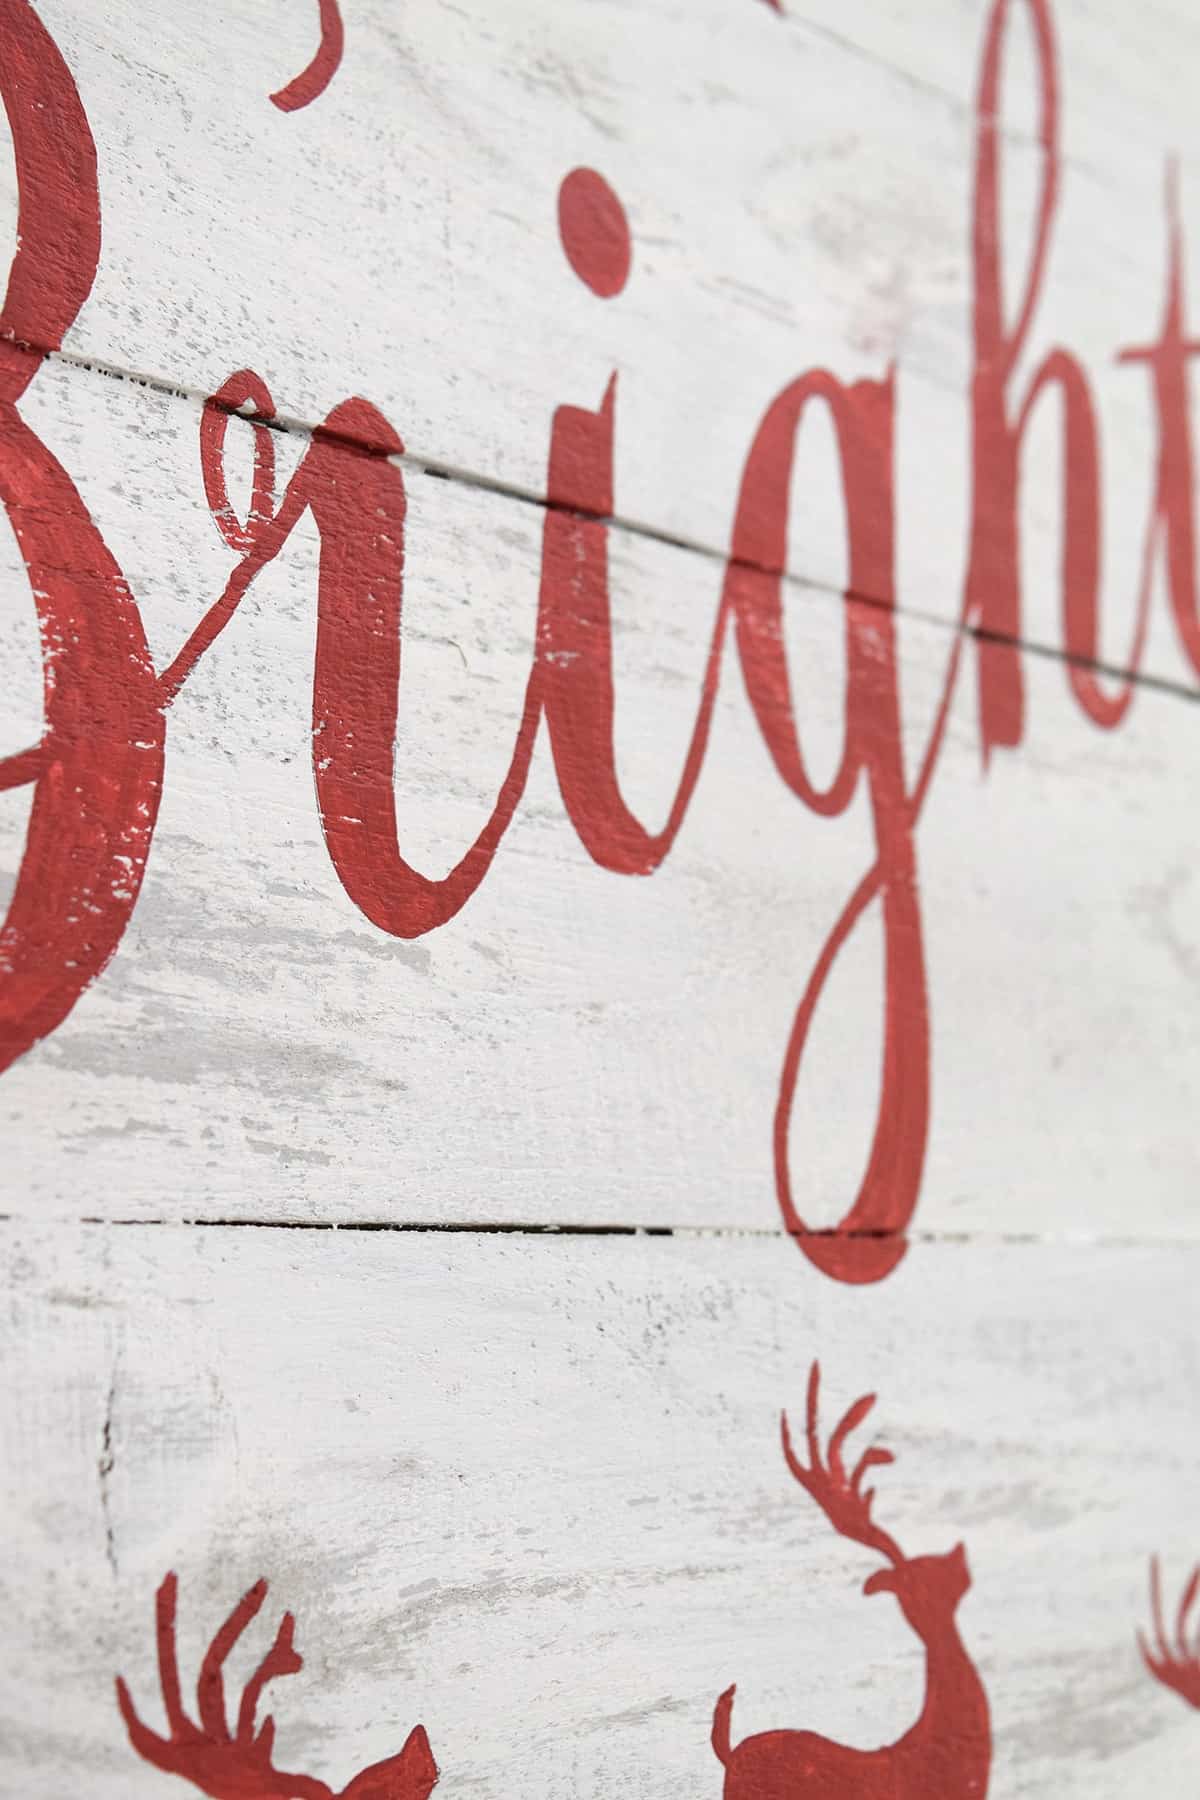
To paint, I used a warm grey chalk paint. I painted with a natural bristle brush and got in all the grooves and sides of the wood. That coat dried for 2 hours.
I brushed a thin coat of the milky white chalk paint over the entire board, but I didn’t worry too much about getting in the grooves. While the white paint is tacky, but not dry, I took #2 steel wool and lightly brushed areas to reveal the grey color underneath and highlight the character of the wood until I was satisfied.
Step 5: Paint the stencil
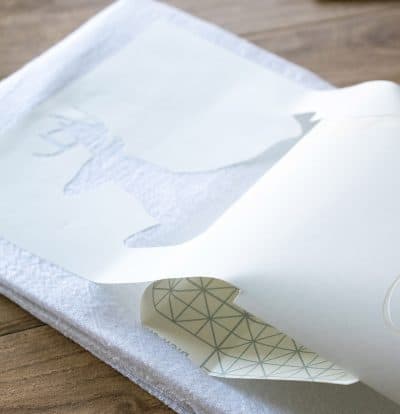
If using a vinyl stencil, there are a few tips to get transferred correctly:
- Remove the part of the stencil you want to paint from the backing paper and toss. Then you are only left with the “negative space”.
- Lay transfer material over the stencil. The design should not stick just yet.
- Peel back the top 2-3 inches of the backing and position the stencil where you want it.
- Working a few inches at a time, carefully peel the backing material down and press the stencil into the board.
- Smooth any bubbles as you go. Remove the transfer material after the stencil is completely on the board.
- You can see better photos of this techniques in our DIY map art tutorial here.
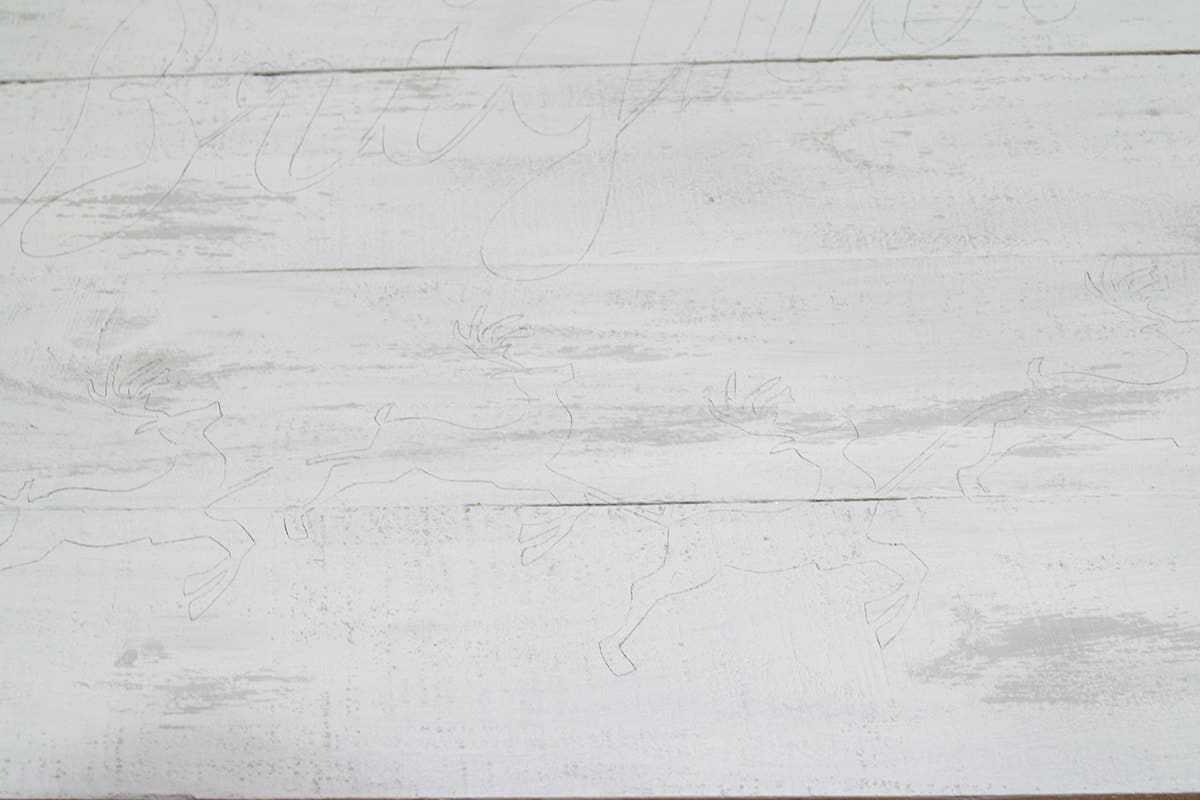
For this particular sign, I wanted a perfectly imperfect hand painted look. Therefore, I cut the stencil in paper and traced the design on beforehand painting with a brush. This makes the lines a little more uneven and the design isn’t perfectly opaque. It suits the distressed style.
How To Hang a DIY Pallet Sign
I drilled holes through the slats on the back and tied a flexible wire around them. This helps it to hang flat.
You can also add two screws to the back of the frame and tied a wire around them. The pallet is quite heavy, so I recommend hanging it on a sturdy screw that is directly in a stud.
Sign Making Tips
- Either gently remove the vinyl while the design is still wet or when it is completely dry, not just tacky. The paint is more likely to pull away when it is tacky.
- If you desire, you can seal the paint with a poly made for painted surfaces that won’t yellow. Fusion Mineral Tough coat is one of my favorites that is guaranteed not to yellow, but I have also used Spray Polyurethane. This one from RustOleum is my favorite.
- Instead of painting the stencil on the background, you can permanently attach the vinyl.
I have several DIY sign tutorials, so you may want to check these out for more ideas:
- How To Make Outdoor Wood Signs
- How To Create DIY wood signs with plywood
- 20 Wall Decorations made from Scrap Wood
- DIY Welcome Sign for the Porch (reversible too!)
Links to Free Files
- Silhouette Cut File (.studio) – a preview won’t load but you can download.
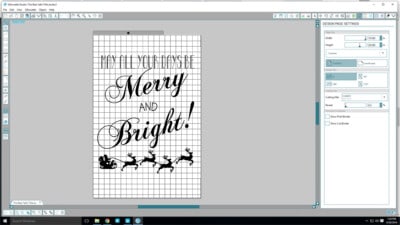
Making a sign is definitely much larger than 12×12. The file includes the original Jpeg and it is traced for your convenience. However, in order to use it, you will have to resize it your desired size and then tile it for cutting. You can tile in the business version of silhouette or here is a great video about how to tile in the Silhouette Design Studio.
2. Merry and Bright Sign (SVG version)
This one you can use with a Cricut, a Silhouette cutting machine, and adobe Illustrator, as well as other design programs.
3. PDF 8×10 Printable with chalkboard background
This file is available to all newsletter subscribers as part of my free printable library! Sign up below to check out all the freebies and join our creative community!
FAQs
To transfer vinyl onto the pallet, first peel off the part of the stencil you want to paint (the negative image). Then lay the transfer material and remove the stencil backing. Lastly, carefully position the image and pressed the top edge onto the pallet wood. Working top to bottom, press the rest of the vinyl onto the image smoothing out any bubbles before moving down.
Yes! I recommend a light sanding to remove any stains or grey wood for the best bond with the paint. Primer may need to be used if the paint calls for it.
For wooden pallet signs, it’s recommended to use acrylic paint or chalk paint, as they adhere well to wood. You can also seal the finished sign with a clear varnish or sealant to protect the paint and enhance its durability.
Wood glue, screwing, or nail pallet boards together. As mentioned earlier, though, mine has lasted over 7 years with just wood glue!
The easiest ways are using vinyl stickers or a stencil for painting. You can make create stencils yourself or order via Etsy.
Unless you are using a paint that specifically does not need a primer on raw wood, then you need to prime. Chalk paint is an example of paint that does not need priming.
To prevent wooden pallets from rotting, store them in a dry, well-ventilated area and keep them off damp or wet surfaces. Additionally, you can treat the wood with a wood preservative or sealant to protect it from moisture and decay.
It’s best to wait a few days and test the wood moisture before painting. Outdoor wood should be 15% or lower on a moisture meter.

Grab our free series "Weekend Home Projects that will Transform Your Life" Sign up below to receive updates including free printables, organization tips, home improvement projects, recipes and more! |
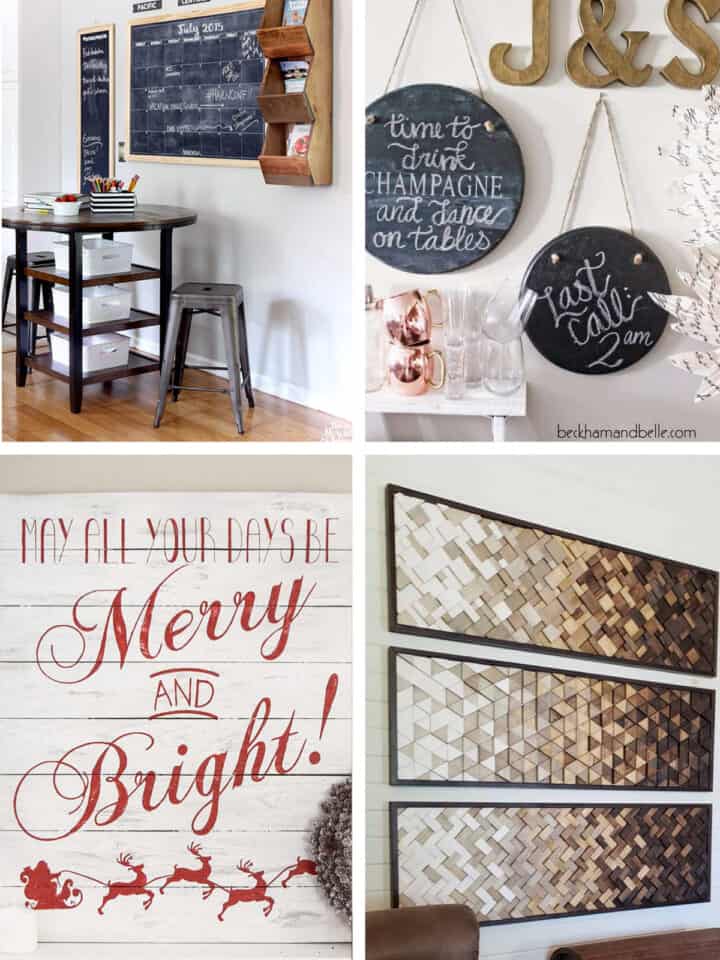
More Stunning Wall DIY Ideas

PS I love seeing your creations! Be sure to take a photo and tag #cravingcreative on Instagram! You can also stay in touch with me through following me on Instagram, Pinterest, and subscribing to the newsletter!
How To Make DIY Pallet Signs
Tools
- Paint Brush
- Cricut
Supplies
For the Sign
- 1 Pallet Wood At least ½ inch thick
- 1 Removeable Vinyl Stencil See notes for ways to make a stencil
- 1 Paint or Stain
- 1 Sealer Optional (see note)
- Wood Glue
Hanging Materials
- 4 Eyelet Screws
- Screws For Wall
- Hanging Wire
Instructions
- Prep your design or stencil. I blew it up to the size of the sign. I highly recommend removable vinyl and transfer paper for vinyl stencils.

- Cut the wood to size. For more intricate shapes, you can use a jigsaw to cut out the template.

- Build the sign. Depending on the thickness of the wood, you can use pocket holes or screw slats to the back of the pallet wood so that each pallet slat is attached. If the pallet wood is too thin, you can generously use wood glue to attach.
- Paint the background. Paint the board with any background color you choose and allow to completely dry.
- Lay the stencil. Remove the part of the stencil you want to paint. Lay transfer material over the stencil. Peel back the top 2-3 inches of the backing and position the stencil onto the boards. Working a few inches at a time, carefully peel the backing material down and press the stencil into the board. Smooth any bubbles as you go. Remove the transfer material after the stencil is completely on the board.

- Paint the stencil. Just before painting, run your finger along all edges to minimize any paint seeping under the stencil. You can use a paint brush or roller over the stencil. Either peel the stencil off when the paint is still wet or completely dry. Do no peel if the paint is tacky or wet underneath the top layer.

- Hang the sign, if desired. I drilled holes through the backing frame and tied wire. but you can also attach hangers.


Notes
- You can draw something free hand, if you're good at that.
- You can also use a projector, like this one, and project the image in your board and trace, then paint.
- Or have an etsy shop (like this one) cut out a design for you with vinyl. Just make sure to ask that the vinyl is removeable without damage if you want to use it as a stencil.
- If you desire, you can seal the paint with a poly made for painted surfaces that won’t yellow. Fusion Mineral Tough coat is one of my favorites that is guaranteed not to yellow, but I have also used Spray Polyurethane. This one from RustOleum is my favorite.
Jenny Wiggins says
I recently started using my Cameo to make large sign stencils. I print off using the tiling feature but I will have to admit I am running into a lot of problems. I would love to get any pointers on how you use your Cameo to print large signs. I currently tape together and trace with graphite paper.
Rachel says
Happy to help! What specific problems are you running into? The biggest problem for me seems to be when certain lines run off the page and you get all these tidbits. For the tiling feature, I usually try to break them up in a way that keeps the fewest lines that run off the tile. For instance, a sign like the Merry and Bright Sign above, I would make long verticle tiles, and not long horizontal tiles. The more intricate the cut, the easier it can be to stretch the material. On this particular sign, I was actually out of vinyl so I printed a paper template first, taped it together and then made the cut version. It was a bit more time but what I loved about it was that I wasn’t staring at an odd shape wondering where I missed a piece! I always seem to loose the negative space pieces like the hole in the ‘e’ or the dots for the ‘i’.
Merianne says
I love this sign! You did an amazing job! Question for you….once you traced your stencil, did you hand paint the red parts? Why couldn’t you have just painted over the stencil then take it off? I’m so new to this so obviously there is a reason, just not sure. I would love a copy of the file if you have it. I have a silhouette so you could just send it in a silhouette file. Thank you so so much!
Rachel says
For this particular project, I designed it in Photoshop at 26×36 inches. Of course, I can’t print sheets that big and my silhouette cameo won’t either. I taped this whole thing together on 8.5×11 sheets basically. So first I printed it and taped all of those together to give myself a proper sized template. Then I did another copy on the silhouette and matched it to the printed template. I have done it before, but splitting up something (like text) larger than a printable area on a silhouette is time-consuming. Rather, I just slid it a bit at a time and made stencil section at a time. This lead to some overlap in areas and I taped the silhouette areas together to match the printed template. That would have been a mess with vinyl or something with a sticky backing and I trusted my painting skills enough to do it without. I hope that makes sense!
Elesa says
Where did you find the cute Santa and Reindeer?
Rachel says
Interestingly, I actually have no idea where I got it from. I didn’t buy the design so I may have made it since the reindeer all look identical. Anyways, I do have the original files from this project. I have a jpeg version and a silhouette cutfile (.studio) version.
Lauren Reinke says
Would you mind too dearly to share the file? I myself have a Silhouette and would love to make this for the upcoming Christmas season 🙂
Rachel says
Hi Lauren! Haha, you caught me just a bit too early. I am working to get this and all my other files as part of an exclusive free download library for newsletter subscribers. I am adding JPEG, PDF, and .studio files- even some that are not on the website. The library should be ready this week or next and I will send an email to all subscribers with the password. I know you will love the sign and I hope you will send me a picture when it’s done!
Joy says
Wow, your so talented, I love it!
Emily says
I love this sign!! I need for my house.
Stephanie says
hey, just wondering what fonts you used? i just love them together!
Rachel says
Thanks, Stephanie! The fonts are Chopin Script and Mayonaise Condensed.
Hillary Seymour says
i may have skipped over it but what two paint colors did you use? trying to find the perfect red is a chore! it seems you’ve done the work for me!
Rachel says
I mixed my own for the most part. You can layer different types of paint for a project like this so long as they dry thoroughly. The grey underneath is basically some latex paint leftover from my son’s grey room mixed with a white chalk paint. Then I layered the white chalk paint after the grey was dry. The red is actually a multi-purpose acrylic craft paint that I had on hand. The color (I am pretty sure since I still have it) is “bright red” and made by Plaid. I got it at Micheal’s craft store. IMHO, bold red is my favorite, but leaning towards the darker muted tones. I hope that helps!
Rebecca says
THIS IS IT!!! This is the project you were talking about!!! I love it. SO much. You did an amazing job and I think the fact that you didn’t stress yourself out over it and try to make it “perfect” made it perfect because I don’t see anything wrong! You did SUCH a great job!!!!!!!! I LOVE LOVE LOVE LOVE IT!
And the colors are perfect too!
OKAY I HAVE TO ALSO MENTION..Your resourcefulness! So many of the materials were things you already had!
Sorry is this too much? I’m just really excited for the gorgeous sign! PERFECT EXECUTION!