Looking to paint some cute coffee mugs? These painted coffee mugs are dishwasher safe and make a cute keepsake or DIY gift. From paint to glitter, learn how to decorate your own coffee mugs with these step-by-step instructions.
Have you seen those DIY coffee cups painted with sharpies on Pinterest? Sorry to be the bearer of bad news, but they aren’t dishwasher safe or permanent at all on surfaces such as ceramic, glass, or even most fabrics (horrible fading).
But don’t despair! I have some great solutions to paint your own mug that will last and be dishwasher safe!
Supplies
- White Ceramic Coffee Mug – The dollar store is great for these.
- Rubbing Alcohol
- Paint – See below for types and where to get them
- Paint Brush
- Q-tips or Paper Towels
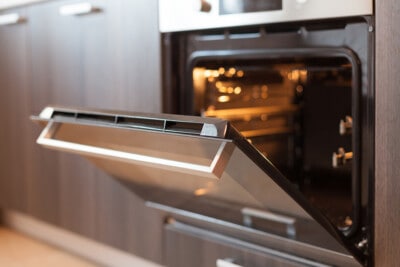
- Oven
- Mod Podge (Optional)
What Kind of Paint to Use for coffee Mugs?
Many times, we paint mugs to personalize them, for gifts, or cherished keepsakes (I heart all the kid painted mugs!). Therefore, we want them to stay so we have to use the right products.
There are a few different paints you can use on glazed ceramic mugs.
- Oil based sharpies
- Acrylic Urethane Enamels that are meant for ceramics.
You can find these at craft stores and those are decent. If you are looking for something with better quality, I recommend the Pebeo Porcelain paints, which come in a variety of colors and have a watercolor style, or these professional paint markers.
If you have doubts, read the label and description. It will usually say, "dishwasher safe" and made for glazed ceramics. Unglazed mugs have different requirements.
Painted Mug Decorating Ideas
There are so many cool things you can paint on mugs!
- Glitter and Mod Podge – Mod Podge makes this dishwasher safe top coating that can be mixed with glitter to use on mugs. Do not bake the mod podge!
- Water Marbling – This is a great tutorial using nail polish, but do not put the nail polish on the rim. To make them dishwasher safe, you will have to seal them as well.
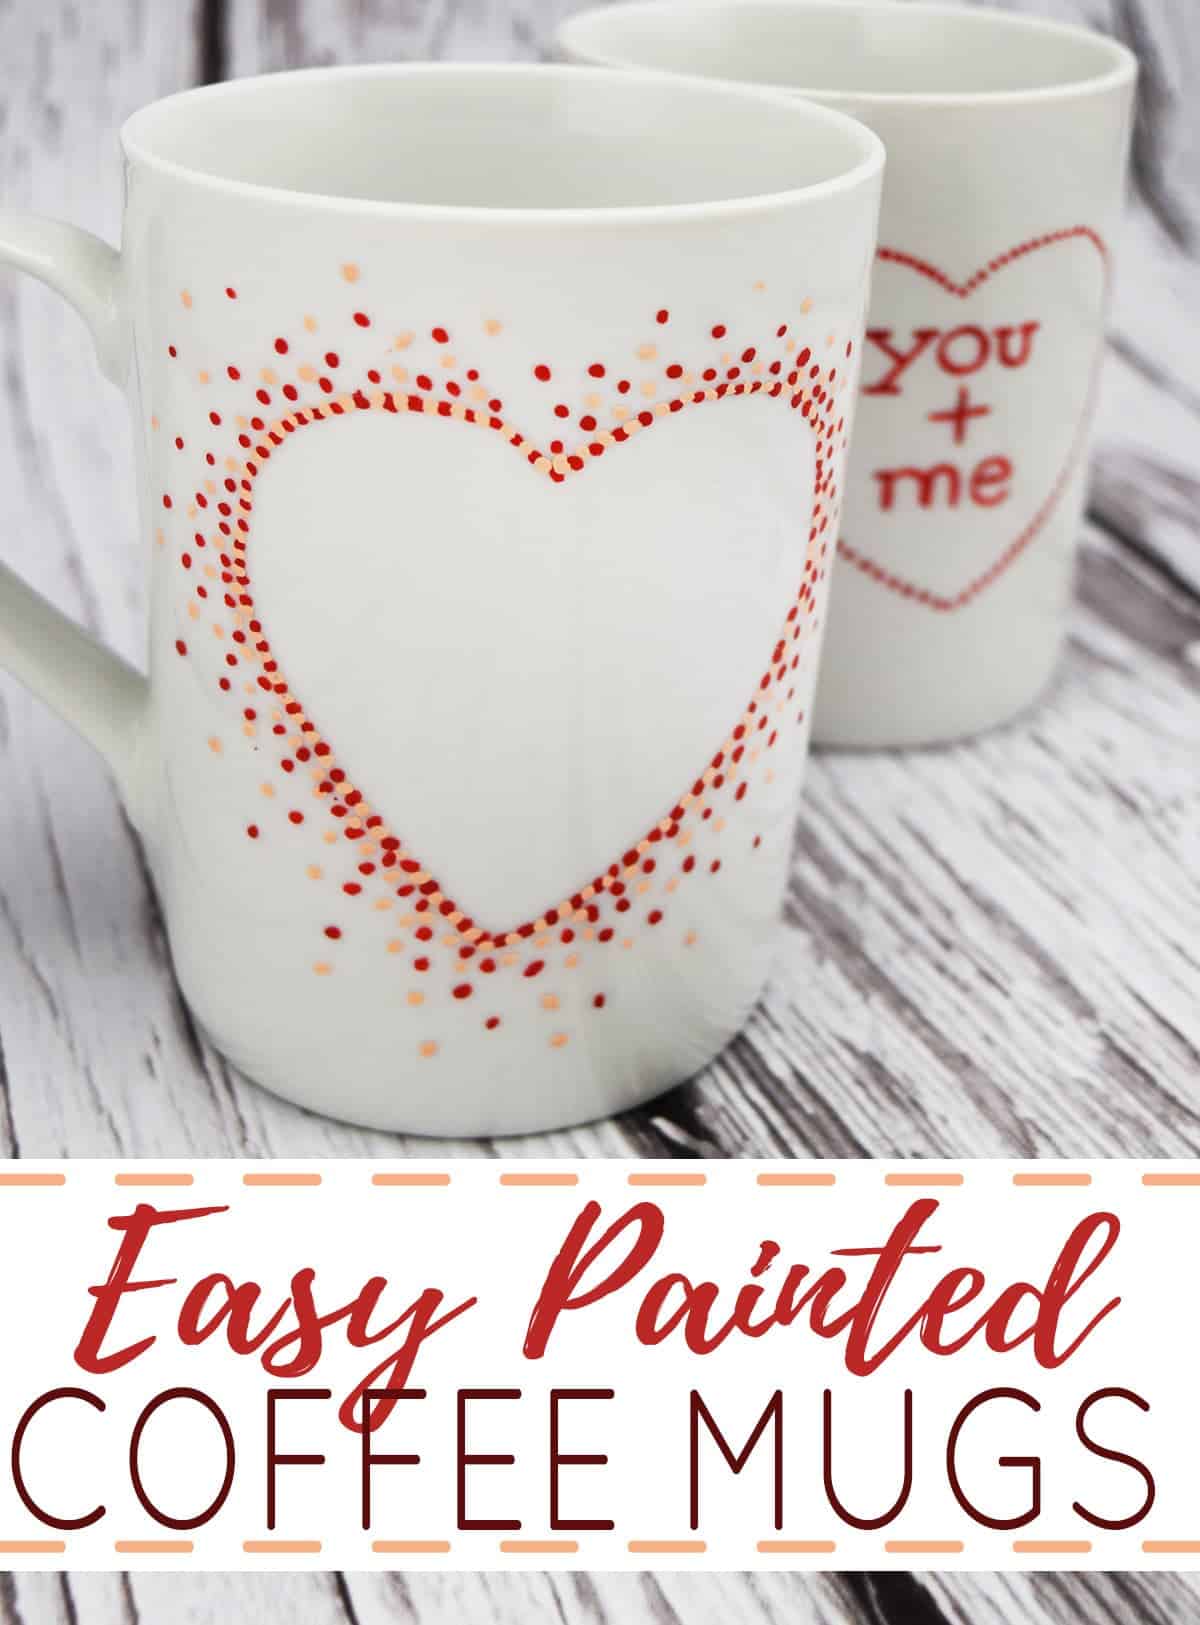
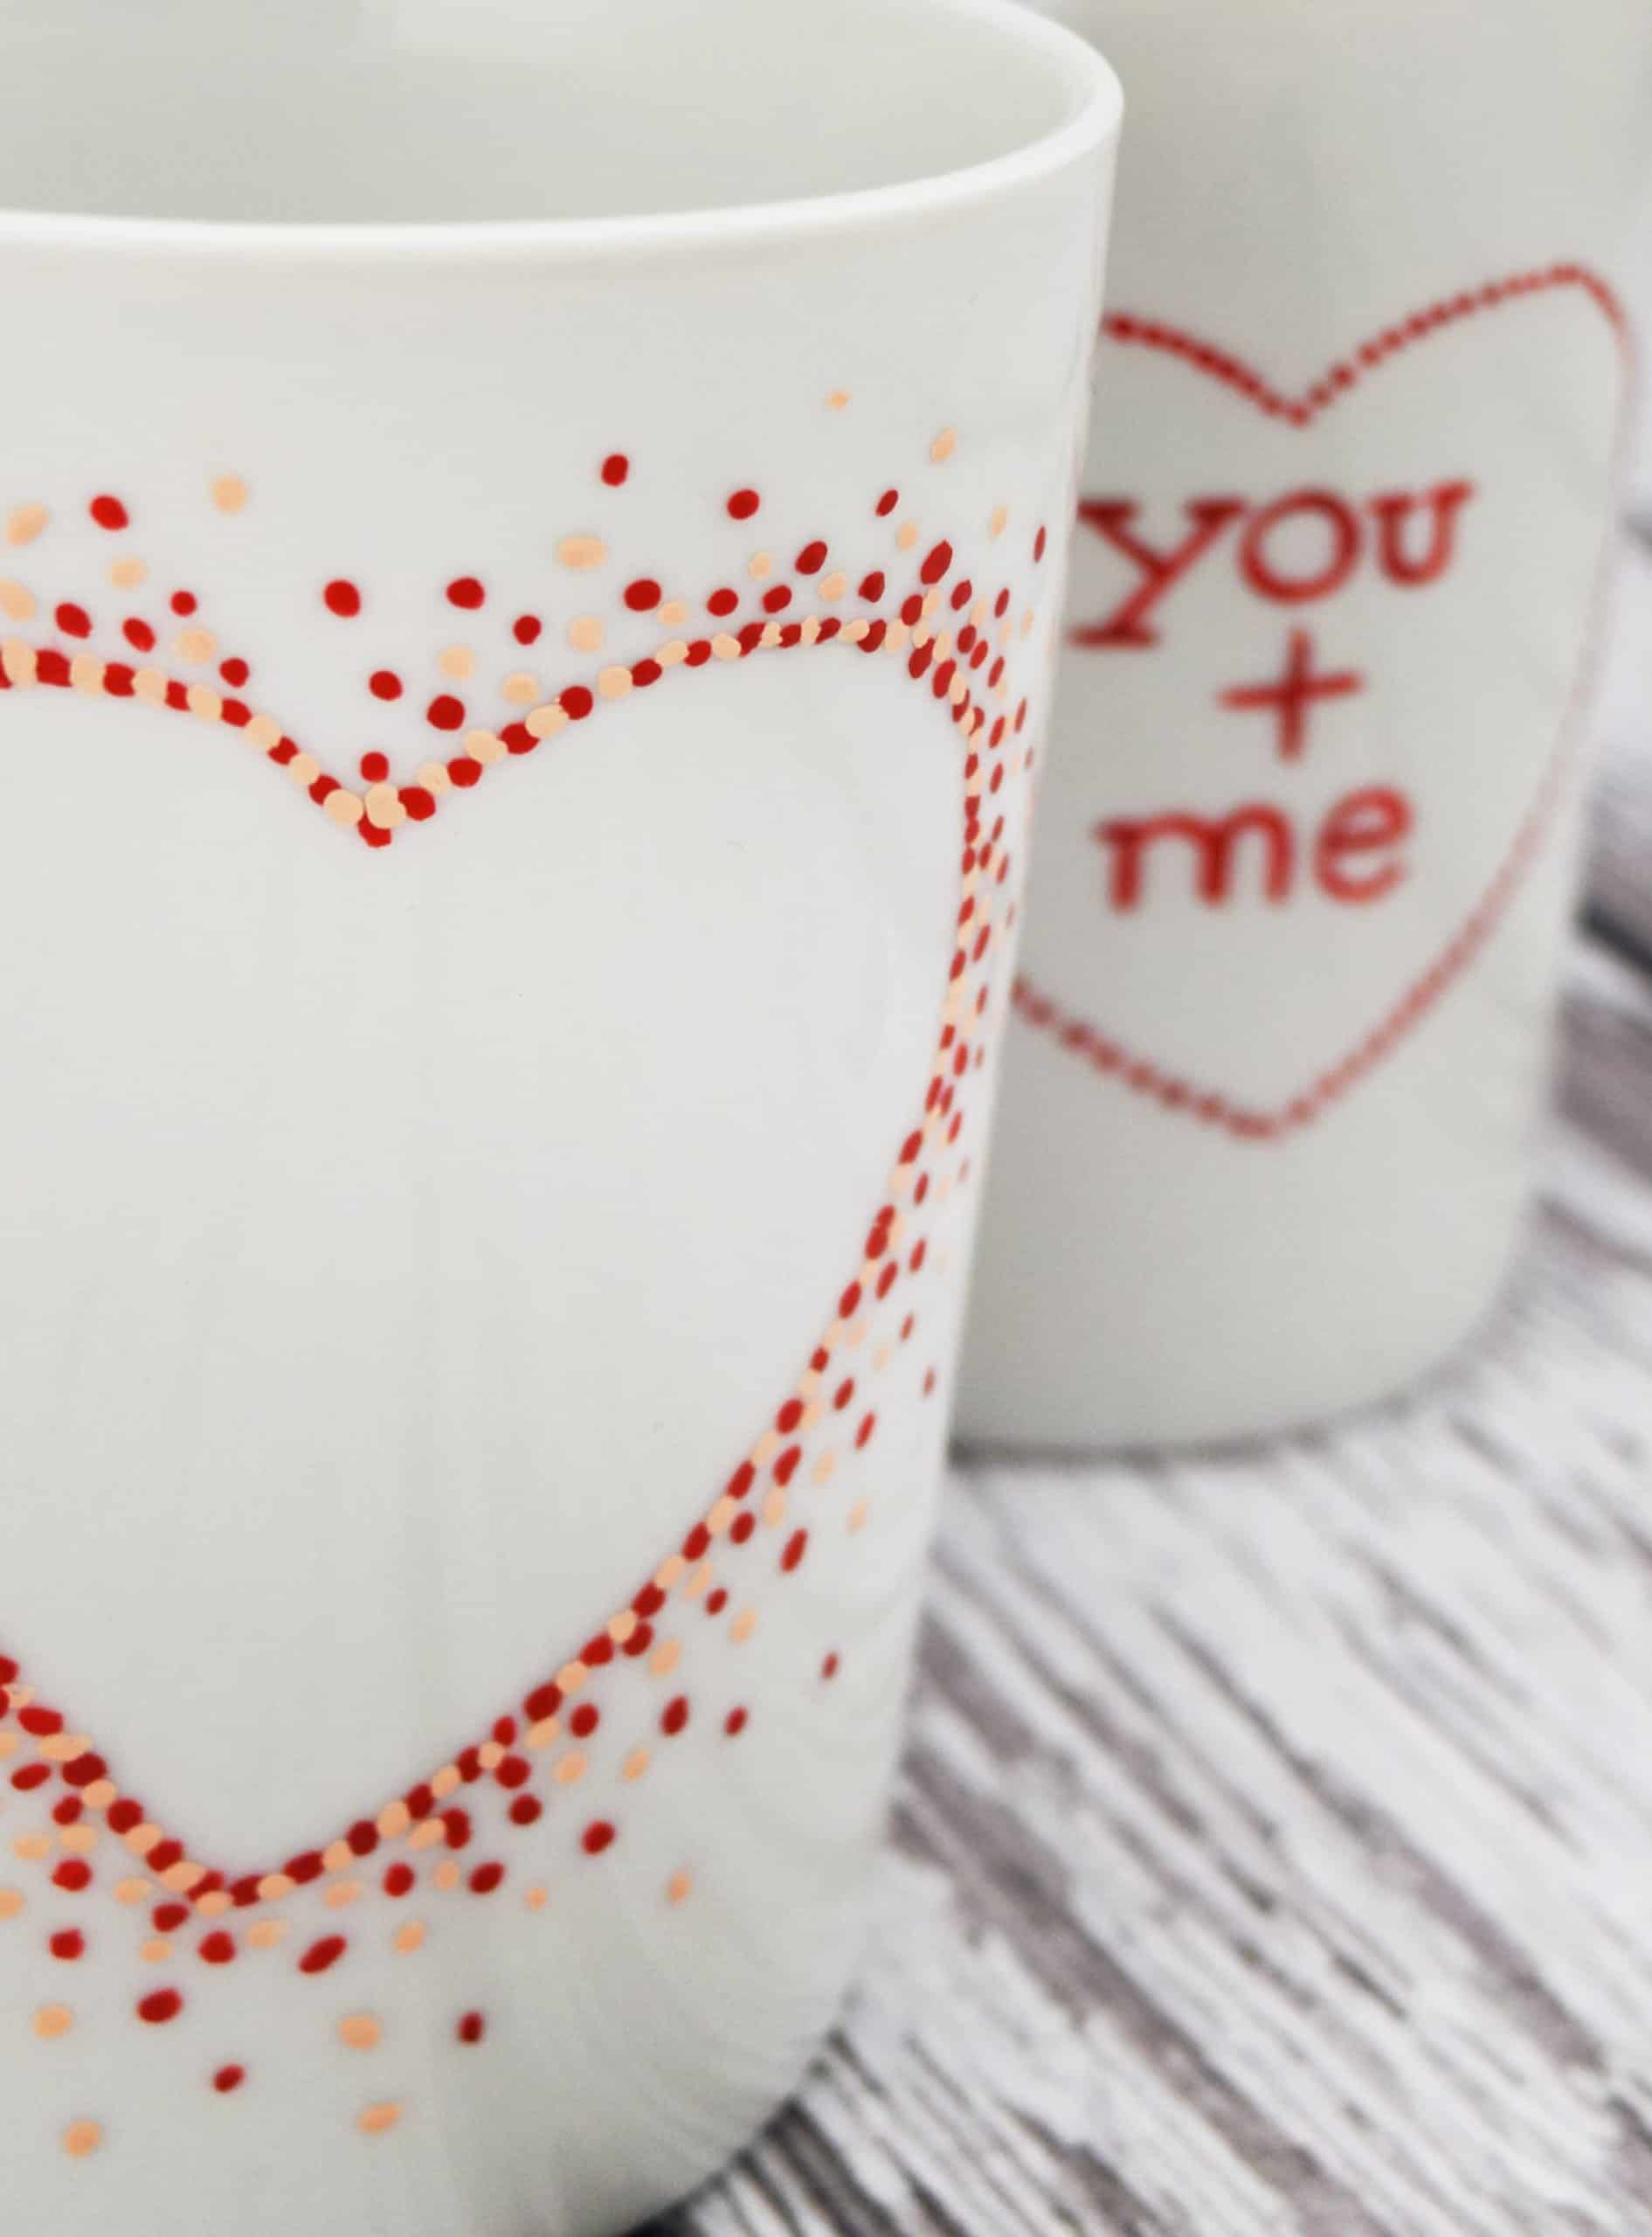
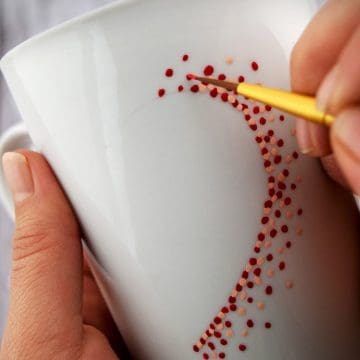
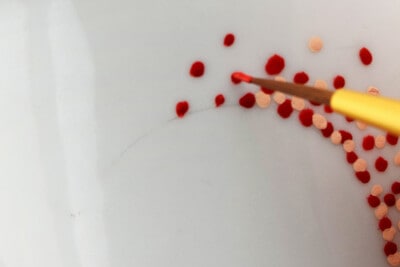
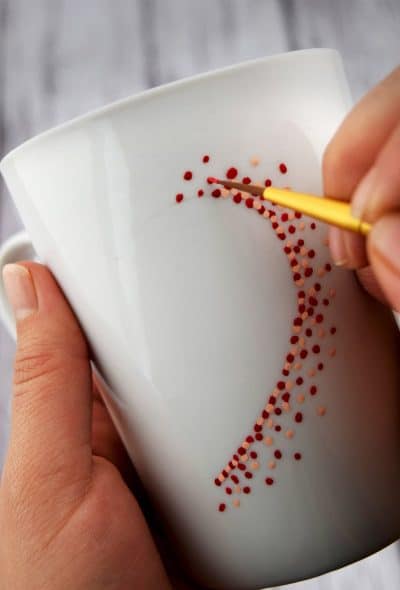
- Stenciling – Use stickers to create a negative to paint around, like a letter or shape. This is similar to how I did the mugs shown today.
- Monogram Design
- Handprints – The cutest kid craft!
- Repeating Patterns – simple brush strokes in different colors, chevron, or something as simple as evenly spaced peaches or trees is one of my favorites.
- Mandala or Zentangle Patterns – these are some of my favorite designs!
Instructions for Coffee Cup Painting
1. Clean the mugs well. Hand wash with a mild dish soap and dry them. Then use some rubbing alcohol and allow to completely dry, around 30 minutes. This is to break down any oils that may be left on the surface.
2. Draw or trace an outline of a shape with a pencil. Pencil wipes off easily but also provides a good guide. You can also use a sticker as a stencil to get the basic shape.

3. Paint your design. Make sure to mix the paint or shake paint pen very well. If you make a mistake, you can rub the paint off with Q-tips. Some paints are easier to remove if you dip the Q-tip in rubbing alcohol.
4. Let paint dry for 1 hour to make sure all layers of paint have dried.
5. To cure the paint and make it top-shelf dishwasher safe, you can use 1 of 2 methods:
Bake Method: Place the mug in a cool oven. Set oven temperature to 350ºF. Once temperature has reached 350ºF, start timing for 30 minutes. After 30 minutes, turn the oven off. Glass must heat gradually with the oven to avoid breakage. Do not place glass or coffee cups in a hot oven. Let the cups cool completely in the oven. Do not use for 72 hours.
Air Dry Method: Air dry project for 21 days before use.
Hope you get to make your sweetheart a painted coffee mug! I think I am going to show these babies off with breakfast in bed or maybe just a quiet coffee in the morning before the little one wakes up. Whatever you do, I am sure it will be lovely.
Expert Tips
- I used an old technique from art class called stippling. Stippling is basically creating any shape or object out of drawing only dots.
- You can wipe off small oopsies with a Q-tip or a Q-tip dipped in rubbing alcohol if you use oil-based paint pens. You will have to let it dry completely again to paint over that area.
- The mugs must cool in the oven, so do this project on a day where you won’t need your oven for several hours.
- While these will hold up great in the top rack of the dishwasher, it’s still best to protect them from scratches and dings. Don’t scrub or use abrasive sponges.
- If you use a paint or medium you aren’t totally sure of, you can try sealing it with dishwasher safe mod podge. However, you will have to allow it to air dry or wait until after baking and cooling.
More Easy Holiday Crafts
- How to Fold a Felt Bunny
- ST Patrick’s Day Craft Ideas
- Stamped Transfer Candles
- Our List of Fun Family Activities
- 20 Free Printable Valentine Cards for Kids
FAQs
Acrylic enamel paint is suitable for most ceramic mugs. However, check the label before purchasing because some aren’t suitable. After you paint your mug and allow it to dry, you can use a clear sealant to add shine and prevent the acrylic paint from cracking.
Bake your mug to cure the paint. Place them in a cold oven, then turn the oven on to 350 degrees and let it come to heat. Once preheated, set a timer for 30 minutes and let the mugs bake. Turn the oven off but do not remove the mugs. Instead, let them completely cool in the oven. You can open the door after a few minutes.
Regular sharpie markers will wash off, but there are oil-based Sharpies that last much better and are dishwasher safe.

Grab our free series "Weekend Home Projects that will Transform Your Life" Sign up below to receive updates including free printables, organization tips, home improvement projects, recipes and more! |
More Valentine’s Day Crafts

PS I love seeing your creations! Be sure to take a photo and tag #cravingcreative on Instagram! You can also stay in touch with me through following me on Instagram, Pinterest, and subscribing to the newsletter!
How To Paint Coffee Mugs
Tools
- Paintbrush
- Oven
Supplies
- White Ceramic Coffee Mug
- Paint *See note for types*
- Rubbing Alcohol
- Q-tips to clean mistakes
- Dishwasher Safe Mod Podge Optional
Instructions
- Clean the mugs well. Wash and dry them. then use some rubbing alcohol and allow to completely dry, maybe 30 minutes. This is to break down any oils that may be left on the surface.

- Draw or trace outline of a shape with a pencil. Pencil wipes off easily but also provides a good guide. You can also use a sticker as a stencil to get the basic shape.

- Paint your design. Make sure to mix the paint or paint pen very well. If you make a mistake, you can rub the paint off with q-tips. Some paints are easier to remove if you dip the q-tip in rubbing alcohol.

- Let paint dry for 1 hour at least to make sure all layers of paint have dried.

- Bake Method: Place the mug in a cool oven. Set oven temperature to 350ºF. Once temperature has reached 350ºF, start timing for 30 minutes. After 30 minutes, turn the oven off. Glass must heat gradually with the oven to avoid breakage. Do not place glass in a hot oven. Let glass cool completely in oven. Do not use for 72 hours.


Notes
-
There are a few different paints you can use on glazed ceramic mugs.
- Oil based sharpies
- Acrylic Urethane Enamels that are meant for ceramics.
- You can wipe off small oopsies with a q-tip or a q-tip dipped in rubbing alcohol if you use oil-based paint pens. You will have to let it dry completely again to paint over that area.
- The mugs must cool in the oven, so do this project on a day where you won’t need your oven for several hours.
- While these will hold up great in the top rack of the dishwasher, it’s still best to protect them from scratches and dings. Don’t scrub or use abrasive sponges.
- If you use a paint or medium you aren’t totally sure of, you can try sealing it with dishwasher safe mod podge. However, you will have to allow it to air dry or wait until after baking and cooling.
Haylee says
Would I put the mod podge on after baking and cooling or before to help seal?
Rachel says
After baking and cooling. Mod Podge sometimes turns yellow when exposed to heat.
Claudine says
Would ‘cooking’ the painted mug at a higher temperature make it dishwasher safe? I have a kiln for glass beads, to anneal them I program 513 degrees Celsius, if I want to slump the glass I heat to 800 degrees C, have tried slumping glass on a bought ceramic plate the plate didn’t break but it was blue and became brownish.
Rachel says
I can’t say as I haven’t much used kilns since art class years ago. True story – my extremely detailed human heart model exploded in the kiln and I was literally and metaphorically heartbroken, haha.So, I wouldn’t trust my advice with kilns or pottery, but hopefully someone else has experimented.
Jennifer says
Can gloss enamel paint be used to make a child’s handprint on a coffee mug? Is it safe to paint their hands?
Rachel says
I can’t speak to the safety because brands vary so much, but it should work well if you use a paint made for ceramics.
Jordyn Robinson says
How many layers of modge podge do you recommend using?
Rachel says
Probably 2 coats would do the trick.
Niki says
Hi there, thank you for this great tutorial. Do you have any experience with the color changing in the oven? I used oil-based paint markers on a white ceramic mug. After the oven, my bright yellow had turned into an icky dark mustard. Thanks again!
Rachel says
I generally use ceramic paints myself, so I haven’t personally had that happen. I tested several brands though when I originally wrote this tutorial and can’t remember that happening, at least not darkening that much. However, I don’t doubt that it might happen with pastel or very light colors, especially if the markers are old or oxidized in some way.
Crista says
Where the instructions show: “Let glass cool completely in oven. Do not use for 72 hours.” Does this mean do not use the mug for 72 hours or do not use the oven? I had seen another post that said not to use an oven you use for food but maybe it was because of a specific product.
Rachel says
I mean to say to not use the mug. Even if you used a product that had some outgassing (released volatile chemicals into the air, which is common in paints), the open oven door will allow it to escape and using it should be fine. For the mug, you want the paint to cool and harden as much as possible before use or washing.
Toni says
I know it’s been a few years since this blog post but I’m hoping you might can help me. I’m looking at buying a ceramic mug and painting the outside of it as a gift. The mug is a surprise mug with a little ceramic figurine inside it and the seller states that the mug is not dishwasher or microwave safe. Do you think this mug would survive being cured in an oven or should I just air-dry it, seal it and hope for the best?
Rachel says
I can’t speak to the use instructions of other products, but I am a little surprised since ceramic has to be fired in a kiln at least 1800 degrees. Maybe there is an adhesive for the figurine or it’s a stress problem with the dishwasher. I would ask the seller definitely, but the air-dry method works great. I pay a lot of attention to the cure times for all paints that I use, whether for home remodeling or crafts. The oven method doesn’t necessarily make the paint any harder or more durable on it’s own. Your sweet gift sounds awesome and now I want one of these adorable mugs!
Toni says
Okay, thank you so much! I feel more confident about the air dry now knowing that it’s just as effective as the bake method!
Sarah says
Hello Friends!
Thank you for this great tutorial! I haven’t been able to find something as well layout as this.
I have a few questions that I cant seem to find the answers to:
*Can do this same process with glasses (like drinking glasses)?
*For ceramic, does it matter if the purchased white ceramic has a shinny glaze on it? Will this still work?
*What kind of paint is FolkArt? Can I used another brand of the same type of paint?
*Can I put the paint on the inside of a mug or on a dish and still have it be safe to drink or eat from (& will the heat break down the paint)?
Thank you again for a easy to understand tutorial!
Happy Painting!
Rachel says
Hi Sarah! Thank you for the nice compliment. Yes, you can do this with drinking glasses and ceramic with a shiny glaze on it. Since I did this tutorial in February, I have used the mugs occasionally although we have lots of mugs so I wouldn’t say they are used frequently but they have held up pretty well. I did scrub a couple of the dots off with a scratcher pad. That was definitely user error, haha.
FolkArt is a line of craft paint from a company called Plaid and I know that it is sold in Micheal’s Craft Stores. It is just a brand that I used since I already had it on hand. Paint can be finicky so I always list the products I used in my tutorials. You can use another brand but you will need an Enamel paint and it should say “for use on ceramic or glass”. Here is some pretty good information about glass painting: https://www.plaidonline.com/glass-painting/dept/home.htm (I am not paid or anything by plaid. I am just going off what I used). The FAQs on that site do state that although the paint itself is non-toxic, it should not come into direct contact with food. And lastly, enamel paint is generally the type of paint that is generally more durable and resitant to heat. However, I would always check a particular brand as sometimes Enamel paint can also be used to describe any glossy, hard paint. Hope that answers your questions and feel free to contact again if you have more. I will do my best! Good luck and let me know how it turns out!
Bonnie @ The Pin Junkie says
Love these painted mugs! Thanks for sharing at The Pin Junkie! They’re part of today’s Valentine craft roundup!
Christie says
These are so perfect for Valentine’s Day! I love them! Thanks so much for stopping by and linking up at Totally Terrific Tuesday!
candace says
I always wondered about the Sharpies and the dishwasher. Thanks for sharing this method! Thanks for linking up with the Creative Spark Link Party!
Glenna @ My Paper Craze says
I love the stippling technique you used on your mugs! It adds so much more interest to the design. Thanks for sharing with Creative Spark Link Party. I hope you can join us again this week.
Glenna @ My Paper Craze
Jennifer Dawn says
These turned out so cute! I’m wanting to give it a try now. Just wanted to let you know that I’m featuring these at our weekly link party! http://www.thelifeofjenniferdawn.com/2015/01/a-little-bird-told-me-link-party-125.html