The ultimate guide to enjoying delicious cold brew coffee at home. Includes how-to methods, the best ratio to make a perfect cup, and helpful money-saving tips.
The heat wave of the summer has been blazing. I don’t even want to get in the car to drive to our local coffee shop for my favorite iced latte kind of hot. So, I’ve been mastering my coffee techniques. And I’m officially a convert!
Nothing is better than a decadent cup of coffee with a delicious breakfast treat like Overnight Oats, Blueberry Sour Cream Cake, or Bailey’s Blonde Cake. Back to the coffee.
What is cold brew coffee?
It is exactly what it sounds like: coffee that is brewed with no heat, typically in the refrigerator or on counter overnight. It’s perfect for iced lattes because the ice won’t melt and ruin your carefully prepared drink.
It has many great advantages:
- No waiting for the pot to brew in the morning
- Less acidic and smoother than drip brewed coffee
- Easy to make
- Way more affordable than coffee shop options
- Easily heated up if you're in the mood for hot coffee
- Although whole bean is highly recommended, any type of coffee can be substituted
- Regular coffee only tastes fresh the day it's made, whereas cold brew stays fresh for 5-7 days when refrigerated.
The real genius? Prepare it one evening, then pour your coffee from the fridge every morning. No boiling water. No watching the coffee maker impatiently drip the magic bean juice, where each minute seems like eternity.
This is a total game changer for someone who’s 100% not a morning person! Night owls, this is the life hack we’ve been waiting for.
Cold Brew vs Iced Coffee
Iced coffee is simply brewed coffee that has been cooled, and then poured over ice. While you can put hot brewed coffee in the fridge to make it cold, it’s not the same. Cold brew is slowly steeped in cold water, which results in a smoother and less acidic cup of joe.
What You Will Need
These supplies are mostly optional. There are methods and work-arounds if you don’t have something on hand, this is a DIY page after all! Think of this as a convenient suggestion list to get started:
- Whole Beans ground coarse is preferred. You can use most pre-ground if you have a strainer, although it isn’t quite as tasty and fresh. Pre-ground will require less coffee and less time since it’s finely ground.
- Coffee Grinder – choose one with a coarse ground ability
- French Press or Pitcher large enough for 34 oz or 4 cups of water. We use this one and LOVE it!
- Strainer – Coffee filters, fine cheesecloth, or a mesh filter (A french press comes with one)
- Additives: Milk, creamer, sugar, etc.
- Time – I usually make this recipe at night and make enough for a few days worth. However, steeped coffee can be stored after straining for up to a week.
How To Make Cold Brew Coffee
FAQ and alternative methods included below.
Method 1: French Press
- Coarsely Grind Beans in a coffee grinder*. The beans should be much more coarse than typical coffee grinds. (See photo under FAQ)
- Add the grounds to a French press and add water. I have this French press which has enough room for 34 oz of water. Larger version like this is great for when entertaining.
- Use a spoon to press the beans down into the water. Allow to steep at room temperature for about 8-12 hours. If you can’t get back to it for much longer, (like 18 -24 hours), no worries! Pop it in the fridge to slow down the brewing process.
- Press the handle down on the French press to filter out the coffee grinds. Pour coffee over ice or heat up to enjoy! For storage, pour coffee into a carafe, and refrigerate for up to a week.
*If you don’t have a coffee grinder, a food processor or a blender can be substituted in a pinch.
*I’ve also successfully steeped pre-ground coffee. With pre-ground coffee, use about 2-3 tablespoon less coffee by volume.

Method 2: Pitcher or Jar
- Coarsely grind whole beans in a coffee grinder. The beans should be much more coarse than typical coffee grinds. See FAQ below for a photo reference.
- Add coarsely ground beans to a mason jar, carafe, or pitcher and then add cold or room temperature water. Use a spoon to press the beans down into the water. Allow to steep at room temperature for about 8-12 hours. If you know you won't get to the coffee for more like 18-24 hours – no worries, pop it in the fridge to slow down the brewing process.
- Use coffee filters or a mesh coffee filter out strain out the coffee grounds, then pour over ice or heat up to enjoy. For storage, pour coffee into a carafe, and refrigerate for up to a week.
Method 3: Convenience packs
With its popularity these days, you can purchase pre-made convenience packs like these at your local grocery store. These packs are pre-measured and include a teabag like filter.
- Pop a convenience pack in a jar or 8oz glass and pour water over it.
- Steep in the fridge overnight for about 8-12 hours.
- These pre-made packs come from many brands including Dunkin, Starbucks, and Keurig. These are usually only single serve options, meant for an 8oz cup.
Cold Brew Coffee Ratio
Making the perfect cup requires a bit of experimentation with your likes and preferences. Coffee steeped at room temperature requires at least twice the amount of coffee grinds as in typical drip brew.
Whole beans are best measured by weight rather than volume. I generally recommend beginner’s start with ¾ cup of whole beans (2.25 ounces) and 4 cups of water and to brew at room temperature. This ratio isn’t very strong, so increase it if you prefer a bolder blend.
- Coffee to Pour over Ice: The most common ratio is 1 ounce of beans per 1 cup of water. For four cups water, that’s approximately 1 cup of beans. If you prefer a stronger flavor, increase to a heaping cup of coffee beans. I personally cold brew ¾ cup of dark roast at room temperature for around 10 hours.
- Coffee to Reheat and Enjoy Hot: Prepare 1 cup of water per 1 ounce of beans. This ratio generally produces coffee stronger than regular hot coffee. Add ¼-1/2 cup of hot water, then heat to enjoy.
- Concentrate for Iced Lattes: use 3 ounces (1 cup) whole beans per 2.5 cups of water.
Frequently Asked Questions
At room temperature, it takes 8-12 hours. I usually leave mine for about 8-10 hours, but the brewing process is slow enough that an hour or 2 won’t make much difference. If you won't get to it until 24 hours, slow down the brewing process by leaving it in the refrigerator. If you'd like to enjoy it sooner, use hot (not boiling) water, and leave it for 3-6 hours.
Yes, it is stronger than regular coffee when using 1oz to 1 cup of water ratio, but you can adjust to your preference. It’s designed to be poured over ice without diluting the flavor as the ice melts. When you add milk and creamer for a latte, the coffee flavor is still smooth and apparent.
Yes, it is great heated! It’s much smoother in flavor than traditional drip brewing. Since it tends to be a bit stronger, the ratio is between 2-4 parts cold coffee to 1 part hot water (1 cup coffee with ½ cup water added) depending on desired strength.
The great news is that any coffee you like is great! Blond, medium roast, and dark roast all work well. For lattes, I use a medium roast but a good quality dark roast gives a unique flavor. Whole beans are recommended to be freshly ground.
Coffee steeped at room temperature works best with coarsely ground coffee that is freshly ground. Finely ground coffee is more difficult to strain and you may get grounds in your coffee. Also, a smaller grind will release more coffee extract/flavor faster because the surface area exposure is greater. This can lead to a stronger/more bitter taste.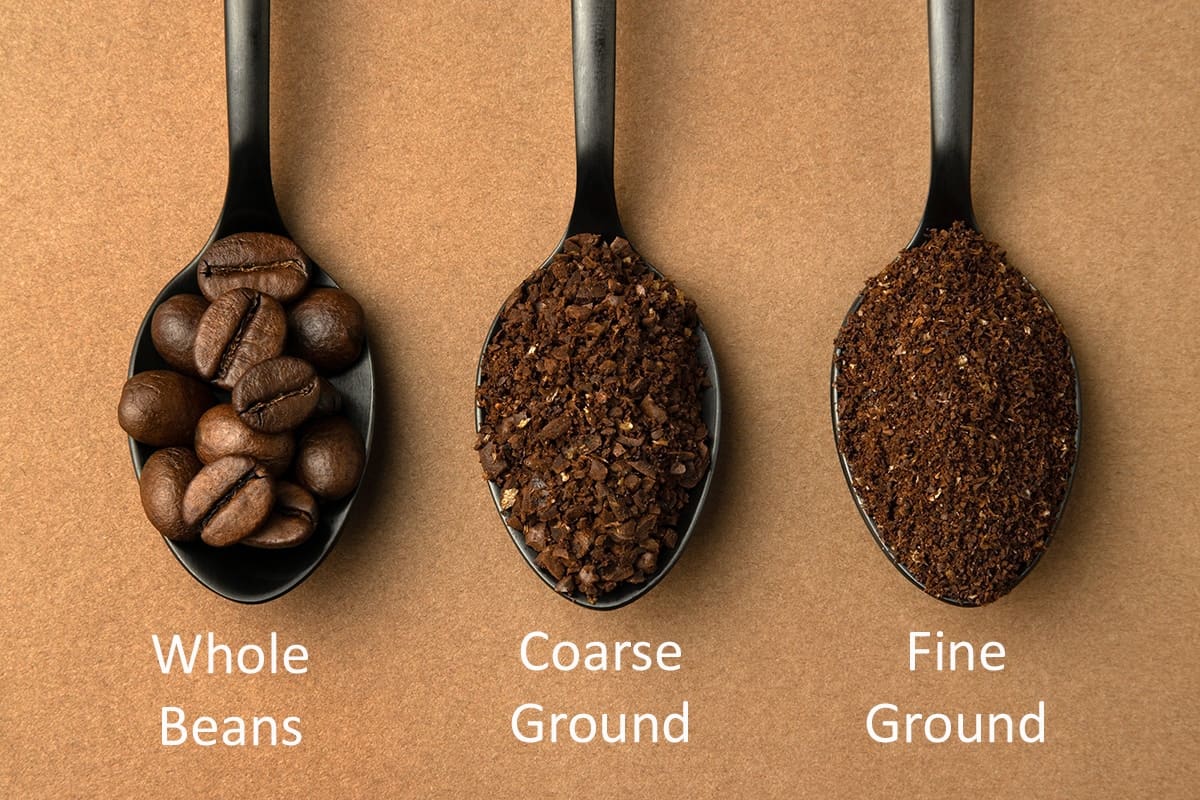
In my area, whole coffee beans don’t have the selection that pre-ground offers. I have experimented with using pre-ground beans, and found that while it isn't ideal, it does work.
There are two things to watch out for if using pre-ground coffee. The first is that since it isn’t coarsely ground, you will need a mesh sieve or coffee filter to strain it (not cheesecloth). My own French press maker strains pre-ground coffee without leaving any grounds left behind. Also, because you are using a finer ground, less beans are needed. I usually use ¾ cup whole beans or about ½ cup of pre-ground plus 1 Tbsp.
You can adjust both the amount of beans, the grind level, and the brew time to suit your liking. Because this recipe takes so many beans already ($$), I recommend adjusting the time or grind level if you only want a little stronger. There are limitations as you don’t want to over extract the beans either. If you like a weaker or stronger flavor, alter the bean level.
This is completely up to your preferences, but I can give you an example of where to start and you can adjust to your preferences.
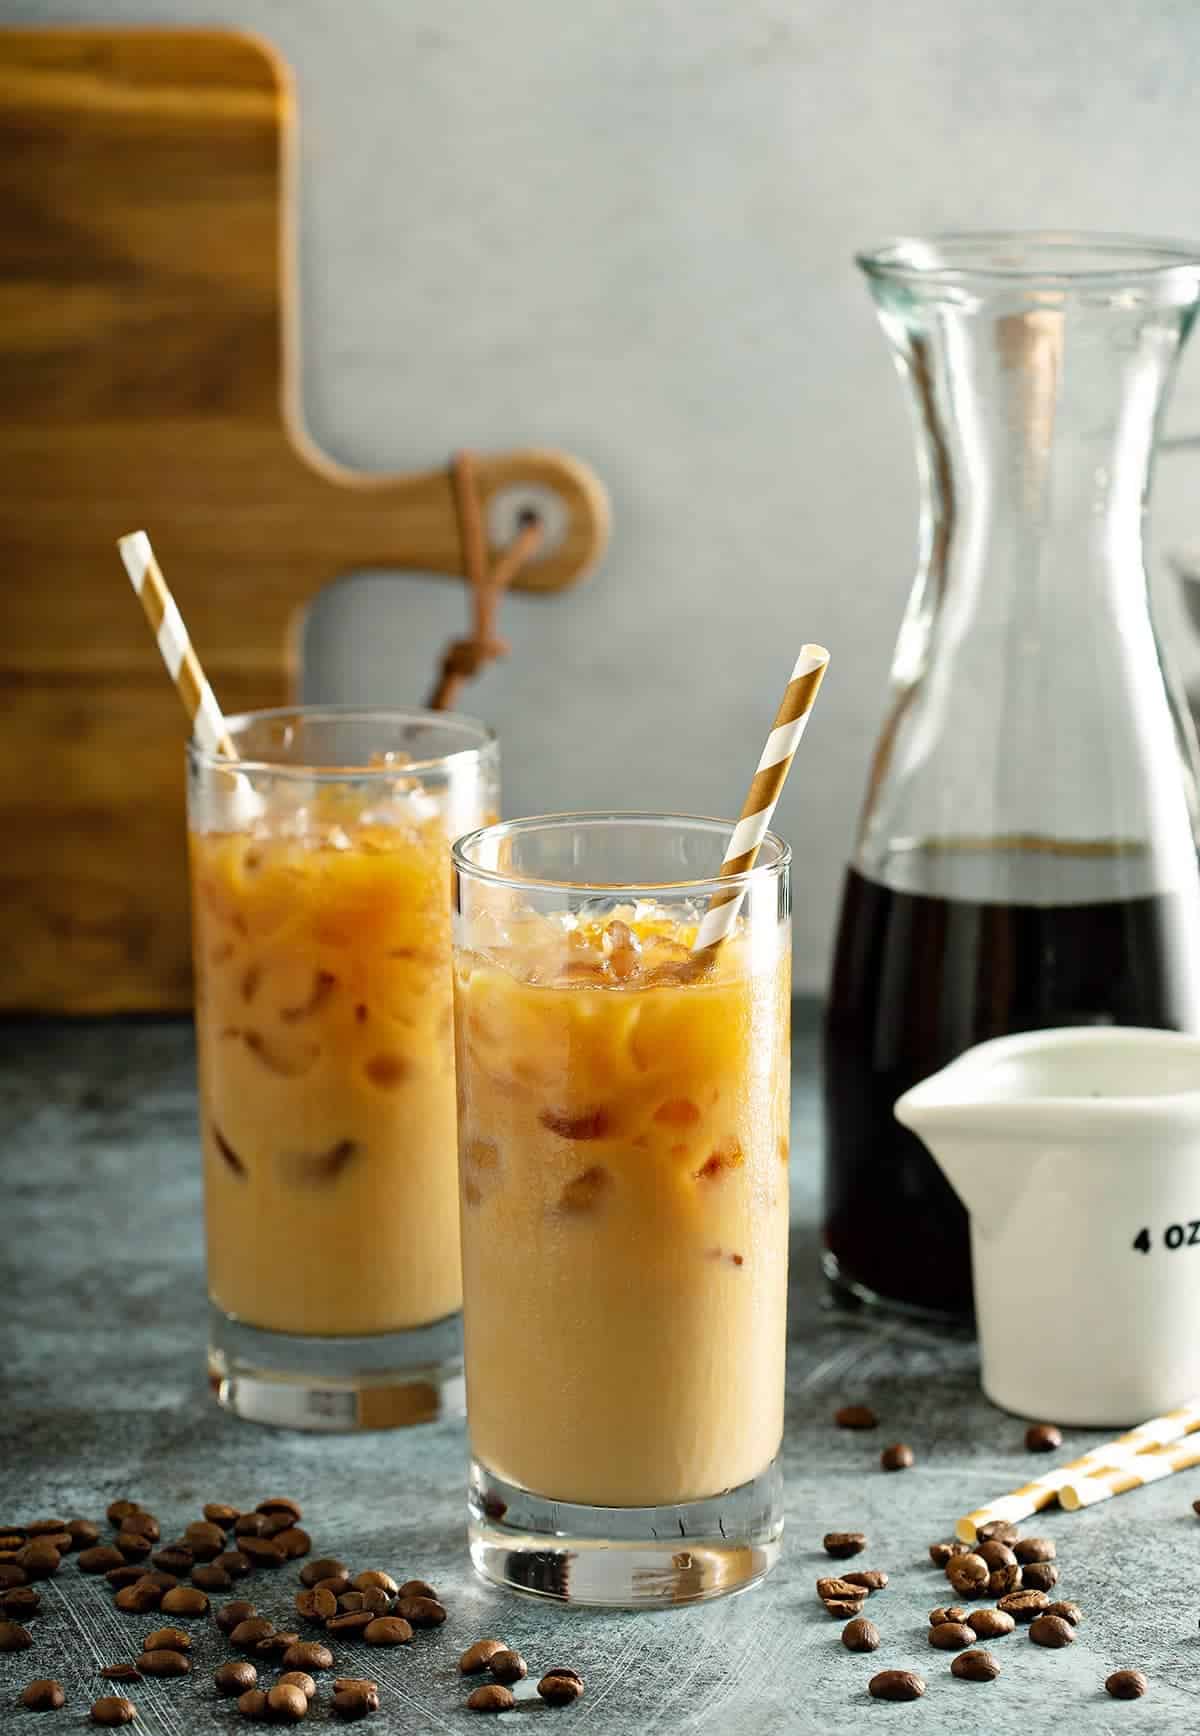
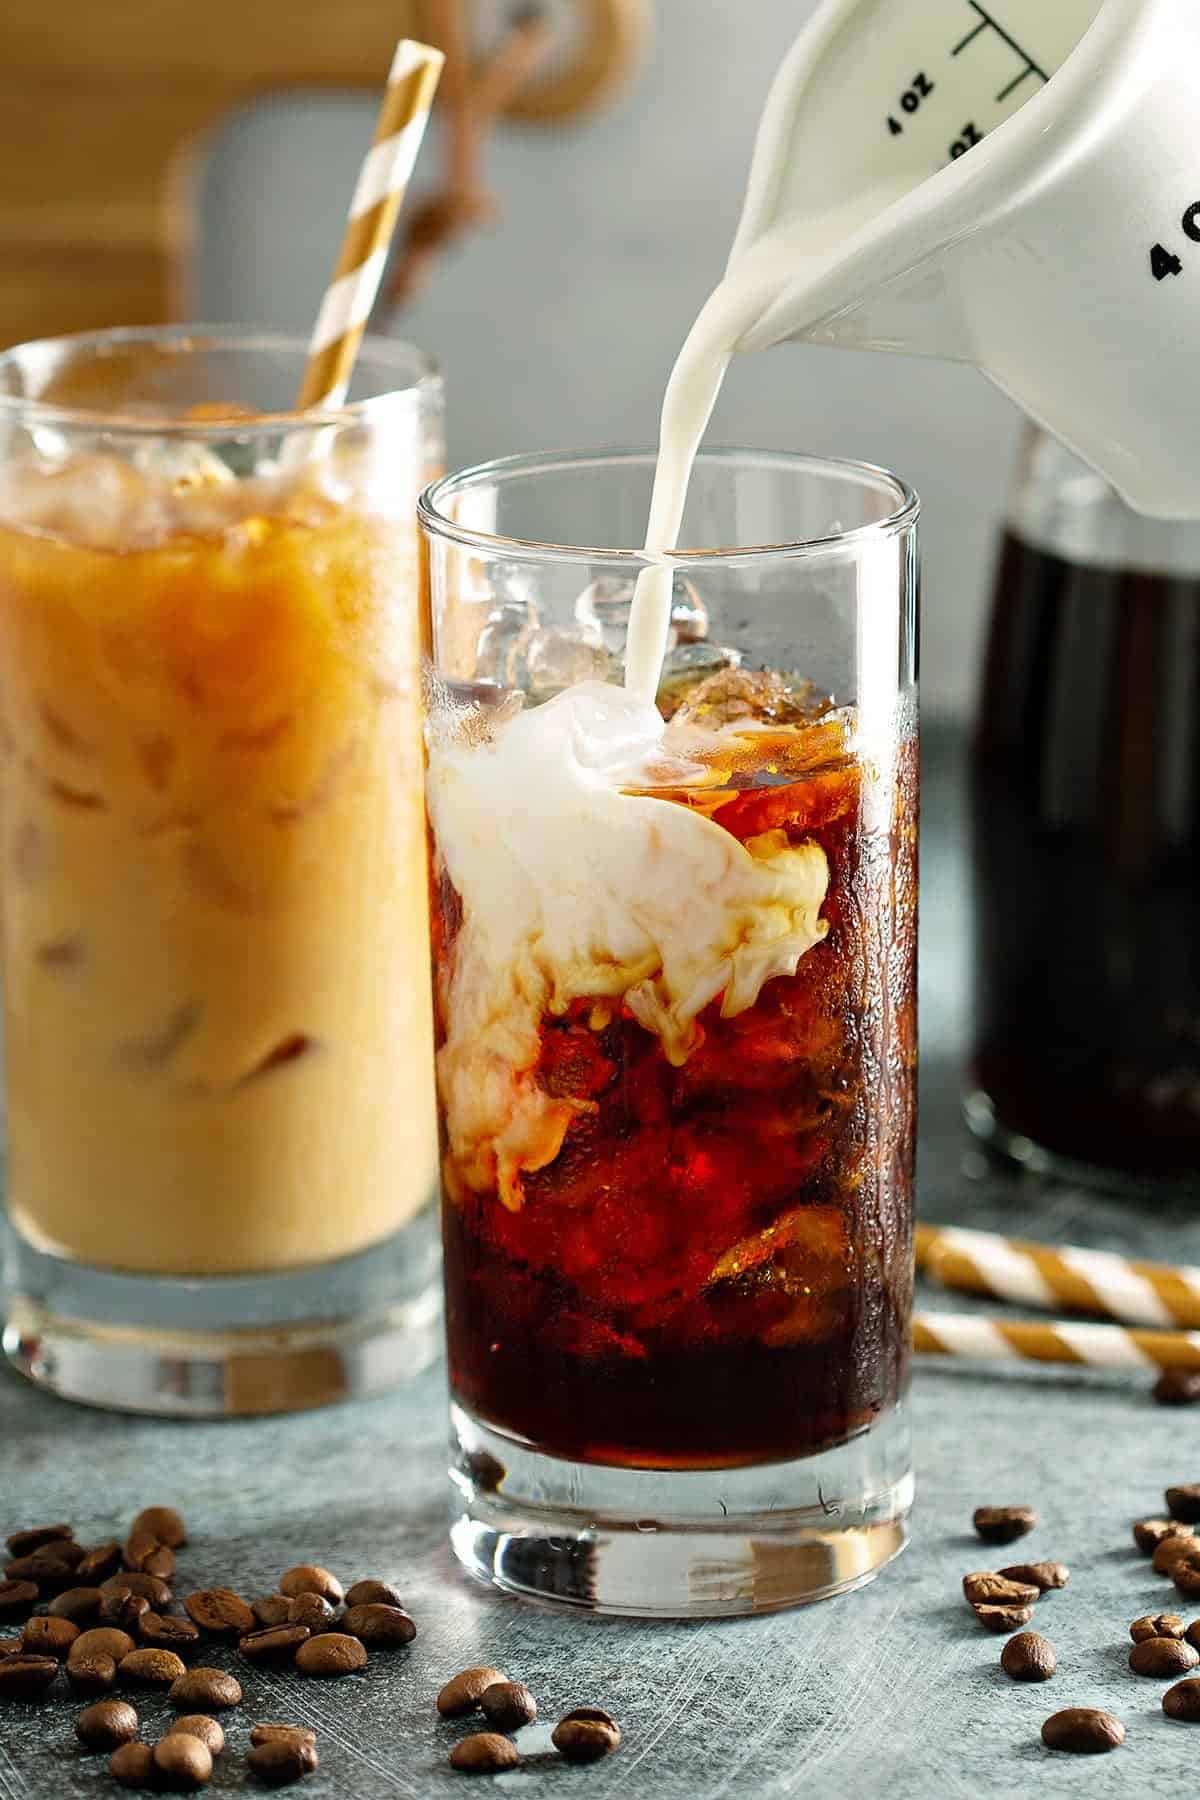
Add some ice to a glass, and then add the ingredients below in order. Taste after adding the milk and half of the creamer to adjust to your liking:
– 2 cups cold coffee
– 1 cup Milk of your preference
– ¼ cup liquid creamer any flavor you like. I use coffee mate almond milk vanilla creamer.
A straw is oddly important because it makes lattes taste better. I use these reusable straws.

Enjoy!
Not Sure
What's For Dinner?
Signup for recipe updates and get a free cookbook of Easy Weeknight Supper Solutions!
More Great Drink Recipes


PS. If you make this recipe, leave a COMMENT AND A STAR RATING in the comments section at the bottom and be sure to take a photo and tag it #cravingcreative on Instagram! I appreciate you for taking the time to read about me and my family recipes.

Cold Brew Iced Coffee
Equipment
- French Press (optional)
- Mesh sieve (if you don't have a french press)
- Coffee Grinder or Blender
Ingredients
Cold Coffee
- 2.25 oz Whole coffee beans about ¾ cups, packed
- 4 cups Room temperature water filtered water produces the best flavor
Concentrate for Iced Lattes
- 3 oz Whole coffee beans about 1 cup
- 2.5 cups Room temperature water
For Smoother Hot Coffee
- 1 cup Cold Brew Coffee
- ¼-1/2 cup Hot water
Additives for Iced Latte (suggestions)
- 1 cup Milk almond milk, soy milk, coconut milk, and regular milk work great
- ¼ cup Liquid creamer any flavor you like. I use coffee mate almond milk vanilla creamer.
- 2 cups Cold brew
Instructions
- Coarsely grind beans in a coffee grinder on coarse setting or blender. The beans should have more texture than a typical grind.
- Add the coffee grounds to a French press, pour room temperature water over the coffee grounds. Alternatively, you can make in a mason jar.
- Use a long handled spoon to press the beans down into the water, and make sure that the beans are wet.
- Allow to steep at room temperature for about 8-12 hours. If you can't get back to it for much longer, like 18 -24 hours – no worries, pop it in the fridge to slow down the brewing process.
- Press the handle down on the French press to filter out the coffee grinds. If brewed in a jar, strain the coffee grounds using a coffee filter or metal mesh sieve. Pour coffee over ice or heat up to enjoy!
- For storage, pour coffee into a carafe, and refrigerate for up to a week.
Lorraine says
My daughter is a Starbucks junkie. This is saving my wallet and sanity. Thank you.
Meredith @ The Palette Muse says
Brilliant! This is exactly what I’ve been looking for. I’ve tried making my own cold brew and ran into a couple of the problems you mentioned. Now I know where to start again. Also, I totally agree about the straw! Thanks for cooling down my summer!