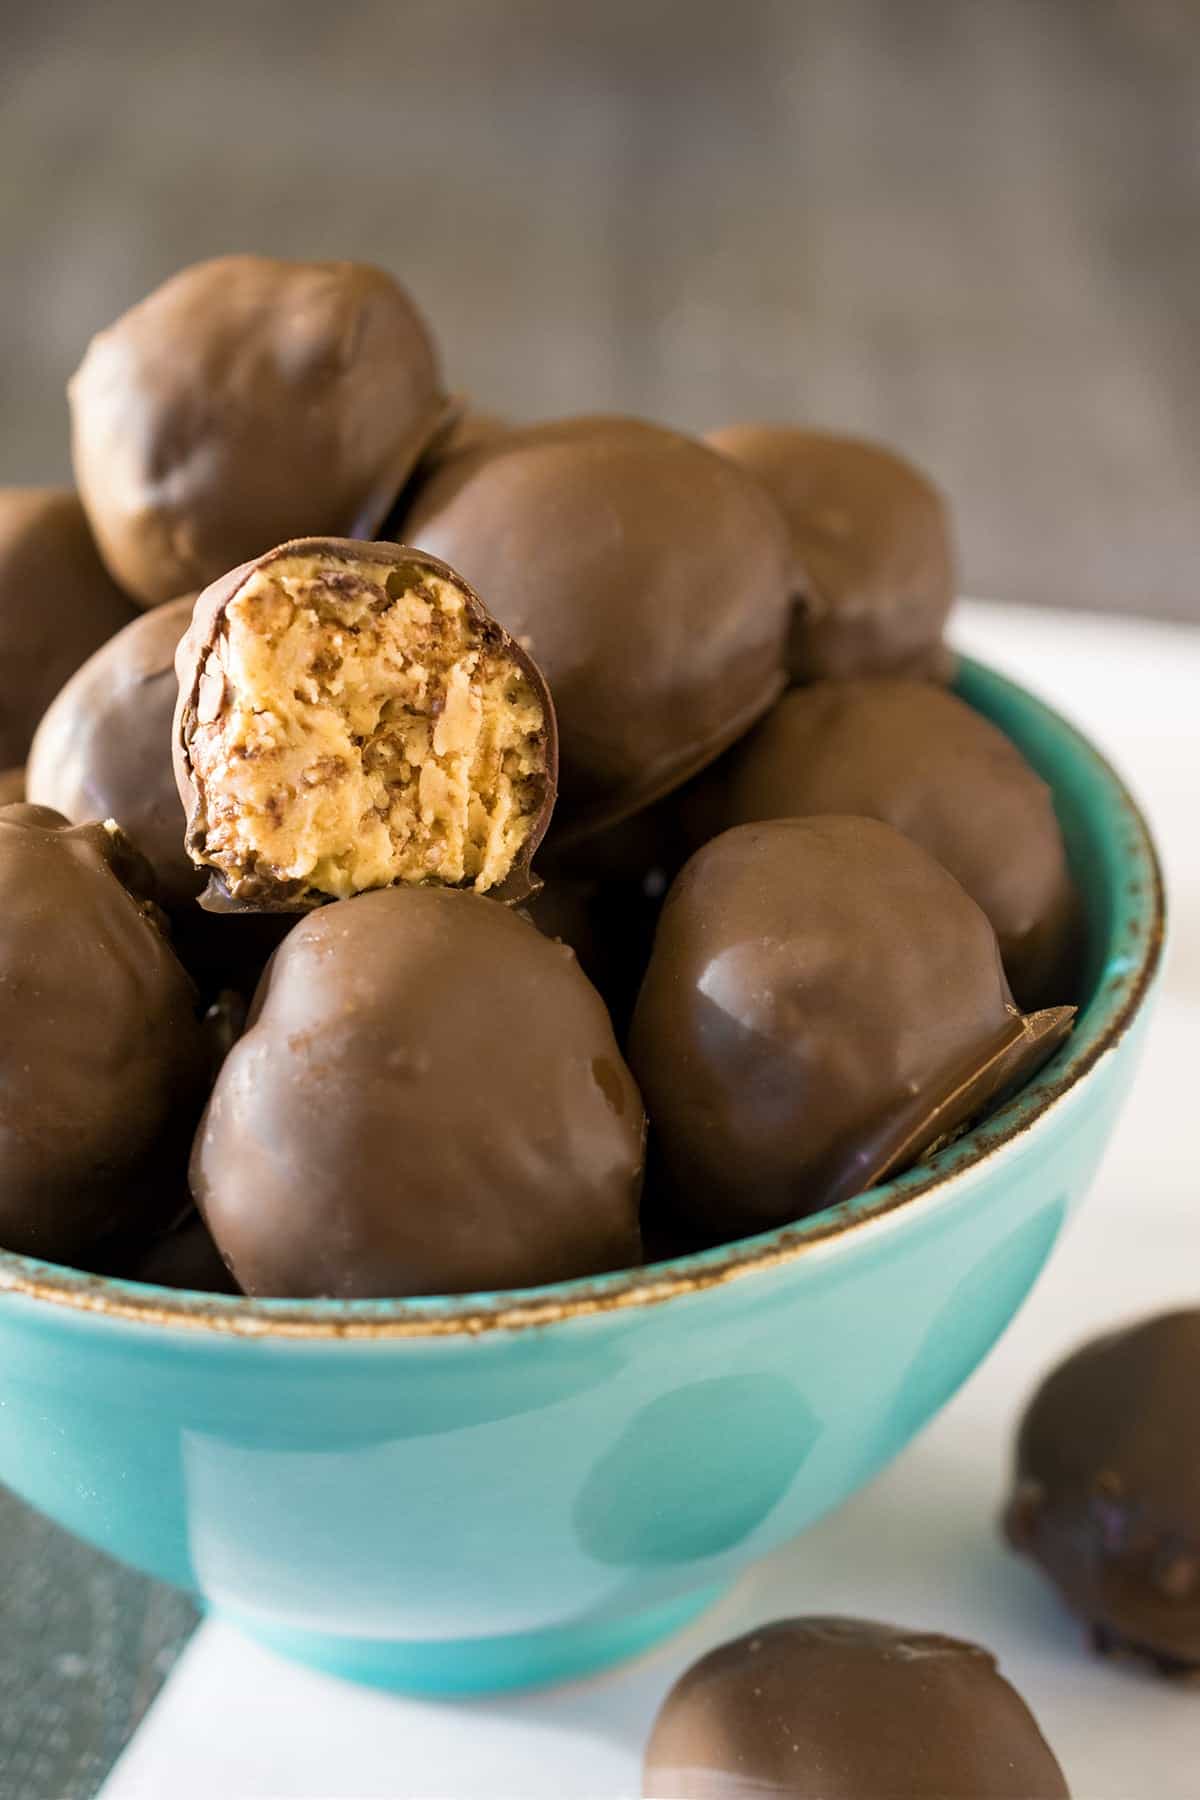
No Bake Oreo Balls are the easiest dessert ever with just 3 ingredients and only a few minutes to make this perfectly easy dessert that tastes amazing! Also known as oreo truffles, these are perfect for cookie exchanges as well as a tasty after dinner treat year-round. Recipe includes decorating ideas and step by step video.
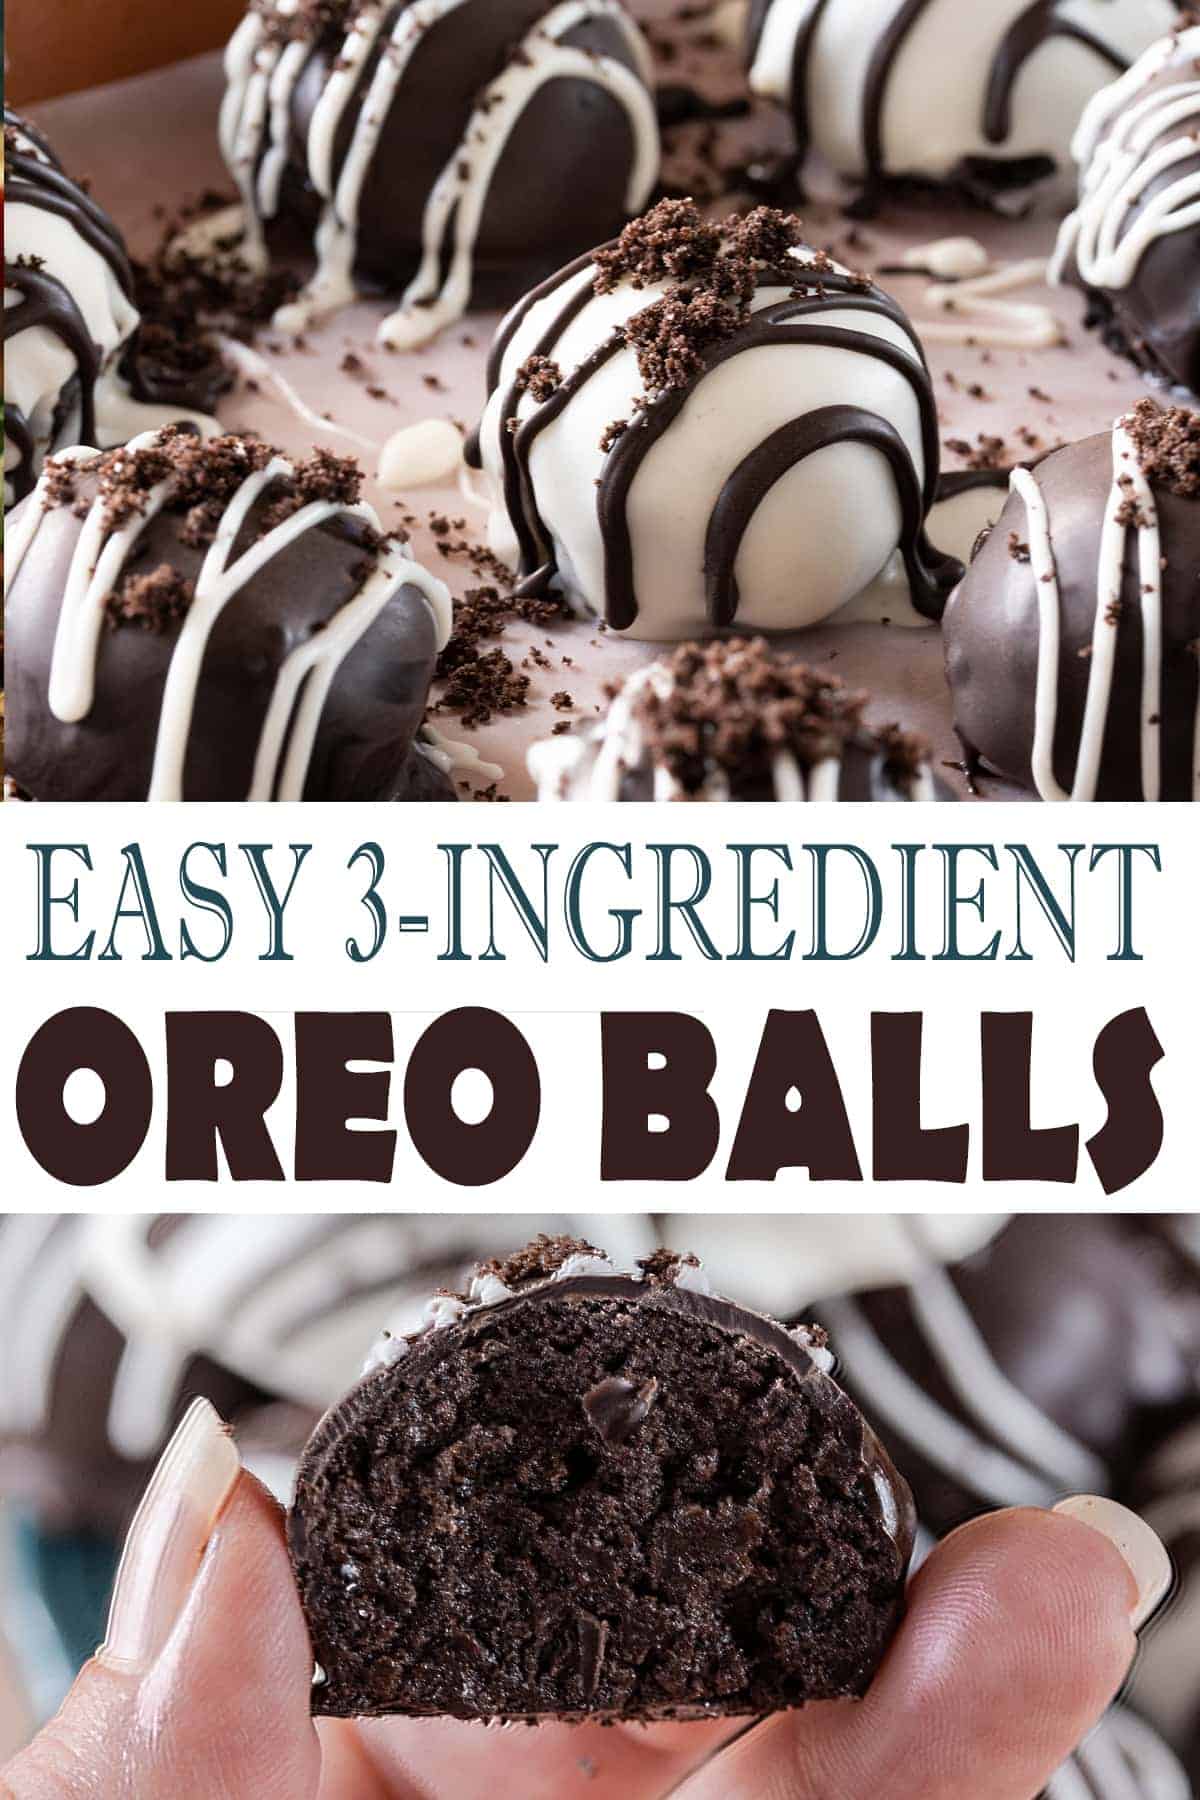
If you need a simple treat that everyone goes crazy over, it's chocolate-coated Oreo Balls! My husband took these to work a few times, and everyone wanted to call them crack balls, but I decided against that, haha.
While I do love my old-fashioned Oreo Stuffed Brownies and Peanut Butter Balls it’s hard to beat only 3 ingredients for this amazing bite sized, no-bake dessert! These little delights are probably the easiest cookie ball ever to make and they taste like Oreo heaven – if that’s actually a thing.
If you've never made truffles before or dipped candies in chocolate this is super beginner friendly!
Ingredients You Will Need
The awesome thing about this recipe? You only need THREE simple ingredients:
- Oreos - Traditional flavor works best here. You can try flavors too if desired.
- Block of cream cheese - Standard full fat cream cheese will give the best flavor and consistency.
- Dipping Chocolate – I go into more detail below but do use what is called dipping or melting chocolate. You could use dark chocolate, milk chocolate, or white chocolate. You can use brightly colored candy wafers to decorate with, but they don’t have as much chocolate flavor.
Equipment:
- Wax Paper – This is to set the balls on while they cool. Parchment paper also works.
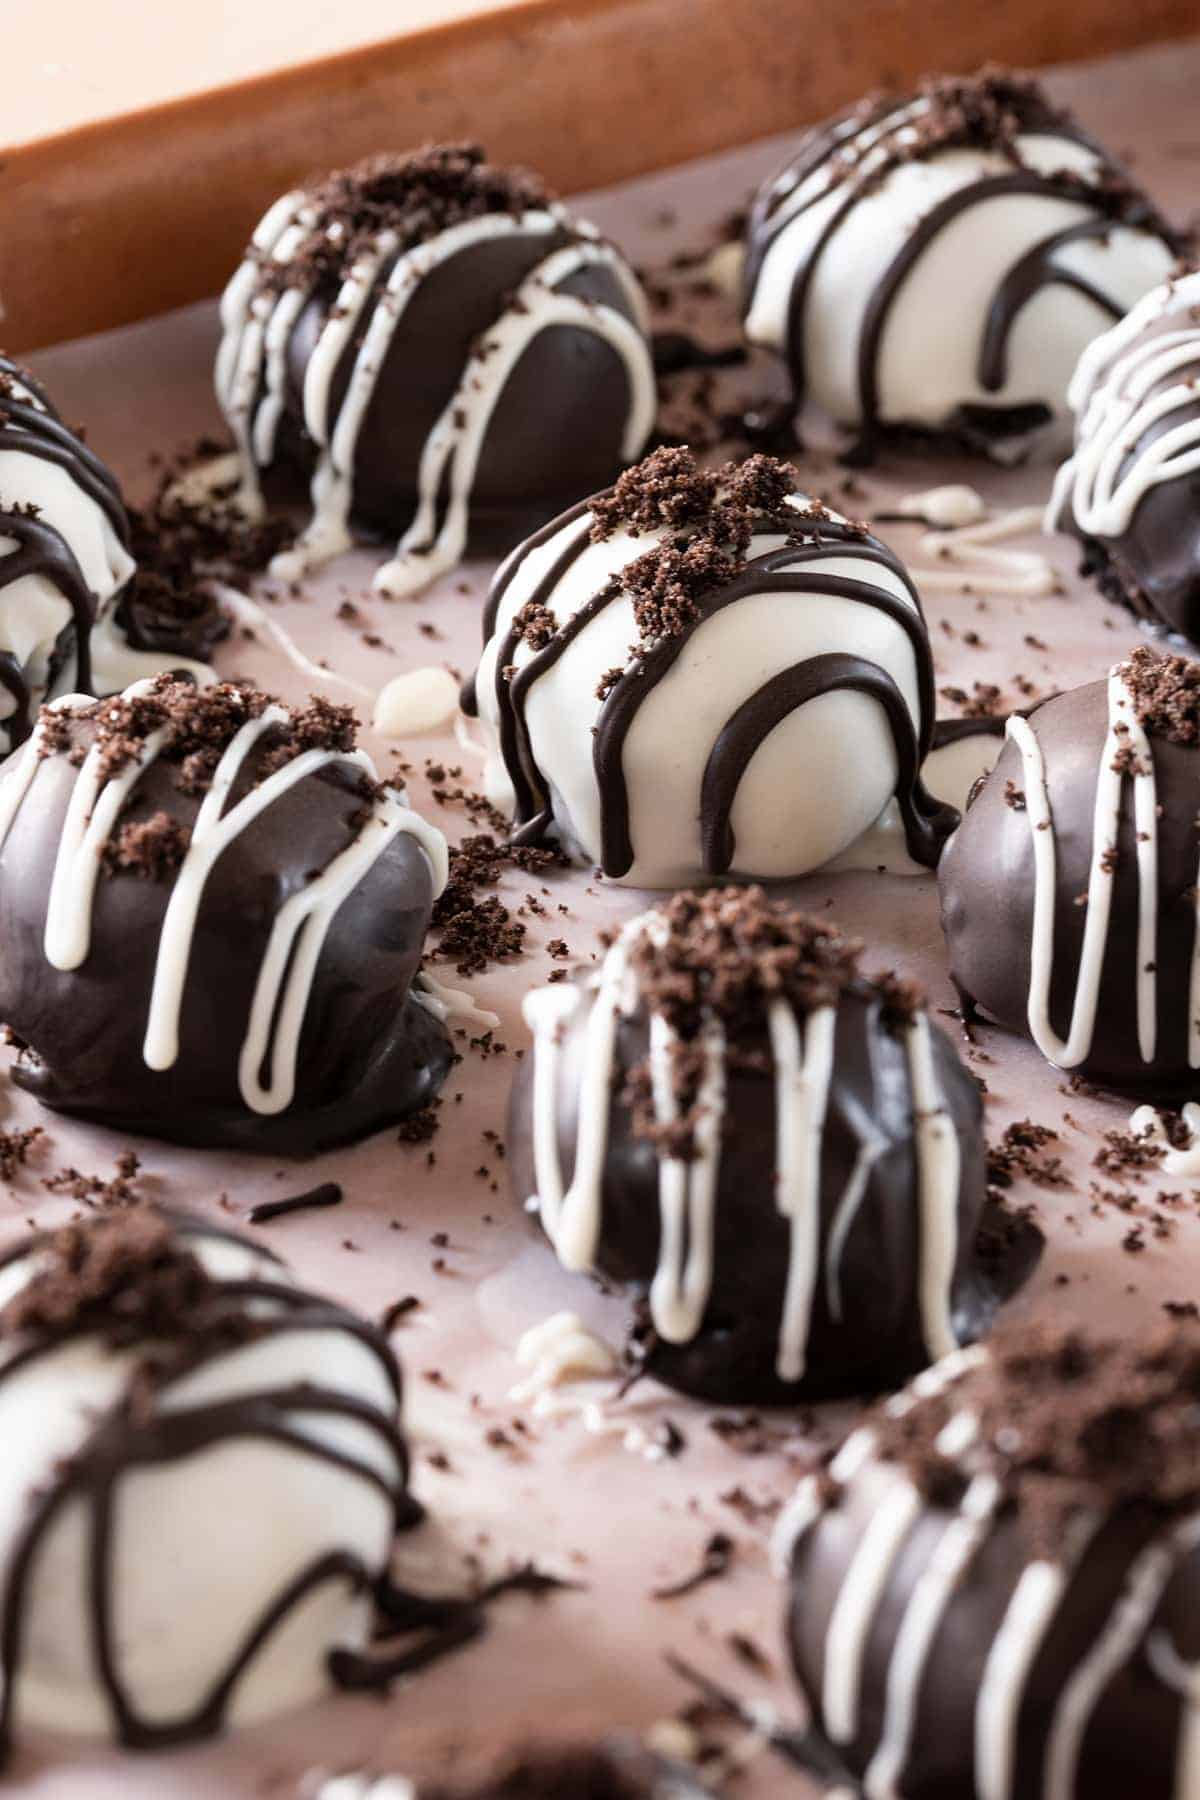
- Decorations – Ideas below, but the recipe keeps it simple with piped chocolate and a sprinkle of crushed Oreos.
- Piping Bottles or Bags – You can use a spoon to drizzle the decorative chocolate, but piped chocolate looks much more professional. I use small bottles for chocolate, but a cake frosting bag with a small tip also works great.
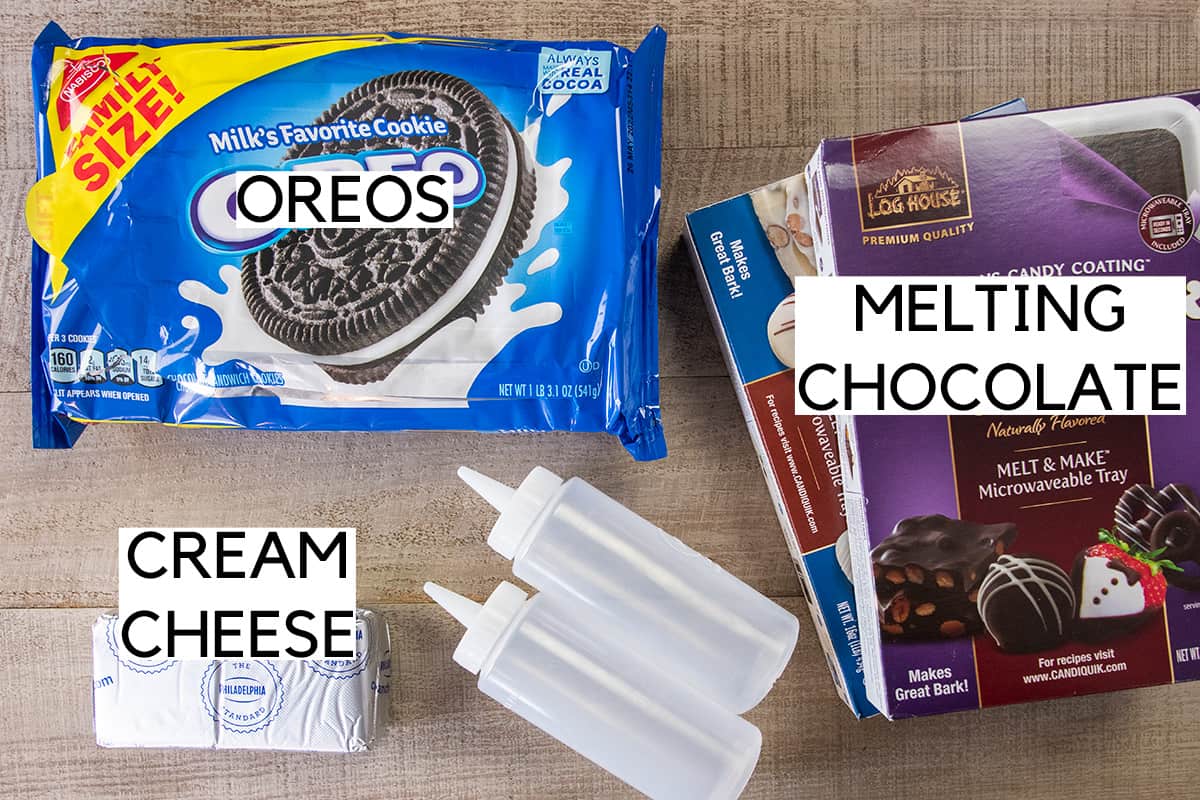
What Chocolate is Best for Dipping?
- In my humble opinion, this dulci frutta is the best supermarket variety of melting chocolate for dipping. You can get the chocolate shell pretty thin with this and it does have a solid chocolate taste.
- My second choice would go to this chocolate melting bark, or Ghiradelli Wafers. Both work well and have good chocolate flavor. Candiquik is another brand that has gotten better in recent years, but it’s more sweet than chocolatey.
- Avoid anything called candy wafers or the stuff in the cake decorating aisle. Quite frankly, I want real chocolate flavor.
- Regular chocolate or chocolate chips will work. However, the coating is much thicker and lumpy. It works best when you add a small amount - about ½ tsp- of coconut oil to the chocolate chips before melting them in the microwave. Other oils can work but coconut oil works best because it solidifies when cool.
How Do You Make Oreo Balls?
The full instructions are in the recipe card at the bottom of this post, but I include this section too for photos, tips, and to preemptively answer questions.
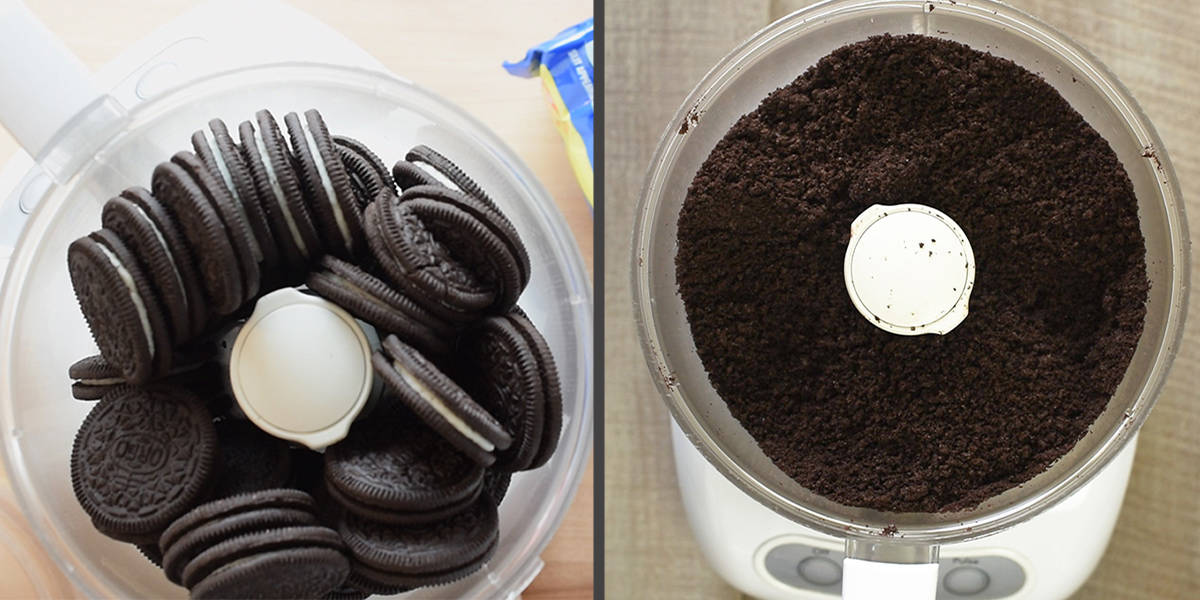
- How to Crush Oreos easily. Place 36 whole Oreos (the filling too!) in a food processor and pulse until crumbs. Alternatively, you can use a gallon size resealable bag and crush with a rolling pin, but it will take longer to create fine crumbs. Reserve about 2-3 tablespoon if you want to use decorate with crushed Oreos.
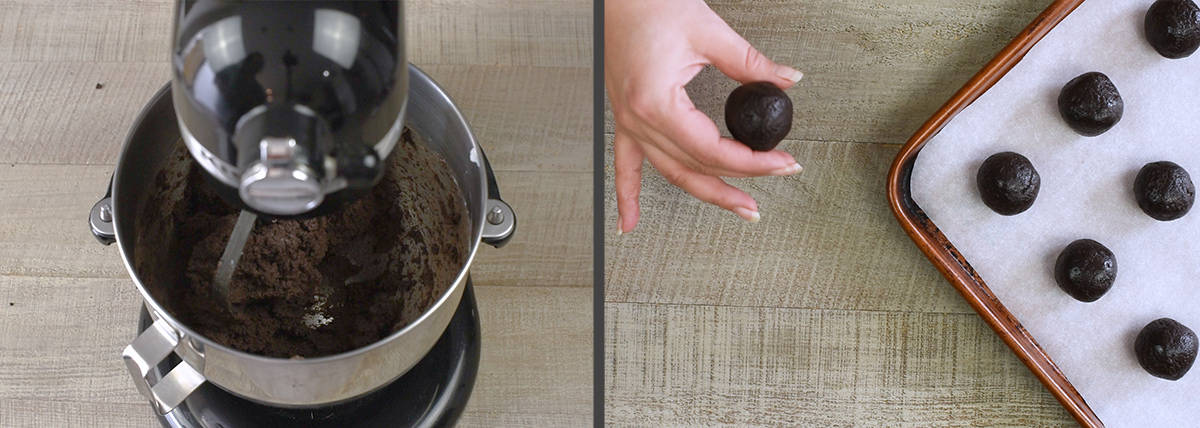
- Shape mixture into balls: Scoop about 1 tablespoon per ball and roll into 1-inch balls. You could use a small cookie scoop for this. Arrange on the wax paper in preparation for dipping.
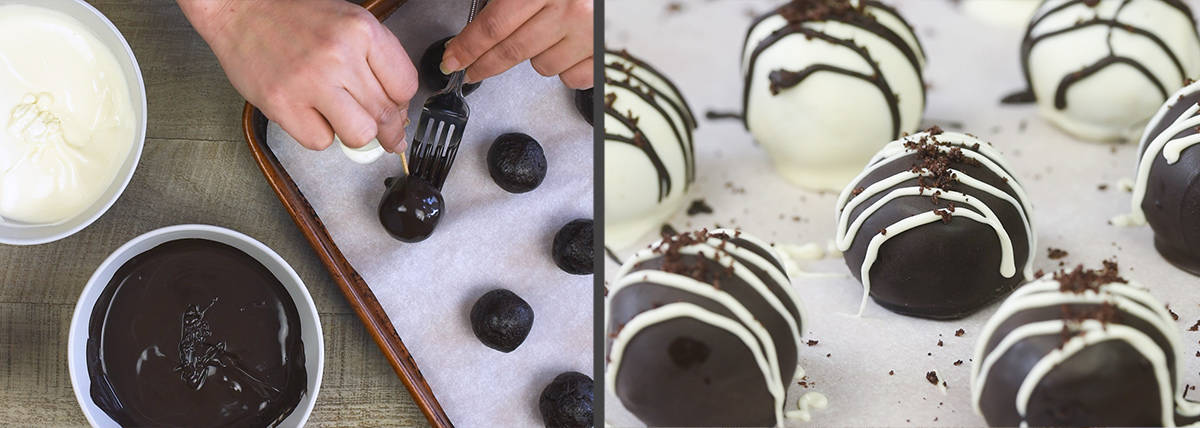
Freeze the balls: About 15 minutes should do it or until the outside is cold and slightly firm. This cools the chocolate coating faster and keeps the balls from crumbling in the hot chocolate. I get everything setup and ready for dipping while they freeze.
How to Get a Smooth Chocolate Finish on Oreo Balls? Drop the Oreo cream cheese balls into the chocolate, spoon the chocolate over them (do not swirl the ball itself), and then scoop up with a fork. Don't stab the ball. Shake them a bit to remove the excess chocolate. When satisfied, use a toothpick to push the ball out on a sheet of wax paper. Finally, let them cool and harden on the counter, ensuring a smooth finish.
Tip: The heat from the chocolate can cause the balls to fall apart. If you find your balls crumbling or loosing pieces in the chocolate, put them back in the freezer until cold and the outside is firm.
Recipe Video Demonstration
I made a video demonstrating everything from the rolling technique to creating serenely smooth balls for decorating.
Pro Tips for the Best Oreo Truffle Balls
Making perfect truffles takes just a little practice. Here are some pro tips for that have a smooth chocolate finish that doesn’t crack!
- Do not pierce the ball when dipping. This can cause the ball to crumble more when putting into warm chocolate. It also doesn’t hold well and can drop back into the chocolate.
- Allow to set at room temperature. The outer coating can crack in drastic temperature differences while setting, so leave them at room temperature to set. They should harden without needing to be refrigerated.
- Cold hands roll better. This is a fact I discovered when my sister and I noticed with my peanut butter balls. She has warm hands and the balls were sticking to her. So, I had her rinse her hands in cold water occasionally which helped make smoother balls that didn’t stick.
Oreo Ball Recipe Variations
Can I use other cookies for Oreo balls? Golden Oreo cookies, Birthday Cake Oreos, or even other cream filled cookies! I’ve been looking forward to trying Oatmeal Cream Pie cookies, for example!
Drizzle with caramel or peanut butter. Instead of using melted chocolate to drizzle like I do, use other flavors or colored candy melts that’ll lead to a fun seasonal looking dessert. Add some crushed candy canes and you’ll have Christmas oreo balls!
Truffle Ball Decorating Ideas
The decorating is the fun part! Here are some ideas:
- Brightly Colored Sprinkles (Red and Green for the holidays, for example)
- Chocolate Stripes – use a chocolate decorating bottle or snip the tip of a Ziplock bag
- Crushed Oreos – sprinkle before chocolate hardens
- Coconut shavings
- Crushed nuts or graham crackers
- Christmas – add a couple of drops of peppermint extract to the “dough” and sprinkle with crushed peppermint candies
Serving Ideas
I often make these during the holidays along with Carmelitas Cookie Bars and my Famous Peanut Butter Balls. They can stay out for eating but keep them away from hot lights and other heat sources.
Storage Options
In the refrigerator: Store in a cool, dry place in an airtight container. They last about 2 weeks in the refrigerator. I do find that if I allow them to thaw, the chocolate will sweat as it warms up.
In the Freezer: Be sure to let the chocolate completely harden before sealing and storing it in the freezer. As long as the balls are no more than 1 inch in size, they are excellent straight out of the freezer. They last 4-6 months in an airtight container and compact container.
Make Ahead: These can definitely be made a few days ahead of time and stored. You can also put the undipped balls in the refrigerator overnight.
More Easy Dessert Ideas
- Peanut Butter Balls with Rice Krispies
- Oreo Cream Cheese Frosting
- Easy Cinnamon Sugar Pretzels
- Easy Marshmallow Pops
Frequently asked questions
When making candy like this I really find that dipping chocolate is the best and comes out smoother with less lumps than chocolate chips. My favorite dipping chocolates are the ones that taste most like chocolate, so I avoid brightly colored melting wafers from the cake decorating aisle.
Whichever brand of melting chocolate you choose, it is easy to melt in the microwave. I generally prefer this method over getting out a double boiler.
The trick to melting chocolate is to go slow. Use a microwave safe bowl and start with about 1 minute in the microwave. Stir and see if it is melting. If it is still solid, continue microwaving in 20-30 second intervals, stirring between intervals.
Often chocolate looks like it's not melted when it really is, and you don't know for sure until you gently stir it. If your chocolate melts but it's too thick to work with, try adding ½ teaspoon of coconut oil, let it melt and stir.
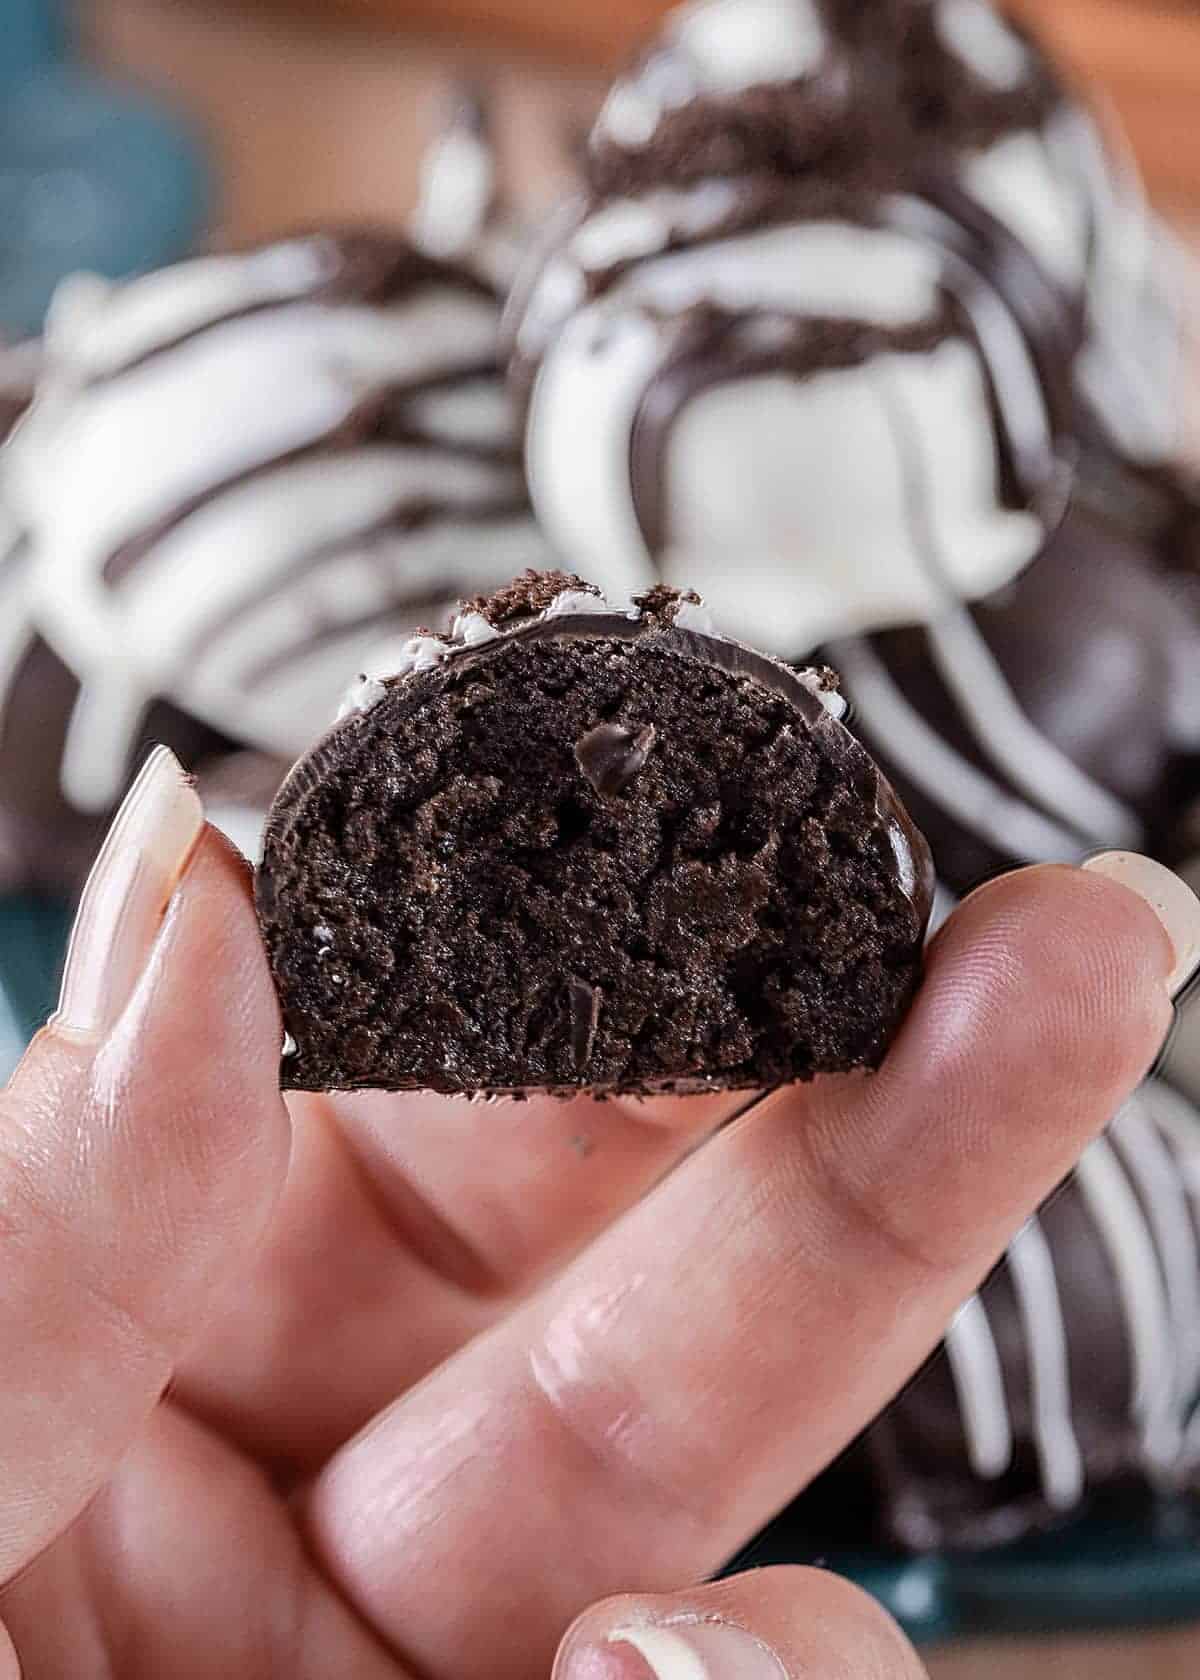
Using the cream filling in the ball mixture is entirely up to you and won’t affect the recipe. If you are the kind of person, like me, who finds the cream filling too sweet when eating an Oreo, remove half of the cream fillings from the cookies.
They might be cracking for two reasons: Either they aren’t chilled prior to dipping in the chocolate, or they are not allowed to set at room temperature. The coating may crack if you put them in the fridge or freezer to set because of the drastic temperature change.
Yes, they have to be refrigerated. They are made with cream cheese which must be chilled.
You can absolutely freeze for later. Make sure they are fully set before freezing and you can enjoy them straight out of the freezer.

Not Sure
What's For Dinner?
Signup for recipe updates and get a free cookbook of Easy Weeknight Supper Solutions!
More Decadent Dessert Recipes
PS. If you make this recipe, leave a COMMENT AND A STAR RATING in the comments section at the bottom and be sure to take a photo and tag it #cravingcreative on Instagram! I appreciate you for taking the time to read about me and my family recipes.
Oreo Balls
Ingredients
- 36 Oreo Cookies (1 14.3oz bag)
- 8 oz Cream Cheese Room Temperature
- Melting Chocolate I used white and dark chocolate
Decorating Equiptment
- Wax Paper
- Chocolate Decorating bottles optional
- Chocolate Dipping Fork optional
Instructions
- Bring 8 oz Cream Cheese to room temperature by placing it on the counter or microwaving at10 second intervals, stirring between intervals until the cream cheese is softened.
- Crush 36 Oreo Cookies (1 14.3oz bag) into fine bits. Use a food processor or a plastic bag and a mallet. The mallet method takes longer to produce a fine texture. Stir the cookies a few times between blends for consistency. Reserve about 3-4 tablespoon for decorating, if desired.
- Mix the Oreo crumbs, minus the reserved crumbs, with the cream cheese using a food processor, mixer or a spoon until uniform.
- Roll into 1-inch balls (1.5 tablespoon mixture) using your hands. Place balls on a cookie sheet lined with Wax Paper or parchment paper.
- Freeze the truffles for at least 15 minutes.
- Place Melting Chocolate in the microwave according to directions. Generally, the melting point is about 1 minute 20 seconds. Stir gently until smooth, returning to the microwave in 15 second increments, if needed.
- Using a toothpick or fork, dip the balls into the melting chocolate and fully coat. Shake off any excess before laying back on the parchment paper.
Decorating Notes
- To stick best, sprinkle the oreo crumbs on top while the chocolate is still warm and melted on the balls. You can also add a small dollop of chocolate on top like the stripes to have the oreo crumbs stick to that.
- If you wish to add stripes, I use Chocolate Decorating bottles (linked in ingredients), but you can also use a plastic bag with the tip snipped off for the chocolate to run through or a frosting tip with a small point. If the chocolate cools too much, microwave for 10 second intervals.
Bonnie says
I used fall colors of orange, red, and white for a bake sale.
Diana says
So delicious! Love how easy they were to make, my son helped out! Definitely saving this recipe.
Stephanie says
Definitely soft and yummy! If you eat more than two be sure to have some milk handy!
Lisa says
Easy and super rich.
Allen says
I’ve made this recipe so many times for family events/holidays, it’s such an easy and kinda quick recipe. Would definitely recommend.
Leisha says
Made these for my sons christening. Everyone loved them!! We felt the name crack balls is very fitting, ha ha!
So simple to make and taste amazing!
Already had a request to make some for my nieces birthday.
Lynne says
Delicious and so easy. Very rich
Alex Smith says
Delicious easy to make and since its no bake you can make them with kids.
Jessica says
I’ve had this recipe for over 10 years and have used a variety of combinations.. they are great!!
Edna says
I’ve had this recipe for over 10 years and have used a variety of combinations. They are great!!
Linda says
Do you store these on the fridge?
Rachel says
Store in a cool, dry place in an airtight container. They can be stored in the refrigerator or freezer easily. They last 4-6 months in the freezer and about 2 weeks in the refrigerator. I do find that if I allow them to thaw, the chocolate will sweat as it warms up.
Suzy says
I haven’t made it yet but I will for Thanksgiving
Rhiannon says
.
Barbara Kelly says
Omg!! I love Oreos so much and just looking at those got my mouth watering. Lol. They were really easy to make too.
Ashley says
Came out AMAZING.
I followed the recipe exactly. It was a hit! thanks!