
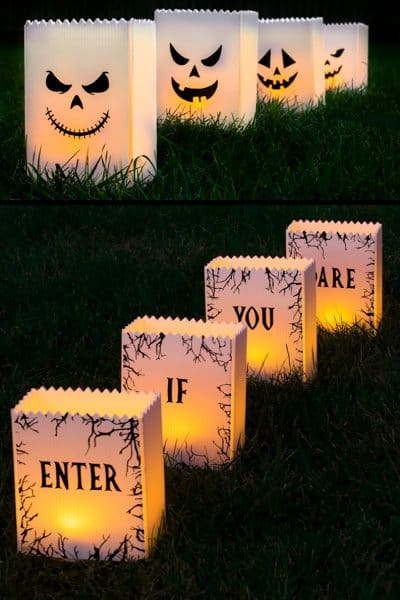
Halloween Lanterns
These DIY Halloween Lanterns are both weather resistant and flameless! Learn how to make these simple and mess-free glowing luminaries to create a spooky path to your door.
Yield: 1 lantern
Cost: $10
Equipment
- X-acto Knife
Materials
- 1 White Corrugated Plastic Sheets
- Metal Stakes
- Black Outdoor Paint
- Jack-o'-lantern designs
- 2 Flameless Candles
- Clear Tape
Instructions
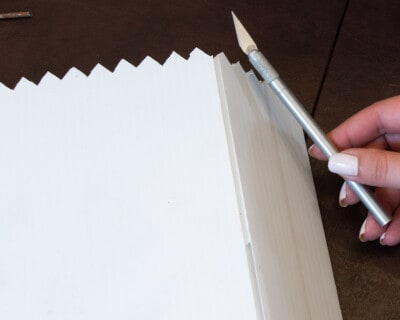
- Cut the plastic to the size you want. Cut a decorative edge with an X-acto knife if you wish.
- To fold, cut a straight line top to bottom through the top layer of corrugated plastic only - do not cut through both layers.
- Paint the designs on the front and back if you choose. Allow to dry completely. Tape the two loose edges together so that it makes a box.

- Place the lanterns where you wish. If on the ground, push thin, long stakes through the channels into the dirt to keep from tipping over. Place flameless tea light or candle in the center of the lantern and turn on.
Notes
- Instead of corrugated plastic, I have seen milk jugs, plastic jack o'lanterns, and actual glass lanterns used.
- Paint applied in 2-3 layers will give the best blackout for your design. I have not used a sharpie, so I would test first but I hear they are waterproof for this sort of design.
- These hold up great for years. I have used them for 3 years and they are in great shape. They have sat in rain, wind, and heat with no problem.
- Waterproof flameless candles that are a few inches taller work the best. I trim the wax around the top to get maximum glow.