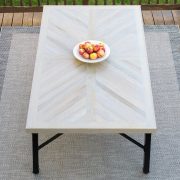
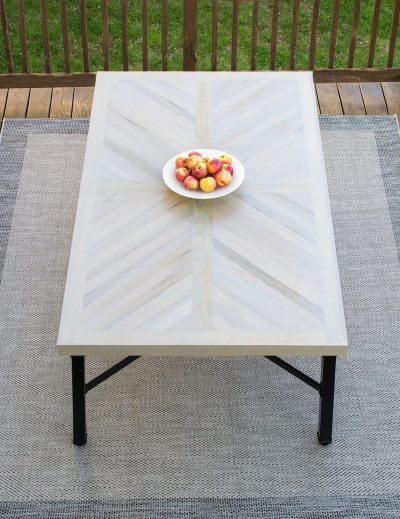
DIY Outdoor Table for Deck or Patio
Enjoy the warm, beautiful weather with family and friends this summer with this diy outdoor table that can be used as an outdoor dining table or patio table.
Yield: 1 Table
Cost: 350
Equipment
Materials
- Outdoor Wood Glue
- 50 1 ¼ inch Screws for pocket holes
- 2 8ft boards 1x4
- 1 6ft boards 1x4
- 3 4 ft boards 1x4
- 2 6 ft boards 1x3
- 2 3 ft boards 1x3
- 3 6ft boards 2x4
- 2 6 ft boards 2x6
- 2 4 ft boards 2x6
- Table Legs
- 10 8 ft boards 1x3 for center slats The slats in our example are 1x3, but you can use 1x4. The amount needed will vary a lot based on actual thickness of the boards, where you start and any spacing between the boards.
Instructions
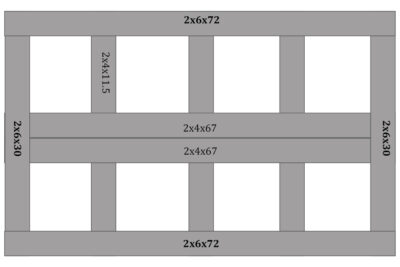
- Build the bottom frame. Cut 2-2×6 boards 72 inches long. Cut 2-2×6 boards 30 inches. This will make a table that is 42.5×73.5 inches with the skirting. If you want to make adjustments to the length or width, this is the time to do so. Screw the boards together with 2 pocket holes per attachment area. Cut the center support 2x4s to fit into the box frame. Attach with pocket holes.
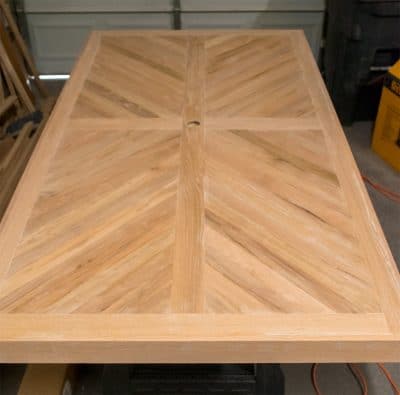
- Build the top frame. The top frame is built similar to the bottom frame – build the outside square and then add the inside “cross”. Cut 2-1x3 boards 72 inches long. Cut 2-1×4 boards 30 inches.
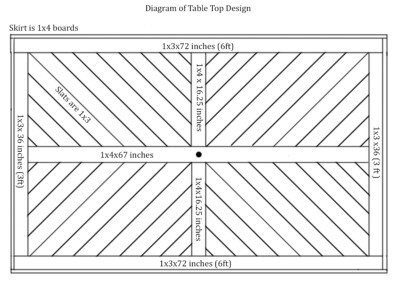
- Add the herringbone pattern. Starting at the inside corners of each square (as shown in the photo), cut one end of the 1x3s for the herringbone pattern at a 45-degree angle. Lay the board on the table, mark the length and angle. Cut to fit inside the square. Attach to the bottom frame with glue and brad nails. Repeat until the entire square is filled.

- Add the skirt. The skirt is 1x4 that wrap around both frames for a finished edge. Cut to length and attach with brad nails and glue or screws.
- Build the legs. There are several ways to create legs for the table. Use 4x4s for the legs (straight down) and then brace them to each other at the bottom for maximum sturdiness. There are also many great pre-made options including A-Frame, X pattern, and Square. You can also build X pattern legs out of wood.
- Drill an umbrella hole, if desired. Use a 2 inch hole saw bit in the center of the table.